
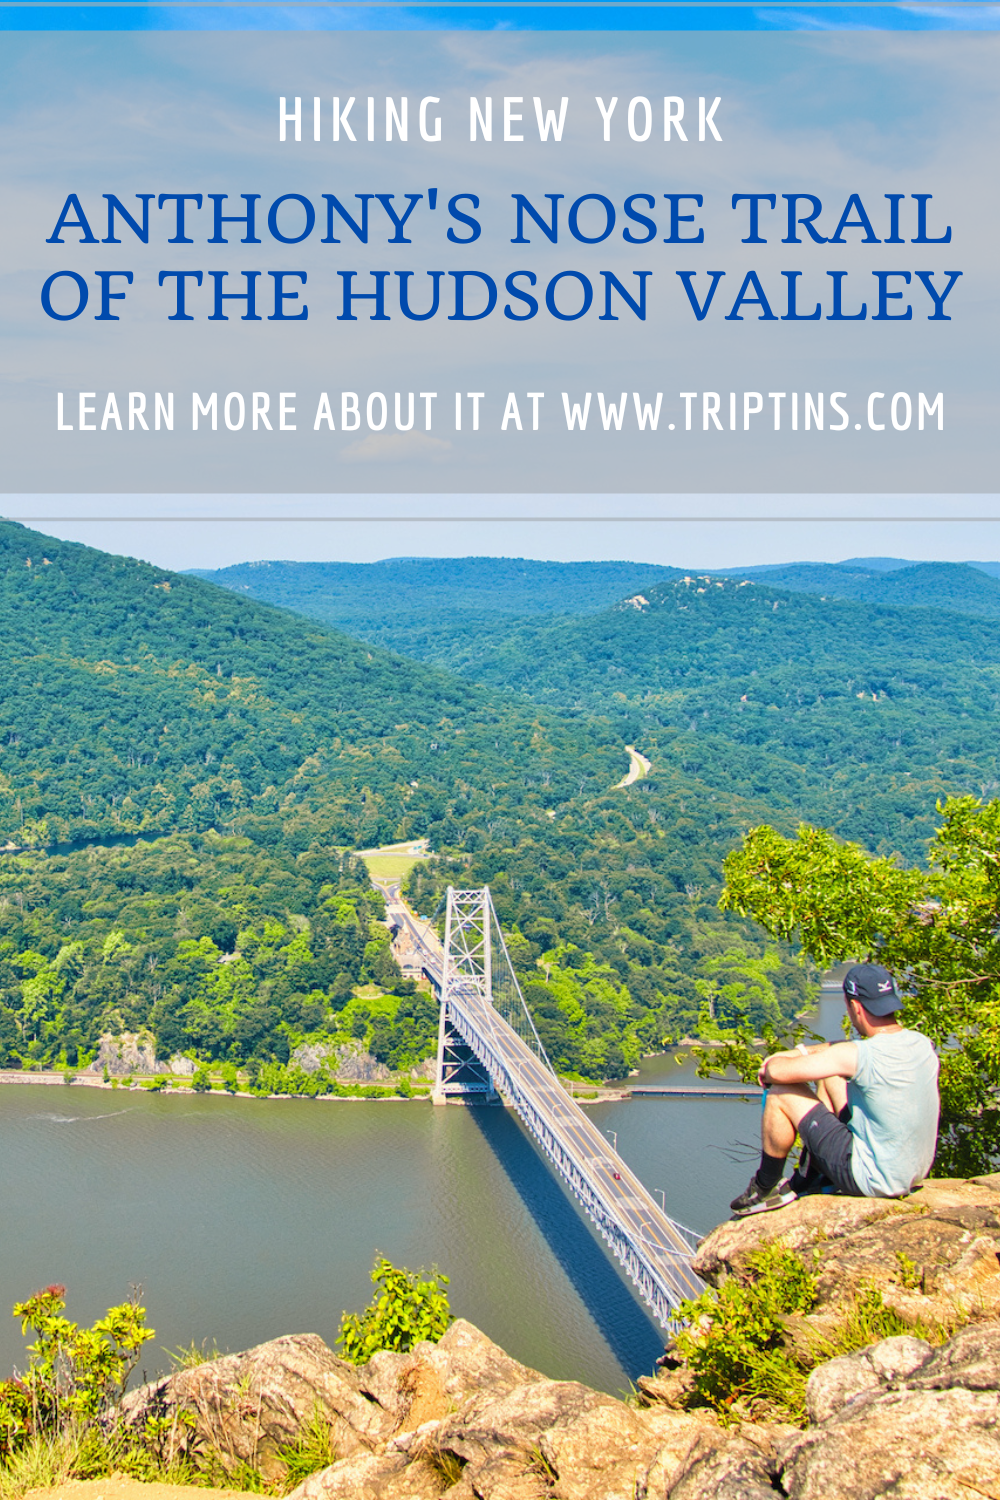
If you are looking for some of the top views of the Hudson Valley and you don’t want to spend too much time hiking, then the Anthony’s Nose trail is for you.
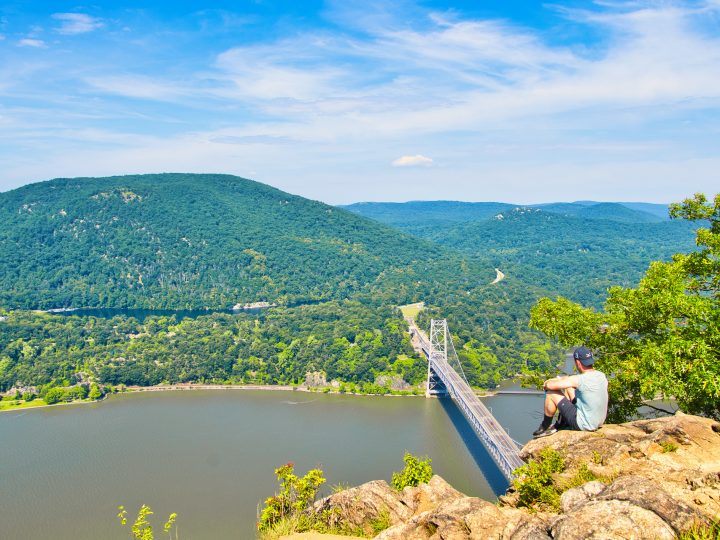
Located within the Hudson Highlands State Park Preserve, Anthony’s Nose offers panoramic views of the Hudson River, the Bear Mountain Bridge, and plenty more scenic landscape from its summit.
This hiking guide will go through everything you need to know to take part of the trail and give you some more insight into what a day out on Anthony’s Nose is all about.
* Affiliate Disclosure: This post may contain affiliate links, which means I may receive a commission if you make a purchase through the links provided, at no additional cost to you. Thanks for supporting the work I put into TripTins!
1) Anthonys Nose Trailhead & Routes
I figured I would start off this guide explaining the various routes and trailheads that you can choose from when going about your hike up to Anthony’s Nose.
The two most popular routes both have trailheads near the eastern side of the Bear Mountain Bridge – one north of the bridge (named Route 9D trailhead) and one south of the bridge (named Camp Smith Trailhead II). Both of these main routes are around the same length (2.5 miles), elevation gain, and difficulty.
In addition to these two, there is also a third longer route that begins in the nearby town of Manitou.
Route 9D Trailhead
The first, more talked about trail is the hike from north of the Bear Mountain Bridge. There is no parking lot at this trailhead, rather there is just parking spots on the side of the road.
If looking for the trailhead, you can type in the GPS coordinates: 41°19’21.6″N 73°58’33.2″W.
The parking spots are located on the east side of the road and depending where you end up, you may need to walk a bit on the side of the road to reach the trailhead.
Camp Smith Trailhead II
South of the Bear Mountain Bridge you will find the Camp Smith Trailhead II. This is the route that I took part of since I heard it is a bit quieter and does come with some extra viewpoints to enjoy along the way to the summit.
This trailhead does have a parking lot, however it can only fit about 10 cars. If you are looking to start from here you can either type in Camp Smith Trailhead II or the GPS coordinates 41°18’44.4″N 73°57’53.4″W into Google Maps.
Since I took part of this second route, that is what I will be referring to throughout the remainder of this guide.
Manitou Route
The Manitou Route will be a longer trail (closer to 6-7 miles round trip). I would recommend this route for those taking the train to Anthonys Nose from NYC (more on that soon).
This route meets up with the Route 9D trailhead route as you can see in the map below. The GPS coordinates for the trailhead here are 41°19’47.0″N 73°57’10.1″W.
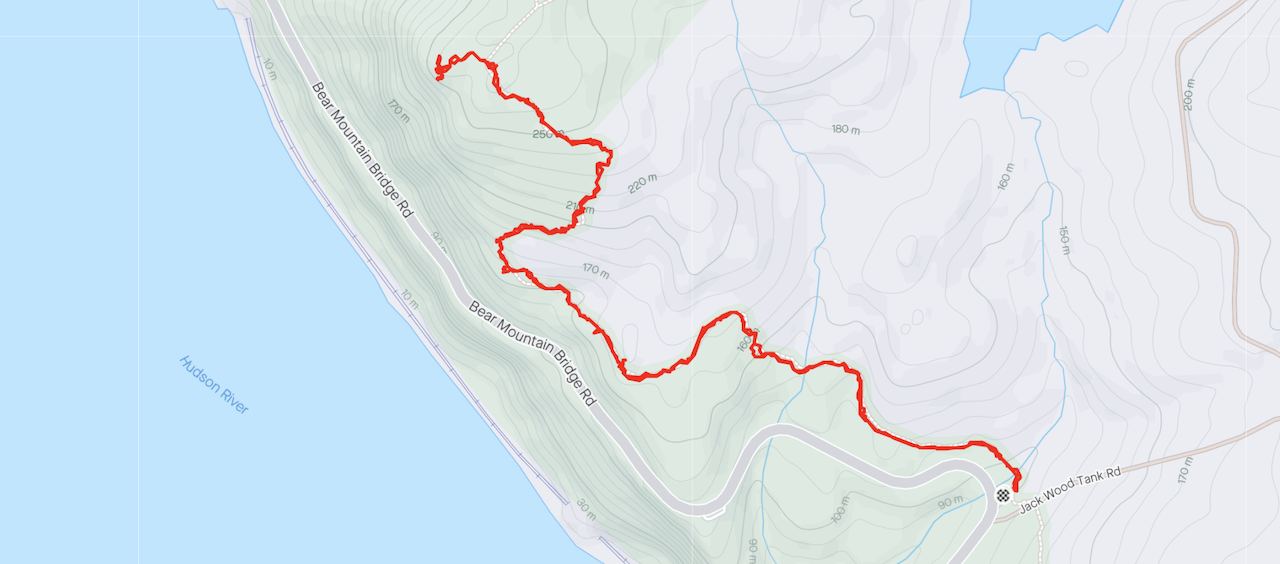
Below is a map that shows the three routes meeting up at the Anthony’s Nose summit:
2) Trail Details & Overview
Now let’s talk through some of the trail details of Anthony’s Nose. This high-level overview should give you a solid understanding of what to expect out on the trail for the main two routes.
Why It is Called Anthonys Nose
You may be wondering why it is called Anthony’s Nose in the first place. The story of the mountain name goes back to the late 1600’s.
Pierre Van Cortlandt, who once owned the mountain named the peak after a pre-Revolutionary war captain, Anthony Hogan. Apparently, he had what is called a Cyrano de Bergerac type nose that resembled the mountain itself.
How Long is Anthonys Nose
As mentioned, there are a couple different routes that can get you up to Anthony’s Nose. The round trip hike from the Camp Smith Trailhead II comes in at around 2.75 miles (with very similar mileage for the other route too).
Anthonys Nose Hike Time
Expect to spend around 2 or so hours on the round-trip hike. During my time on the trail, I logged around one and a half hours of hiking time with another 45 minutes of rest time at the various lookout points.
Elevation Gain
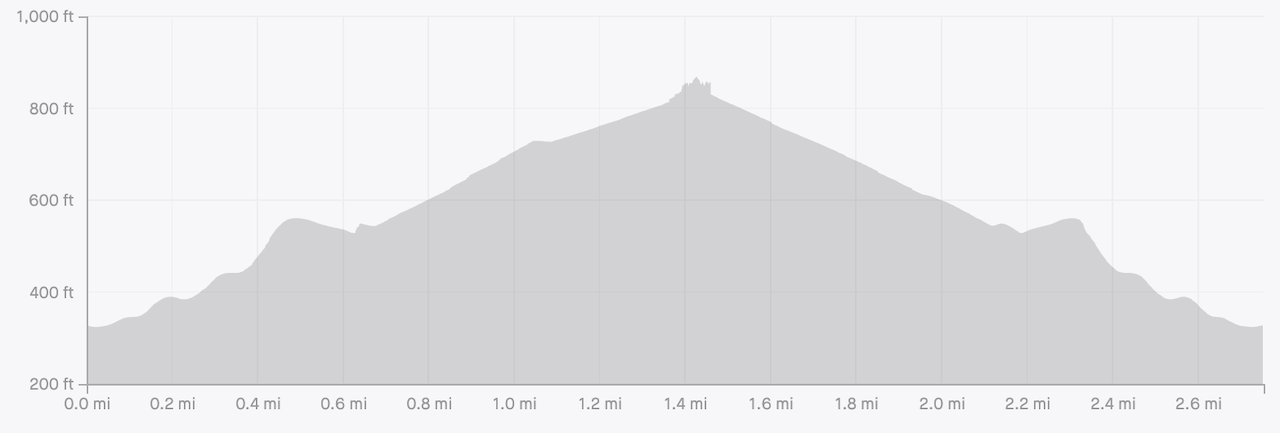
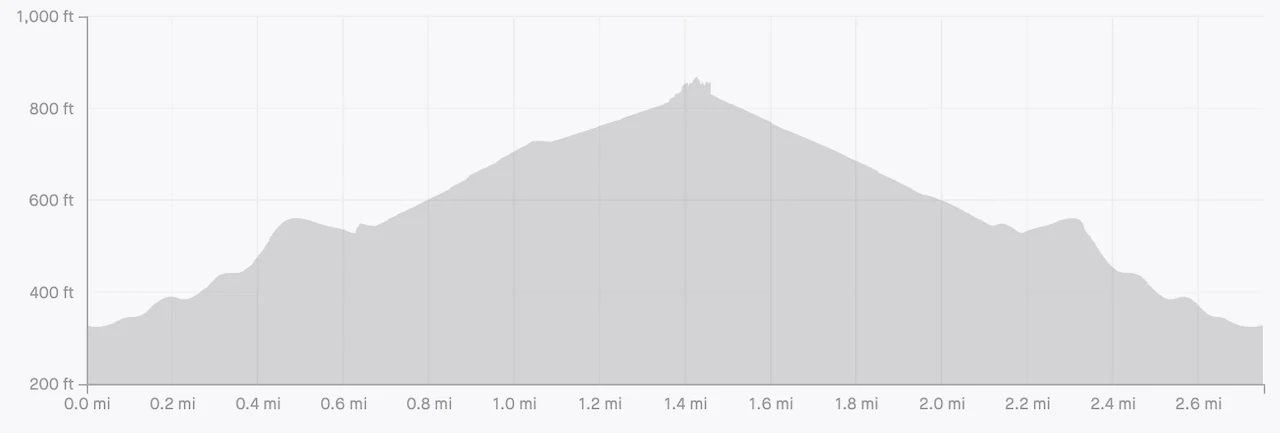
There is approximately 620 feet of elevation gain during the Anthonys Nose hike. While there is a mostly constant incline from the trailhead to the summit, it was the second portion of the ascent that got a bit steeper with trickier terrain.
See below for the elevation profile of the hike to get a better sense of the ups and downs of the trail.
Anthonys Nose Hike Difficulty
Overall, I would consider the Anthony’s Nose trail as an easy/moderate hike. For those experienced hikers out there, you will find the round trip hike quite easy. For the more beginner hikers, this would fall more into the moderately difficult category.
Although the trail is less than 3 miles in length, there is still several hundred feet of elevation gain. Coupled with the fact that the terrain can be quite technical at times (rocks, roots, etc.), it is does come with some difficulty.
At the end of the day though, I do believe this is a perfect hike for anyone out there who wants some views of the Hudson Valley.

3) Where is Anthonys Nose Located
Anthonys Nose is located within the Hudson Highlands State Park Preserve just north of Peekskill and just south of Manitou/Garrison/Cold Spring. You will find it along Route 9D on the east side of the Hudson River.
Directly across from the peak you will find Bear Mountain State Park and the Bear Mountain Bridge that crosses over the Hudson.
Anthonys Nose Hike from NYC
If coming to Anthonys Nose from NYC, there are a couple different ways to go about a trip – either by taking the train or by heading out in a car.
By Train
Taking the train from NYC to Anthonys Nose is the best option out there for those without a car.
On weekends, you will want to take the Metro North Railroad from Grand Central Station to Manitou along the Hudson Line.
The train ride should take around just around an hour and fifteen minutes and will drop you off at the Manitou train station. You have a few options here when it comes to how to get to a trailhead.
→ If you opt for the longer route from Manitou, you can simply walk to the trailhead from the train station and take part of the round trip hike from there (total round trip will be around 7 miles).
→ On the other hand, if you want to take part of one of the other two routes, those will require a taxi or Uber to drive the 5-10 minutes to the trailheads.
→ Alternatively, you could walk to the two trailheads from the train station, but that could be a bit dangerous as there is no sidewalk along the road (note it is 1.7 miles from the station to the Route 9D trailhead and 3 miles to the Camp Smith Trailhead II).
On weekdays, you will want to take the train to Peekskill instead as the trains don’t run to Manitou during the week (be sure to check the latest schedules so you are up to date). Your best bet here is to simply take a cab/Uber to the trailhead and back.
By Car
Instead of taking the train, you could also just drive yourself to the trailhead from NYC. The morning drive from the city should take around 1 hour without any traffic.
It is a beautiful drive up as you spend around 40 miles along the Palisades Interstate Parkway that is surrounded by nature and trees all the way through.
If following the Palisades Interstate Parkway, the route will then take you around Bear Mountain State Park, followed by crossing over the Bear Mountain Bridge to the east side of the river.
Once on the other side of the Bear Mountain Bridge, you will either make a right for the Camp Smith II trailhead or a left for the Route 9D trailhead.
Anthonys Nose Parking
As mentioned earlier, the parking situation can be a bit tricky for either trailhead.
At the Route 9D trailhead, you will only find roadside parking available on the east side of the road. You simply will need to drive slowly and find a spot safe enough to pull over. Ideally, you are able to pull over close to the trailhead, so you avoid walking too much along the road itself.
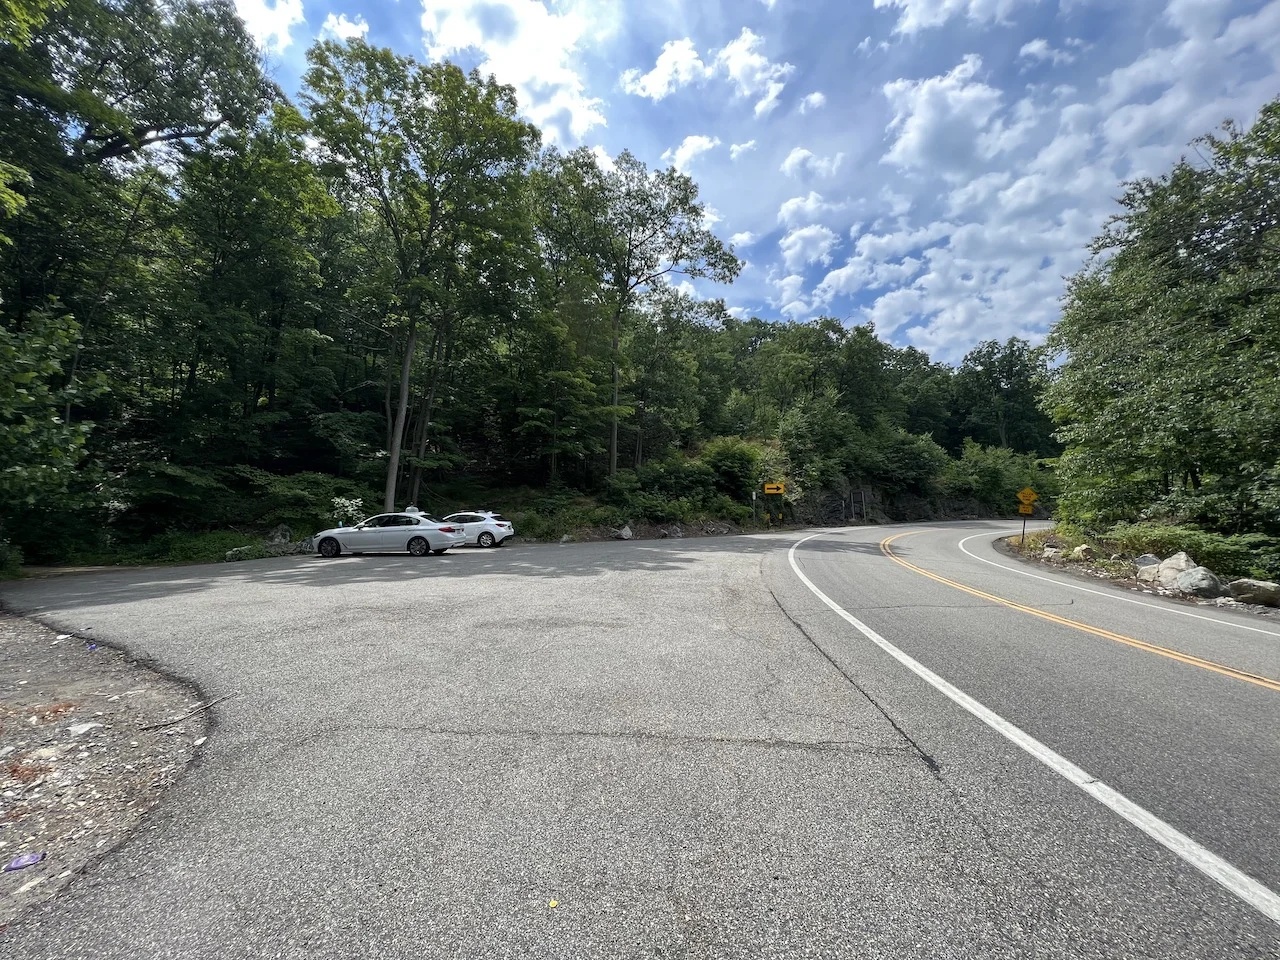
At the Camp Smith Trailhead II, you will find just a small lot directly on a curve in the road. Here you will also want to drive slowly to be certain you don’t miss the parking turnoff on the east side of the road. Below you can find a picture of what this parking lot looks like.

4) Anthonys Nose Hike Map
Here is the Anthony’s Nose hike map to give you a better idea of what the route looks like from the Camp Smith Trailhead II. You can also take a look at the map I included earlier on to see all three trails in one.

Hiking Resources & Checklist
Before heading out for the trails, be sure to read up on some of the hiking resources up on the site. These are here to better prepare you for all types of outdoor adventure.
- Gear: Hiking Packing List
- Weather: How to Prepare for Hiking Weather
- Navigation: Hiking GPS & Navigation
- Tips: 20+ Hiking Tips & Tricks for the Trail
- Accommodation: Book Your Hotel Today
- Rental Car: Book Your Car Rental Today
5) Anthony’s Nose Trail
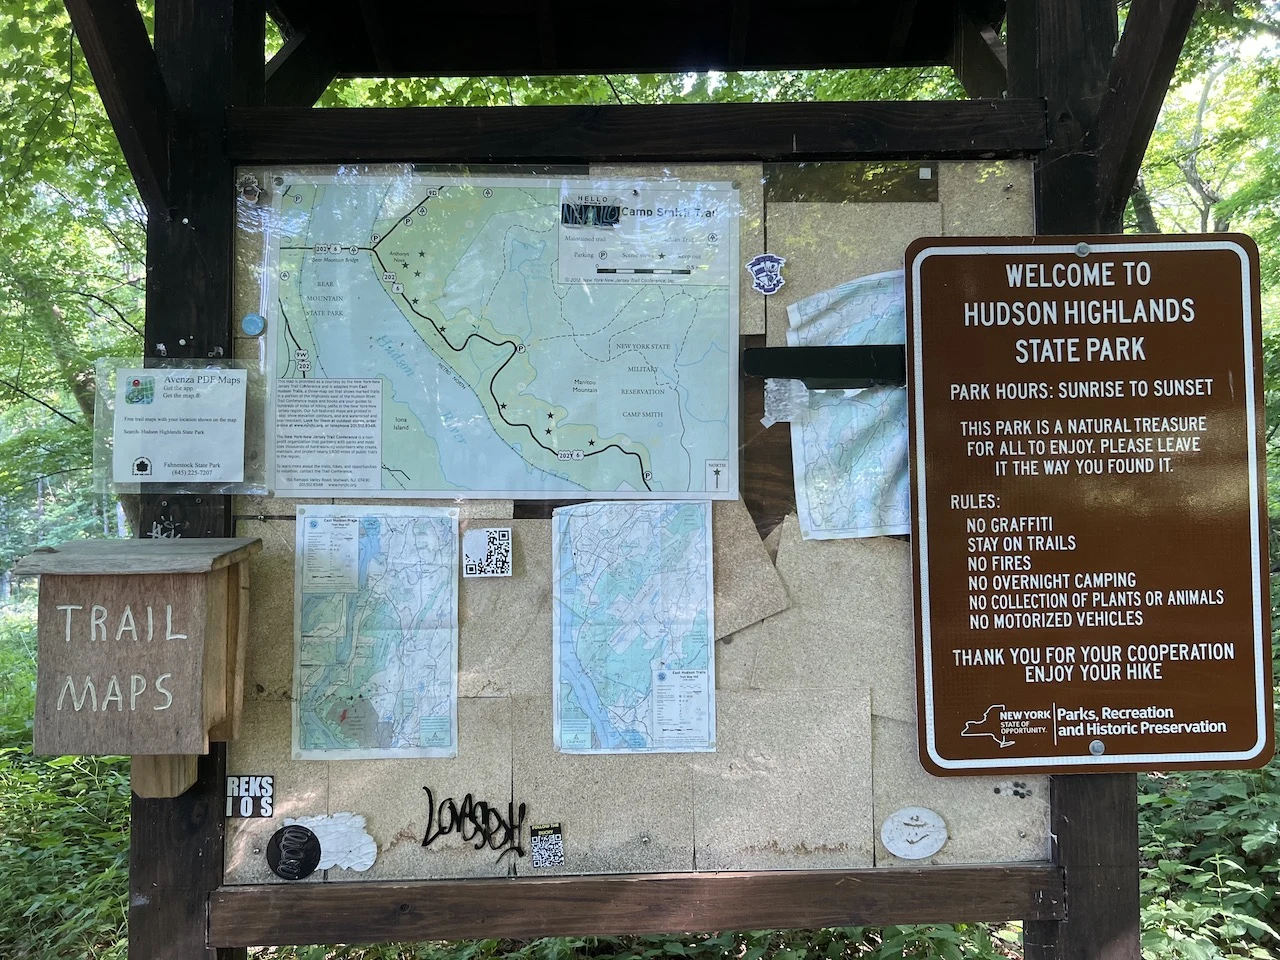
From the Camp Smith II parking lot, it is time to begin the hike up to the summit. The trailhead is just along a dirt path at the back of the lot, where you will find the signboard and trail maps.
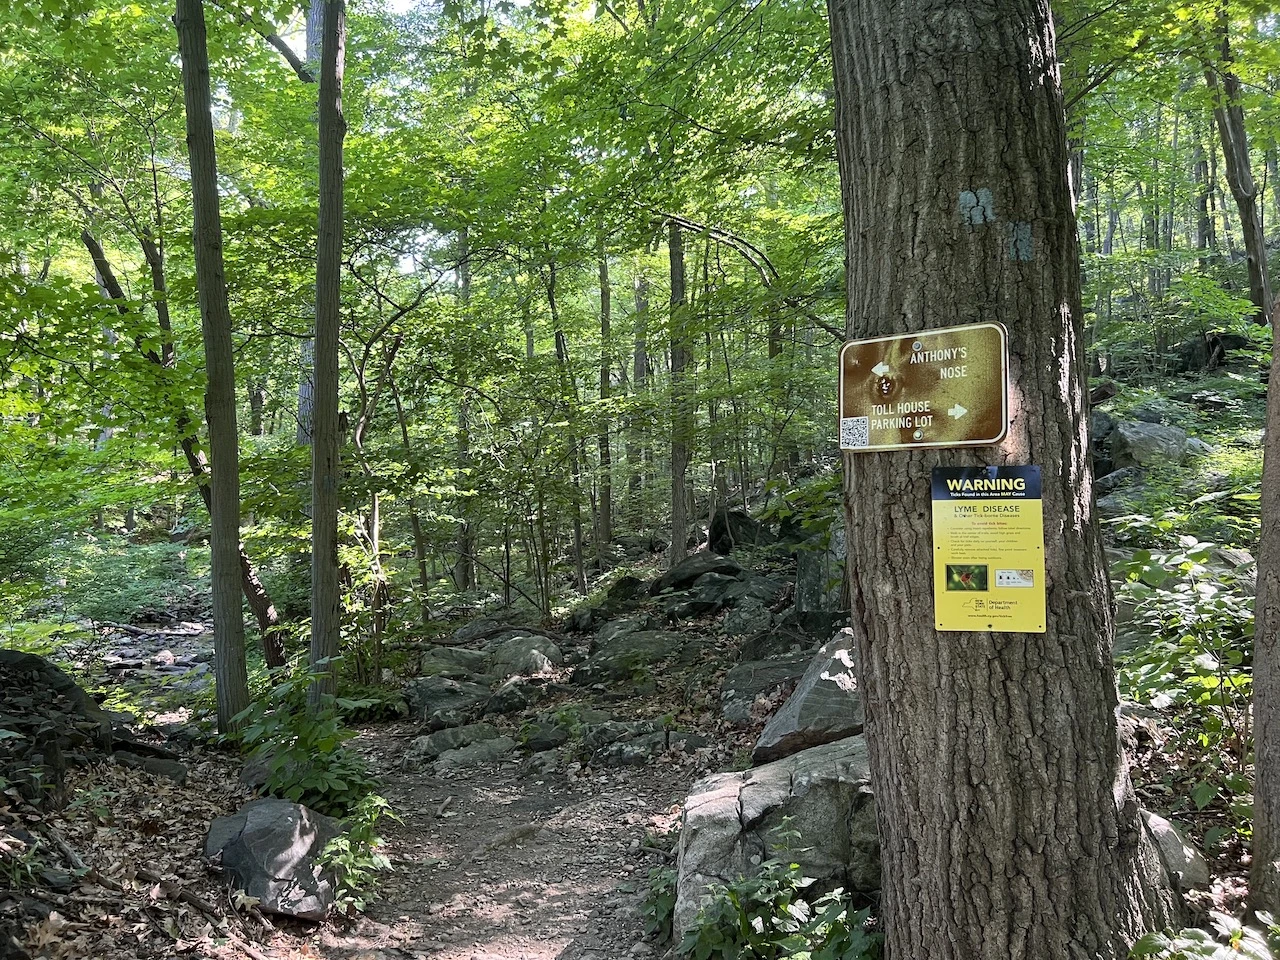
You will also see a hiking sign pointing you towards the left to Anthony’s Nose. From here, there is really just one obvious path to follow all the way through.
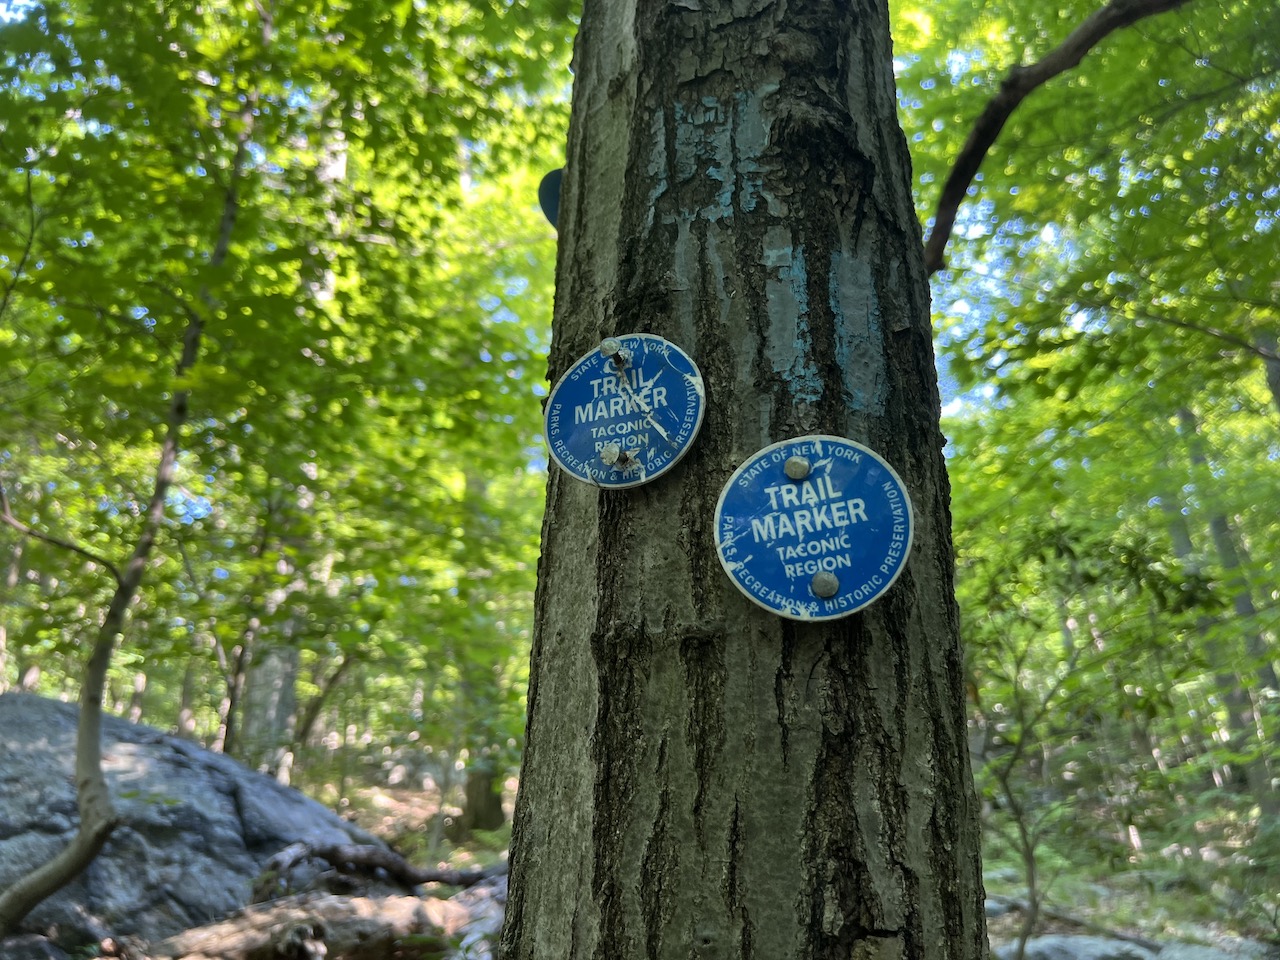
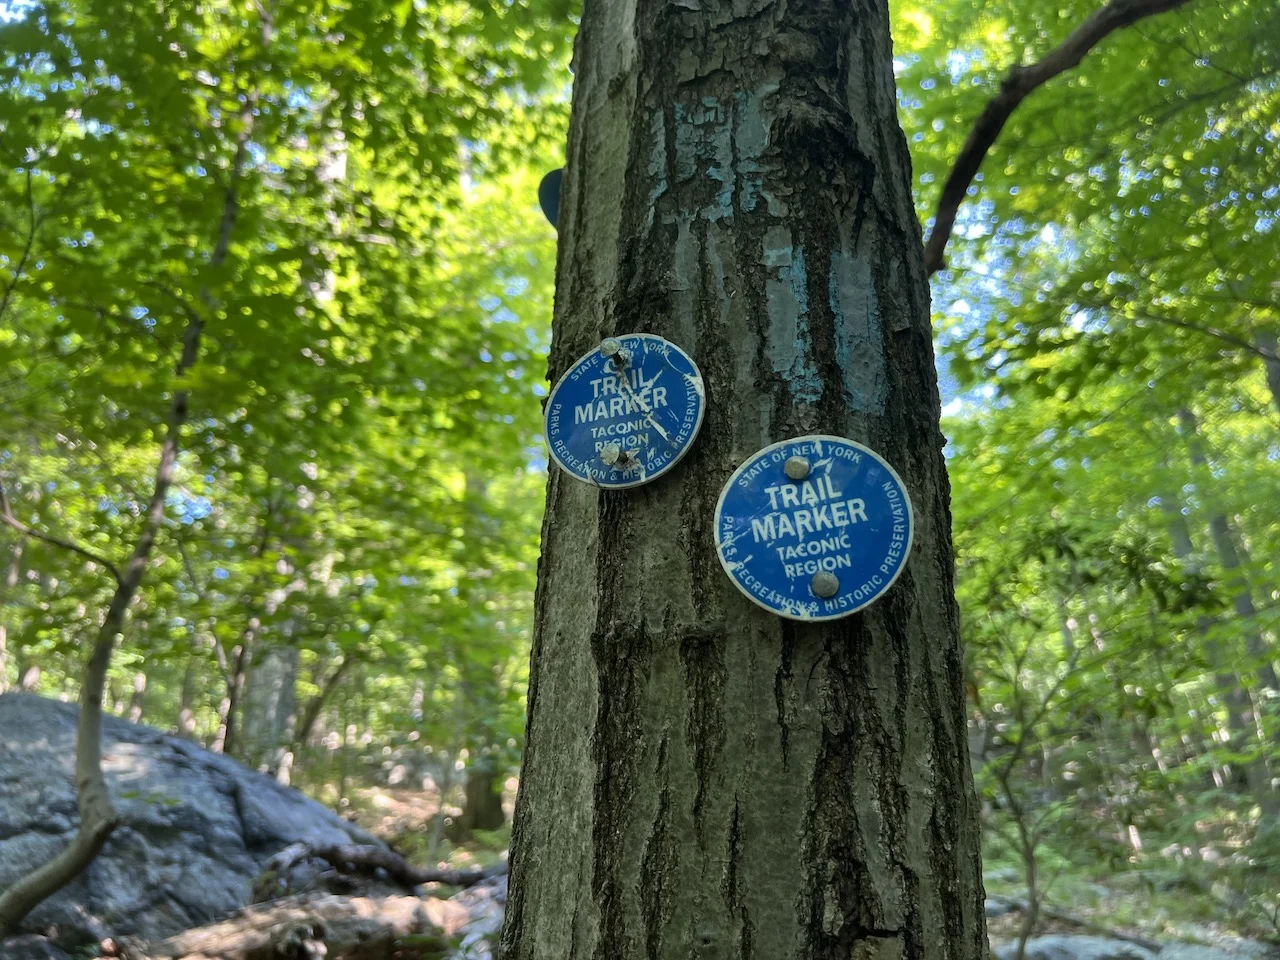
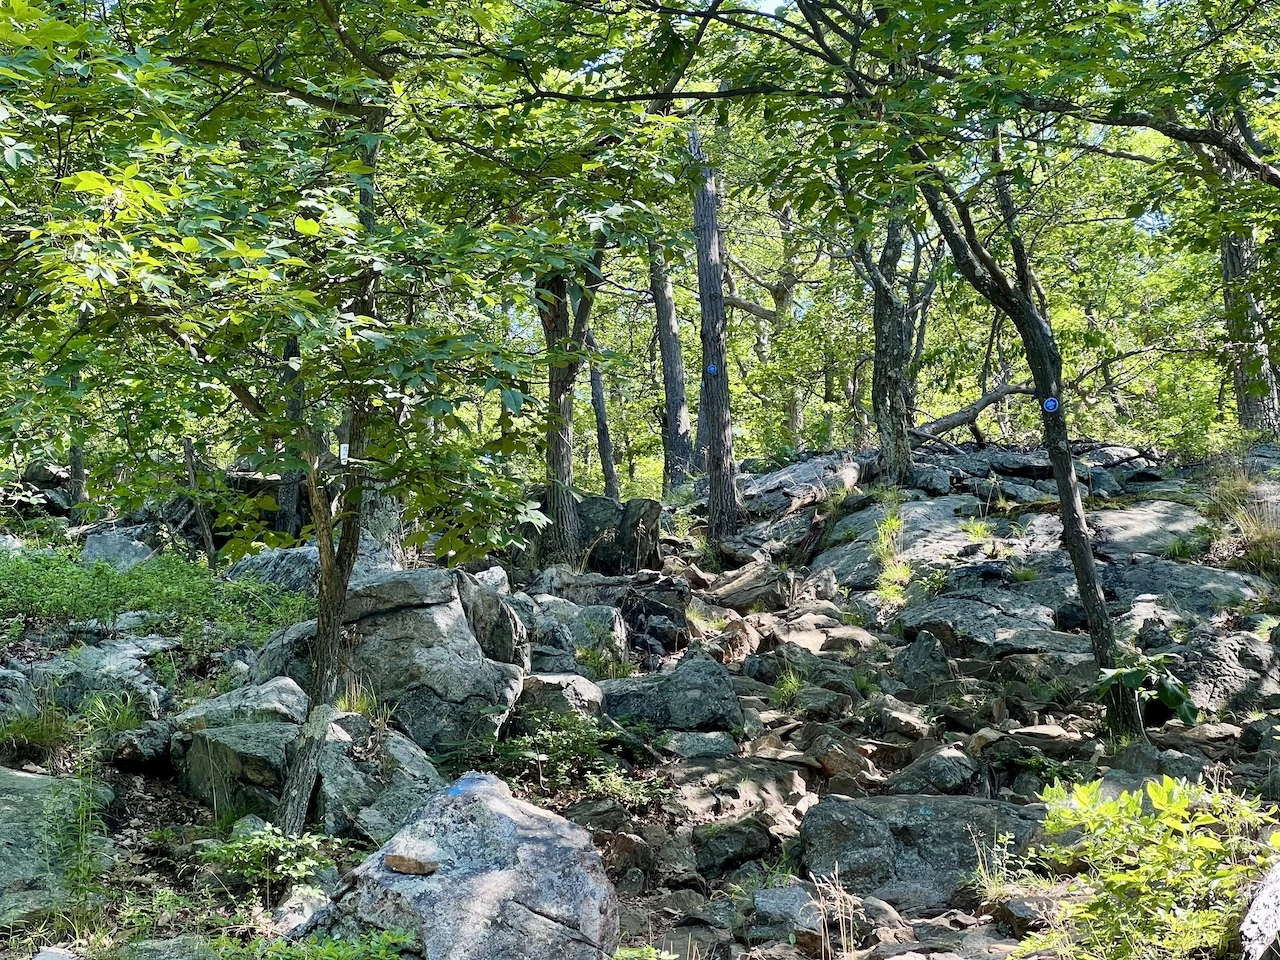
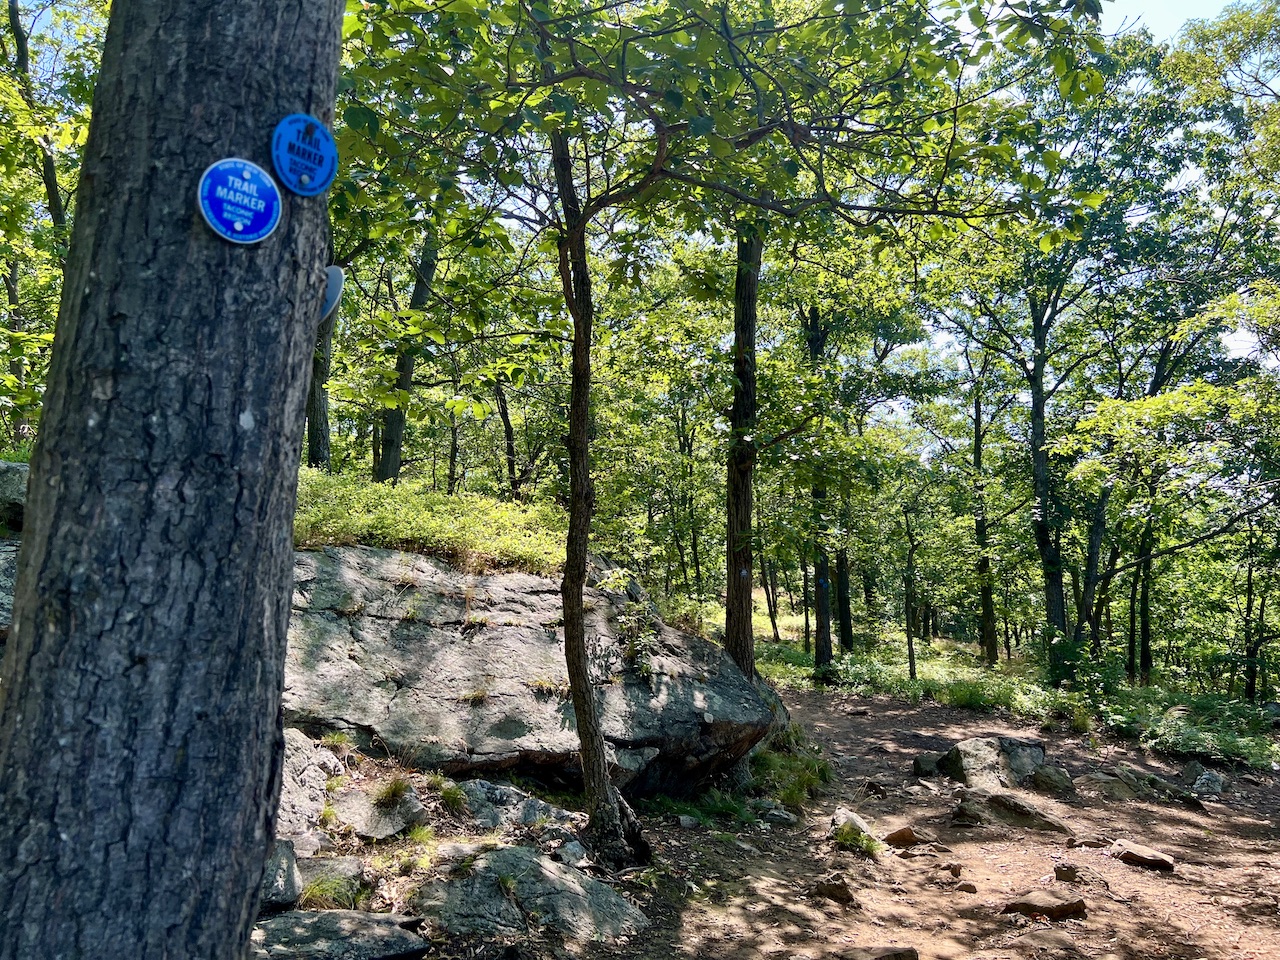
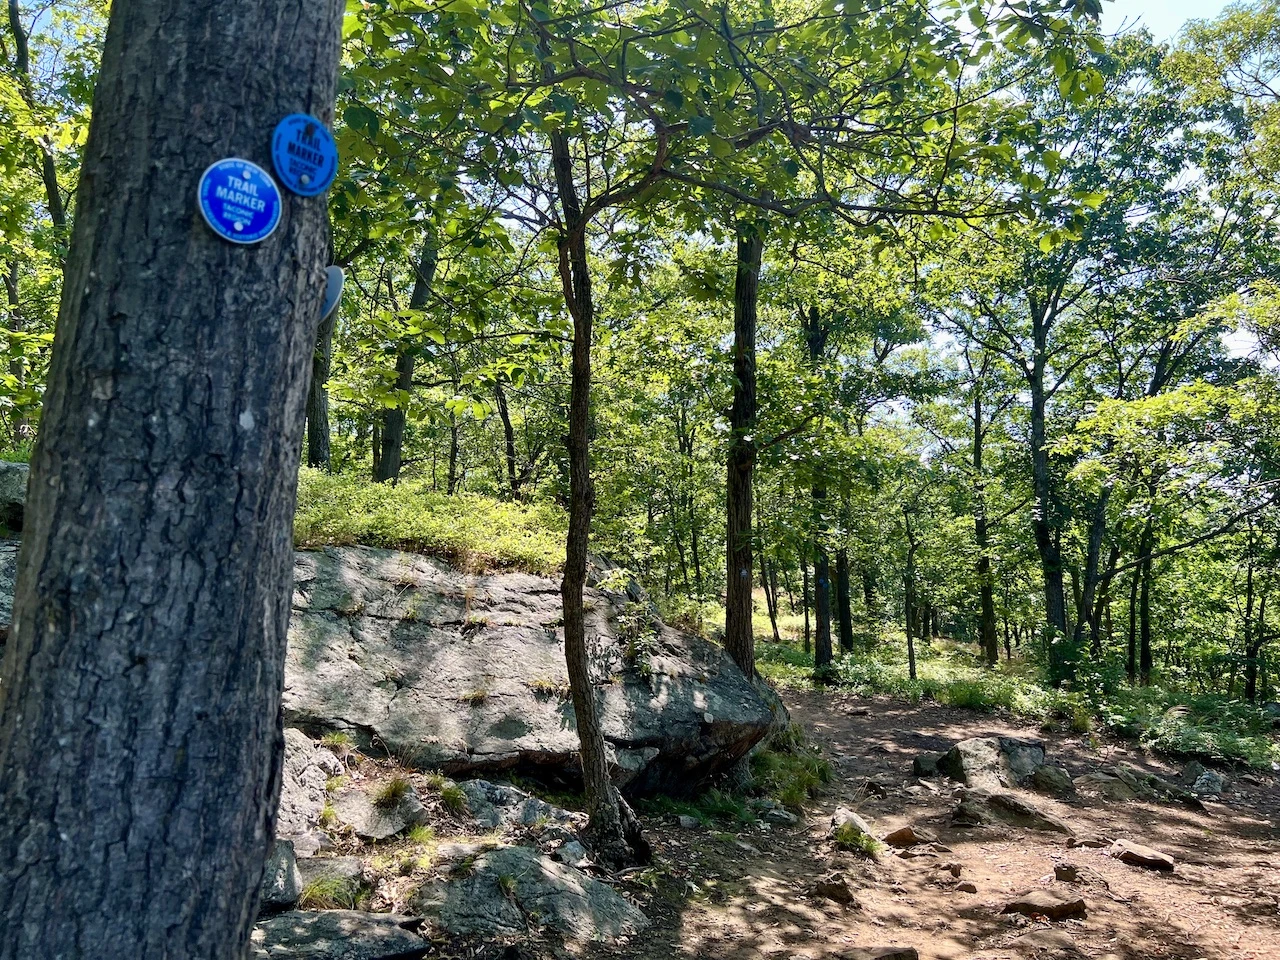
To be certain though, you will find blue trail markers on trees and rocks during the duration of the hike.
As you are making your way up the trail, just be certain to always keep the next trail marker in view to ensure you are hiking along the correct route.


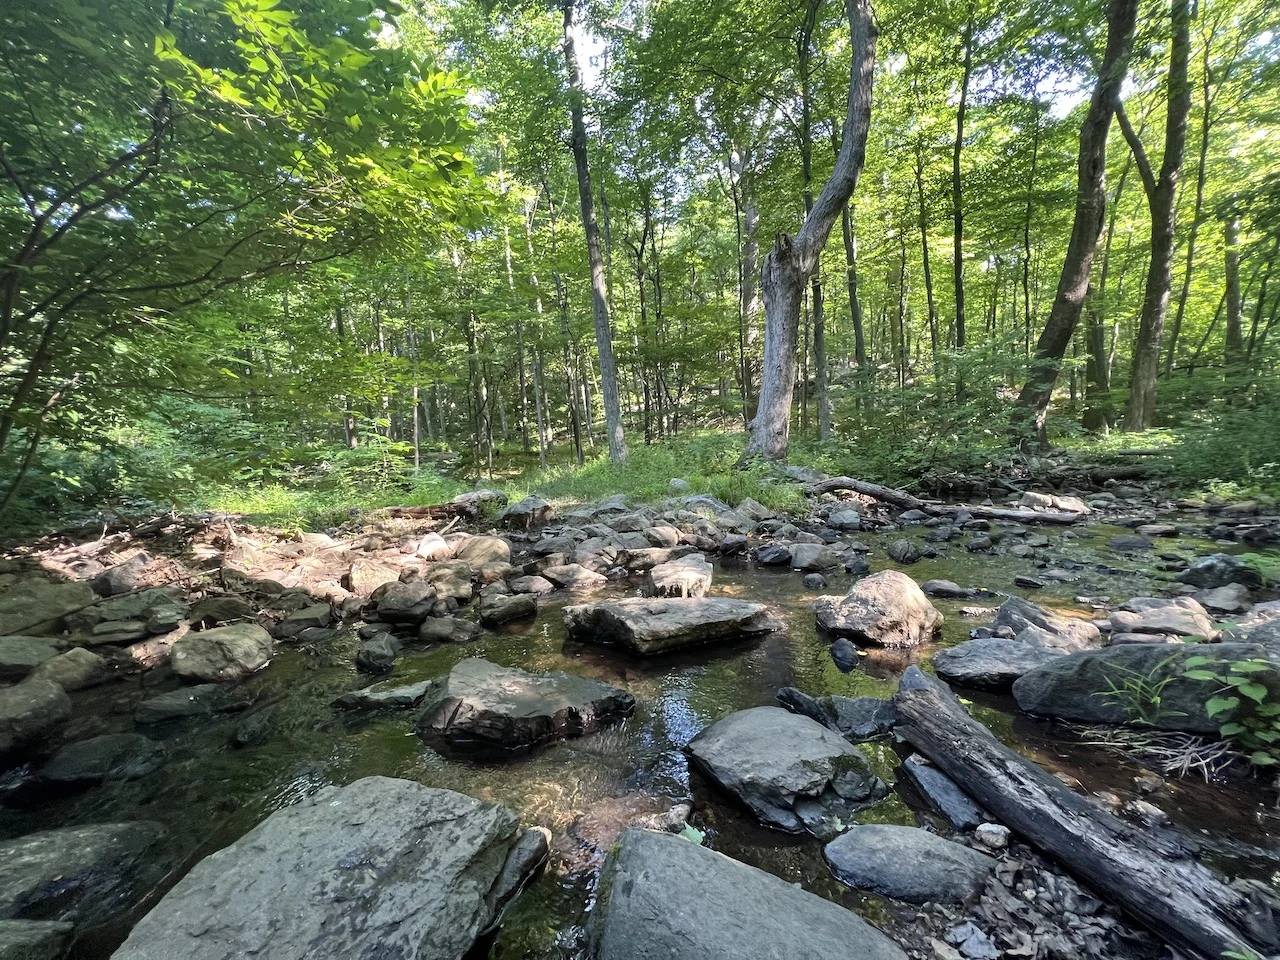
Soon after leaving the parking lot and beginning your time on the trail, you will come across a small stream. Here you will need to hop across the rocks onto the other side to continue along on the trail.

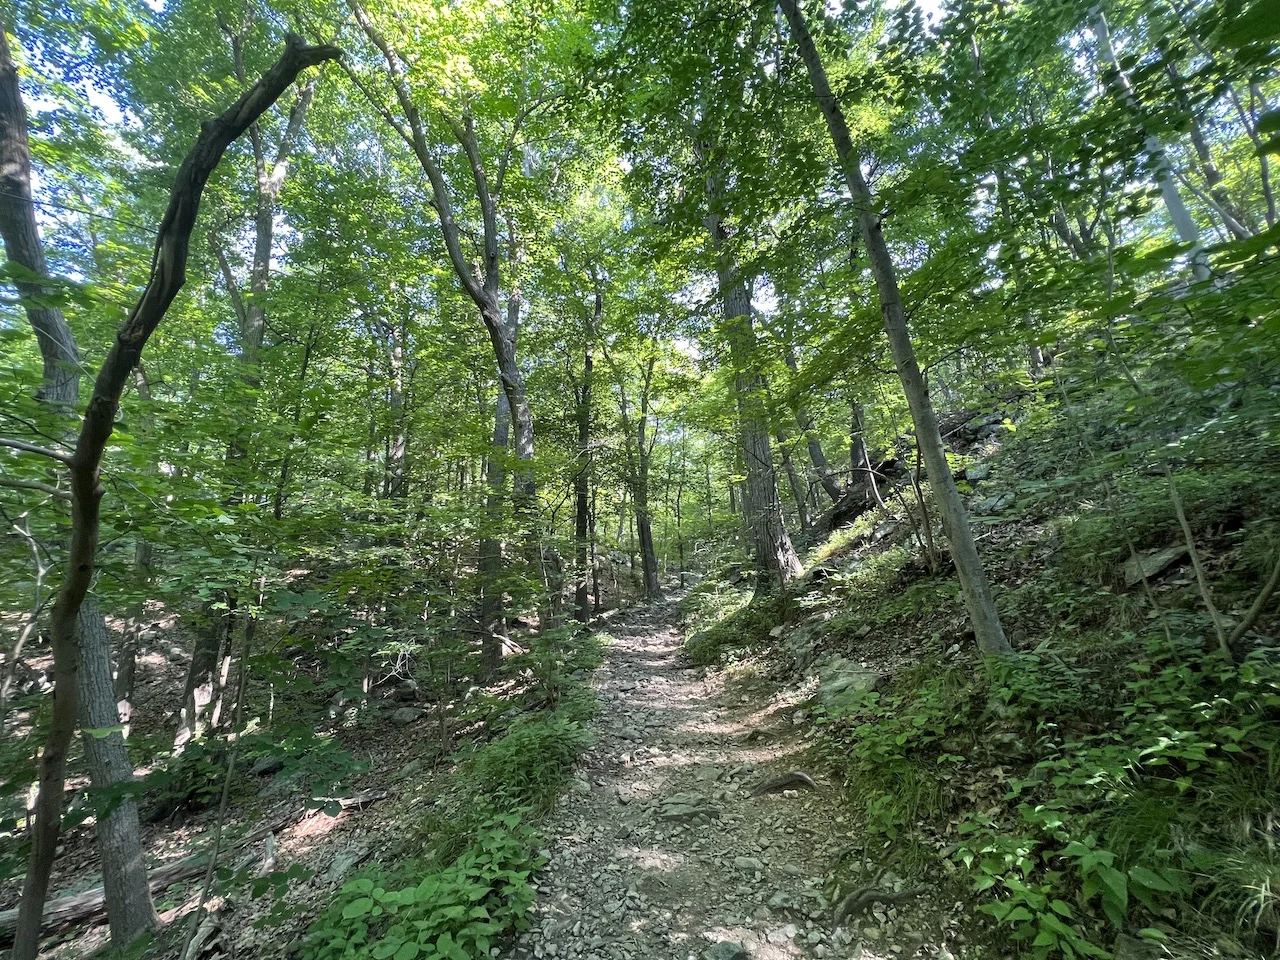
From there, the trail follows a dirt and rocky pathway that climbs its way closer to the summit. While the first portion of trail does have its uphills (and some downhills), it is on easier and less technical terrain.

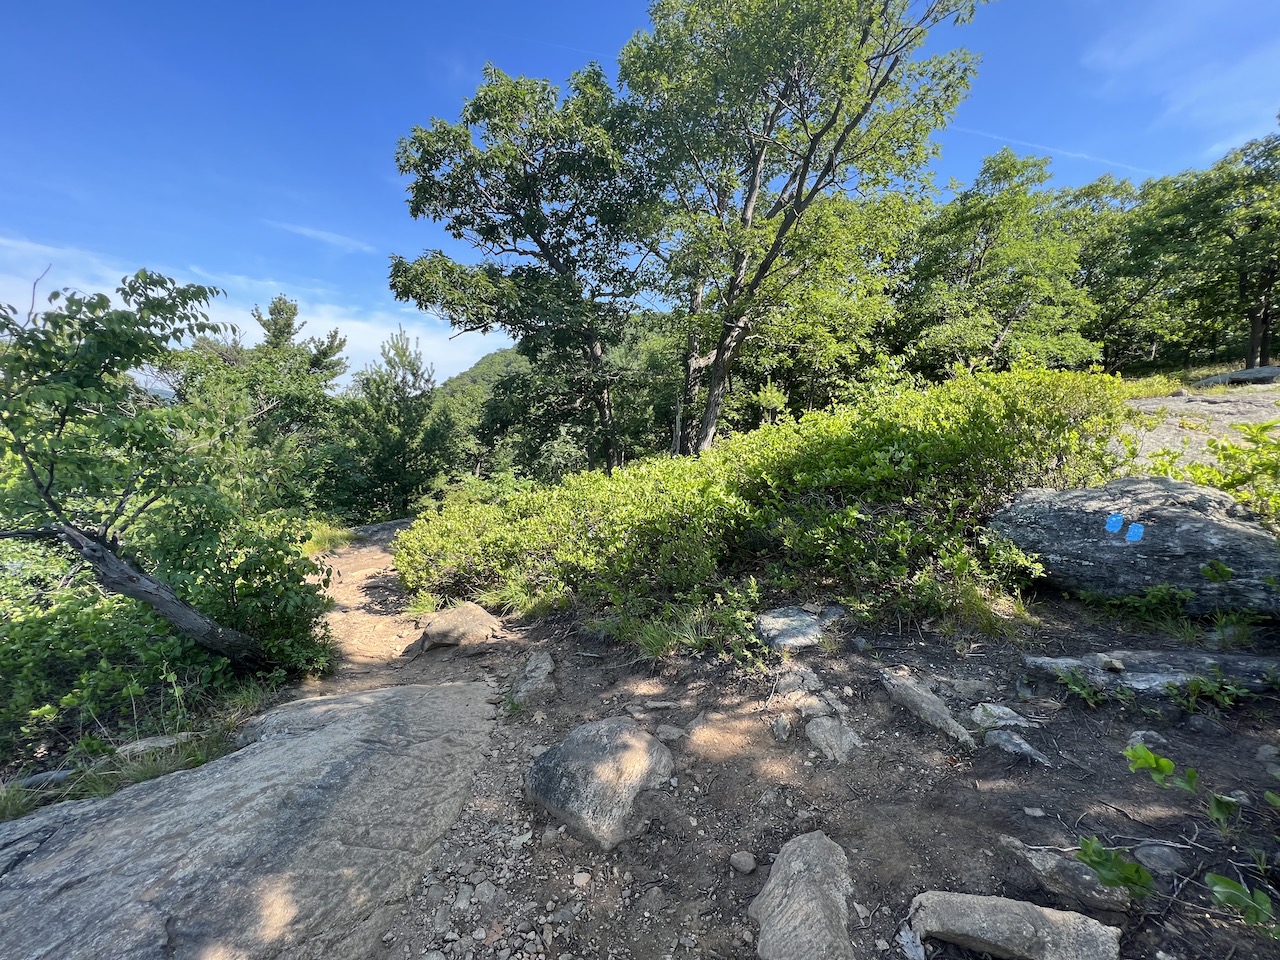
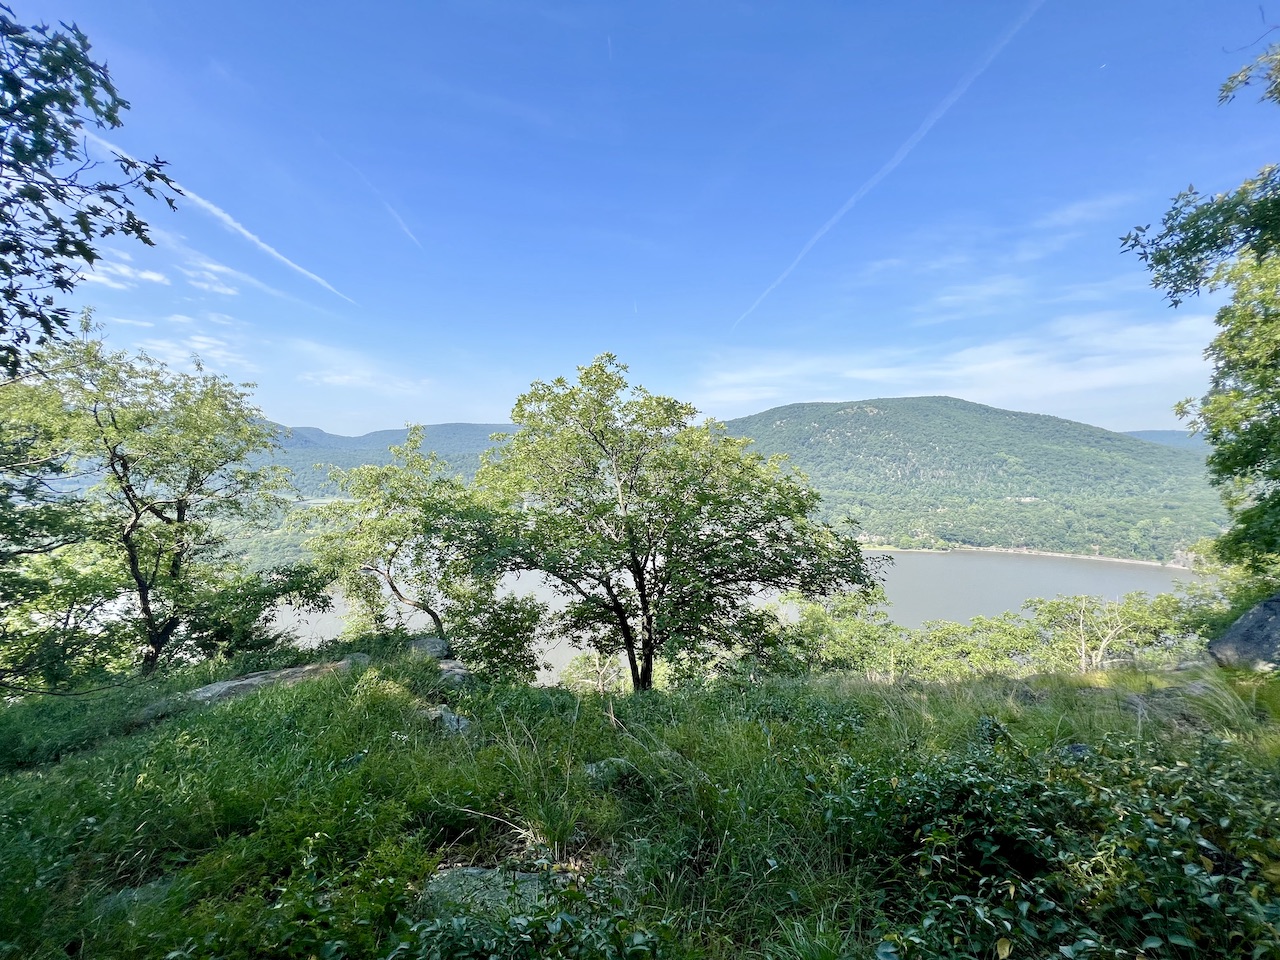
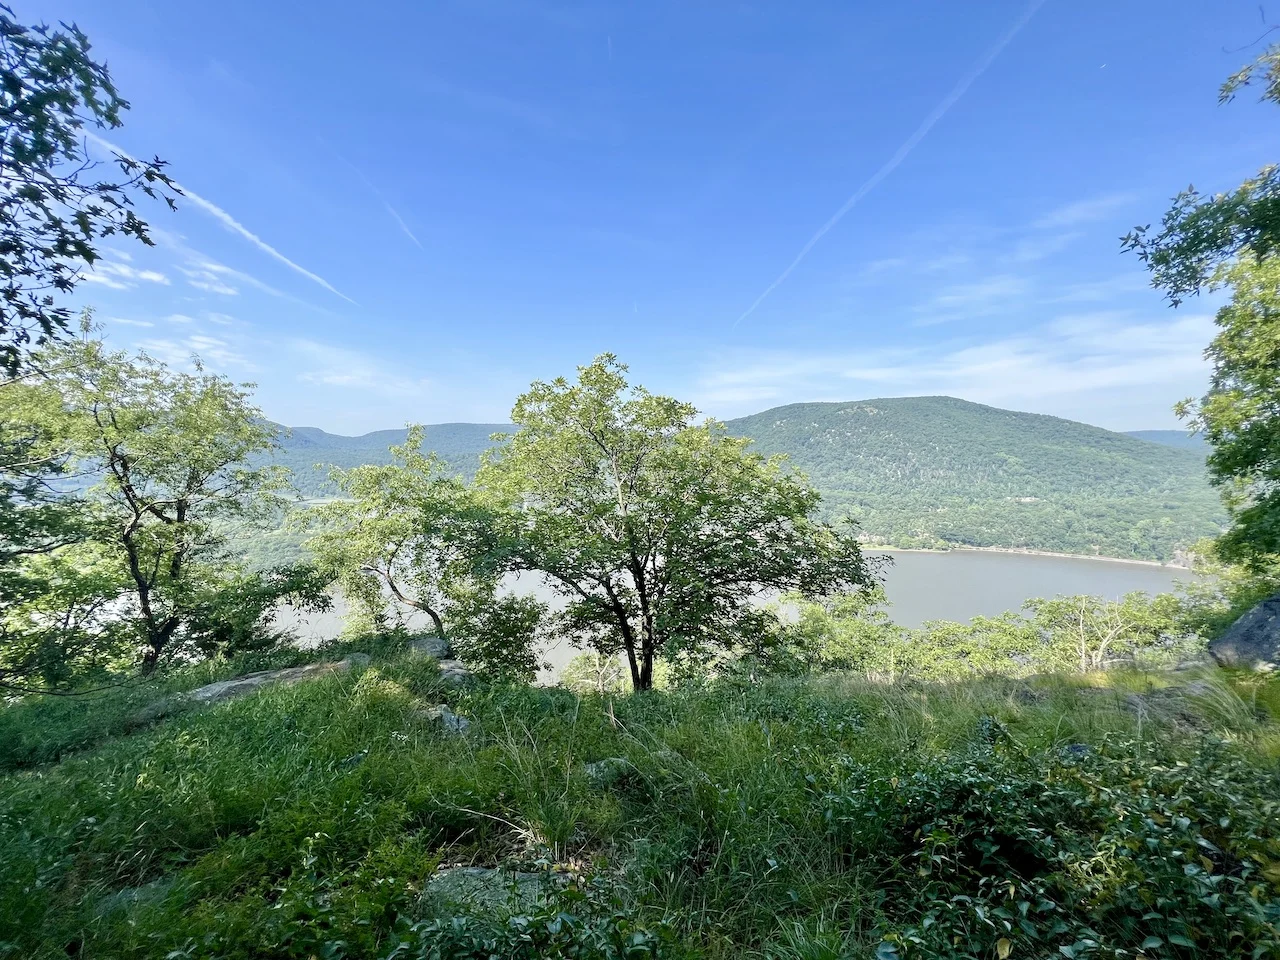
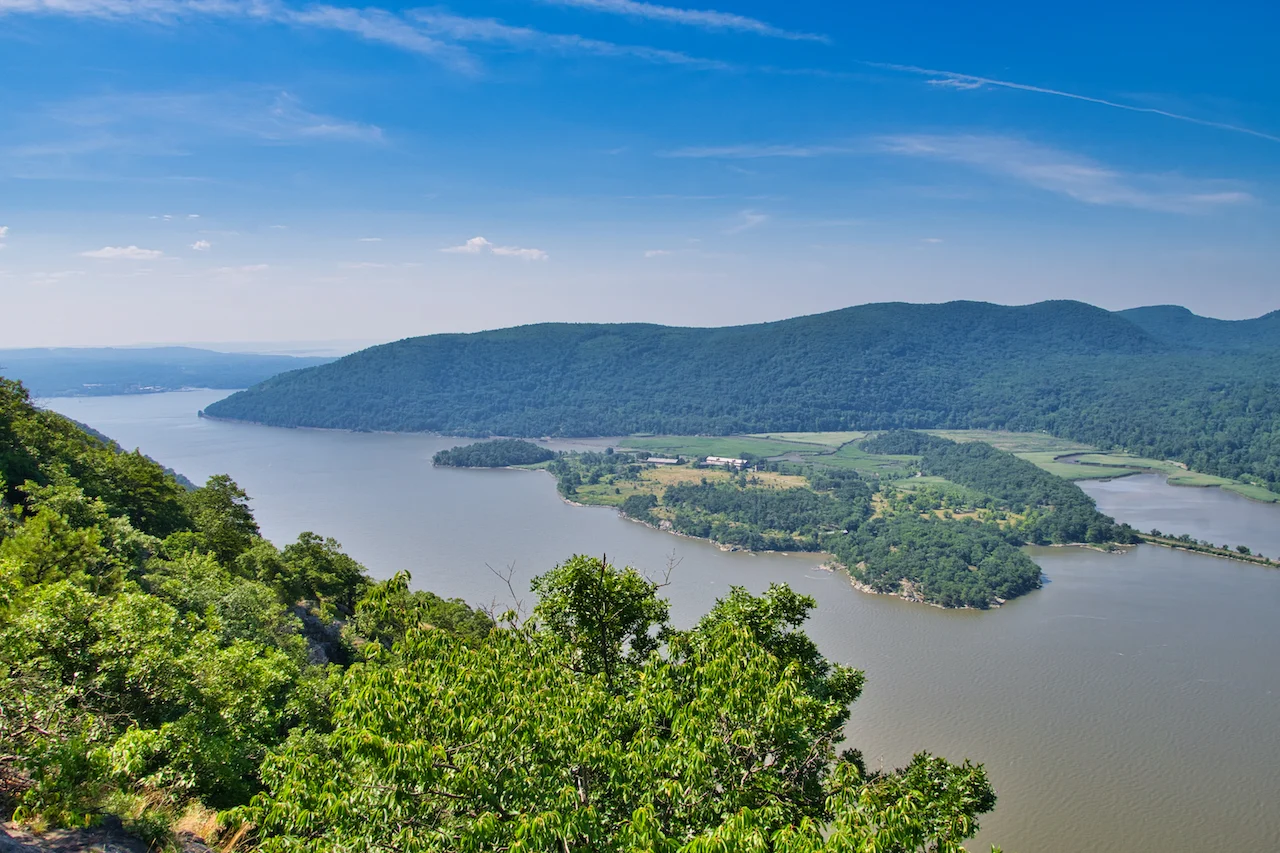
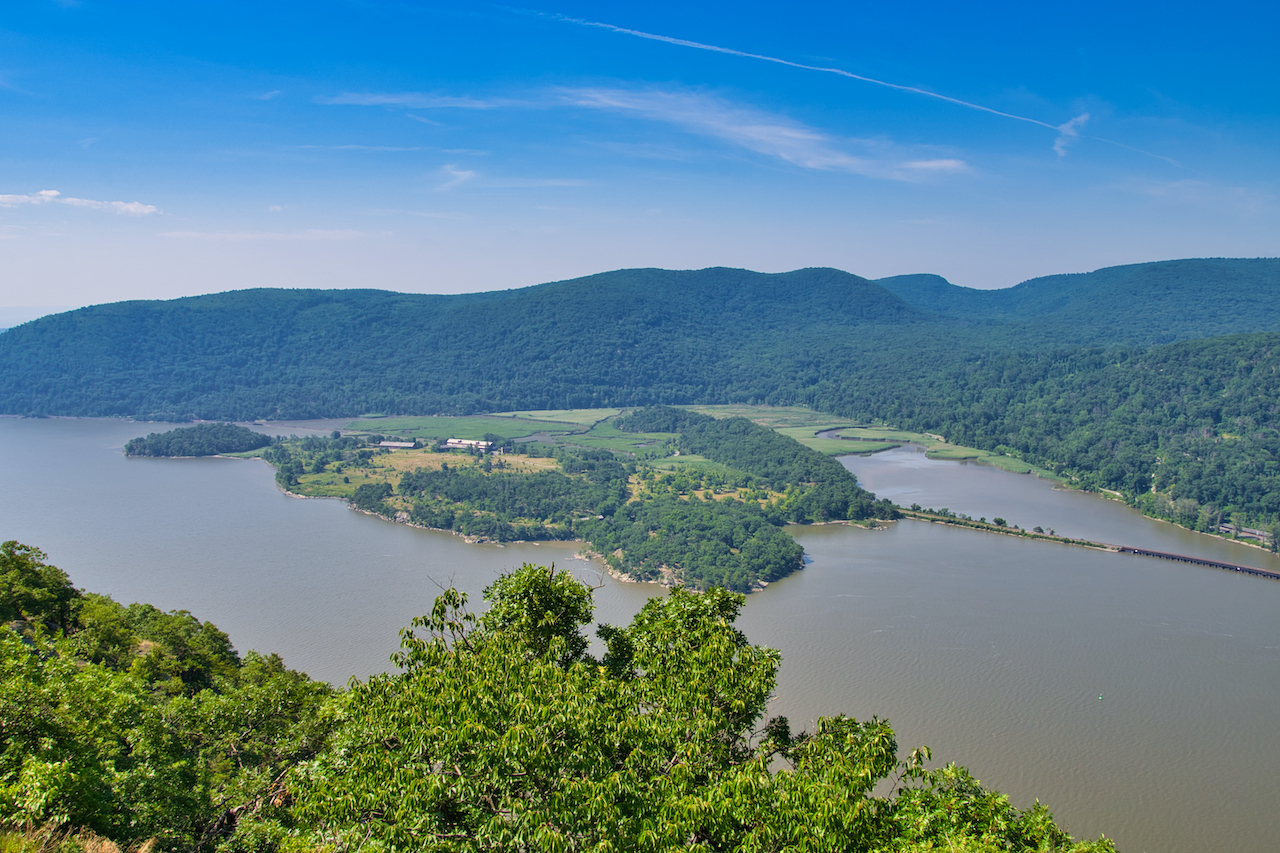
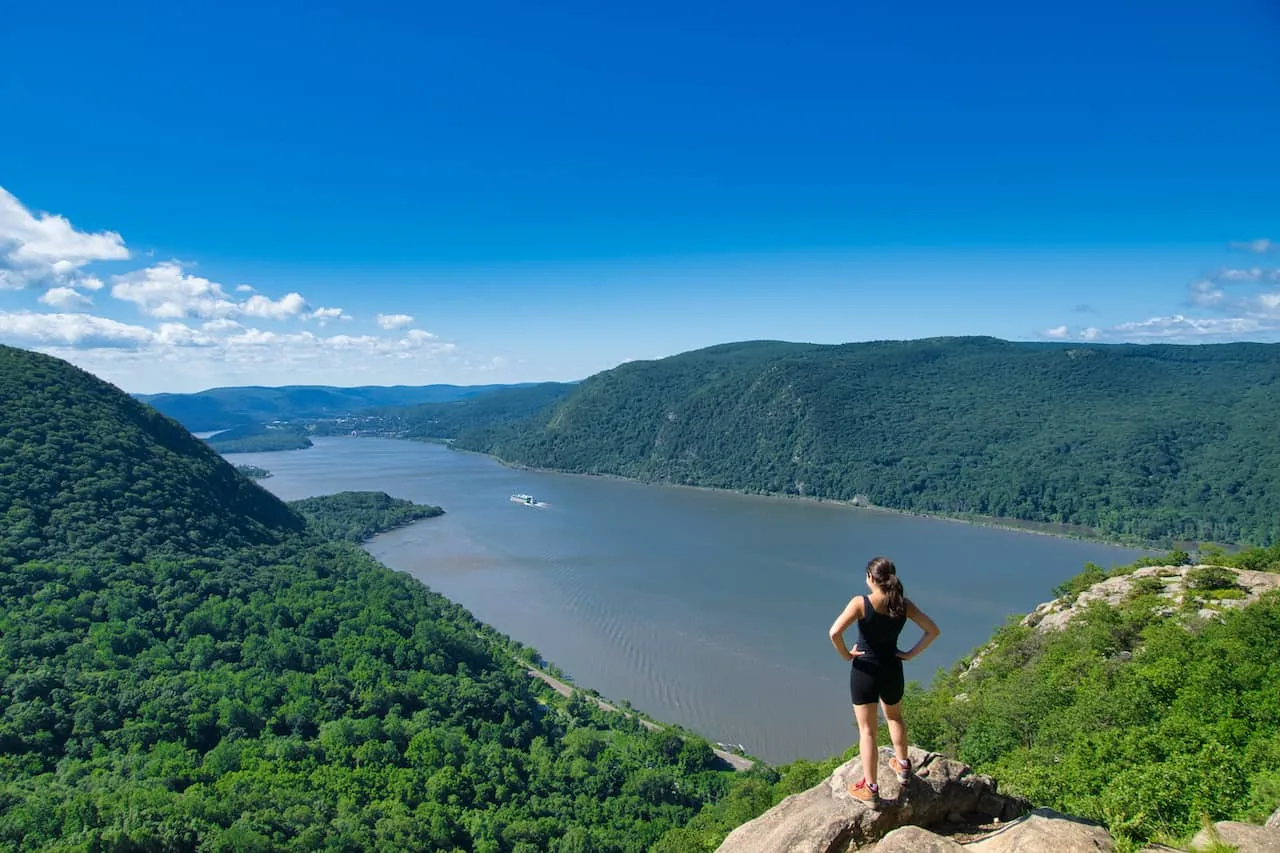
Around 20 minutes into the hike, you will come across the first viewpoint, where you will begin to see more of the surrounding Hudson Valley.
From here you will get some beautiful views of the Hudson River with Bear Mountain across the way and more rolling hills and mountains all around.
At this viewpoint area, you will also find a spot that is a bit more elevated. You can see in the photo below there is a rock with two blue markers on the right.
If you head just past this rock, you will have a larger more scenic panorama out in front of you.


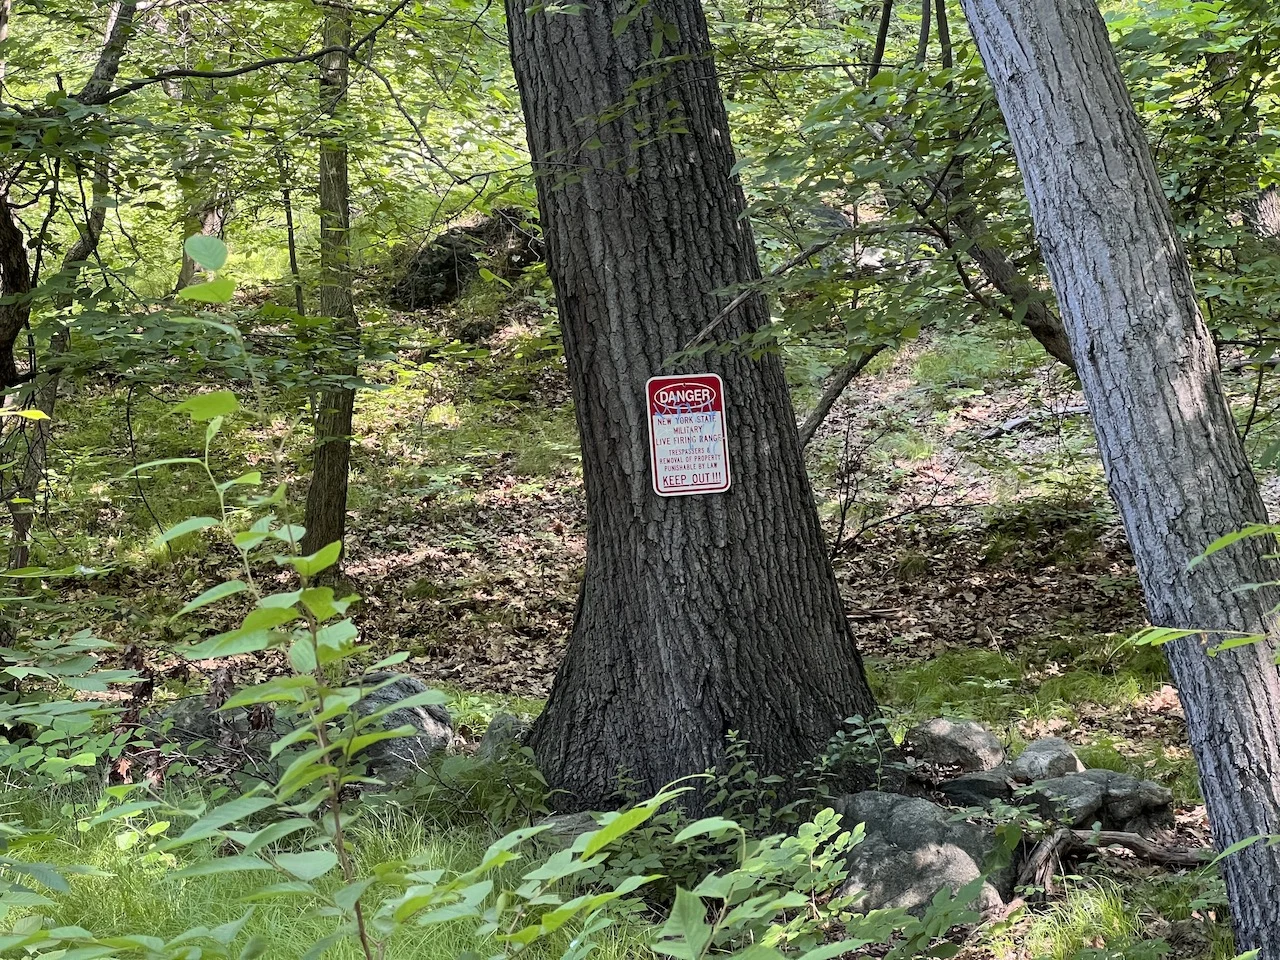
After taking in the view, head back onto the trail and follow the route along the mountain. During this portion of trail you will see some warning signs for restricted areas of the New York State Military.
As long as you simply follow the main route, you should have no worries. For the next 10 minutes or so along this pathway, you will come across additional viewpoint areas (marked on the Google Maps view that I included earlier on).

While these viewpoints are not as open as the first one, there are still some nice spots to take in the surrounding views.
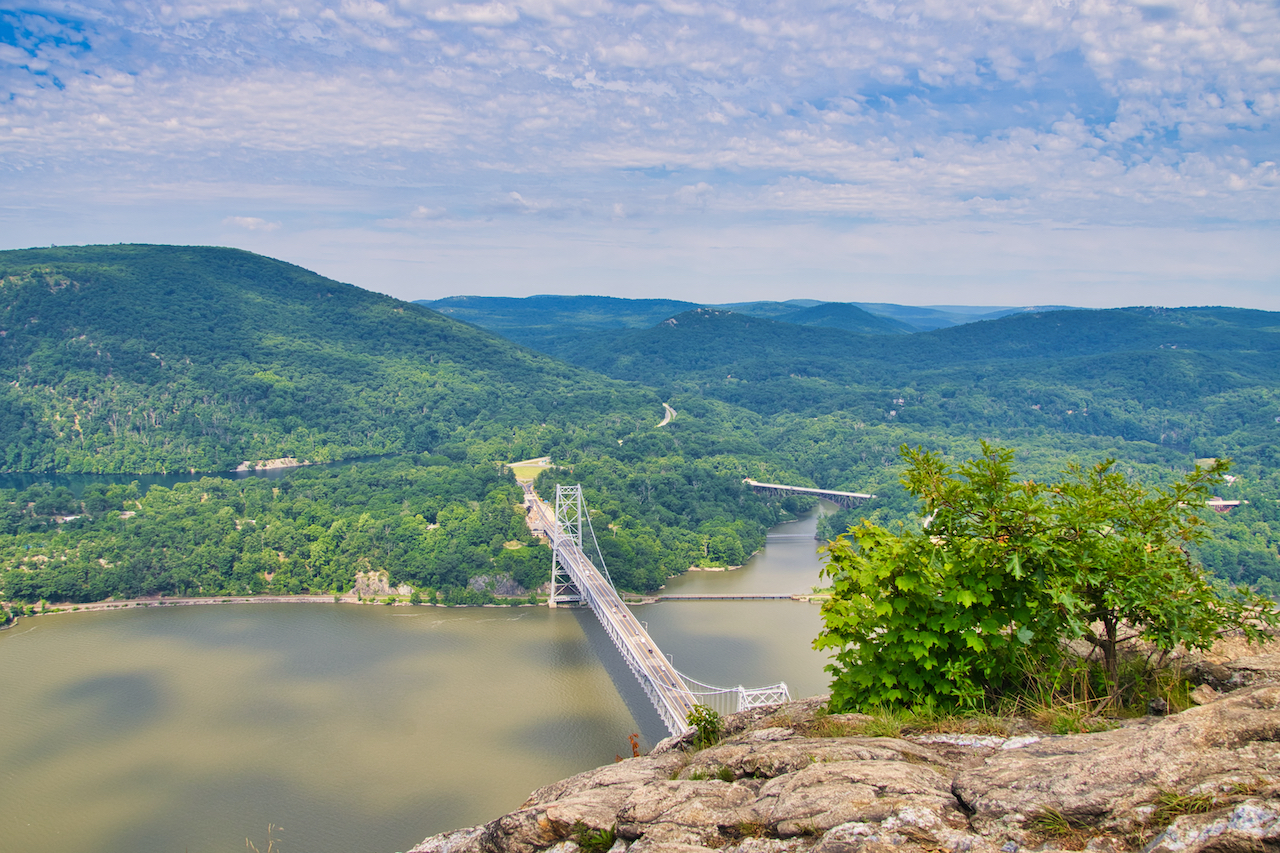
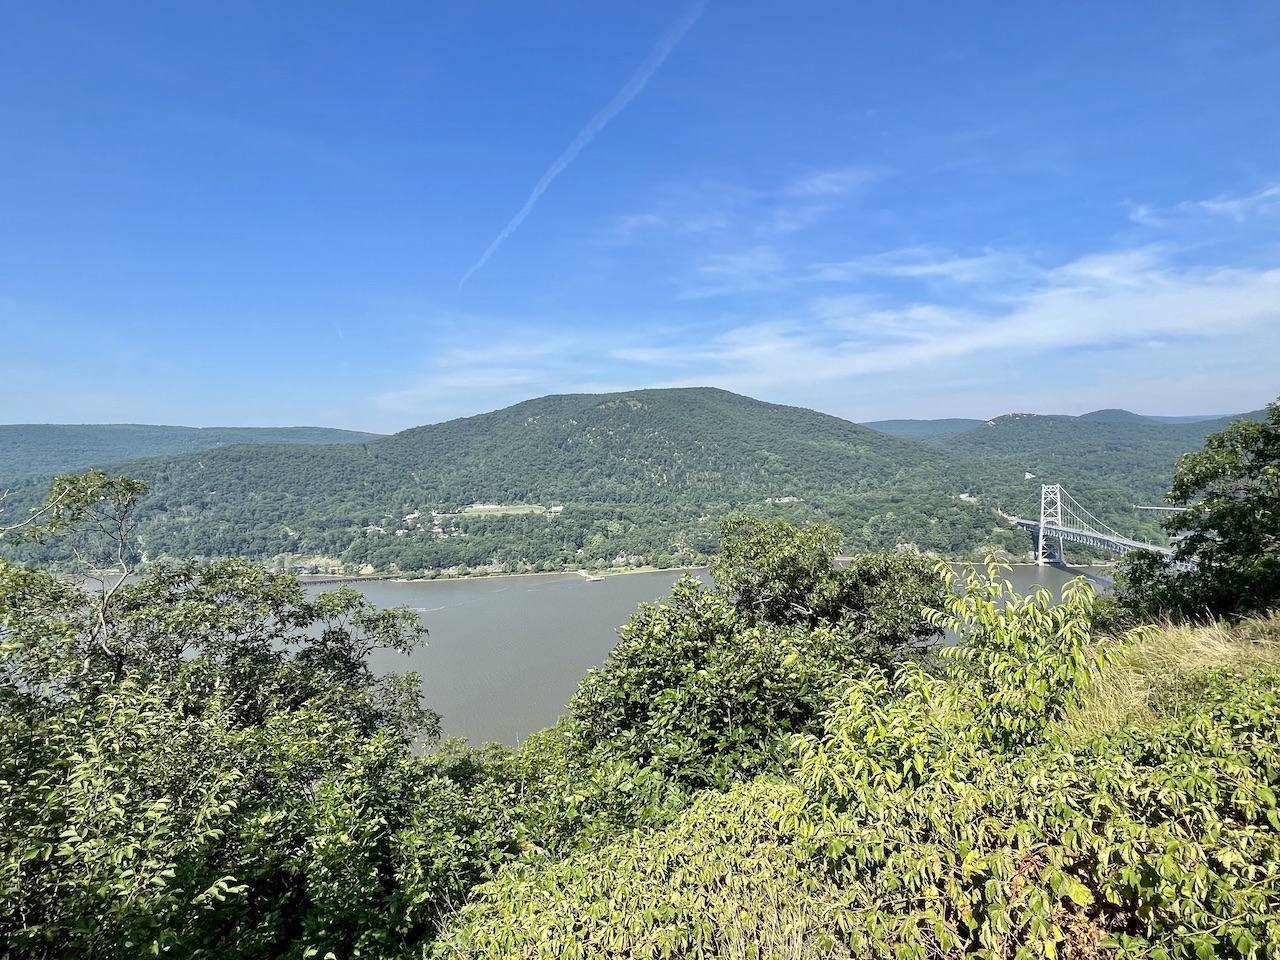
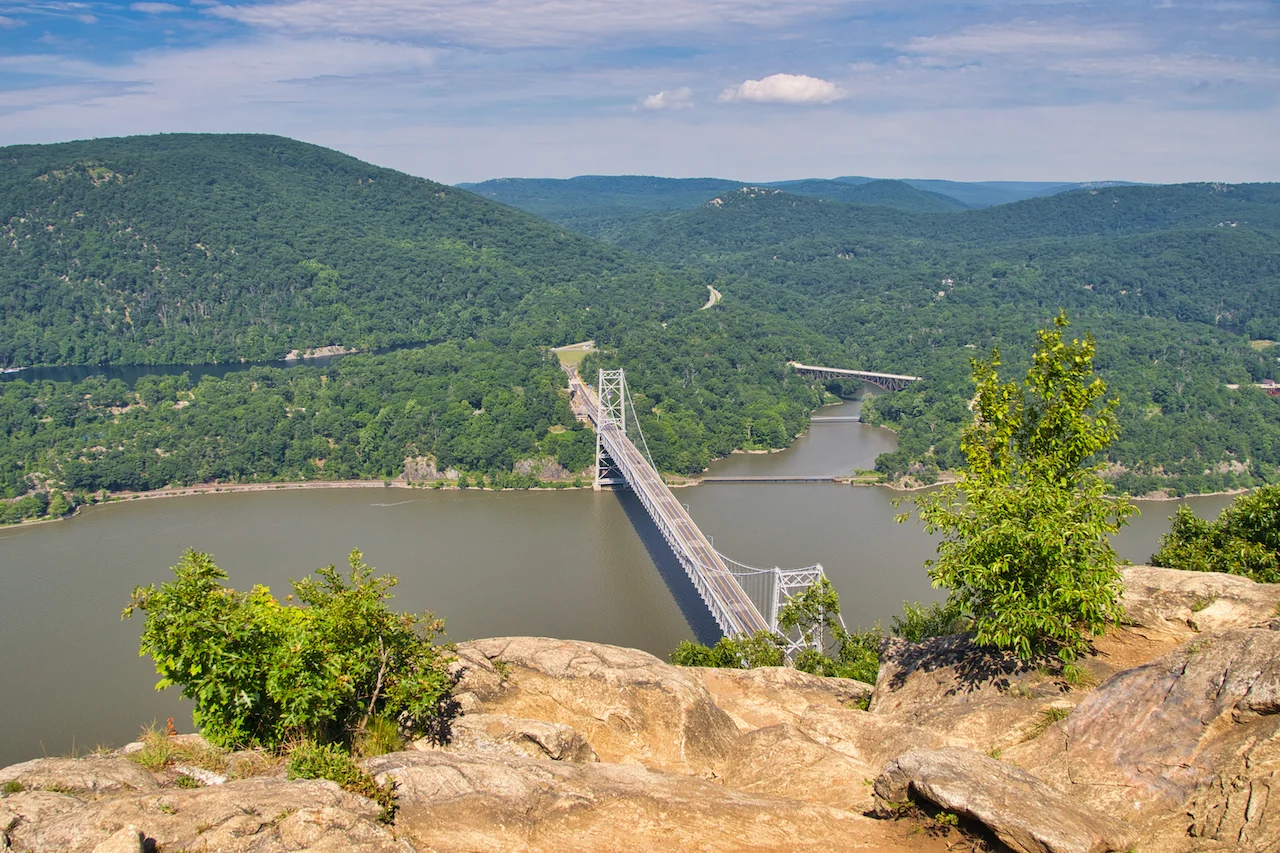
At the last viewpoint, you should also get a glimpse of the Bear Mountain Bridge – an introduction of what is yet to come at the summit.

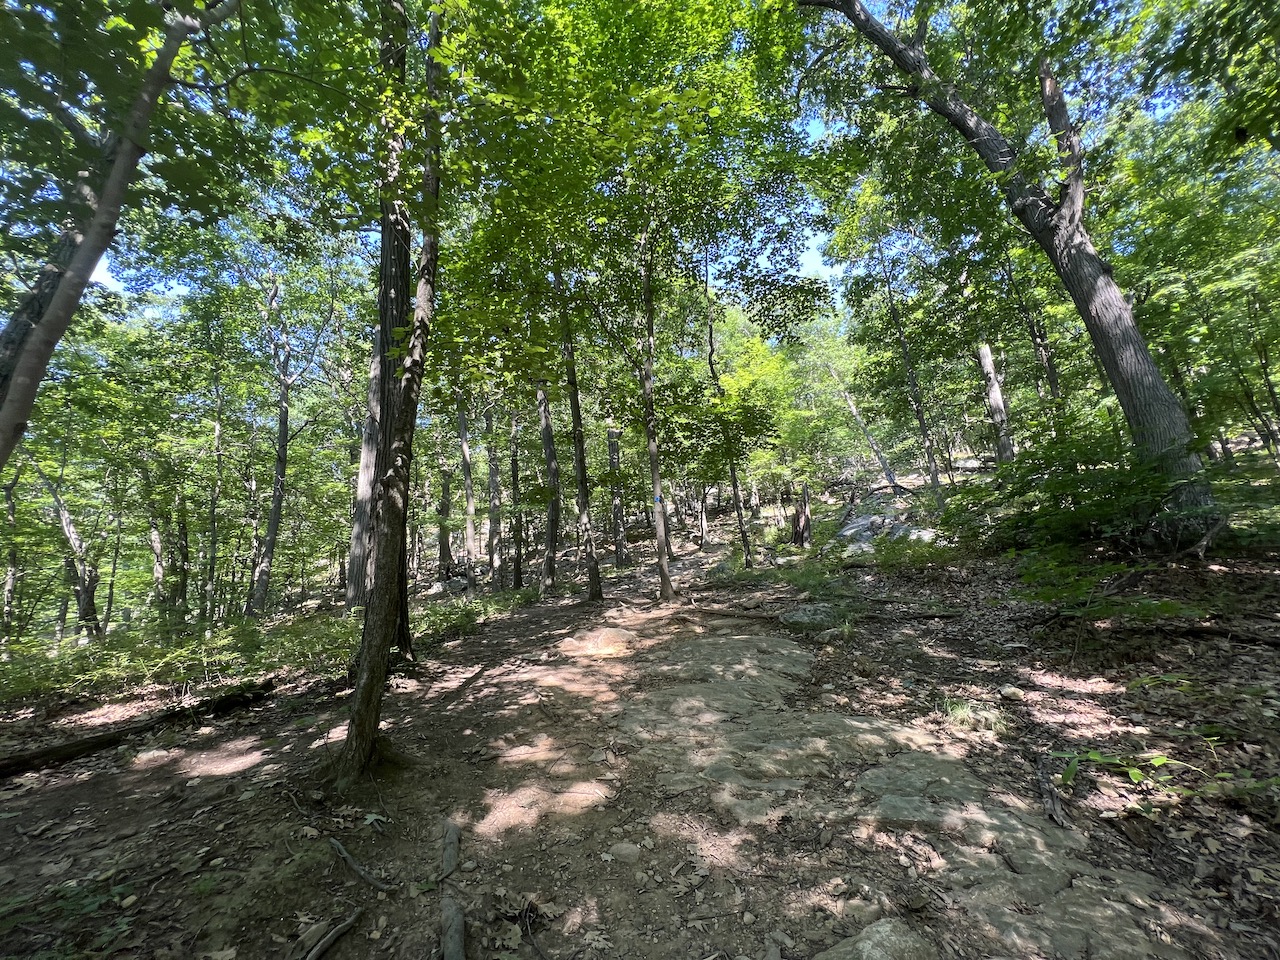
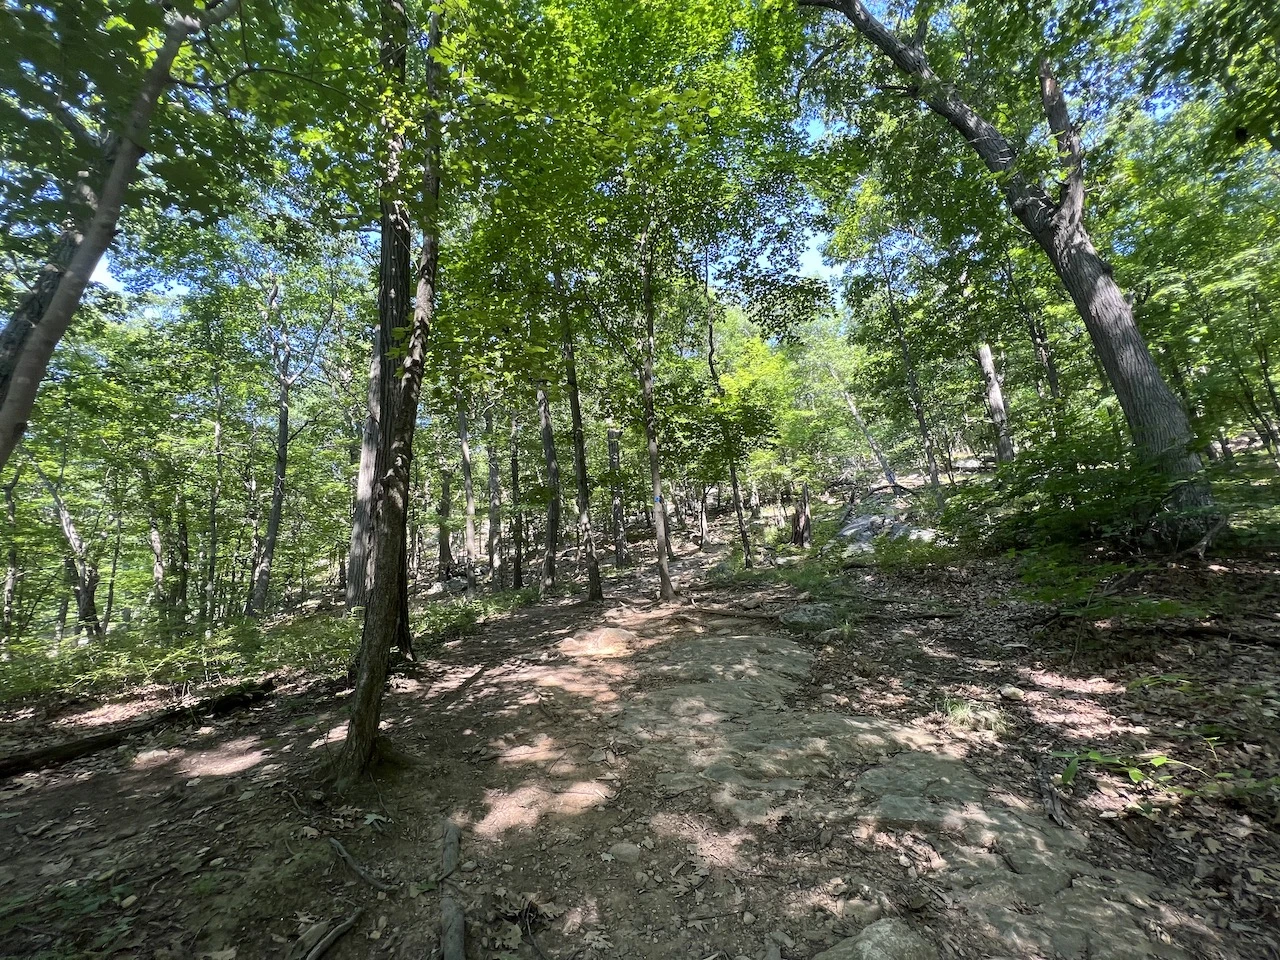
Once you have made it past this last viewpoint area, the trail turns inland and begins to gain more and more elevation. You will find the route becoming more technical as there are more rocks and branches making up the trail.
You can see in the pictures below what this route looks like. There is not one set path around some of this area. Instead, you will just want to choose the best path as you follow the blue markers out in front of you.
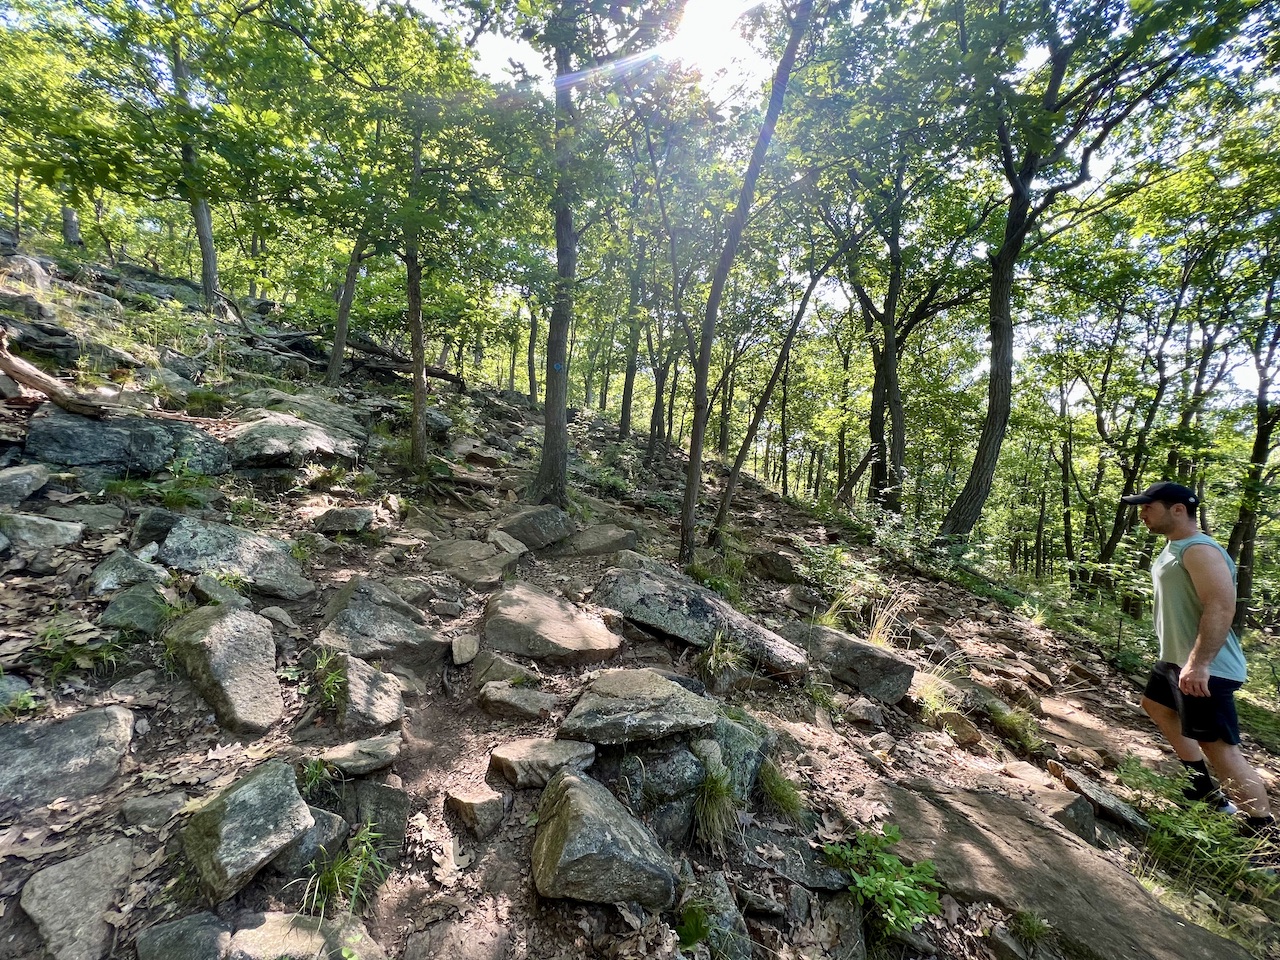


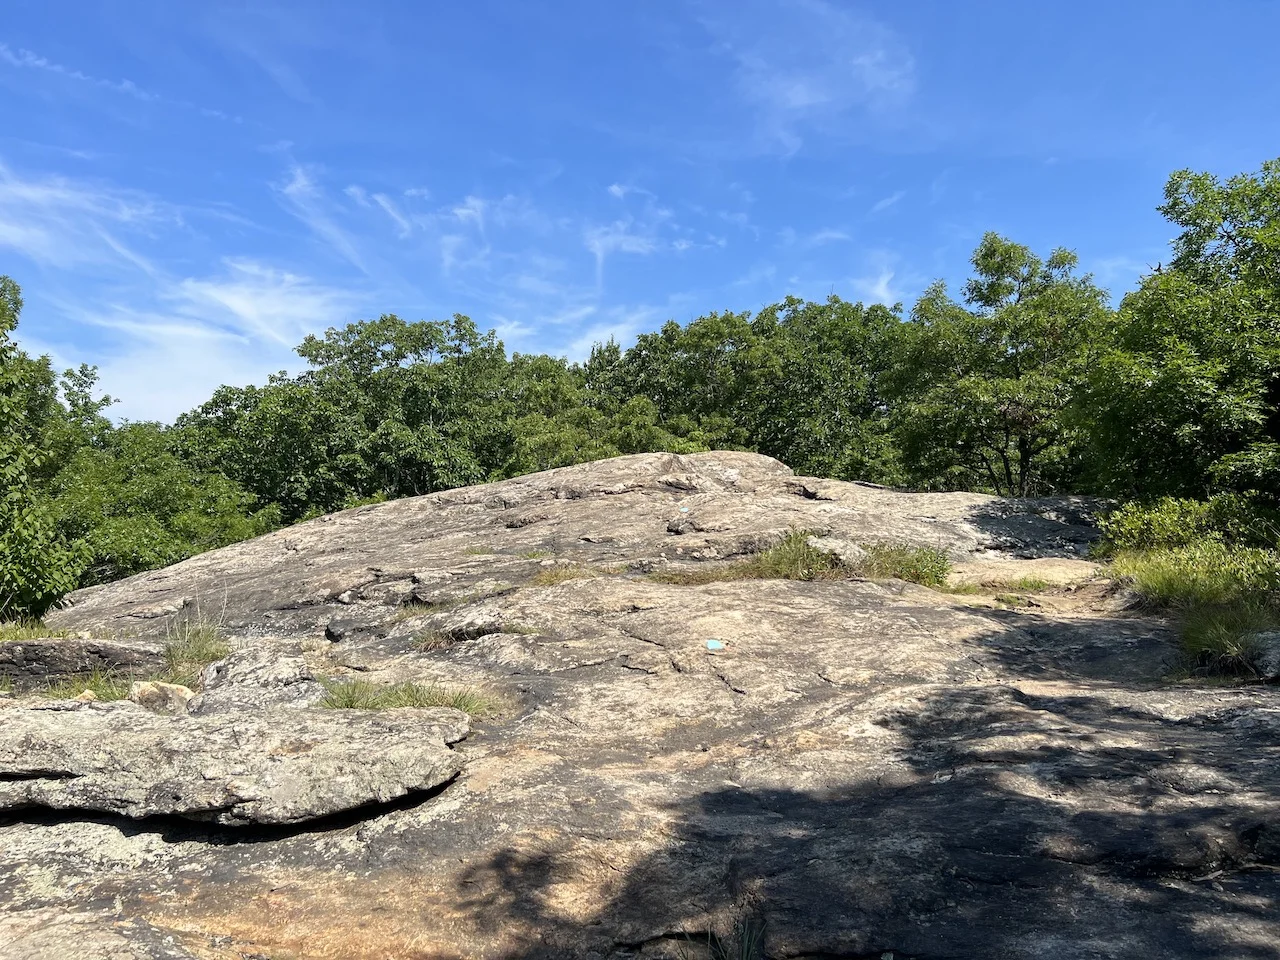
The trail continues to climb until you reach a large open rock area. This is not the viewpoint of Anthonys Nose, rather you are just a few minutes away.
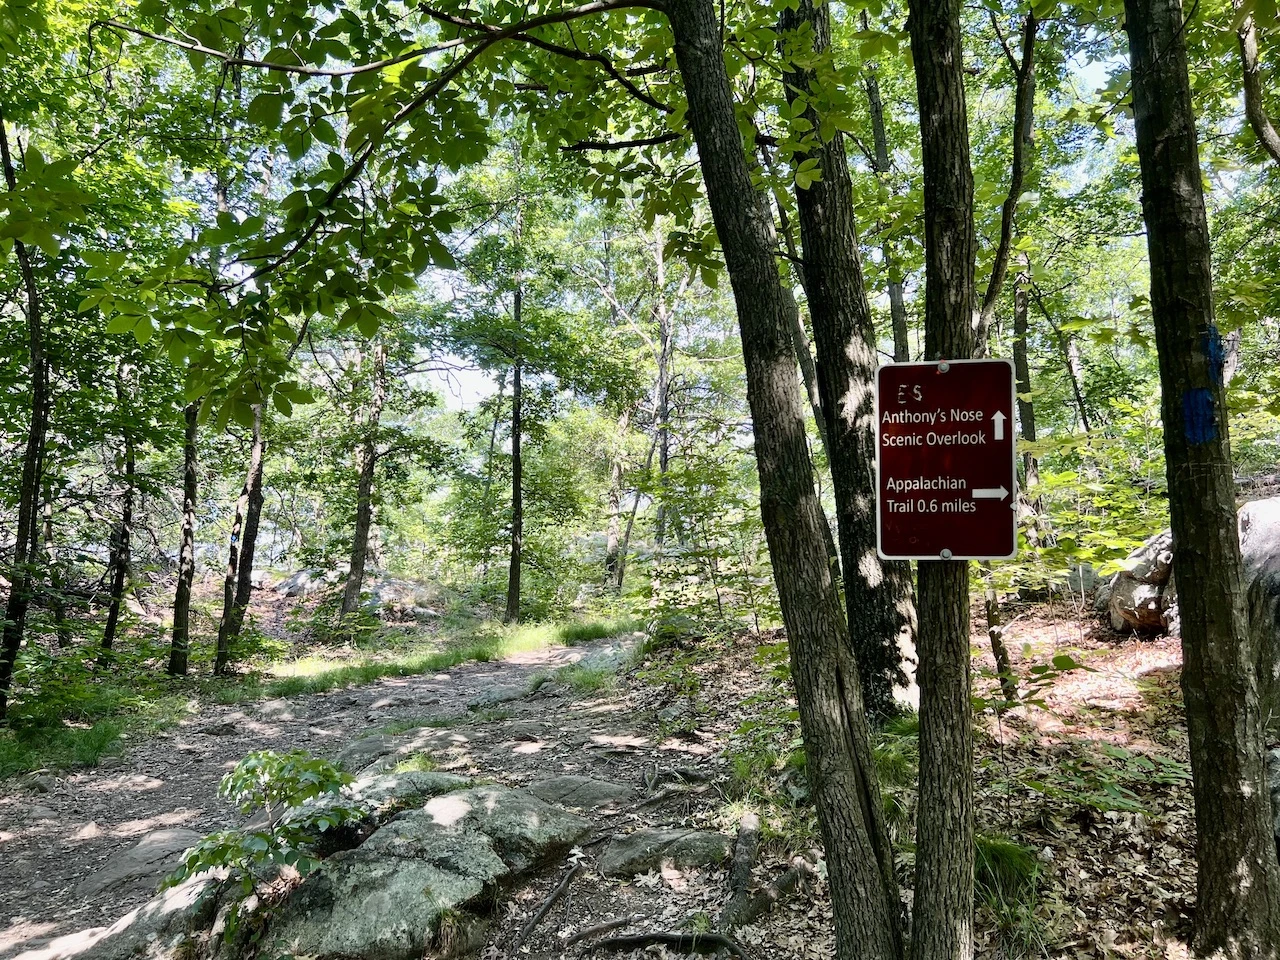
You will find the blue marked rocks pointing you out in the correct direction followed by a trail sign to the Anthony’s Nose Scenic Overlook.
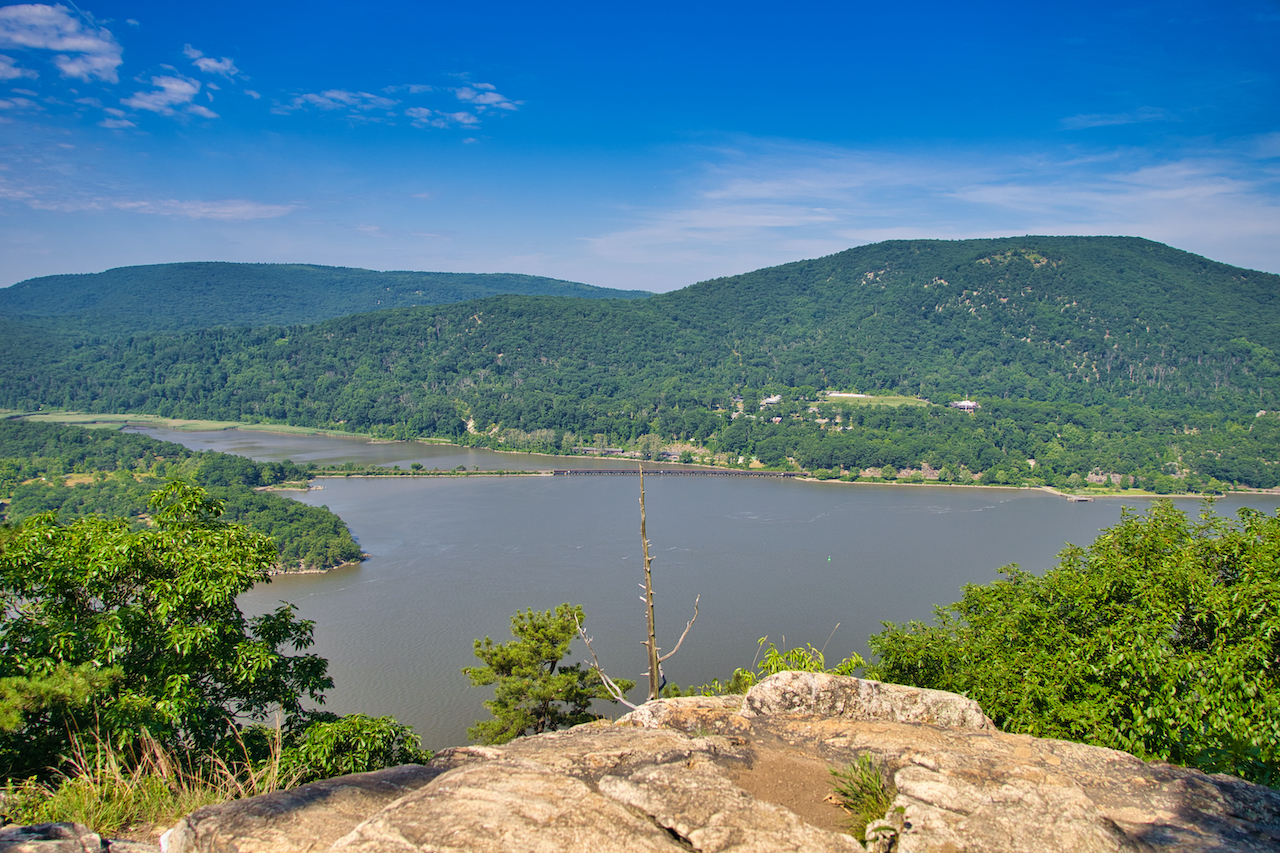
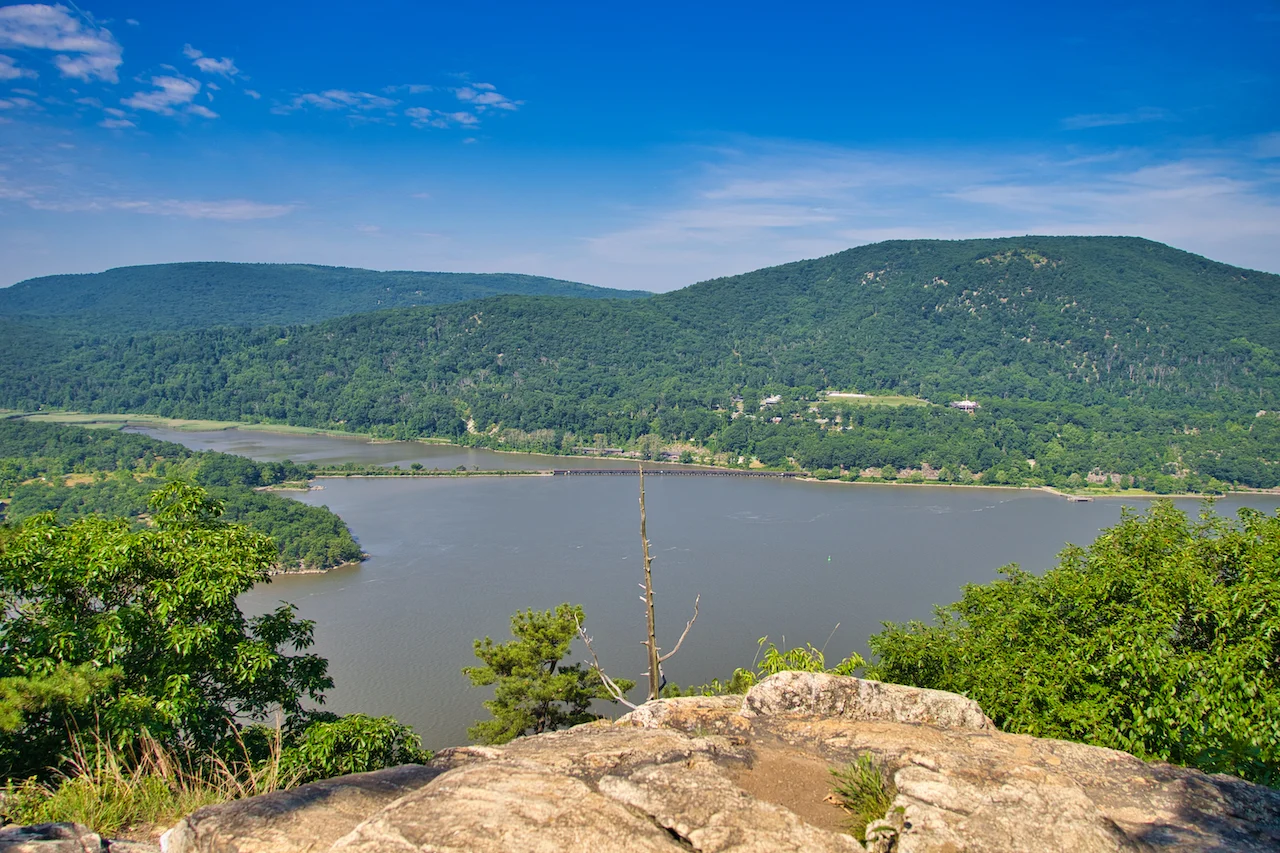
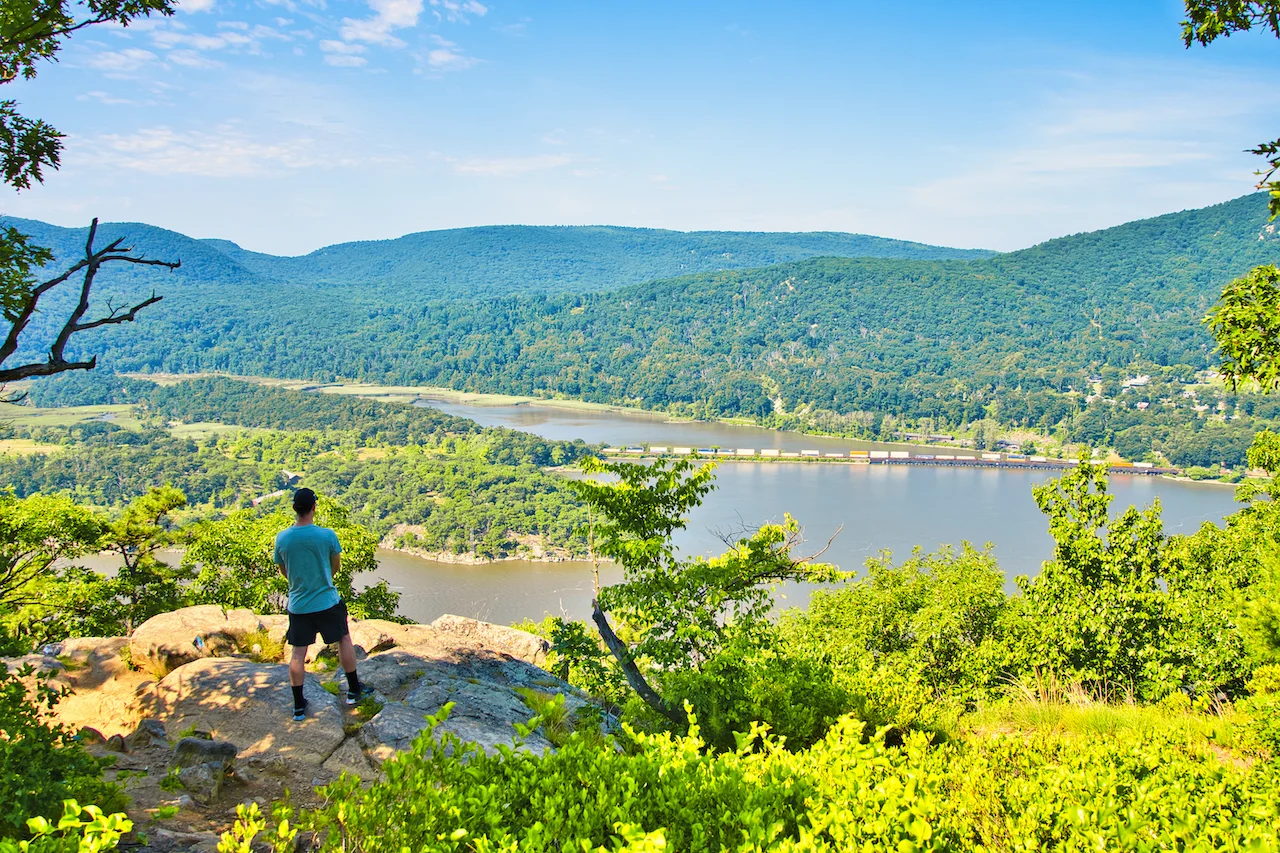
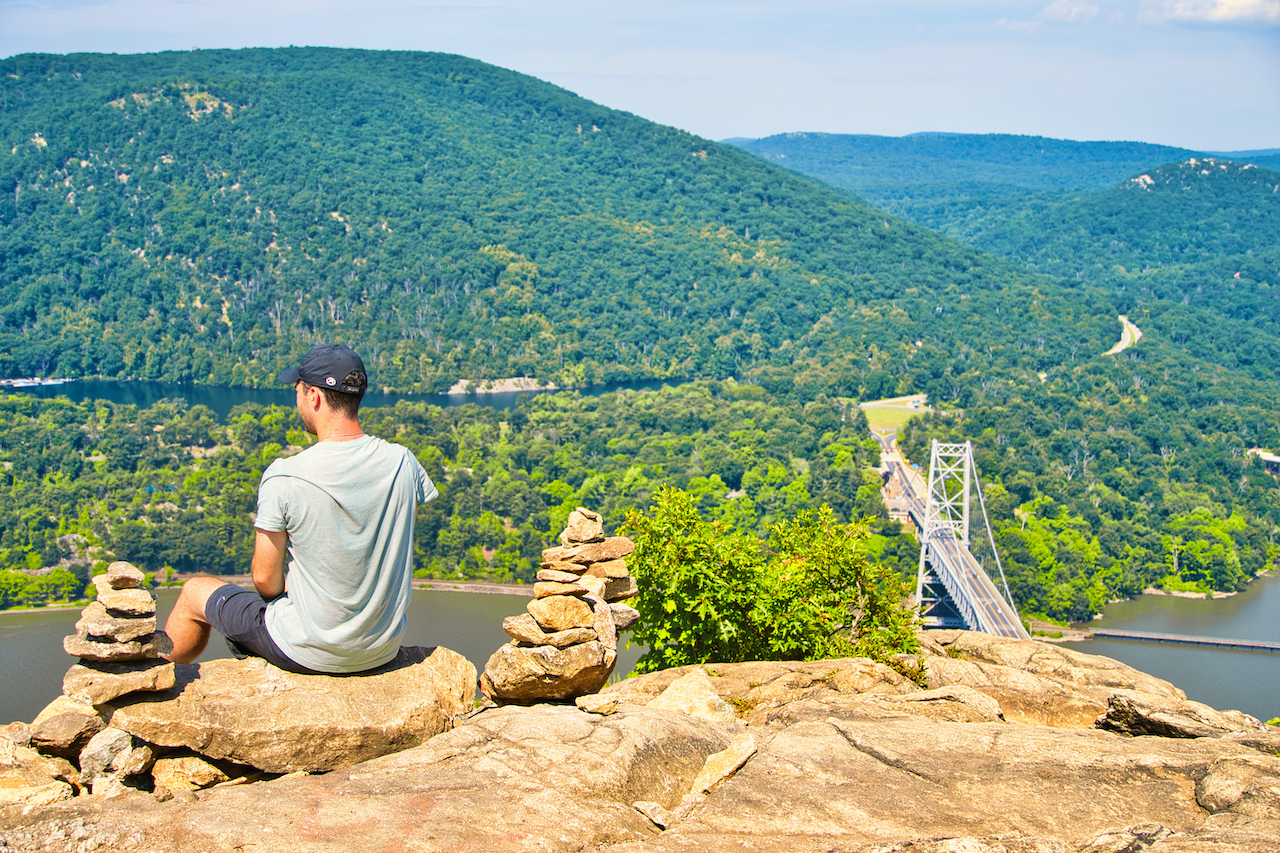
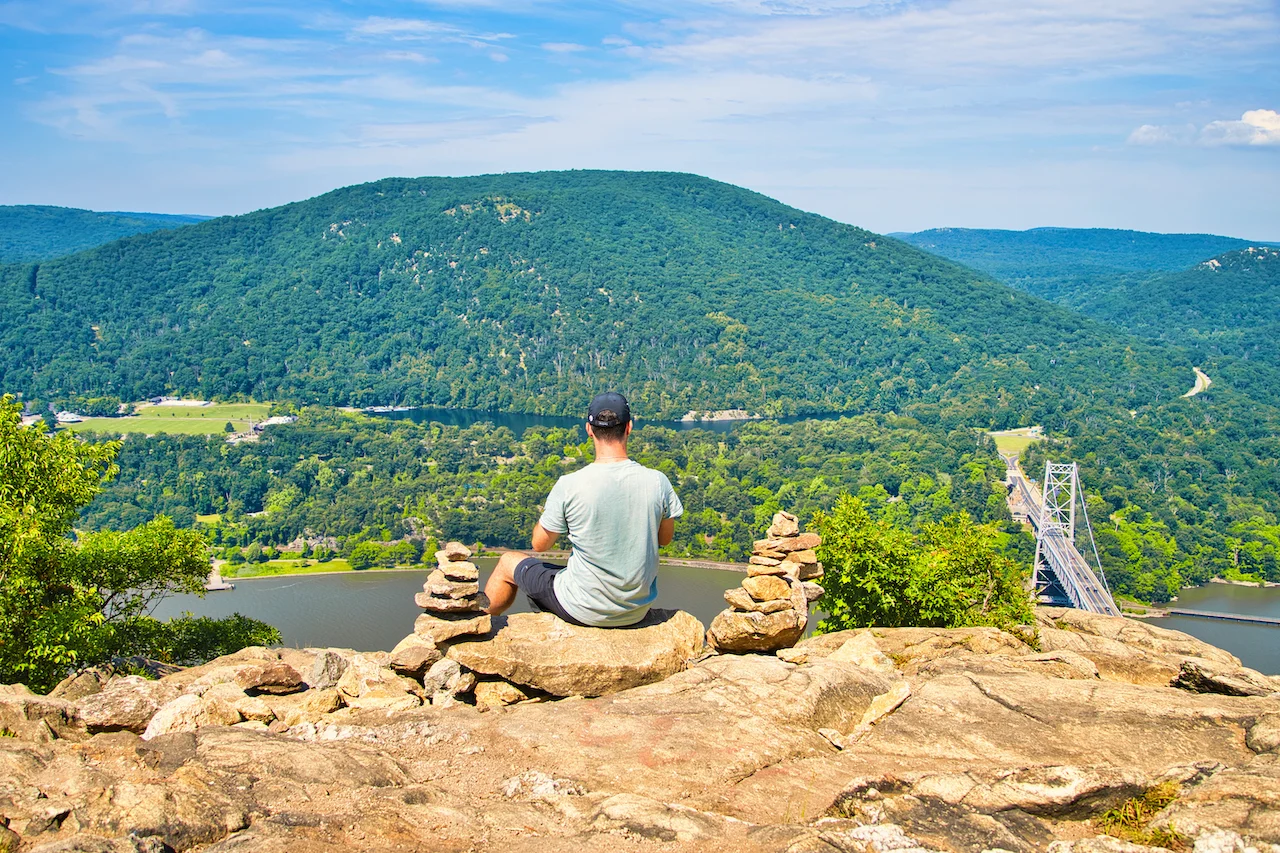
Follow the signs and the markers back towards the Hudson River, where you will then be welcomed to the best views of the hike.


The viewpoint area is quite large, and you can take your time to walk around the area to get some different angles of all of the surrounding landscape.
You will get views looking far southbound down the winding Hudson River, the Bear Mountain Bridge to the north, and Bear Mountain State Park out in front of you.
Spend as much time as you would like taking in the views and finding a nice spot to sit back and relax at. When it comes to Hudson Valley viewpoints, this is certainly up there with the best.


After enjoying the summit, you will simply want to retrace your route back down to the parking lot. Try and be careful as you are making your way back as the terrain going downhill can be tricky to maneuver.
Once you are back though near those initial viewpoint areas, it should be an easier route to hike through as you are soon welcomed back to the trailhead parking lot.
6) Other Hudson Valley Hikes
If you want to hike other nearby trails, there are plenty of them to choose from. Here are some of my top recommendations when it comes to hikes around the area:
Bear Mountain Loop Trail
You have heard me mention Bear Mountain a few times already throughout this guide. If you want to actually hike up to the top of it, then that can be an option for you. This loop trail takes you up to the Bear Mountain summit, where you can enjoy some stunning views all the way to NYC.
Learn More: Bear Mountain Hike
Storm King Mountain
A bit further north up the Hudson River you will find Storm King Mountain. While there are a few routes to choose from, they all head through the summit. At the summit you will get some of the best Hudson River views looking northbound.
Learn More: Storm King Mountain Hike
Popolopen Torne
This is another mountain that you will get to see from Anthony’s Nose. The loop trail makes its way along a river and then up the mountain, where you will need to use your scrambling skills from time to time.
Once up at the summit, you will be welcomed to a memorial dedicated to US soldiers as well as some beautiful views to enjoy. It is then down the other side of the mountain as you complete the loop.
Learn More: Popolopen Torne Hike
Bull Hill
Just further along Route 9D, past Cold Spring, you will find the Bull Hill hike. This hike takes you up to several viewpoint spots overlooking the Hudson River. On the way down, you can also opt to visit the Cornish Estate Ruins before finishing up the loop trail.
Learn More: Bull Hill Hike
Breakneck Ridge
If you have done any research into Hudson Valley hikes, then odds are you have come across Breakneck Ridge. This is definitely a bit more difficult of a hike as you are required to do quite a bit of scrambling to reach the summit and various viewpoints.
The views are certainly worth it though as you get some beautiful unobstructed panoramas along the way.
Learn More: Breakneck Ridge Hike
Beacon Mountain
Further north from Anthony’s Nose you will find the town of Beacon, and Beacon Mountain. The hike up to the peak is a great one as pass by the Beacon railway, some old casino ruins, and onwards to the fire tower. From the fire tower you will get arguably the best 360 degree views you can ask for in the region.
Learn More: Mt Beacon

I hope you enjoyed this guide to Anthony’s Nose and are now able to take on the trail for yourself. If you have any questions or comments, feel free to add them in below.
Also, be sure to check out some of the other New York itineraries and guides up on the site.
Have fun out there and safe travels!


D Blake
Thursday 11th of April 2024
Just hiked it today from the Camp Smith trailhead. Thank you so much for taking the time to put this together. Much appreciated. Moved up to the Hudson Valley during the pandemic and I am enjoying all the beauty!
Lisa
Tuesday 28th of February 2023
Anthony’s Nose was named after my 9th great great grandfather, Antonie De Hooges. He was a Dutch immigrant, entrusted with the business management of the colony from 1648 until his death in1655. He held the offices of secretary and commissioner in Arent Van Curled’s absence.