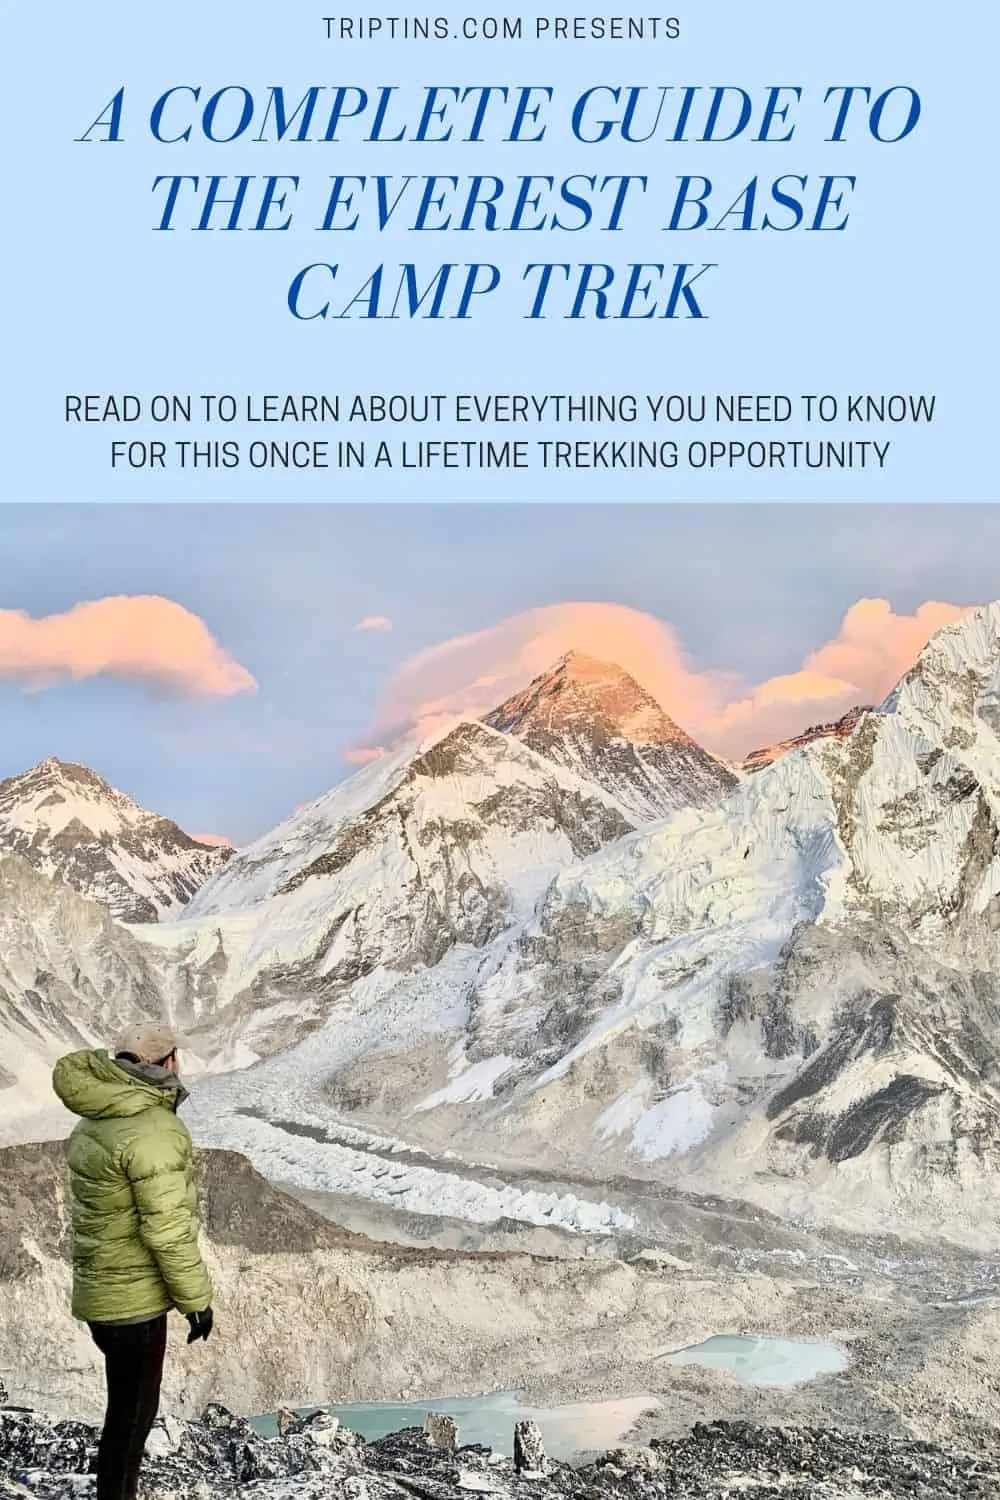
The Mount Everest Base Camp trek is undoubtedly one of the most popular multi day treks in the world.
The 11 day hike takes you from the mountainside village of Lukla to Everest Base Camp and back, as you take in some of the most scenic landscapes that the Himalayas have to offer.
This guide will go over everything (yes, literally everything) you will need to know about the Everest Base Camp trek experience, how to prepare for it, and what to expect along the way.
* Affiliate Disclosure: This post may contain affiliate links, which means I may receive a commission if you make a purchase through the links provided, at no additional cost to you. Thanks for supporting the work I put into TripTins!
1) Everest Base Camp Trek Introduction
The Everest Base Camp trek (also known as the EBC trek), is an 11 day out and back route that makes its way through Sagarmatha National Park of the Himalayas, where you will experience first-hand some of the best trekking that the world has to offer.
You will begin the trek in the village of Lukla at an elevation of 9,318 feet / 2,840 meters. Over the course of the first 8 days, you will slowly make your way further into the national park as you hike during the day and sleep in local villages at night.
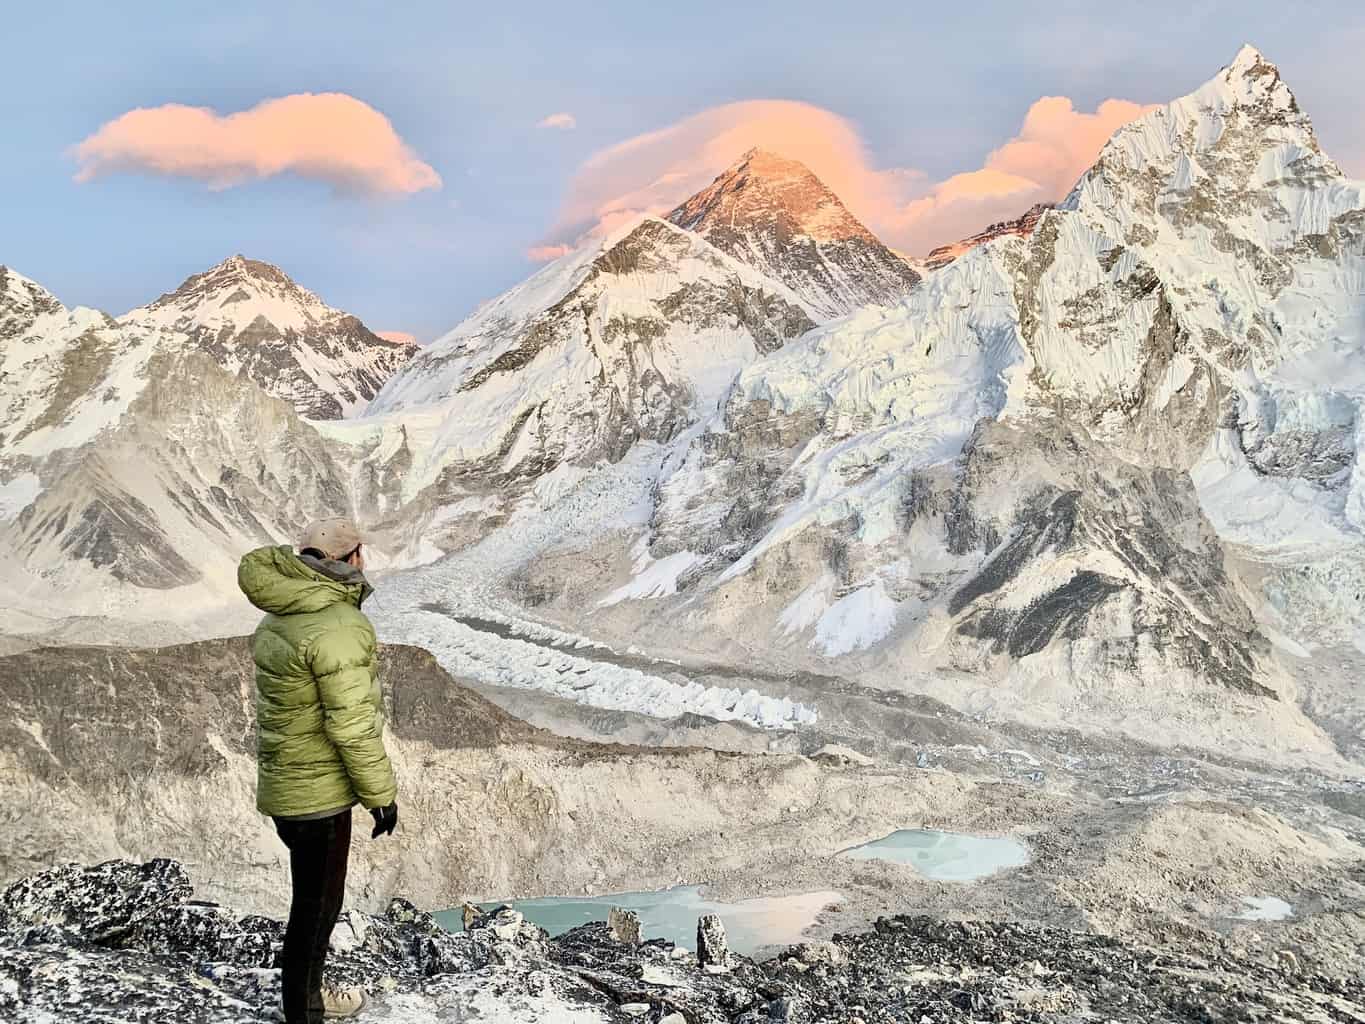
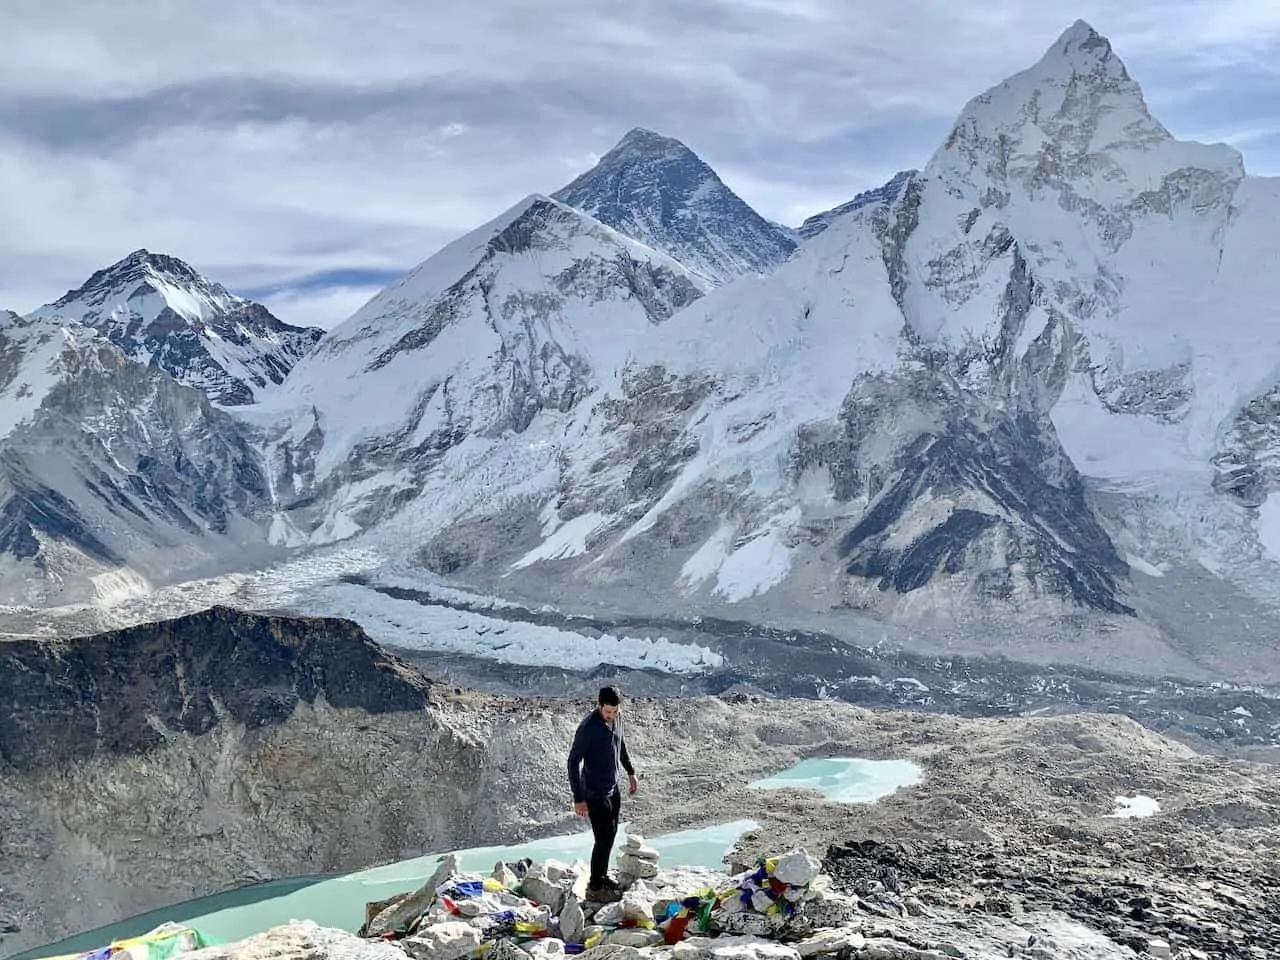
Sometime on day 8 you will reach your final destination of Mount Everest Base Camp at an elevation of 17,598 feet / 5,364 meters.
Here is where the top climbers from around the world begin their ascent up the tallest mountain in the world – Mount Everest (29,029 feet / 8,848 meters).
On the final three days of the trek, you will retrace your route back down towards Lukla. Since this will be mostly downhill and you won’t need to spend time acclimatizing (more on that later), you will be able to complete the return journey in less than half the time.
To give you a high-level overview, here is a day by day breakdown of the Everest Base Camp trek, which I will dive further into throughout the guide.
Day 1: Fly to Lukla | Hike to Phakding
Day 2: Phakding to Namche Bazaar
Day 3: Acclimatization Day | Hotel Everest View
Day 4: Namche Bazaar to Tengboche
Day 5: Tengoche to Dingboche
Day 6: Acclimatization Day | Nangkartshang Peak
Day 7: Dingboche to Lobuche
Day 8: Lobuche to Gorak Shep to Everest Base Camp to Gorak Shep
Day 9: Kalapattar Trek | Gorak Shep to Pheriche
Day 10: Pheriche to Namche Bazaar
Day 11: Namche Bazaar to Lukla
Day 12: Morning flight to Kathmandu
→ There are alternative villages to stay in during the trek, which could alter the route slightly. The above route is a pretty standard trek over the 11 days.
This is not just a simple trek though, which is why I wanted to lay out a complete and helpful guide to better prepare you for the experience, and answer any and all questions you may have about the route.
The remainder of this guide will do just that, so read on for everything you need to know about the Everest Base Camp trek.

2) EBC Distance, Elevation Gain & Duration
I thought it may be helpful to first breakdown the stats of the Everest Base Camp trek.
Yes, it is an 11 day trek and yes, you do hike from 9,318 feet to 17,598 feet in elevation, but there is SO much more behind those numbers. Let’s dive into distance, elevation gain, and duration:
Distance
You will see a few different numbers thrown around here but I calculated the entire 11 day trek at 62 miles / 123 kilometers long.
That averages out to 7 miles / 11 kilometers per day, with the shortest days being in the 3 mile / 5 km range and the longest days around 12 miles / 19 km in length.
These numbers do include several additional highly recommended add-ons to the trek:
1) Day 3 round trip acclimatization hike up to the Hotel Everest View (from Namche Bazaar)
2) Day 6 round trip acclimatization hike up to Nangkartshang Peak (from Dingboche)
3) Day 9 round trip hike up to Kalapathar (from Gorak Shep)
Elevation Gain
For me, elevation gain is the most important number to look at when figuring out the difficulty of a hike.
A hike could be 20 miles long, but if it is all flat, then that can be a pretty easy trail to walk. On the other hand, there could be a hike at just 5 miles long, but it gains 5,000+ feet of elevation. A hike like that is going to be much tougher for most people.
During the Everest Base Camp trek, the total elevation gain is not just calculated as the difference in elevation between Everest Base Camp and Lukla (8,280 feet by the way), rather it is calculated by understanding the exact elevation profile of the entire journey.
Throughout a day’s hike, you may go down, go up, go down again, and then go up again. By adding up all of these inclines is how you will get to that true total elevation gain number.
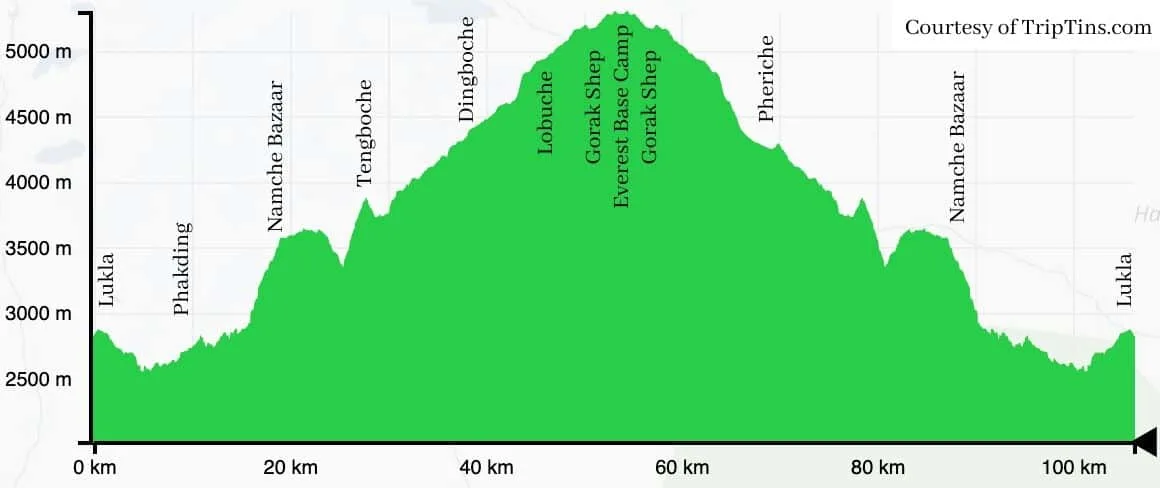
With that said, the total elevation gain during the 11 day trek (including those three additional side hikes mentioned above), comes out to +24,000 feet / +7,300 meters.
You read that right, the actual elevation gain is nearly 3 times the number calculated by just looking at the difference between Lukla and EBC.
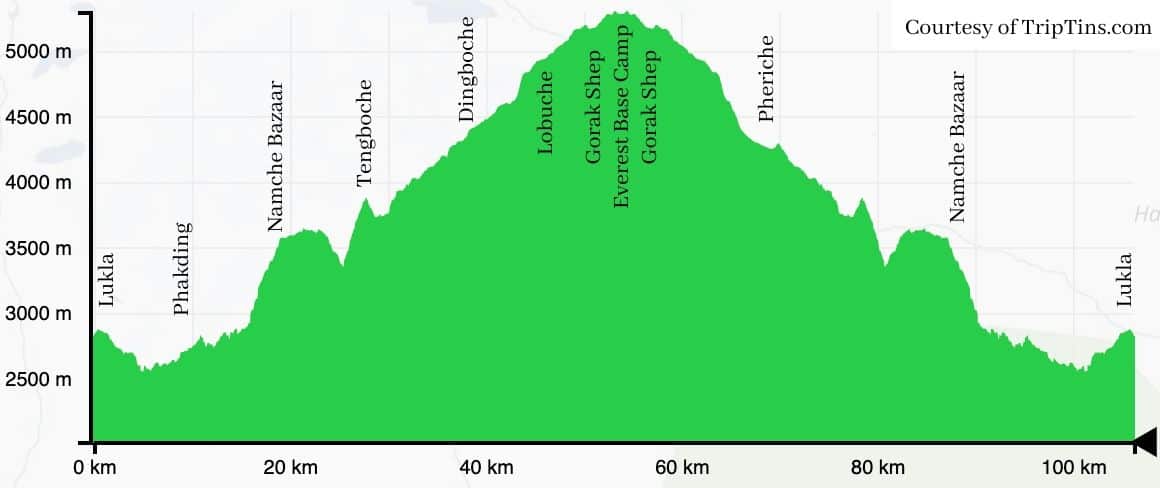
Below is a helpful Everest Base Camp elevation profile that shows the ups and downs that you will encounter during the trek. Note that the charts does not include the 3 additional hikes from above.
Duration
So, now that you understand the distances and elevation gains, how does that determine how much time you will actually spend trekking on a daily basis?
Well, on average you will be hiking around 5-6 hours per day. The shortest days will be around 3 hours long while the longest days can reach up to 8 hours on the trail.
This is not necessarily because the distances are so long, but it is more so the slow pace that you will be required to trek at due to the high altitude of the hike.
On the way up, on average, you should expect to hike around 1 mile (0.6 km) per hour. Yes, it does seem quite slow but when dealing with the incline and lower oxygen levels, that is where the average will be.
Of course, if you are an above average trekker, you can shave plenty of time off of those numbers. But either way, I would advise to go slower rather than faster due to the high altitude.
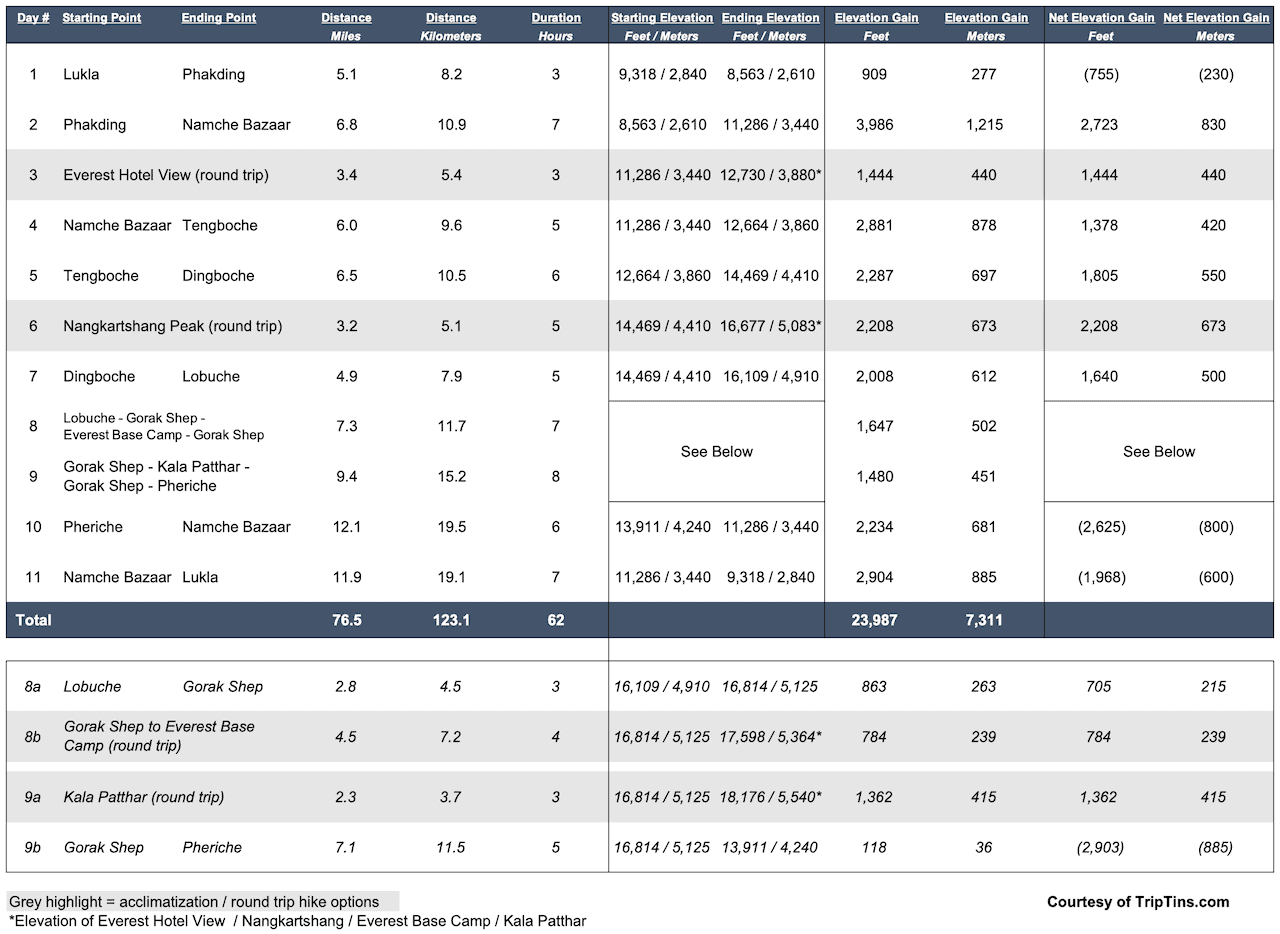
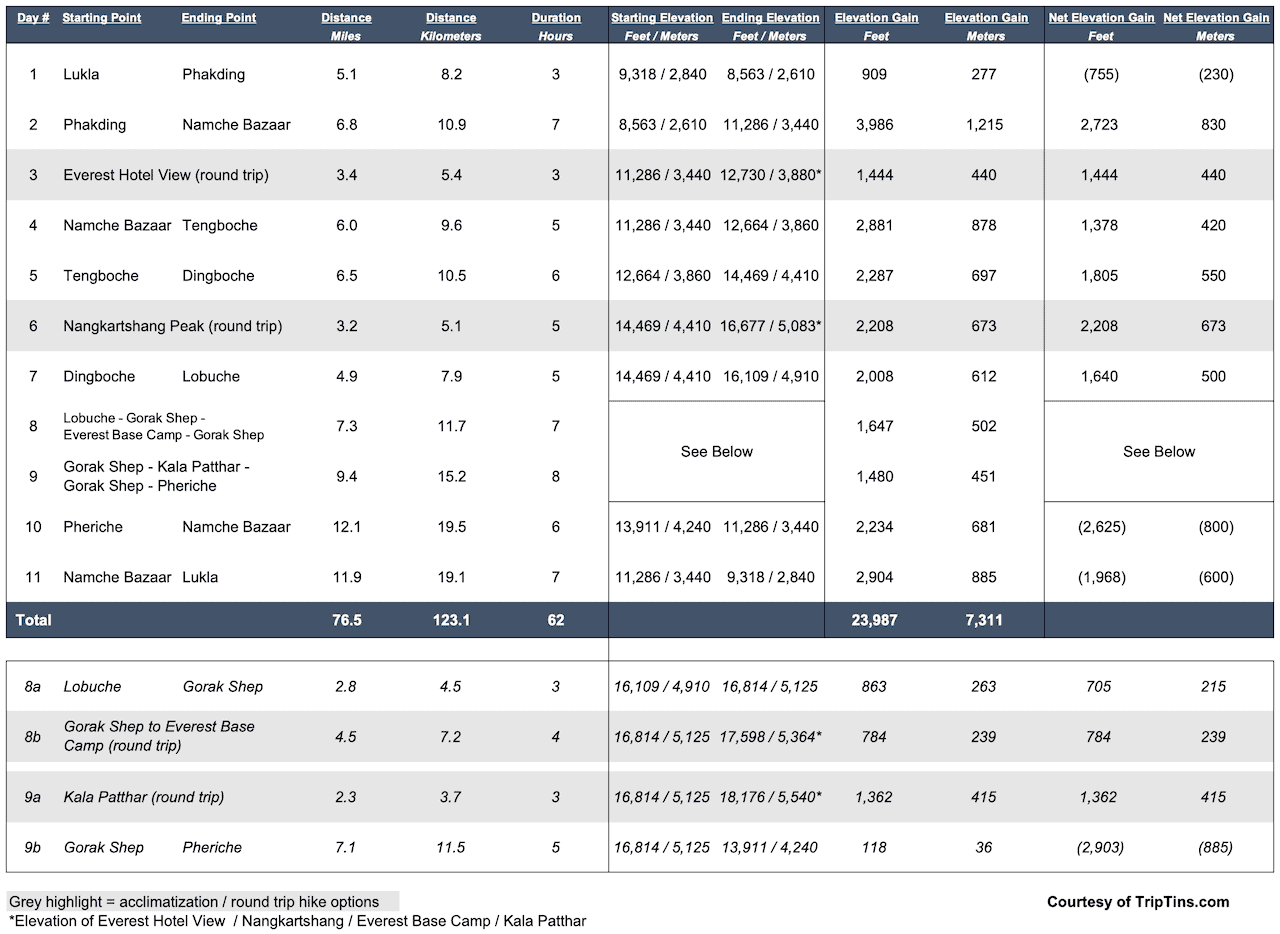
The chart below breaks down the day by day data behind distance, elevation gain, and duration throughout the entirety of the trek.
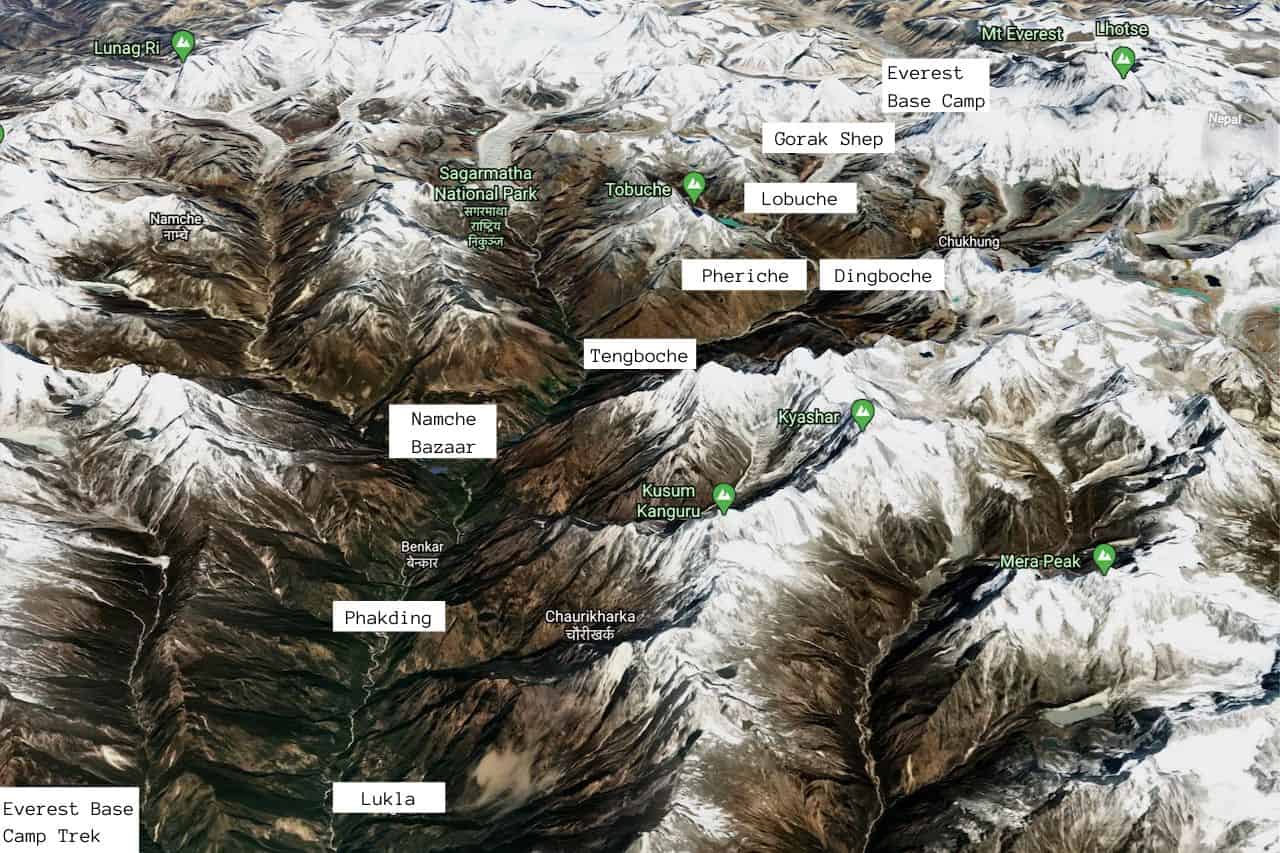
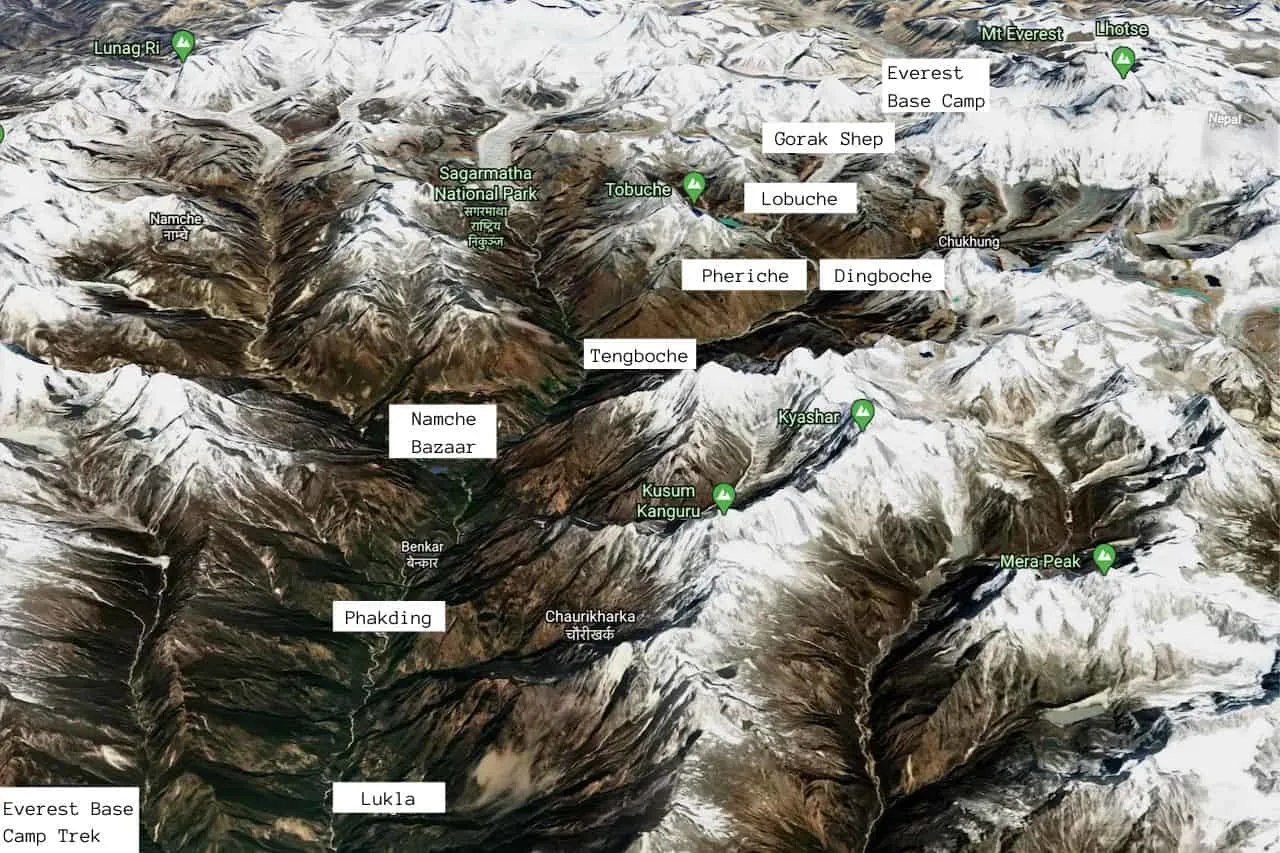
3) EBC Trekking Map
It may also be helpful to get a sense of what the Everest Base Camp layout looks like.
Below is a map with the various villages that you will be staying overnight in throughout the duration of the trail.
4) When is the Best Time to Trek to Everest Base Camp?
Now that you have a better background on the Everest Base Camp trek, your next step is to figure out exactly when to head out on your own.
Well, there are really only two main seasons that you will want to complete the trek – in the Spring from mid-March to May or in the Fall from mid-September to November/beginning of December.
Outside of these months the weather is either going to be too rainy, cloudy, cold or snowy, and it just would not make for optimal trekking conditions.
The Spring time period is a great season to go since that is when mountaineers will actually be attempting to climb Mount Everest itself.
They usually make their way on the same EBC route as normal trekkers do in mid/late March and then summit Everest in mid/late May. So, you may see climbers on the trail with you and you are likely to see an active base camp when you arrive there on day 8.
The weather also begins to warm up during this time period, as the snow tapers off from the winter and visibility is decent as well.
This is the more comfortable time of year to trek from a temperature perspective but you will have cloudier days and less visibility compared to the late Fall.
After the Spring trekking period ends, the rain then begins as it drenches the region during the Summer.
Starting in mid-September, the weather begins to improve and trekkers once again begin to flock to the region.
October and November are both great months to visit when it comes to visibility, with less clouds, and little to no rain.
As you move farther along into the Fall, it does get colder but it is arguably the best time of year to visit when it comes to visibility.
Once December rolls around, you will still have some people on the trail but the temperatures will drop significantly, snowfall will arrive, and many teahouses will close down for the Winter.
The most popular months (according to 2018/2019 data from the Sagarmatha National Park entry point office) are going to be April (12,386 visitors) and October (12,452 visitors), followed by November (8,869 visitors) and March (5,598 visitors).
At the end of the day, I wanted my experience to be all about the enjoying the landscape every day as much as possible.
That landed me with a mid-November trek, when visitors began to taper off but visibility was at an all-time high.
» Learn more in the article I wrote that dives deeper into why I choose a November EBC trek

5) What is Acclimatization
I have mentioned it several times already, so it is time to talk about what acclimatization actually is.
For most people out there, to be 10,000+ feet above sea level is not what the body is used to on a day to day basis. The higher you ascend, the less oxygen there will be in the atmosphere.
This means that your body will need to adapt itself slowly over time to operate efficiently at these higher altitudes.
At Lukla for example, the starting point of the trek, oxygen saturation levels are already at just 73% of normal levels, while at Everest Base Camp, oxygen saturation drops to 50%!
Going up in elevation too quickly can result in altitude sickness (dizziness, headaches, nausea) and potentially even more dangerous complications like cerebral and pulmonary edema.
To help prevent altitude sickness on the Everest Base Camp trek, it is common that acclimatization begins around 11,500-foot mark. Since Namche Bazaar (arrive on day 2) is just below that altitude, most people spend 2 or even 3 nights in the village to get their body better prepared for the rest of the journey.
Essentially the two main rules here to follow include:
» You should increase your altitude by no more than 1,000-1,600 feet / 300-500 meters per day (most days are just within this level)
» For every 3,000 feet / 915 meters of altitude gained, you should take a day off from going upwards (this will occur by days 2 and 5 of the trek, which is why days 3 and 6 are acclimatization days)
One way to help acclimatize in a more efficient way is to take part of acclimatization hikes during your “days off”.
Essentially, this means hiking up to a higher altitude so your body gets accustomed to the lower oxygen saturation, and then heading back down to sleep at a lower elevation to rest and recover.
So on day 3 for example, it is popular to head from Namche Bazaar (11,286 feet / 3,440 meters) to Hotel Everest View (12,730 feet / 3,880 meters), and then back to Namche.
On day 6, a similar hike is recommended by heading up from Dingboche (14,469 feet / 4,410 meters) to Nangkartshang Peak (16,677 feet / 5,083 feet) and back down.
While these hikes are by no means easy to do, they offer both 1) a safe way to better acclimatize yourself for the remainder of the journey and 2) incredible views of the surrounding Himalayan landscape that you certainly do not want to miss out on.

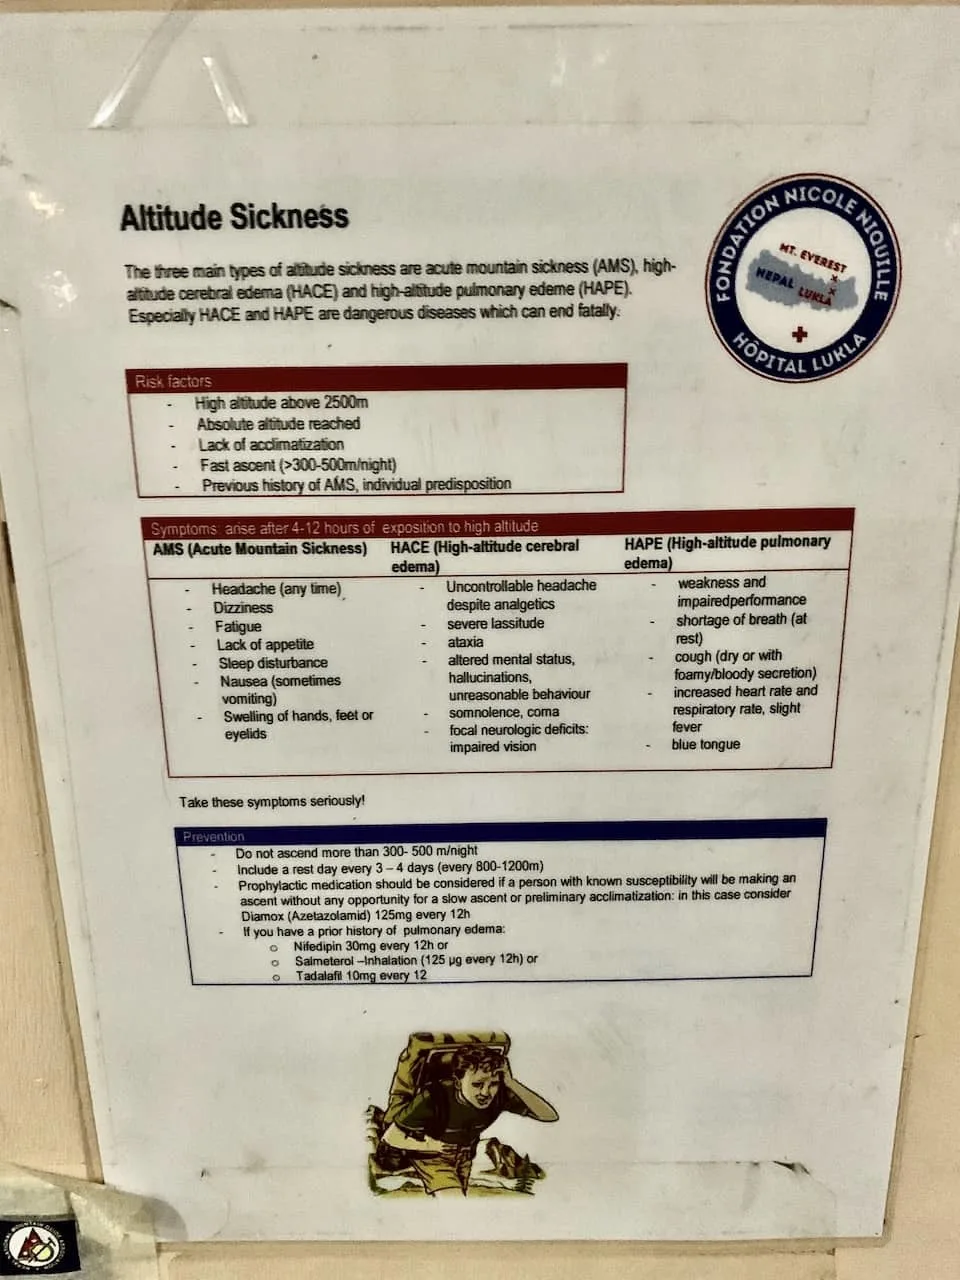
6) Altitude Sickness
Going off of acclimatization, it is important to also talk about the side of effects of altitude sickness and what it does to the body.
Even the most well-built athletes can experience altitude sickness on a trek like this. If your body is not used to these high altitudes, you must take it slowly and give it time to get accustomed.
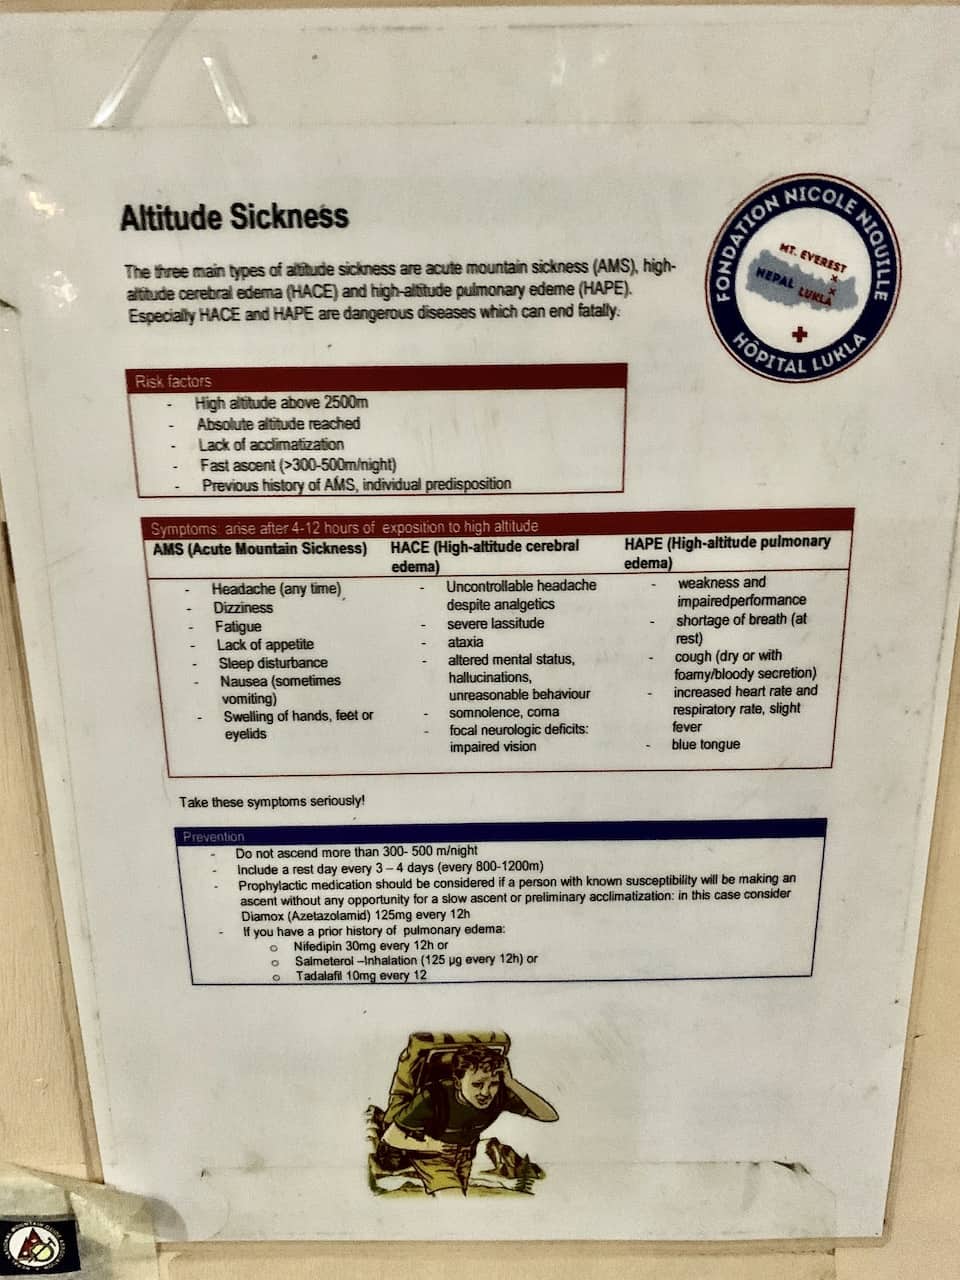
Altitude sickness (or Acute Mountain Sickness – AMS) can come with a variety of symptoms, with the main ones including headaches, fatigue, dizziness, shortness of breath, nausea, insomnia, and lack of appetite.
These can start out pretty mild but if you continue along without letting your body recover, then the symptoms can continue to get more severe.
At the onset of any of these mild symptoms, it is important to just take 1-2 days to rest and not continue along the route.
If the symptoms completely disappear and you are back at full strength you should be able to continue. If they don’t improve though or begin to get worse, then it is time to head down to a lower altitude.
You should never continue upwards unless you are symptom free!
The higher you get, the higher the chance you have for worsening symptoms, which can get quite severe.
Two extremely dangerous forms of altitude sickness include high altitude cerebral edema and high-altitude pulmonary edema (HACE and HAPE).
HACE is when your brain begins to swell with fluids and HAPE is when your lungs begin to swell with fluid.
Symptoms for HACE and HAPE can include loss of coordination, memory issues, chest tightness, severe cough, among several other troubling signs.
If any of these begin to happen, you must descend immediately or even opt for a helicopter rescue back to Kathmandu.
These are potentially deadly symptoms to have so do be aware of how your body feels throughout the trek.
Besides for acclimatization to help prevent altitude sickness, many trekkers opt to take Diamox medication during the climb up.
Diamox helps prevent altitude sickness – it does not cure altitude sickness. So, if your doctor recommends it and you don’t have any side effects, you can take Diamox for the EBC trek (starting 1-2 days before the trek begins).
EBC Tip – take a dose or two of Diamox before heading out to Nepal under normal conditions to see if you have any of the more severe side effects from the medication (vomiting, drowsiness, blurred vision). From there you will know if it is safe for you to take on the trail itself.
7) Everest Base Camp Trek Cost
The cost of the Everest Base Camp trek will fully depend on what type of experience you are looking for. I like to break it down into three main options: Fully Guided Trek, Independent Trek, or an Independent Trek with a Guide / Porter Guide / Porter.
Fully Guided Trek
These are your most high end trekking experiences to choose from. You can either join a larger group or opt for a private trekking tour, where everything from beginning to end will be taken care of for you.
There will be no worrying where to go or what to do. At every step of the way you will have English speaking locals and potentially Westerners, guiding you all along the way.
These treks can cost anywhere from $1,200 to $4,000+ depending on group vs. private and local vs. Western tours. They usually include the following but that can differ from tour to tour:
› Transportation to and from Kathmandu Airport
› Accommodation in Kathmandu before and after the trek
› Day tour in Kathmandu before or after the trek
› Flights to Lukla
› Trekking Permits
› English speaking guides
› Porters to carry your bags
› Teahouse accommodation and food
These types of treks can be booked with local Kathmandu tour agencies (on the lower end of the price scale) or with Western companies like REI, National Geographic, etc. (on the high end of the scale).
This Everest Base Camp trek is known for steady pacing, reliable logistics, and experienced local guides who understand the trail and its conditions day by day.
Independent / Do It Yourself
Instead of opting for the all-inclusive type tours, you can also just complete the trek on your own and care take of any logistics yourself. The main cost considerations to take in account for the 11 day trek include:
Teahouse Accommodation: $5 per night | $55 total
Food & Drinks: $7 per meal / 3 meals per day | $231 total
Trekking Permits: $17 (Khumbu Permit) + $25 (Sagarmatha Permit) | $42 total
Lukla Round Trip Flight: $360 total
Total Cost: ~$690 per person
The total for a DIY trip from a basic standpoint can come out to just around $690. So if you are on a budget then this is a great experience to take part of that keeps costs low.
This is assuming you come prepared with things like a power bank and water sterilizer, and don’t spend money on things like hot showers. More on all of that soon.
Guide / Porter Guide / Porter
Now, if you want a mix between a guided tour and a DIY option you can also opt to have a local guide, porter guide, or porter along with you on the trek. You still will have someone to guide you along the trail, but the price point will be lower than an all inclusive option.
In addition to the $690 above for the DIY option, you will want to add $30, $20 or $15 per day depending on which option you go with. The bolded number is the total cost including the $690.
Local Guide (+$30 per day / $1,020 total): these will be English speaking locals who will walk alongside you for the duration of the trail. They will not carry your bags, but they will be able to answer your questions and teach you more about the region along the way.
Porter Guide (+$20 per day / $910 total): a porter guide is a mix between a guide and a porter. They do not speak great English – just enough to get by, but they will carry your bag throughout the duration of the trail.
Porter (+$15 per day / $855 total): porters will simply carry your bag for you during the trek. They speak little to no English and will not understand questions you may try to ask them.
A few things to note when hiring these locals for your trek:
» I would advise at least a 20%+ tip if you hire a local during your trip. This can be added to the daily prices above depending on how much you decide on.
» You can get connected with these locals by a Kathmandu tour operator or you could meet one in Lukla or Namche Bazaar.
» Many Kathmandu tour operators will give you the option to have a more all-inclusive price (includes accommodation and food), or just an option with the guide/porter guide/porter.
» You can also hire both a porter and a guide if you want to have your bags carried for you and have an English speaking local alongside you during the trek.
So, to wrap up you are looking at the following estimated breakdown:
Independent DIY: $690
Independent w/ Porter: $855
Independent w/ Porter Guide: $910
Independent w/ Guide: $1,020
All Inclusive Tour: $1,200+
→ To learn more, take a look at the Everest Base Camp Trek Cost breakdown that goes into detail about the above costs as well as additional costs to consider when in Nepal
Since we just got off the topic of costs, we might as well jump into the main considerations to expect along the trail. The following several sections will breakdown the main costs to consider along the way.
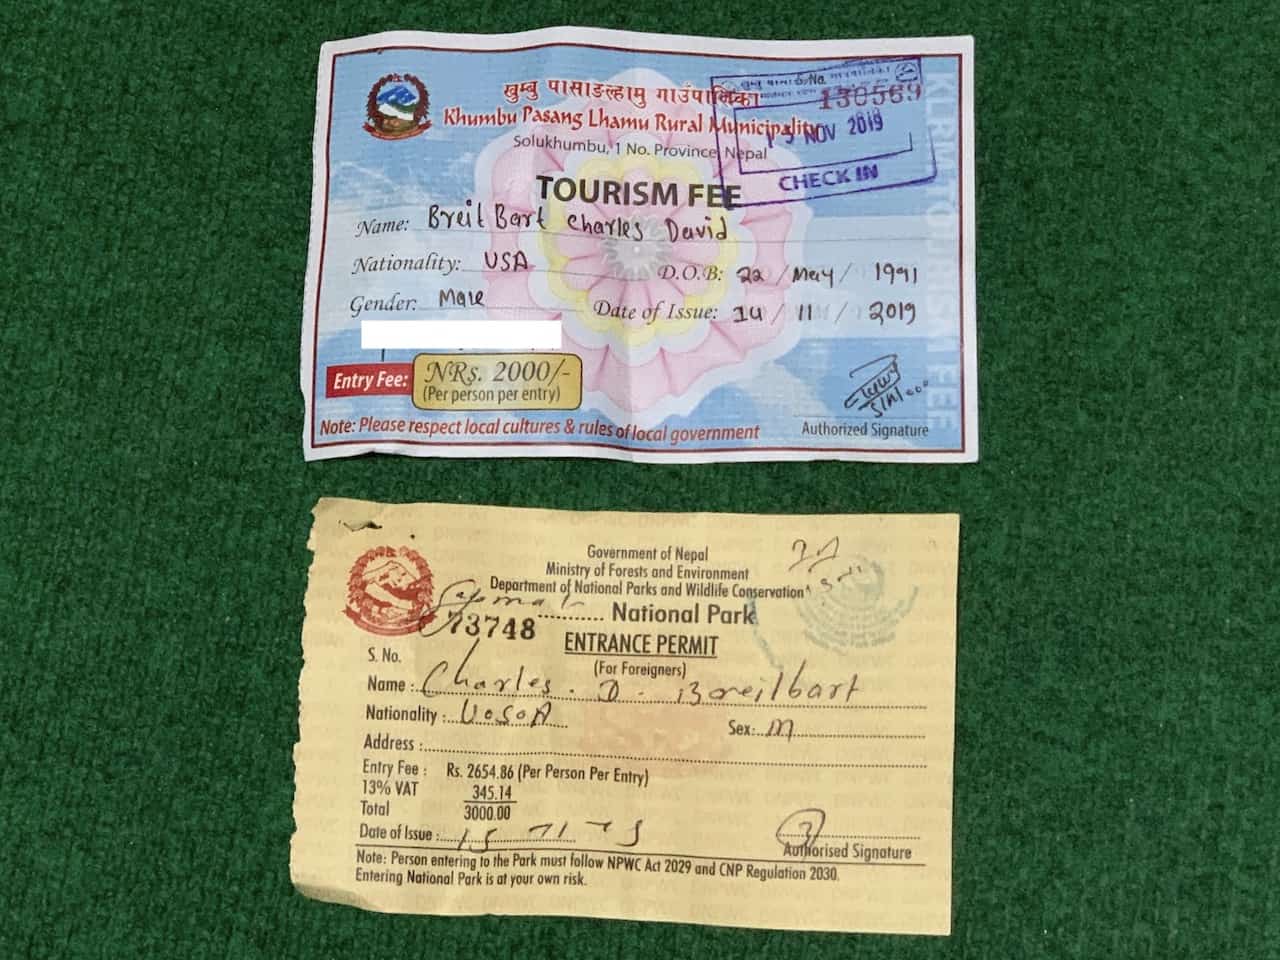
8) Trekking Permit
To take part of the Everest Base Camp trek you will need to purchase two trekking permits.
Both of these permits will be purchased on the trail itself. There is no need to purchase any sort of permit prior to Lukla.
Be sure to keep your permits in a safe spot as there are checkpoint spots during the trail, where you must show your permits – both at the start and end of the trek.
1) The Khumbu Pasanglhamu Rural Municipality Permit costs Rs 2000 / $17 USD and will be purchased on your first day on the trail just as you are leaving Lukla.
2) The Sagarmatha National Park Permit costs Rs 3000 / $25 USD and will be purchased on your second day on the trail between Phakding and Namche Bazaar.
You do not need to purchase a TIMS card for this trek in Kathmandu or on the trail. This was previously required but that is no longer the case.

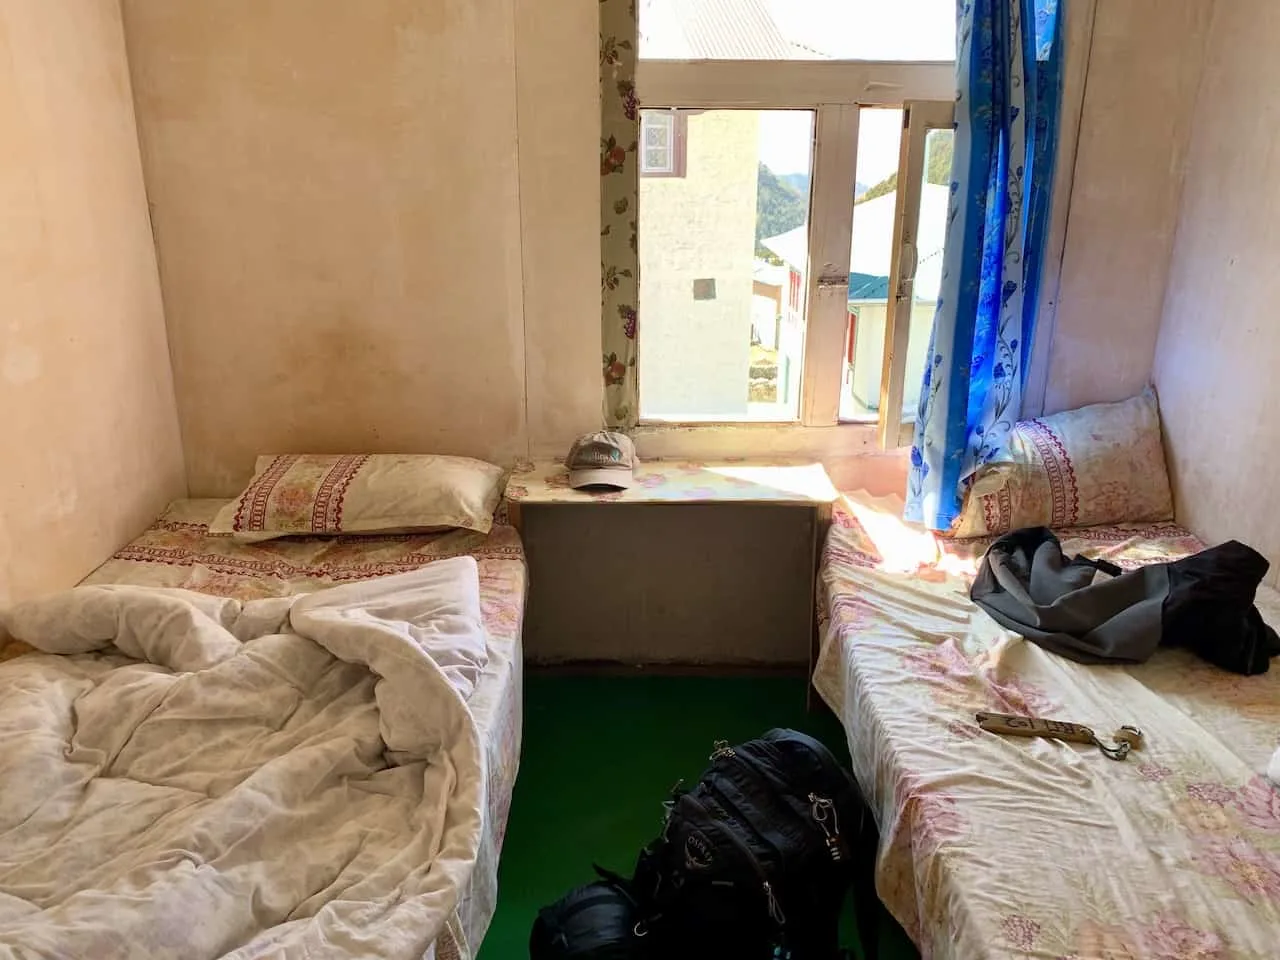
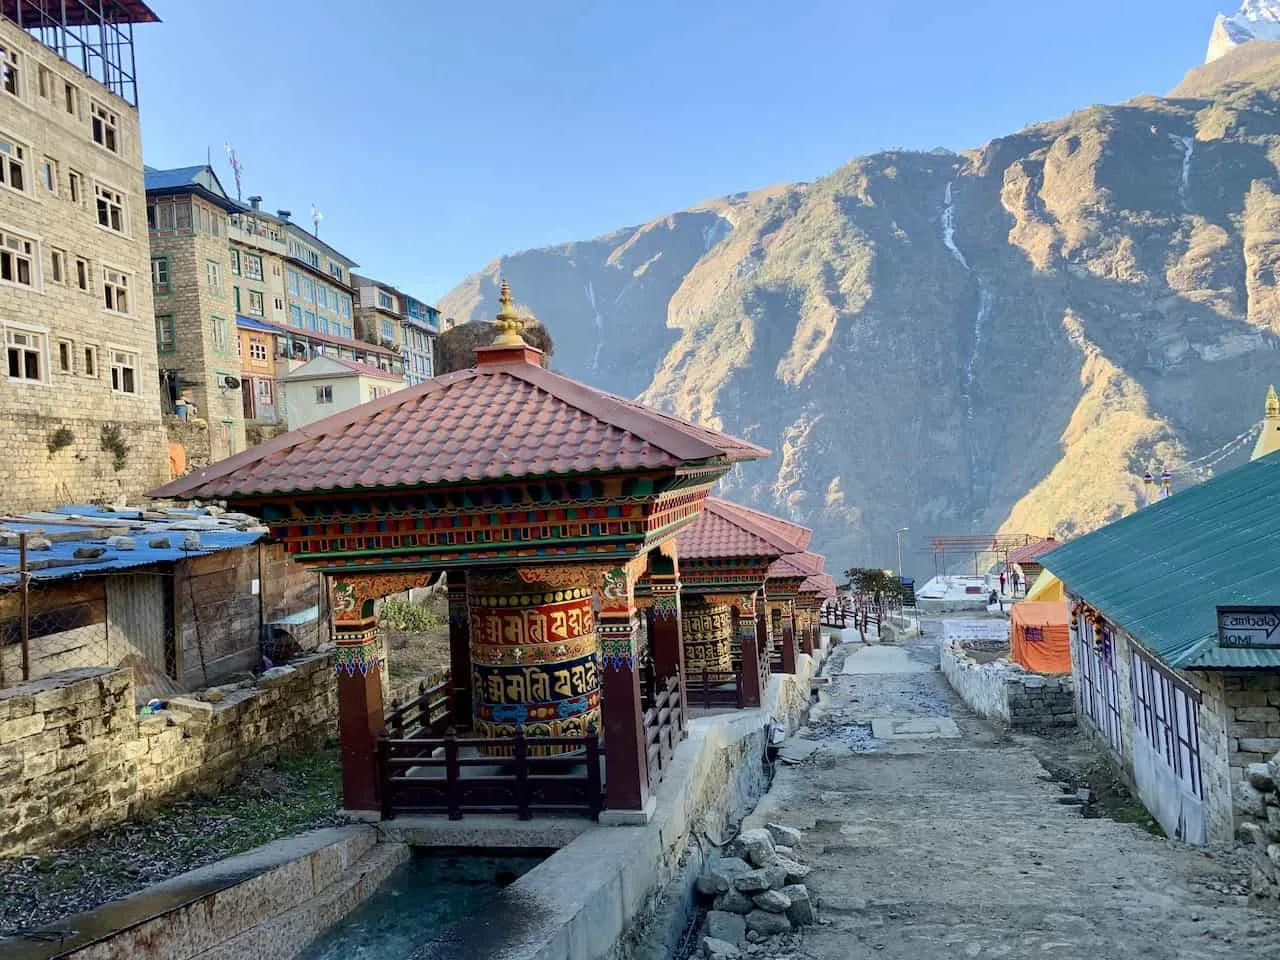
9) Teahouse Accommodation
During the duration of the trek, you will be sleeping in teahouse accommodations in the various villages.
These teahouses offer basic accommodation options that cost around $5 per night (Rs 500). The only place where prices were a couple dollars more was in Lobuche (night 7).
Note: these prices are based on the fact that you eat your meals in the teahouse. If you decide to not eat your meals in the teahouse, then they will charge you extra.
While some teahouses may be slightly nicer than others, I found for the most part that they offered very similar services and amenities.
You will have a small room with 1-2 beds (some places may offer 3+ bed option too), with a thin mattress, some hooks to hang clothes on, and a garbage basket. Besides that you won’t find much else in them.
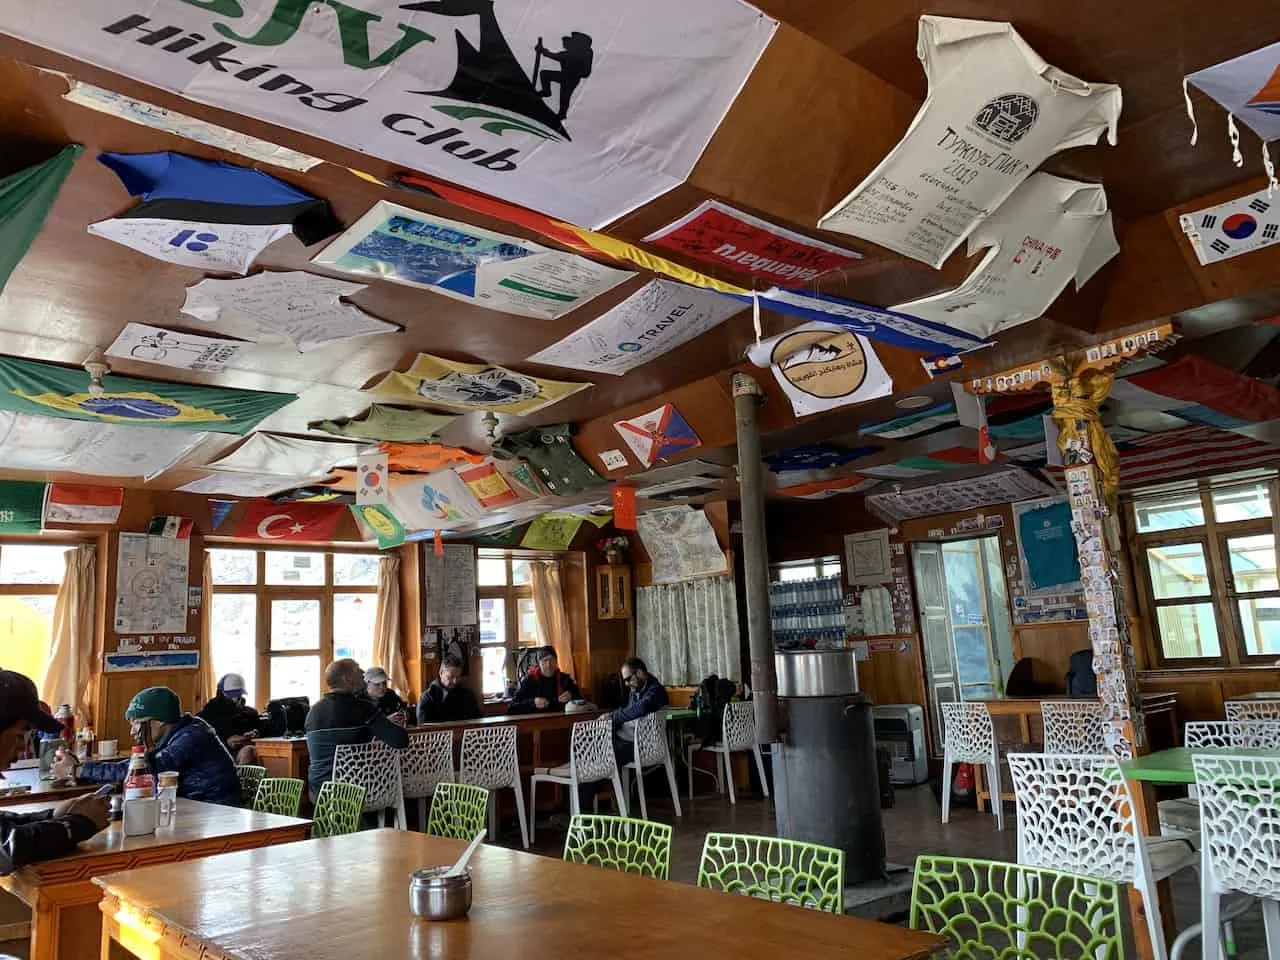
The main hangout spot in these teahouses will be the common dining room area. Here is where all meals will be served and also where you will find the most important part of the teahouse – the fireplace.
In the early mornings and in the evenings, they will have the fire going to help warm you up as you eat your meals (and maybe as you play some card games after dinner).
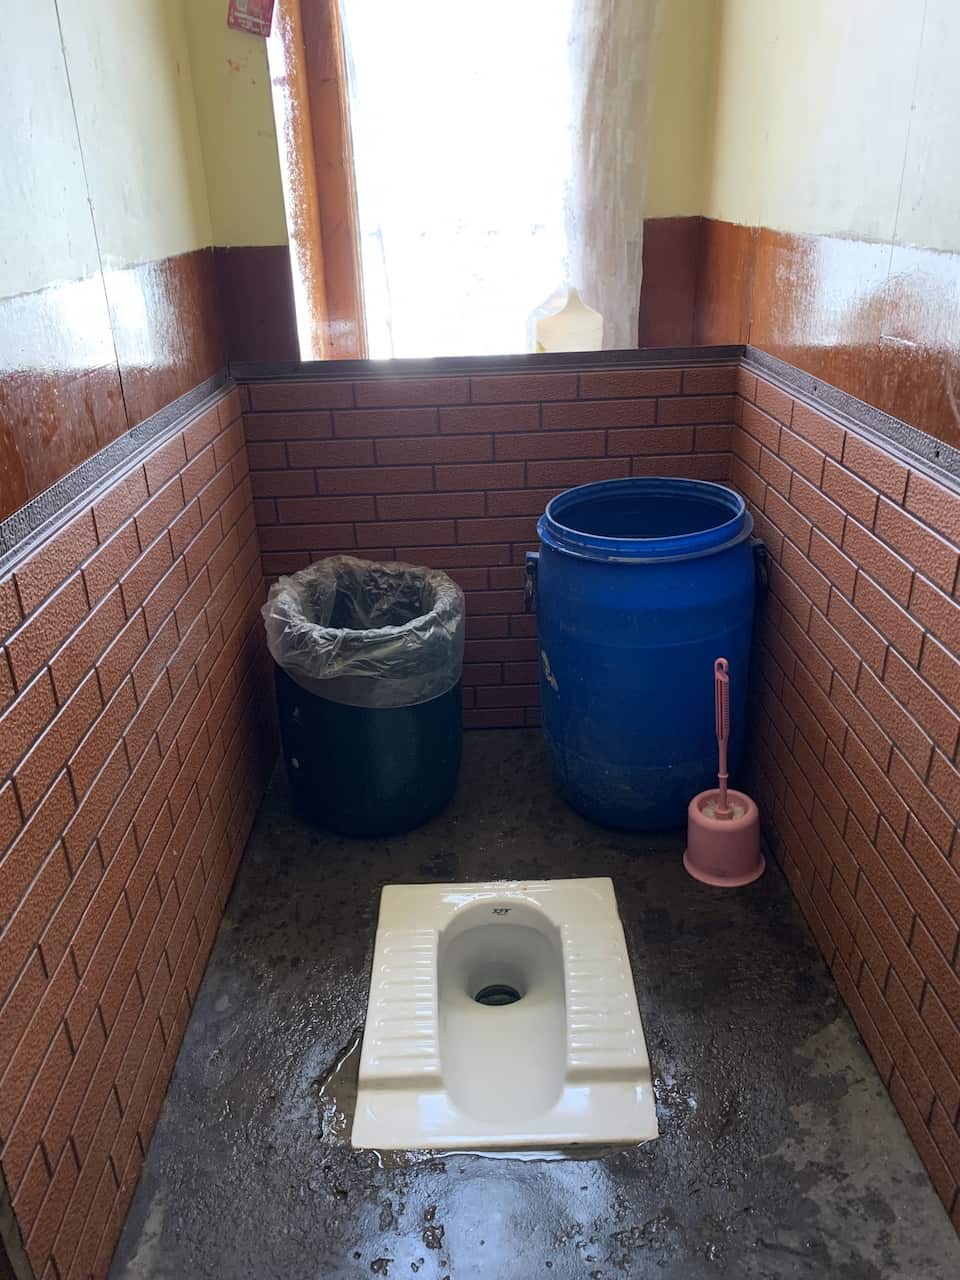
On each floor of the teahouse you will find several restrooms. These may be just western toilets, just squat toilets, or a mixture of both. Outside of the restroom area, there will be 1-2 sinks to wash your hands in.
Below are some shots I took from the various teahouses I stayed in throughout the trek.


10) Food on the Trek
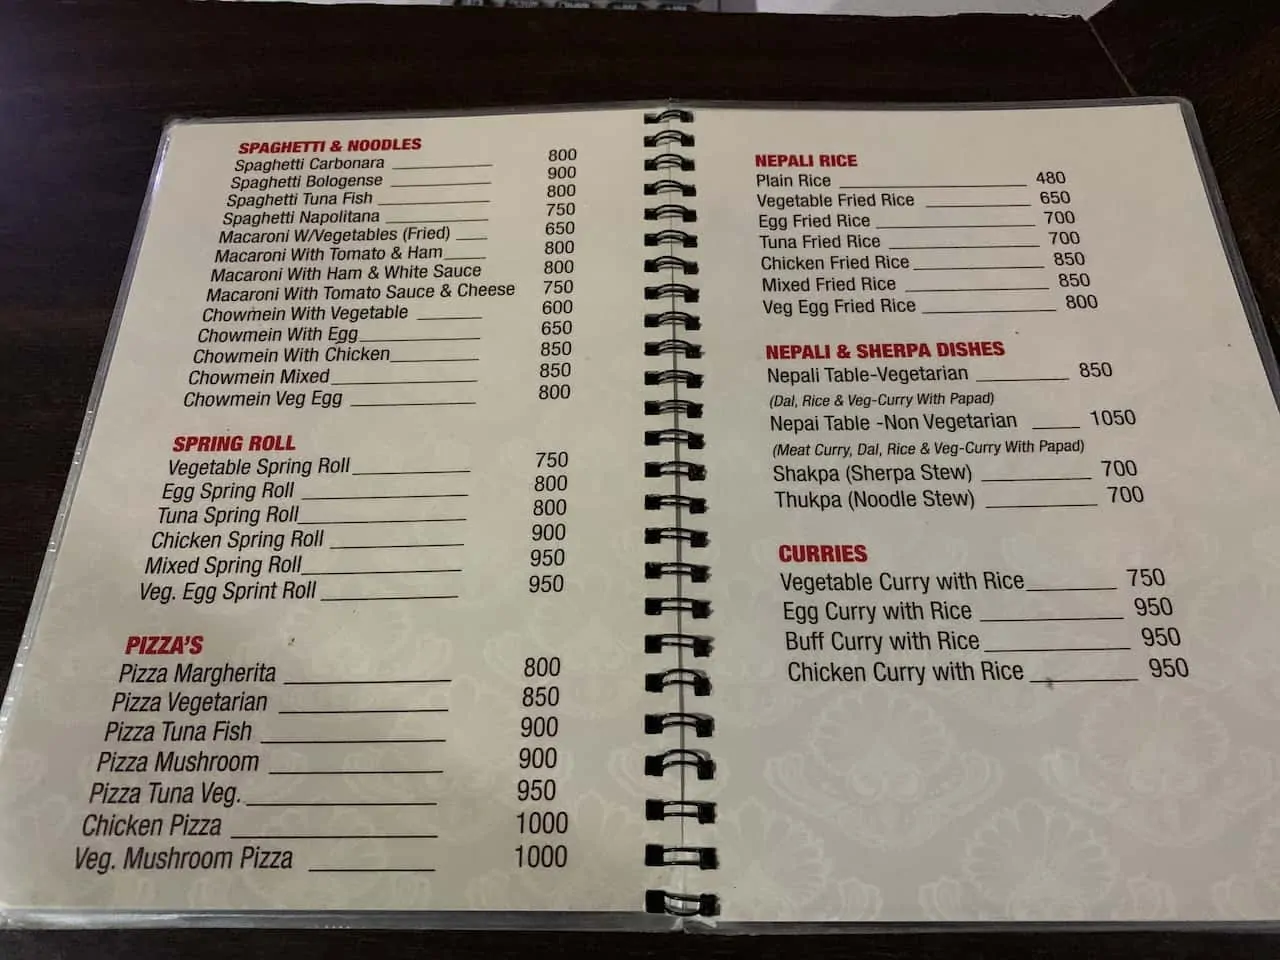
The great thing about teahouses is that they offer 3 meals a day with a whole variety of food options. I was pleasantly surprised by the selection of food that I got to choose from on a daily basis and how good it all tasted. Some of the classic options include:
Breakfast: different style of eggs, French toast, pancakes, porridge and toasts
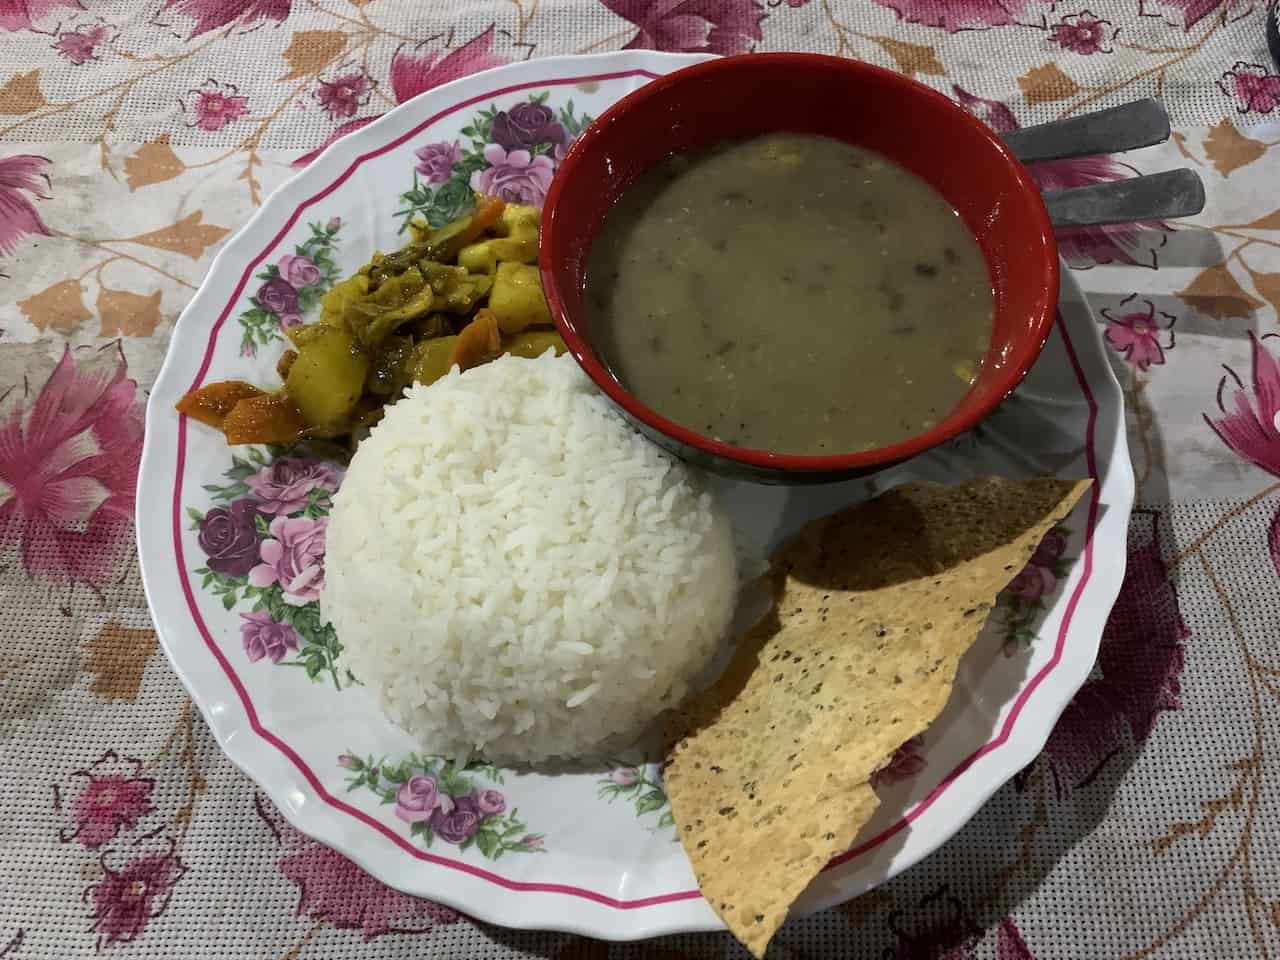
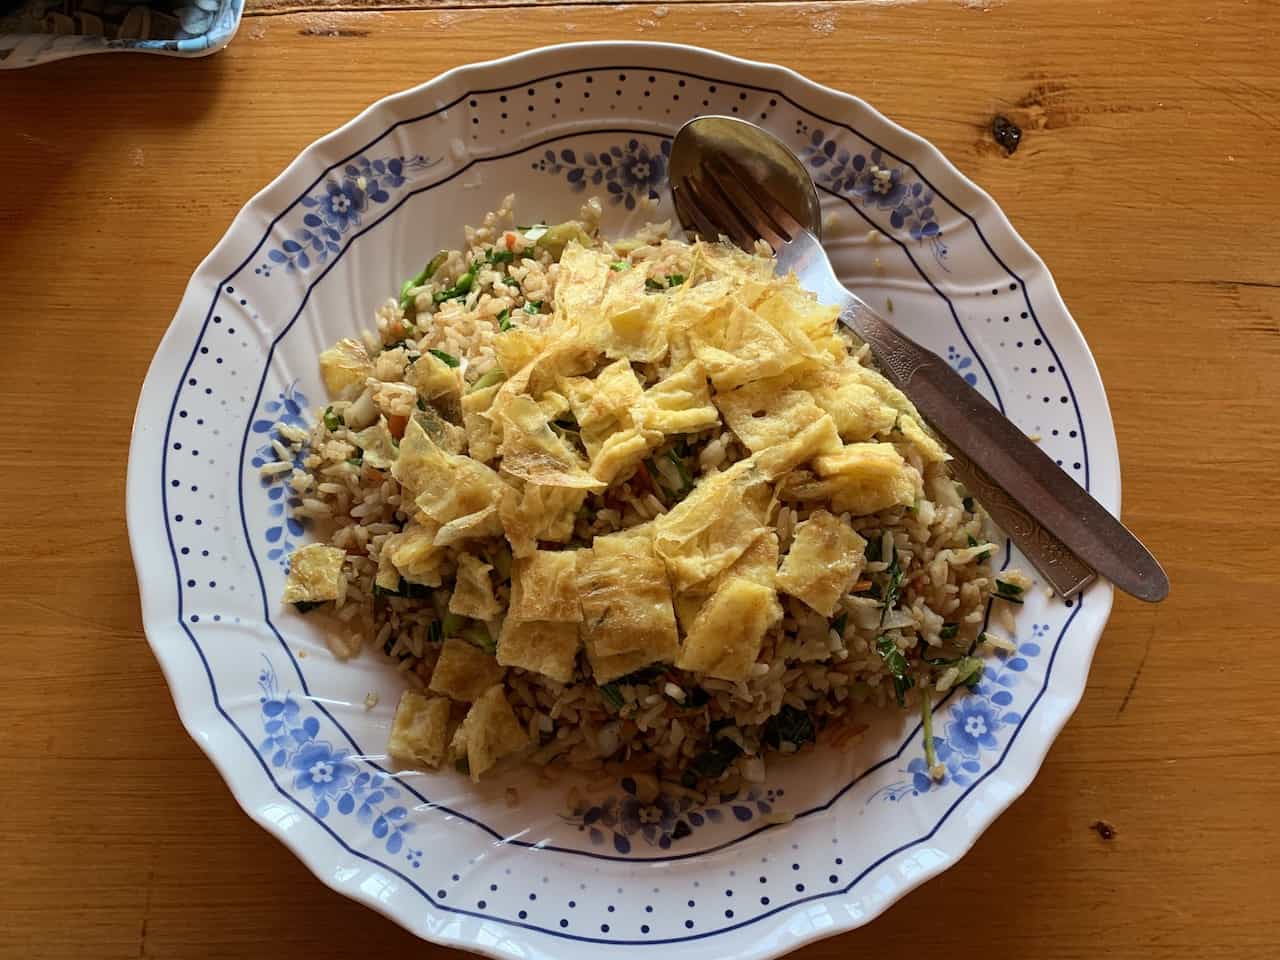
Lunch/Dinner: Soups, Noodles, Potatoes, Momos (dumplings), Pizza, Rice, Spring Rolls, Steak, Burgers and of course the famous Dal Bhat.
→ Dal Bhat by the way is a local dish comprising of rice, veggies, and lentils. You can get a free refill on it as well making it a favorite among trekkers.
→ You will also find plenty of drinks to choose from included a wide variety of tea, soft drinks, beer, and water.
Water is one of the most important parts of an Everest Base Camp trek.
You will want to make sure you stay well hydrated throughout the trek, especially due to the high elevations. While you can purchase water throughout the trek for $2-$4 per bottle, I would highly recommend bringing along a SteriPEN UV Water Purifier.
Bringing along a purifier will allow you to fill up a water bottle using water from the teahouse (tap or kitchen) and then sterilize it using the pen.
So, instead of spending money every day on water, you simply can invest in a purifier and fill up for free all along the trail.
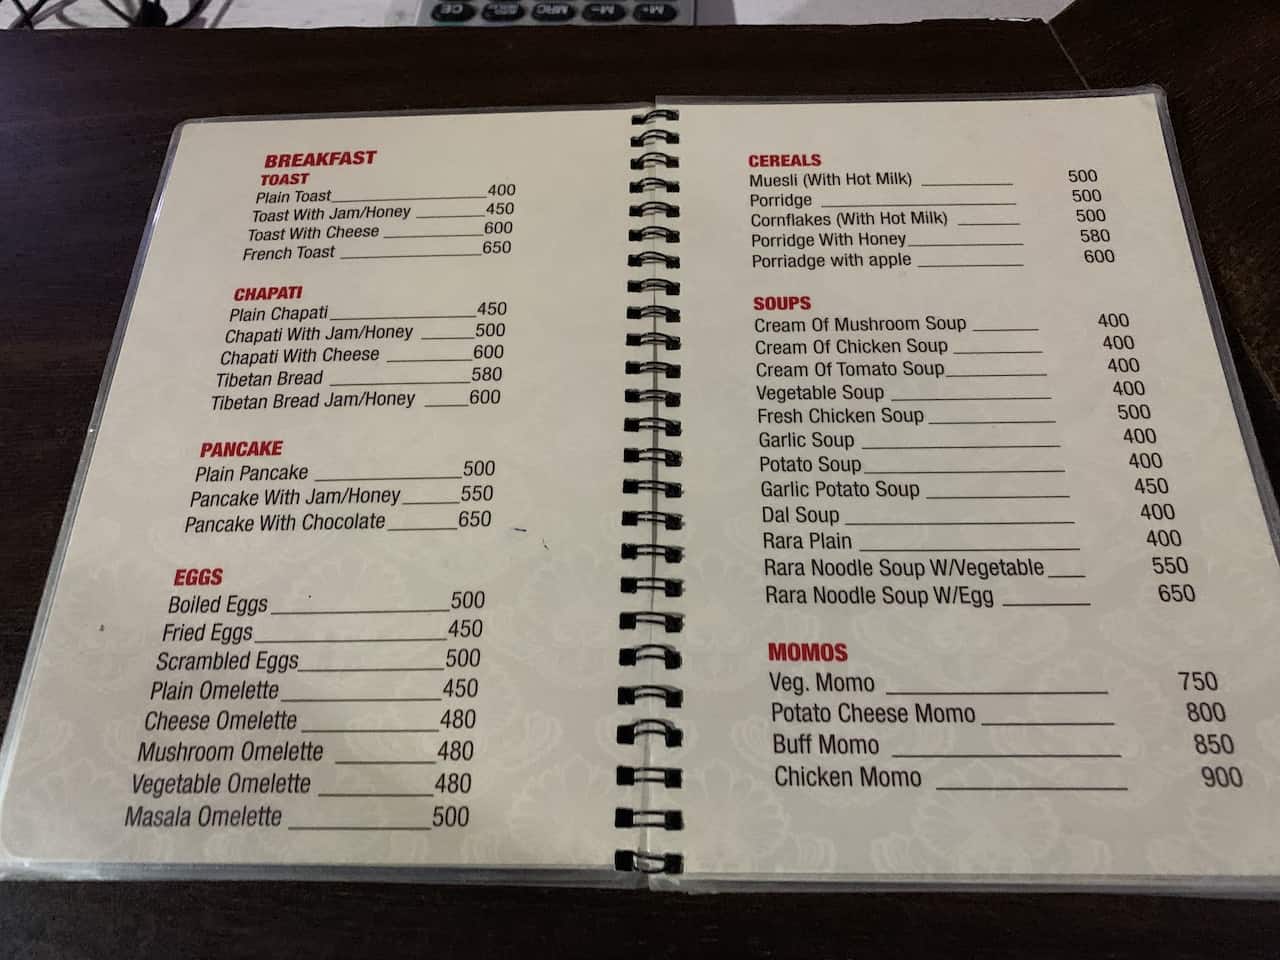
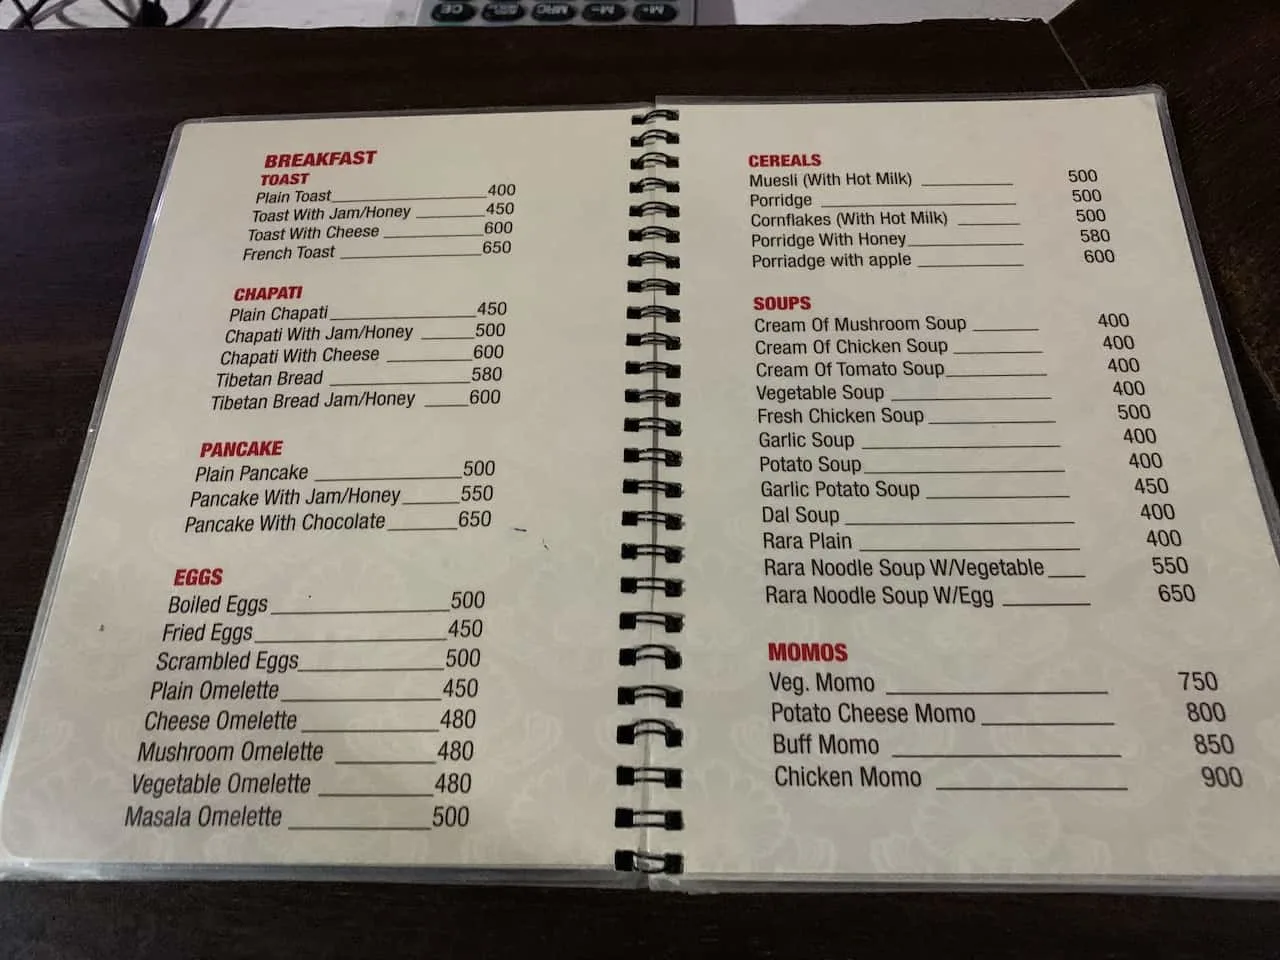
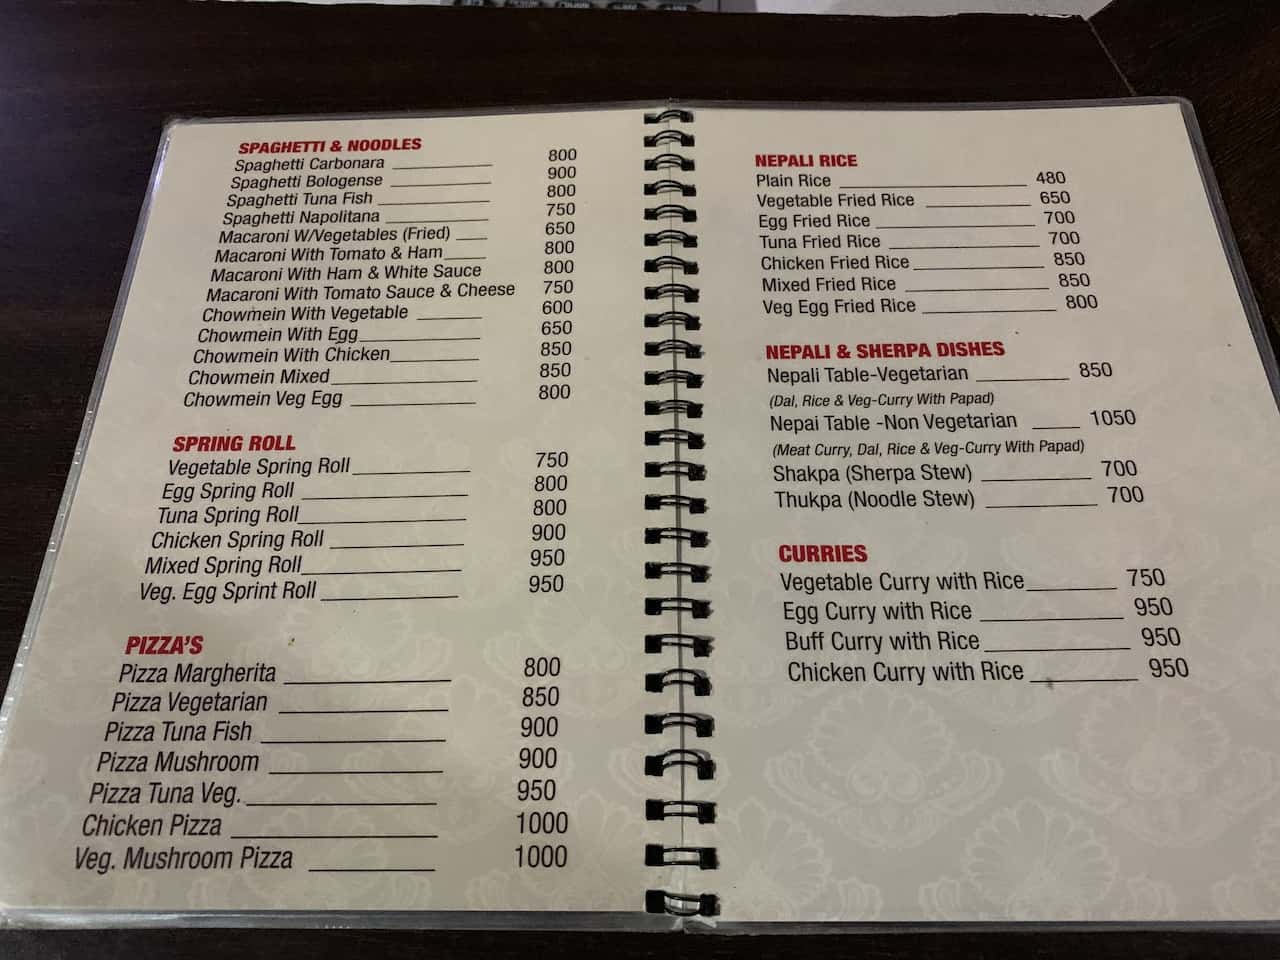
I would usually get a tea and a main course dish, which would come out to around $5-$9 (Rs 600 – Rs 1000) depending on meal.
Sometimes it was a bit more, sometimes a bit less. Below are a couple menus pics that you can browse through to get a better idea on prices as well as some photos of dishes I tried on the trail.


11) Showering / Hygiene
If you didn’t realize before, I never mentioned showers when I spoke about teahouses. That is because teahouses don’t have (free) public showers available.
Many, but not all teahouses will have one or two hot showers (from solar power) that cost around $5 – $10 or so depending on where on the trail you are.
So, if you want to stay clean all throughout the duration of the trek, you will want to add an additional $70 or so to your budget.
While hot showers are great, it is also important to note that some showers may not be hot per se, but more so warm showers. You should also be prepared to be quite cold right after the shower, as you will be then exposed to some frigid temperatures once done.
And lastly, the hot showers won’t always be available as they are based on solar energy. If there isn’t enough juice to keep the teahouse running then showering may not be a possibility.
» A quick drying towel is a must (I have been using the Rainleaf Microfiber Towel during my travels). No other towels will stand a chance of drying at those low temperatures.
» Shower / wash up right when you get to the teahouse. As the day goes on, it just gets colder and you will feel less and less inclined to get wet.
If you are wondering how to stay clean without showering then here are some helpful tips:
» Bring along body deodorizing wipes (Alcala Bamboo Deodorizing Body Wipes recommended), that remove all the dirt and sweat from your skin, leaving you feeling much more refreshed after a day of hiking.
» You can use the sink water (can purify it with your water sterilizer if you would like) to wash your face.
» Some teahouses offer the chance to purchase a “warm water washing bowl” for $2-$3, that can be used to wash your face and other parts of your body.
12) WiFi / Cell Coverage
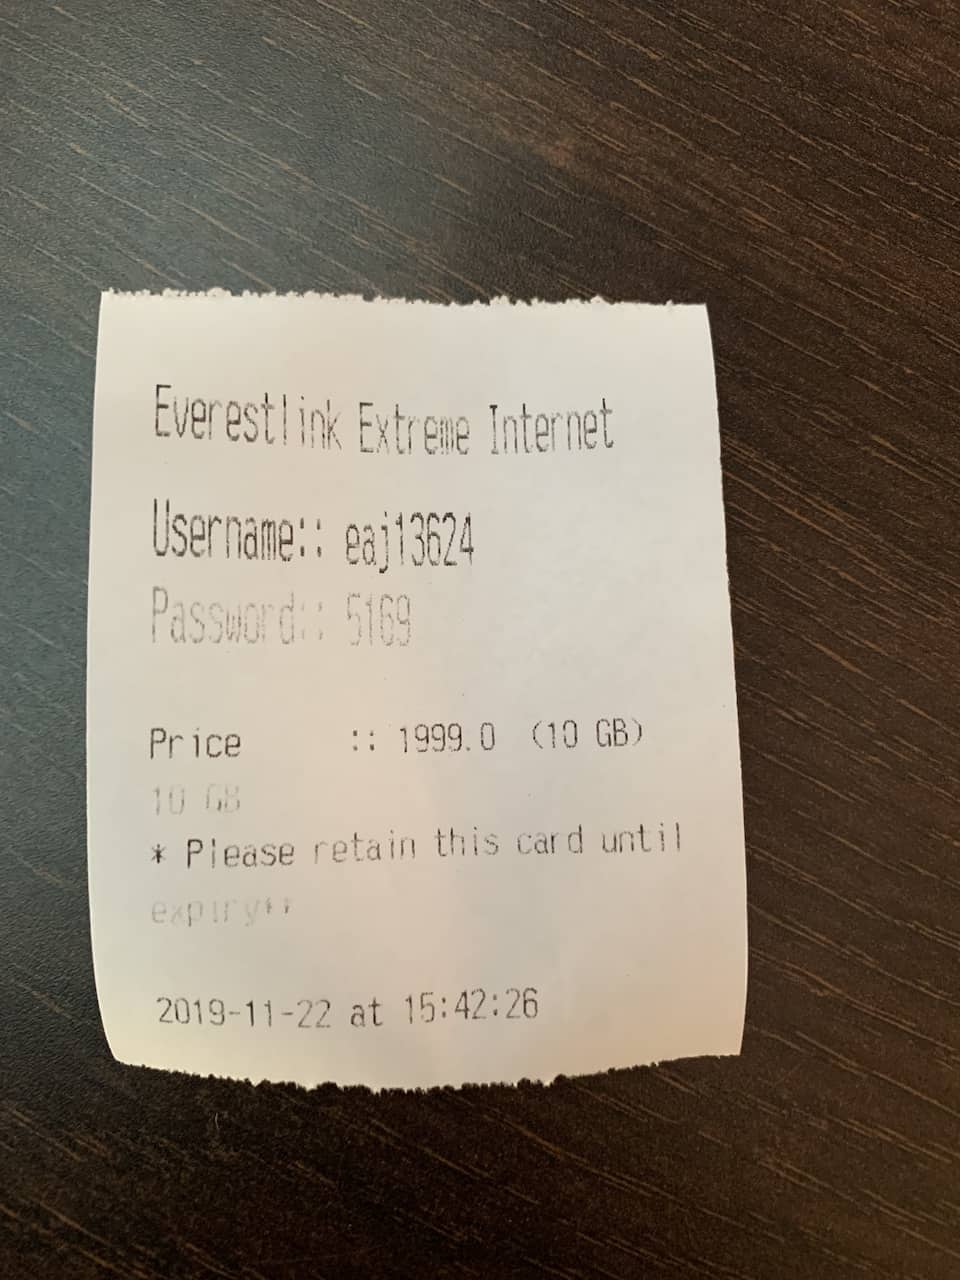
Staying connected is something many people think about when heading out on long treks like this one. To help solve that, there is an Everest WiFi system in place that many teahouses are a part of.
This WiFi system is called Everestlink, and all you need to do is connect to the teahouse WiFi, input your username and password from the receipt, and you should be good to go. It worked surprisingly well on the trail and was great to use to get weather updates and connect with family.
Prices can fluctuate a bit for the WiFi, but expect around $6 for 1 GB, $20 for 10 GB, and $25 for 20 GB.
You can buy these directly at teahouses along the trail. By inputting the username and password each time, the network will be able to track how much data you are using.
You can also get connected by purchasing an Ncell SIM card in Kathmandu prior to heading to Lukla. I paid $10 or so for one at the airport, and had great service up until the Tengboche / Pangboche area. Once past there though, I barely got any service at all.

13) Charging Electronics
Another thing that I did not mention you will find in your teahouse rooms are outlets. That is because outlets are not offered in teahouse rooms.
If you want to charge your electronics, you must give them to the teahouse, who will then charge your devices for you (and charge you a price for doing so).
This will also vary based on where you are on the trail but expect to pay around $4 for a phone charge, $6 for a camera charge, and $8 for a power bank charge.
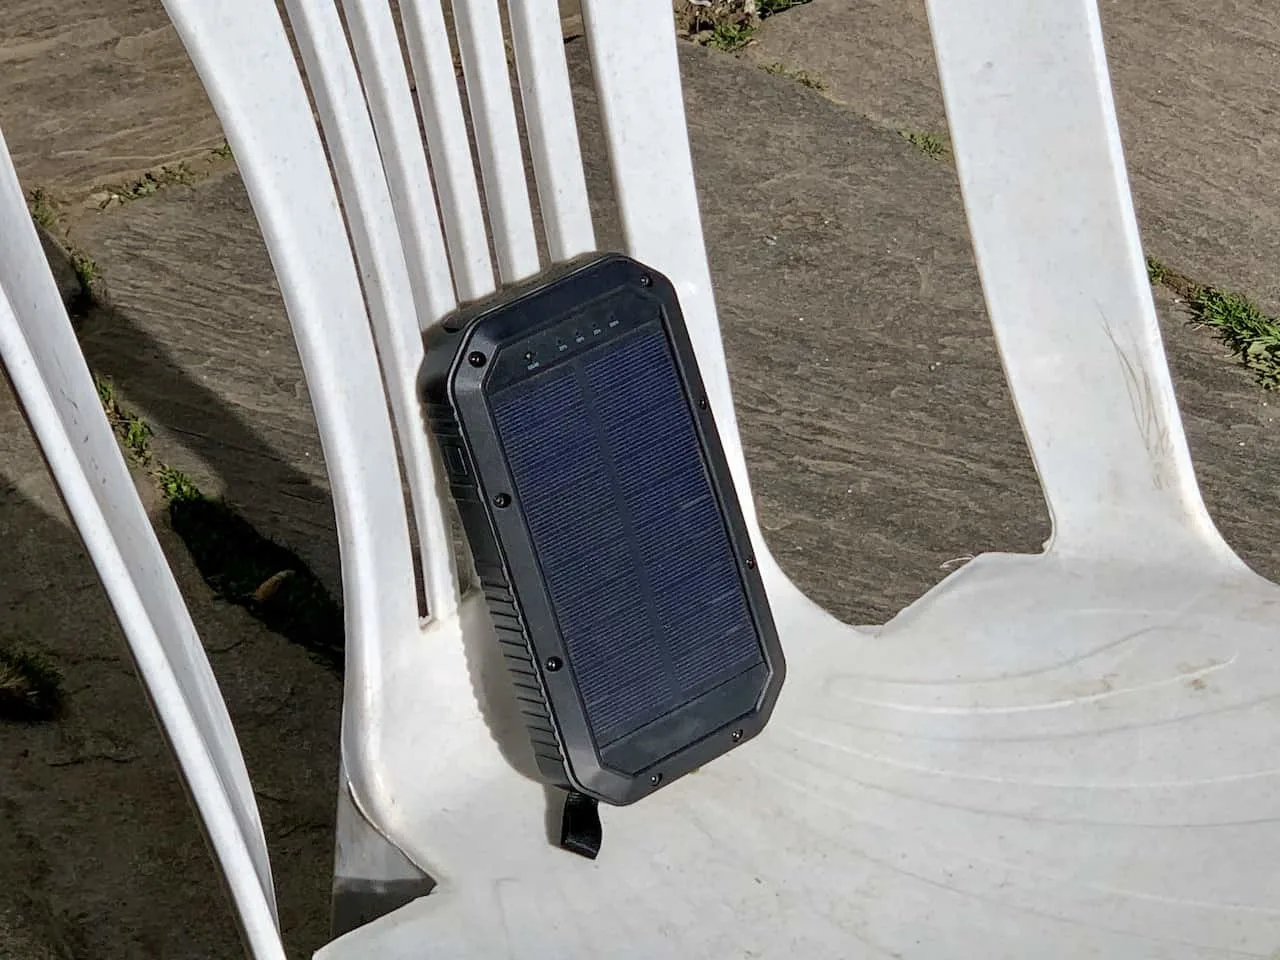
Charging your electronics daily can certainly add up in cost depending on what you bring along on the trail. Due to this, I would highly recommend purchasing a power bank solar charger prior to heading out on your trip.
My recommended solar charger is this Anker 20,000mAh Solar Power Bank
I had the charger fully charged and ready to go prior to the trek and it lasted me the entire trail without needing to recharge it or pay extra for charging any of my devices.
Two helpful tips about bringing along a solar charger – 1) be sure to hook it onto your backpack during the day using a carabiner so it can charge while you are trekking. 2) Once you get to the teahouse, leave the charger in the sun to continue its charge.
Note: you may find that your teahouse in Namche Bazaar offers free charging which can be great to help your electronics recharge for no cost on days 2,3, and 10 of the trail.

14) Lukla Flights
The most expensive part of the Everest Base Camp trek is most likely going to be the flights to/from Lukla.
It is pretty standard that the main airlines who run the Kathmandu to Lukla route (Tara Air / Yeti Airlines, Summit Air and Sita Air), charge $180 each way, or $360 total.
Important Note: Flights sometimes only depart from Ramechhap, a 5-6 hour drive from Kathmandu. Be sure to check the latest flight schedules to better understand if Kathmandu offers departures during your trip.
If you are trekking during high season, I highly recommend booking your flights as soon as you know your dates. These are very small planes with only 15 or so available seats, so availability can be at a minimum here.
Another important note to point out is that these flights do get cancelled often. If the weather conditions are not perfect, the flights will not take off due to the dangerous landscape of the Lukla Airport.
For this reason, it is always good to leave some additional buffer days at the beginning and end of your trek in the chance that your flight does get cancelled.
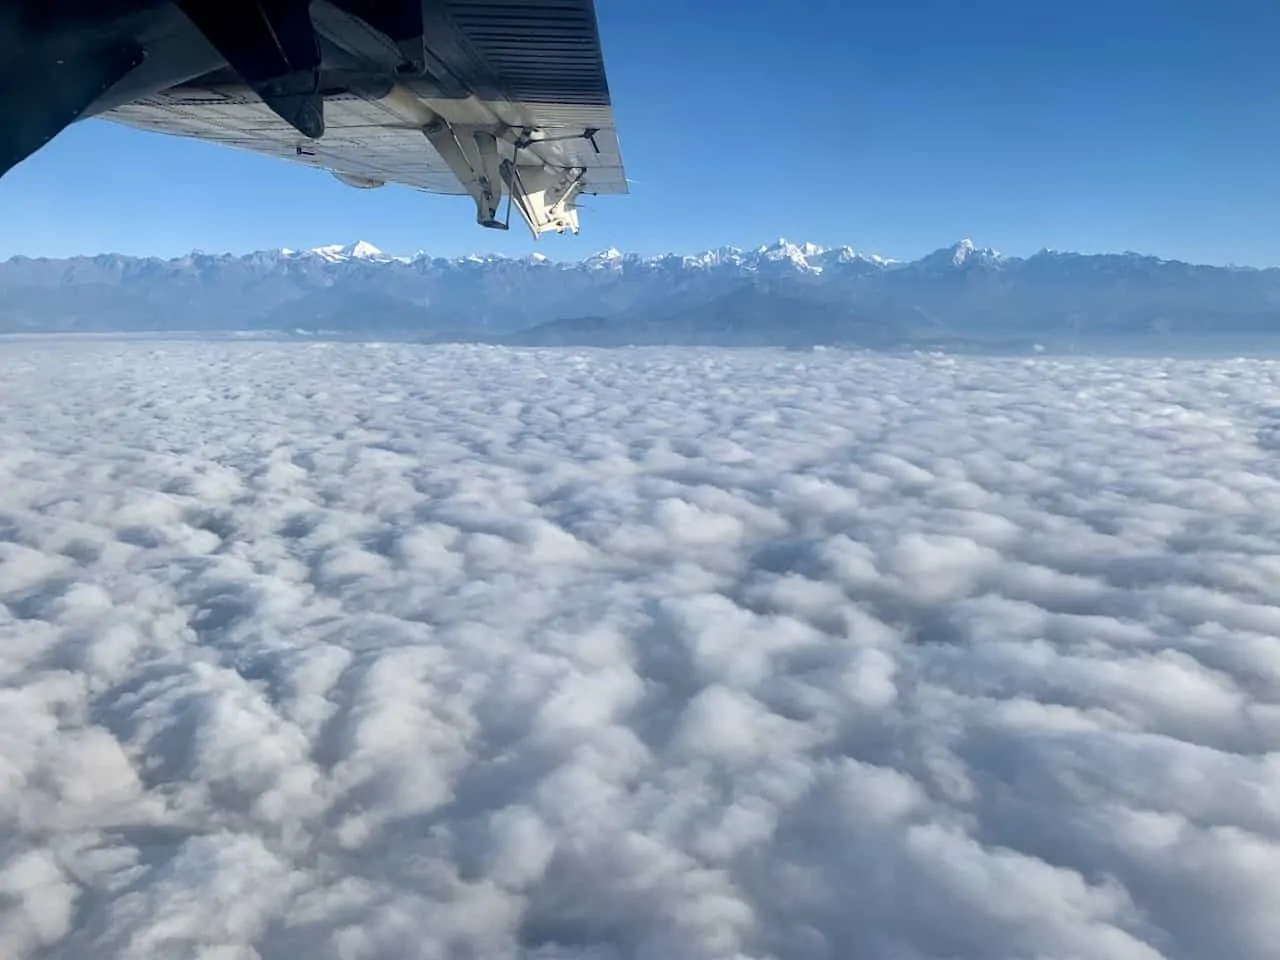
Below are some helpful tips to know about the Kathmandu to Lukla flight:
↔ The flight lasts just about 30 minutes from take off to landing, covering 85 miles / 136 km.
↔ Be sure to sit at a window seat on the left side of the plane from Kathmandu to Lukla and the right side of the plane from Lukla to Kathmandu.
Also depending on aircraft, be sure to avoid the middle of the plane, where the wings can block some of your view. Note that you cannot book a seat beforehand – it is just first come first serve.
↔ The weight restriction is 15 kg / 33 lb (10 kg of check in / 5 kg of carry on) to bring onto the aircraft. You will need to pay some hefty fees per kilo if you go over the restrictions.
↔ Take the earliest flight of the day you can find. This will give you the best chance of not having your flight be cancelled by weather.
Note 1: You can also opt for a helicopter ride in one or both directions. These run around $500 per person each way. By opting for a helicopter, you will not need to worry as much about your flight being cancelled due to the weather.
Note 2: You can avoid the helicopters and flights altogether by adding several more days of hiking. You can do so by taking an 8 hour bus to either Jiri or Salleri followed by a 4+ day trek to Lukla.
» Learn plenty more about it all in the Kathmandu to Lukla Flight Overview on the site

15) Travel Insurance
In a situation where you get altitude sickness and need to be medically evacuated, you sure don’t want to be stuck with a $2,500+ bill.
Instead, all you need to do is purchase travel insurance that covers you up to 20,000 feet in elevation.
That’s right, you will need to make sure that your specific travel insurance covers “extreme / high altitudes”. Be sure to check beforehand when purchasing insurance because many options do not cover these types of activities.
Considering travel insurance for the Everest Base Camp Trek?
World Nomads offers coverage for more than 150 adventure activities as well as emergency medical, lost luggage, trip cancellation and more.
For years, World Nomads has been protecting, connecting & inspiring independent travelers, offering travel insurance & safety advice to help you travel confidently. Their mission is to support and encourage travelers to explore their boundaries.
World Nomads has simple and flexible travel insurance that has been designed by travelers for travelers. Even if you leave home without travel insurance or your policy runs out, you can buy or extend out on the road.
Get a quote for a World Nomads travel insurance policy today!
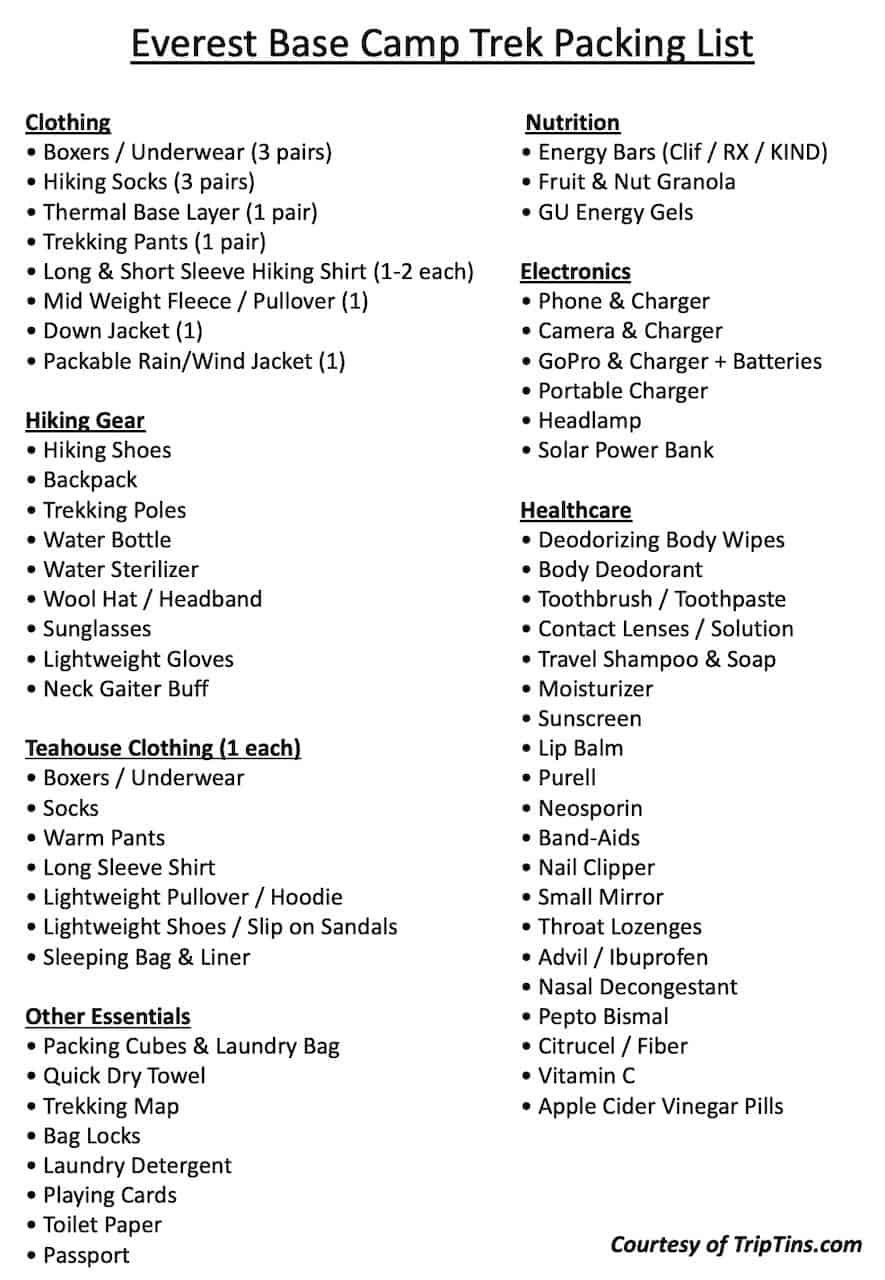
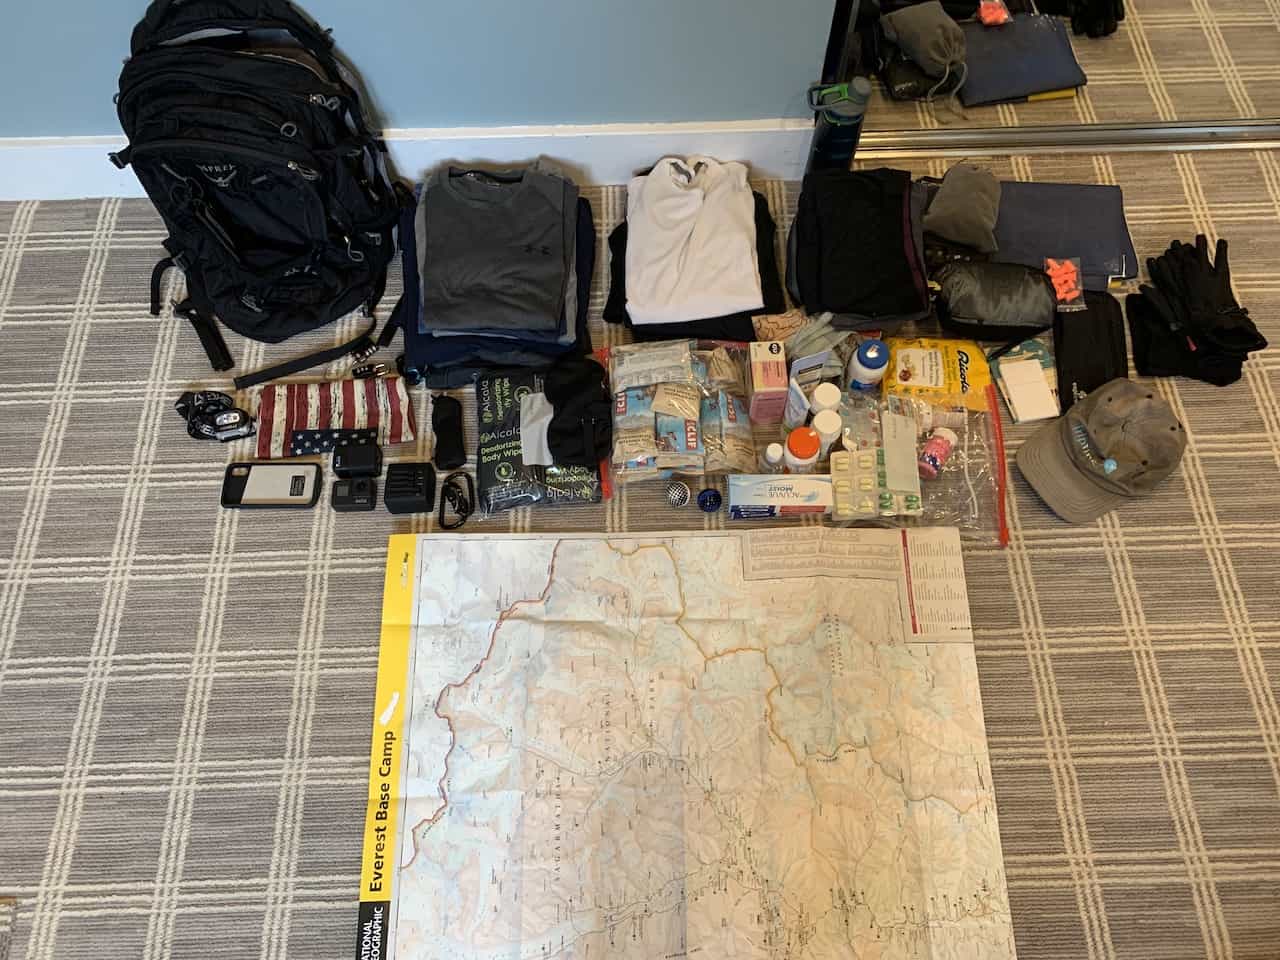
16) Everest Base Camp Packing List
To have a successful Everest Base Camp trek, you will need to come prepared with the right gear.
Remember, this is an 11 day trek and it will very likely include some cold conditions along the way. By utilizing the packing list below, you should be in great shape with all necessary gear and other essentials.
The Everest Base Camp Trek Packing List I put together goes into detail about everything to bring along and will explain more thoroughly why certain items are recommended.

Here are a few additional tips when it comes to the packing list:
» All of your clothing should be made of moisture wicking materials such as Dri FIT, polyester, or wool. These types of materials do not trap moisture and instead keep you dry and comfortable as you are hiking the trails.
» Be sure to keep your electronics in your sleeping bag at night. If you did not know, leaving electronics out in the cold kills their batteries much faster than normal.
If you keep all your electronics / batteries in your sleeping bag at night, you have a better chance to preserve those much needed charges during the duration of the hike.
» You can rent a down jacket and sleeping bag in Kathmandu if you do not want to bring those two larger items with you from abroad.
If you are missing any other items, you should also be able to find most of them in Kathmandu before you head off to Lukla.
» Bring along more cash than you will need.
Cash is king on the EBC trek and you will need to pay for all your food, accommodations, tips, and other purchases with local Nepalese Rupees (you may be able to pay with USD for permits but rupees will be needed otherwise). Be sure to bring enough cash (and then some) from Kathmandu.

17) The Everest Base Camp Trek
Now that you have a ton of background on the trek and how to best prepare for it, let’s talk a bit about the trek itself.
There are 11 days of beautiful trekking that awaits you, and below are some tips followed by a breakout of those 11 days along with some data, short descriptions, and images of the trail.
Hiking Tips & Notes
» If you are trekking during high season and are not taking part of an all inclusive tour, then be sure to get an early start to your days.
Teahouses in smaller villages like Lobuche and Gorak Shep can run out of space. It is common for people to sleep in the dining area during high season because of this, so starting your day early can better guarantee that you get a room.
» If you are hiring a porter or guide, they can also help out by calling teahouses ahead of time to reserve a spot for you.
» There are a ton of animals making their way on the trail in both directions – yaks, horses, donkeys, etc. You not only will need to watch out for them as you are trekking but you also will need to watch out for all their bodily waste.
» The terrain on the trail will be a mix of stone, dirt, rocks, and sand so be prepared for a bit of everything during your time on the trek.
You will have some easy flat sections combined with some more technical inclines and declines. Each day will offer something new.
Below are the day by day stats and info for the EBC trek. I won’t go into so much detail here because I have already put together separate guides for each and every day of the trail.
You can click on those links as you are reading through if you would like to learn more about a certain day and what to expect out there.
Everest Base Camp Trek Day 1: Lukla to Phakding
Duration: 3 Hours
Distance: 5.1 miles / 8.2 km
Starting Elevation: 9,318 ft / 2,840 m
Ending Elevation: 8,563 ft / 2,610 m
True Elevation Gain: 909 ft / 277 m
Net Elevation Gain: -755 ft / -230 m
Learn More → Lukla to Phakding Day 1
After flying in from Kathmandu, you will arrive in the mountainside town of Lukla. Once landed you can have a small breakfast, and then begin your Mount Everest Base Camp Trek!
The first day of trekking is a relatively easy one. You will start in Lukla, make your way through town, get the first of your two permits and be on your way to Phakding from there.
This will actually be a net loss elevation day as Phakding is lower than Lukla, however you will have some inclines sprawled throughout as well.

Everest Base Camp Trek Day 2: Phakding to Namche Bazaar
Duration: 7 Hours
Distance: 6.8 miles / 10.9 km
Starting Elevation: 8,563 ft / 2,610 m
Ending Elevation: 11,286 ft / 3,440 m
True Elevation Gain: 3,986 ft / 1,125 m
Net Elevation Gain: 2,723 ft / 830 m
Learn More → Phakding to Namche Bazaar Day 2
Day 2 will bring you from Phakding to Namche Bazaar and is one of the most demanding on the trek from an elevation gain perspective.
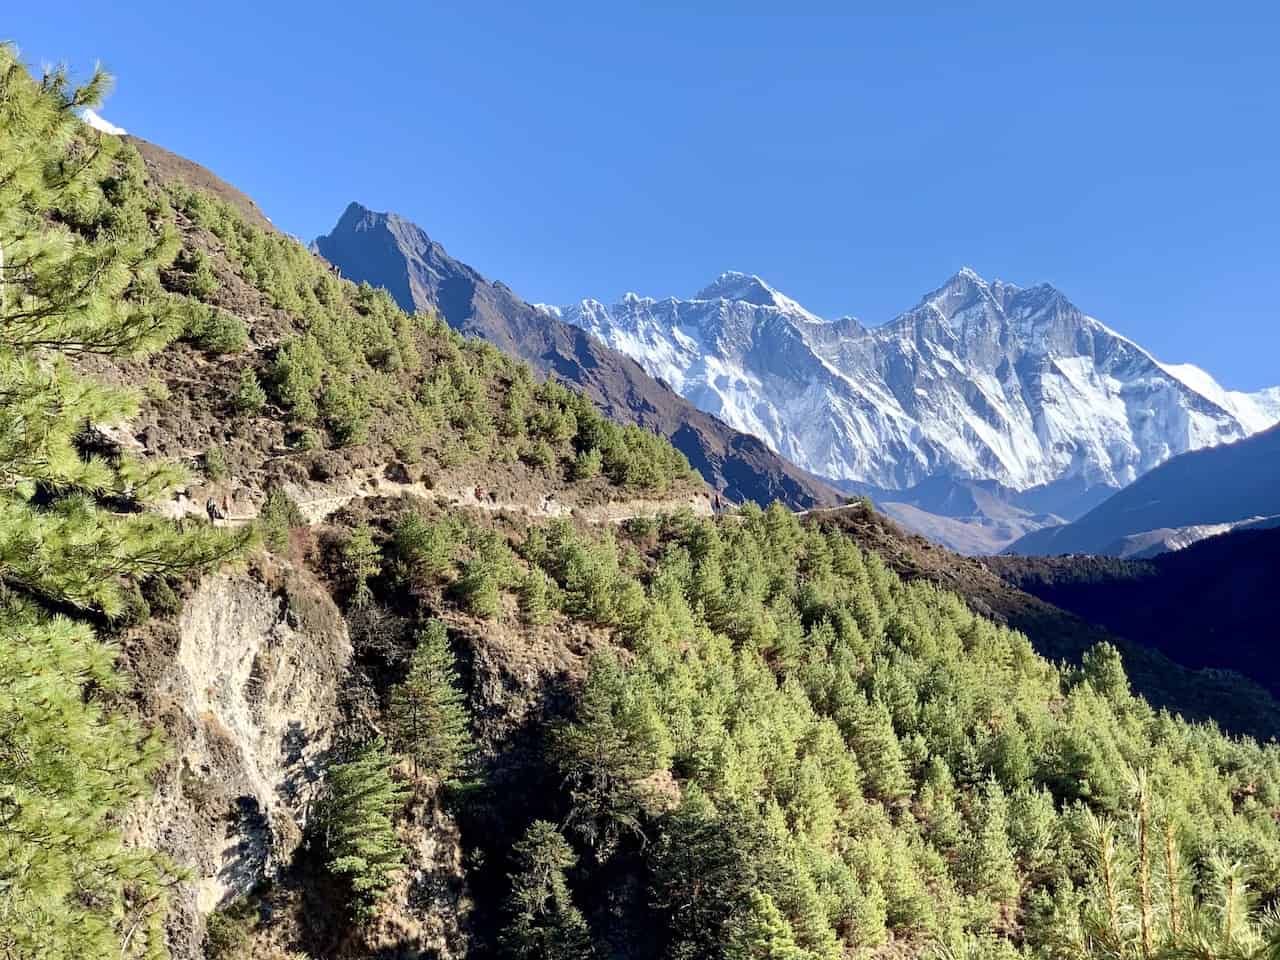
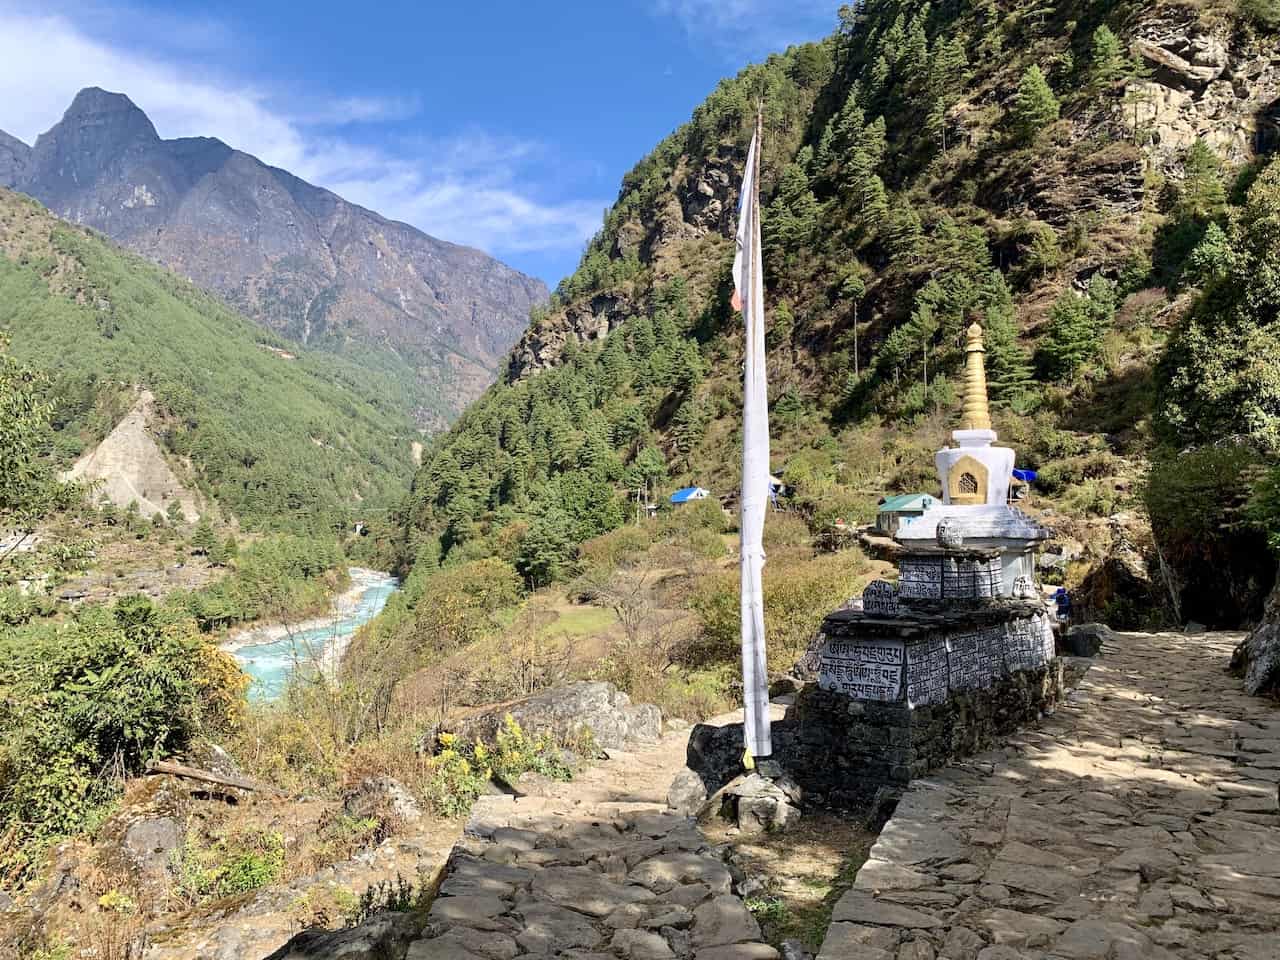
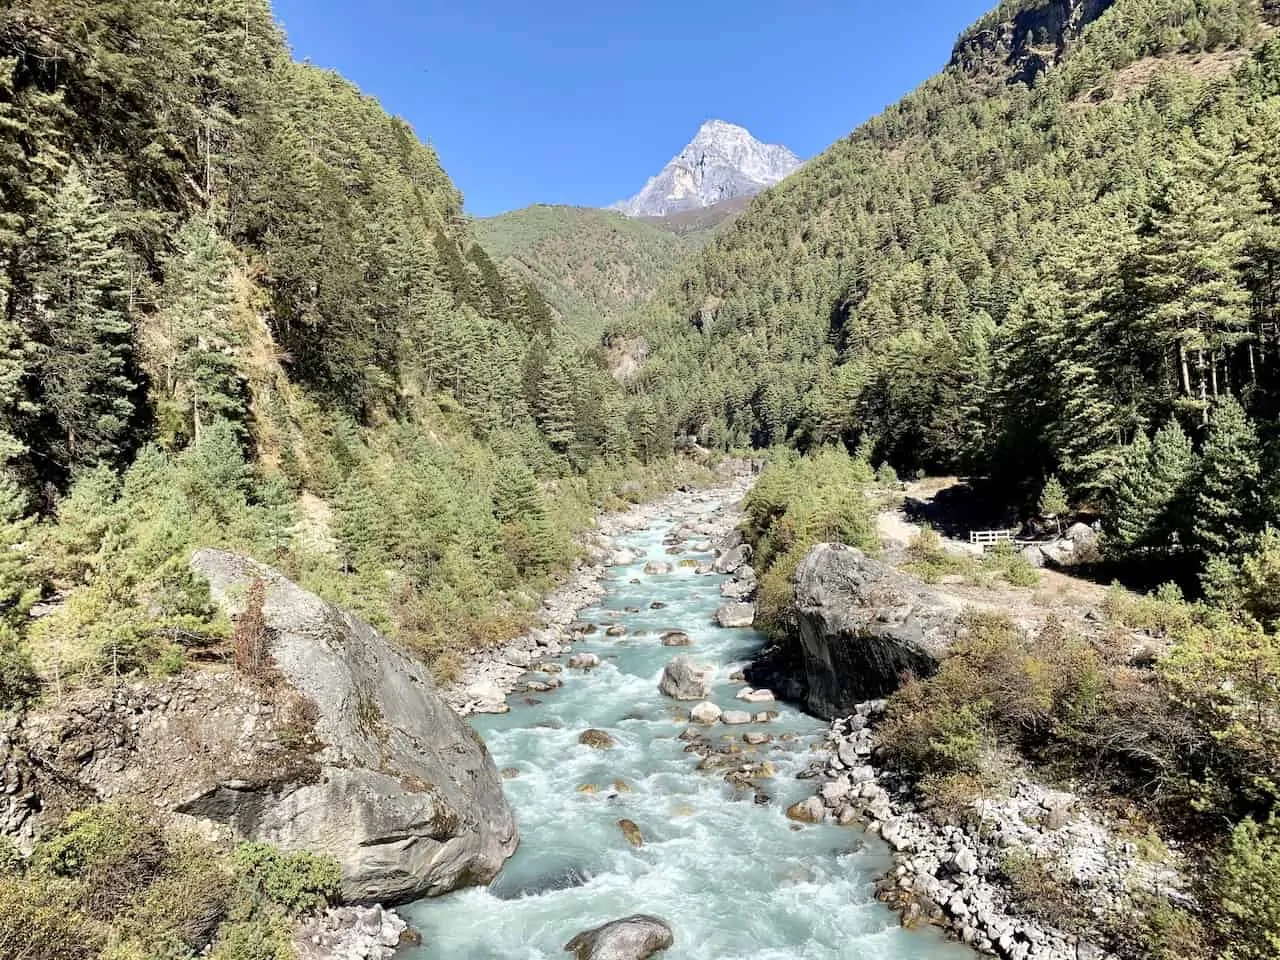
You will pass by several small villages throughout the journey as you make your way across suspension bridges and along the river as you inch closer to Namche.
Along the way you will need to purchase the second of the two permits as you officially enter Sagarmatha National Park. Towards the end of the trek, you will also get your first glimpse of Mount Everest (on a clear day that is).
After a long day of hiking, you will arrive in the largest and most eventful village of the trek – Namche Bazaar.

Everest Base Camp Trek Day 3: Namche Bazaar Acclimatization Hike – Everest Hotel View
Duration: 3 Hours
Distance: 3.4 miles / 5.4 km
Starting Elevation: 11,286 ft / 3,440 m
Ending Elevation: 12,730 ft / 3,880 m
True Elevation Gain: 1,444 f / 440 m
Net Elevation Gain: 1,444 f / 440 m
Learn More → Namche Bazaar Acclimatization Day 3
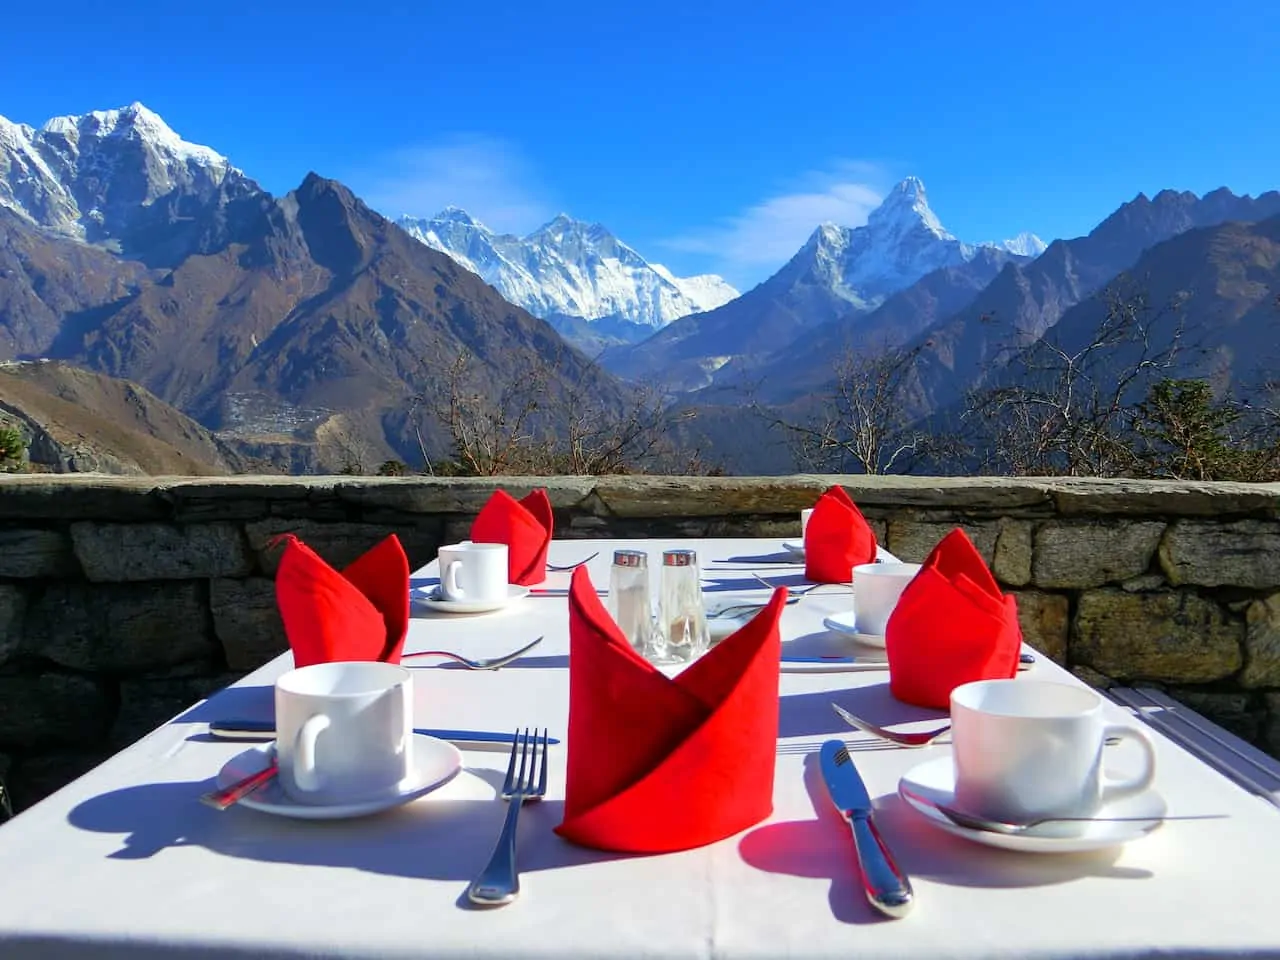
If you remember from earlier on in this guide, day 3 is going to be an acclimatization day. So, you can leave your bags behind in the teahouse and just bring along a daypack as you head up to Hotel Everest View.
This hotel is located up in the mountain above Namche, and it makes for the perfect hike to get your body acclimatized to the altitude. Once you reach the hotel, you can head on back to the outdoor deck, have some food/drinks and enjoy the view of the Everest Mountain Range.
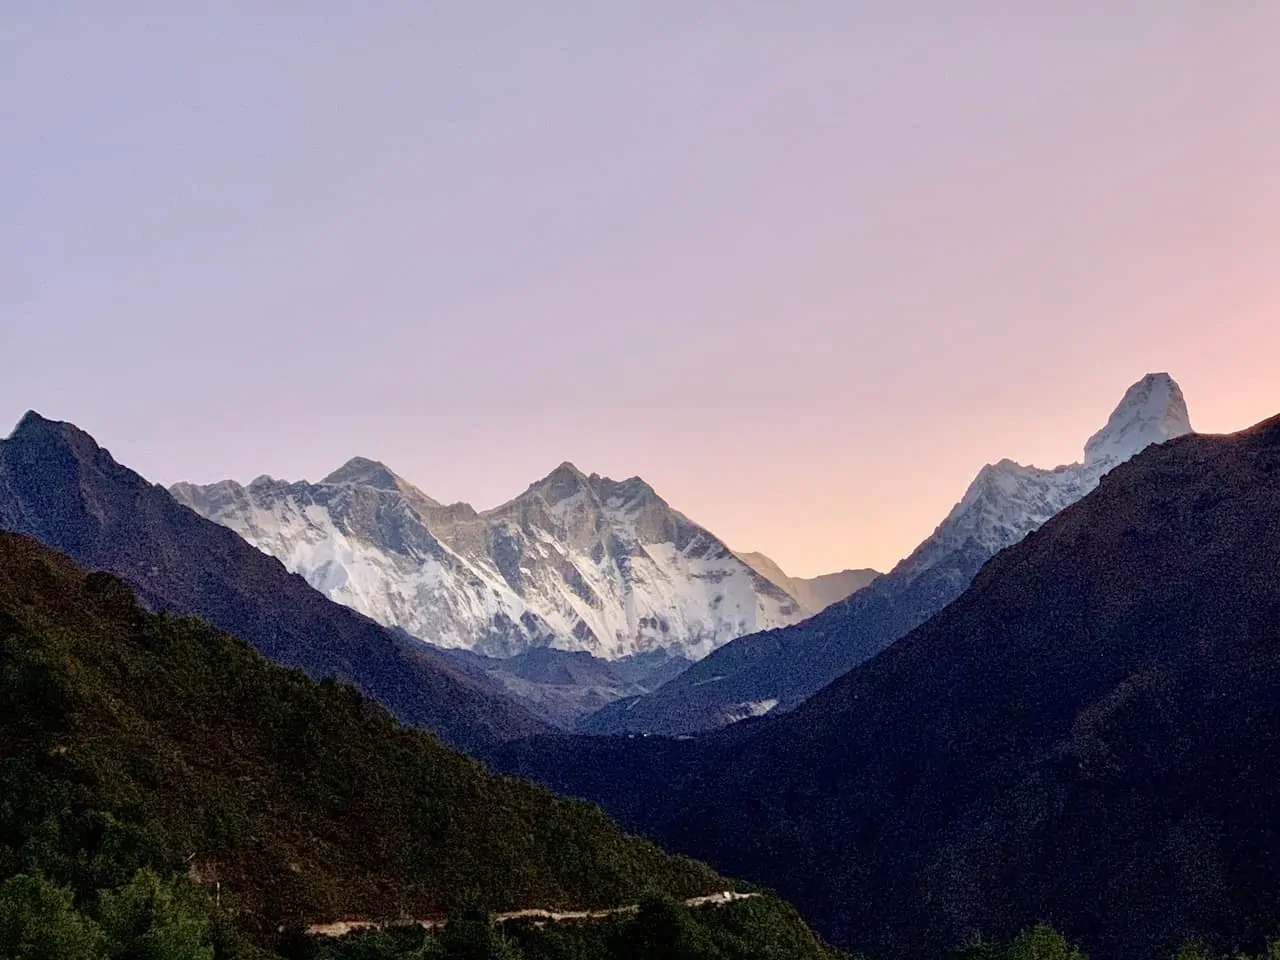
Note: I would also recommend a visit to the Sagarmatha National Park Museum, which you can visit before (potentially for sunrise) or after the trek up to the hotel.
From the museum you will get a great view of the valley with Everest and the surrounding mountains out in the distance.

Everest Base Camp Trek Day 4: Namche Bazaar to Tengboche
Duration: 5 Hours
Distance: 6.0 miles / 9.6 km
Starting Elevation: 11,286 ft / 3,440 m
Ending Elevation: 12,664 ft / 3,860 m
True Elevation Gain: 2,881 ft / 878 m
Net Elevation Gain: 1,378 ft / 420 m
Learn More → Namche Bazaar to Tengboche Day 4
After spending two nights in Namche, it is off to the village of Tengboche. This is another one of those days where looking at just the net elevation gain between the two villages is a bit misleading.
Although the two are just 1,800 feet / 550 meters apart in elevation, you will actually be gaining closer to 2,300 feet / 700 meters of elevation. This is because there are some longer up and down sections during this portion of trail.
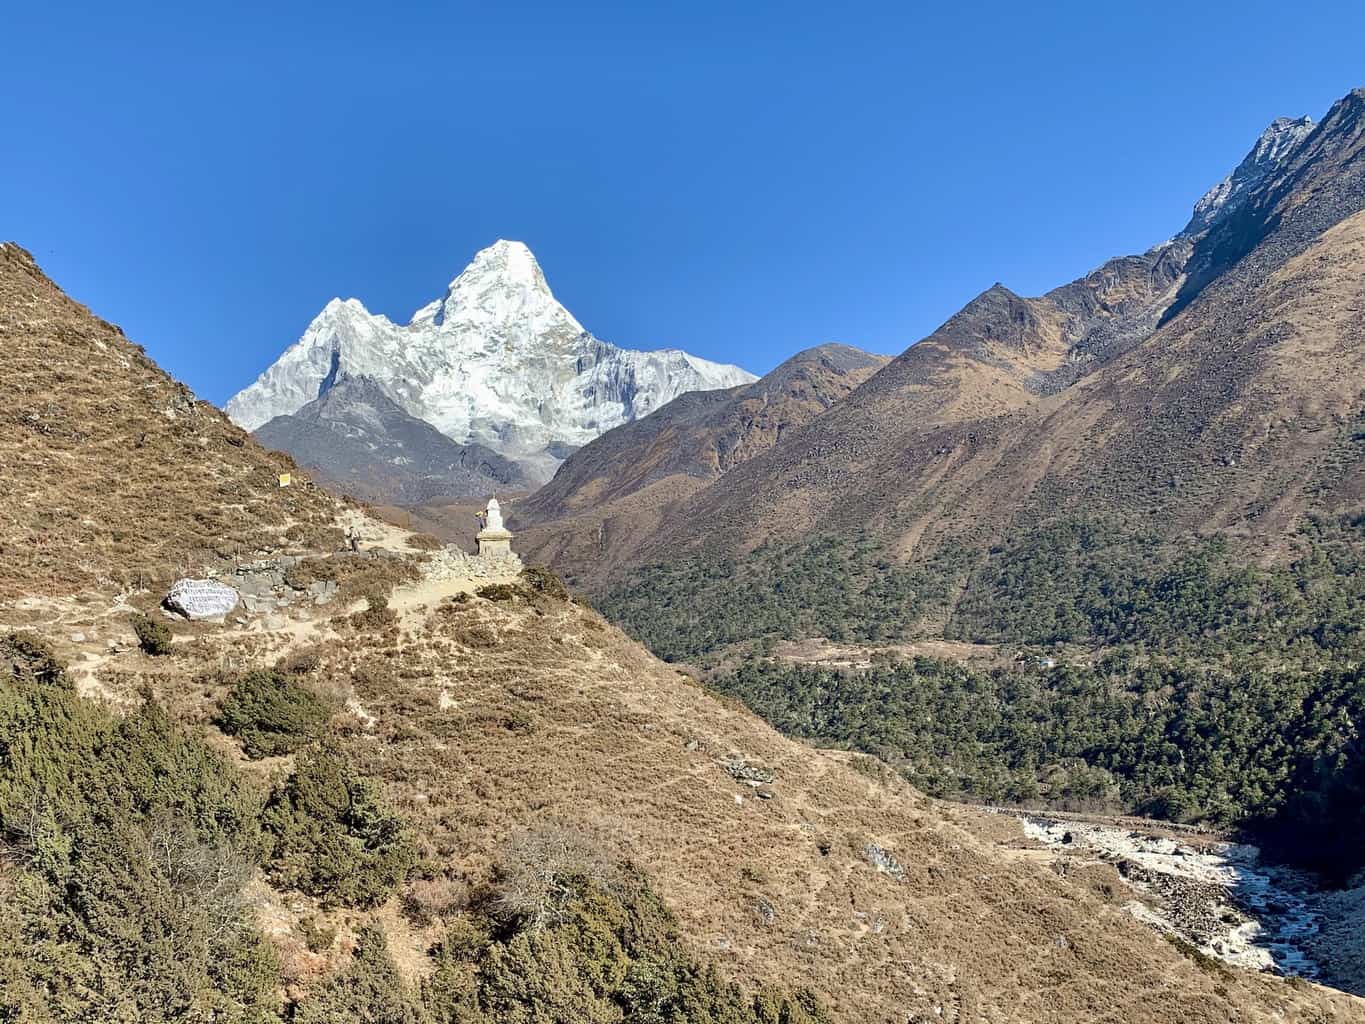
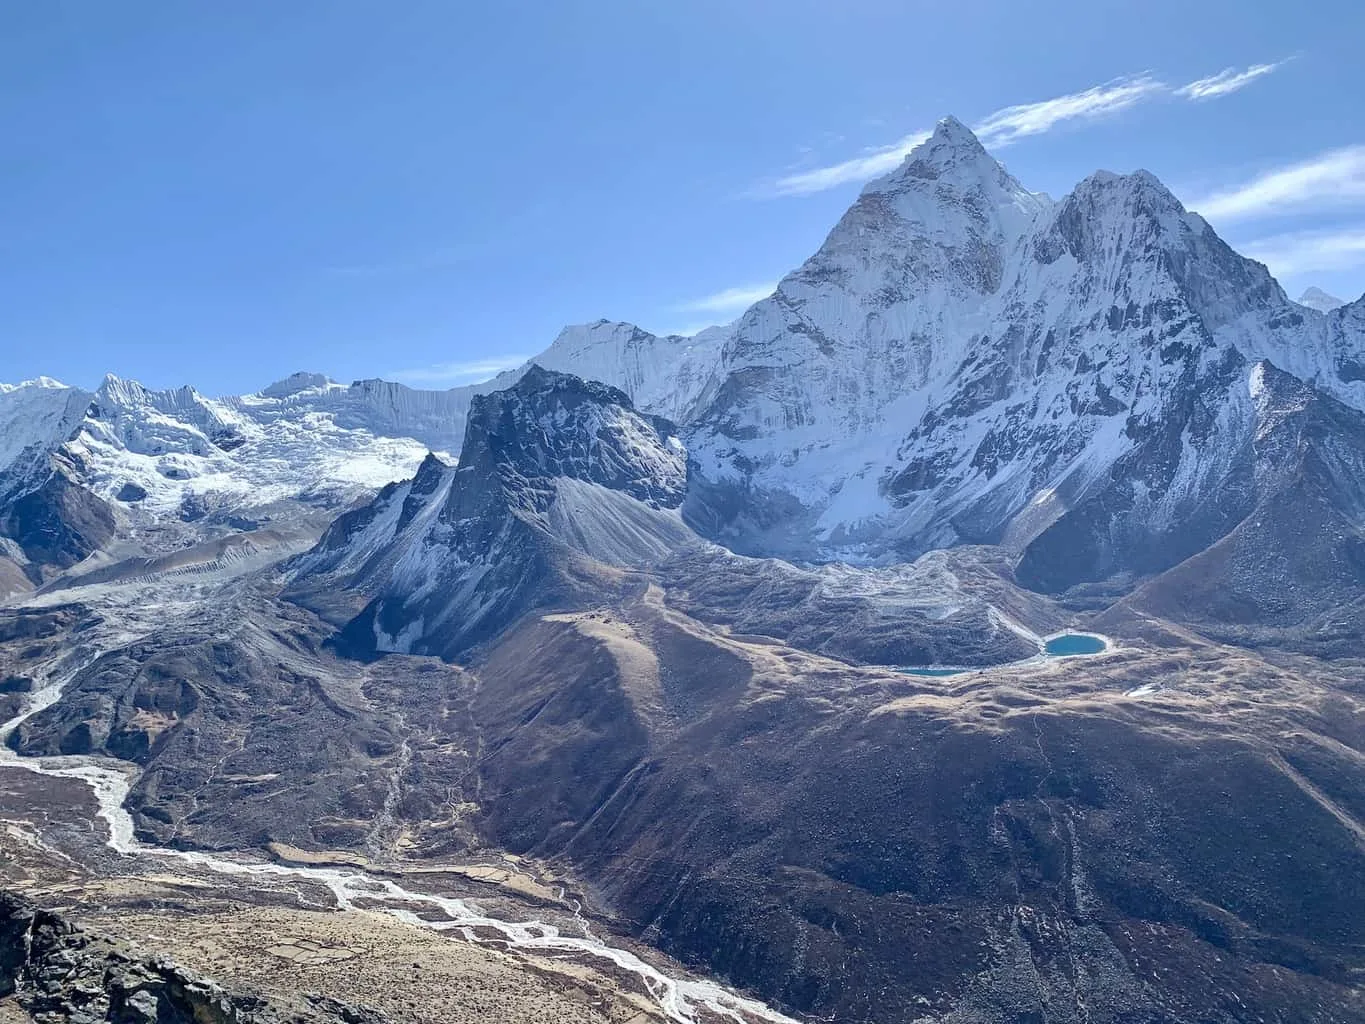
While you will begin the hike along the valley wall with the river down below and Everest out in the distance alongside Nuptse and Lhotse (and Ama Dablam off to the side), the trail will then head downwards closer to the river.
After that it is back up towards Tengboche as you zig zag your way along the terrain.

Everest Base Camp Trek Day 5: Tengboche to Dingboche
Duration: 6 Hours
Distance: 6.5 miles / 10.5 km
Starting Elevation: 12,664 ft / 3,860 m
Ending Elevation: 14,469 ft / 4,410 m
True Elevation Gain: 2,287 ft / 697 m
Net Elevation Gain: 1,805 ft / 550 m
Learn More → Tengboche to Dingboche Day 5
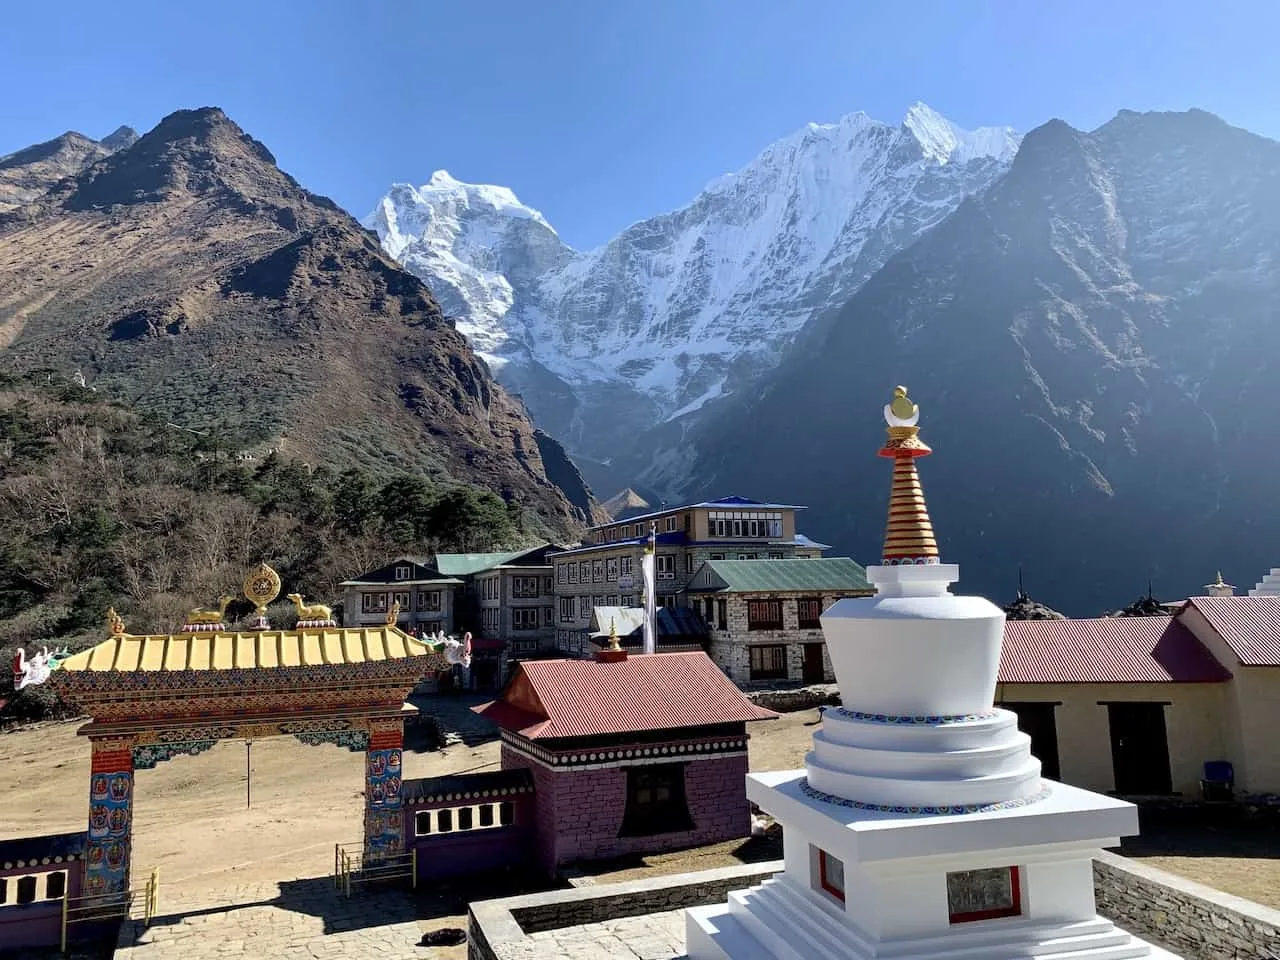
Before heading out to Dingboche, be sure to check out the Tengboche Monastery in the village (either in the afternoon of day 4 or the morning of day 5).
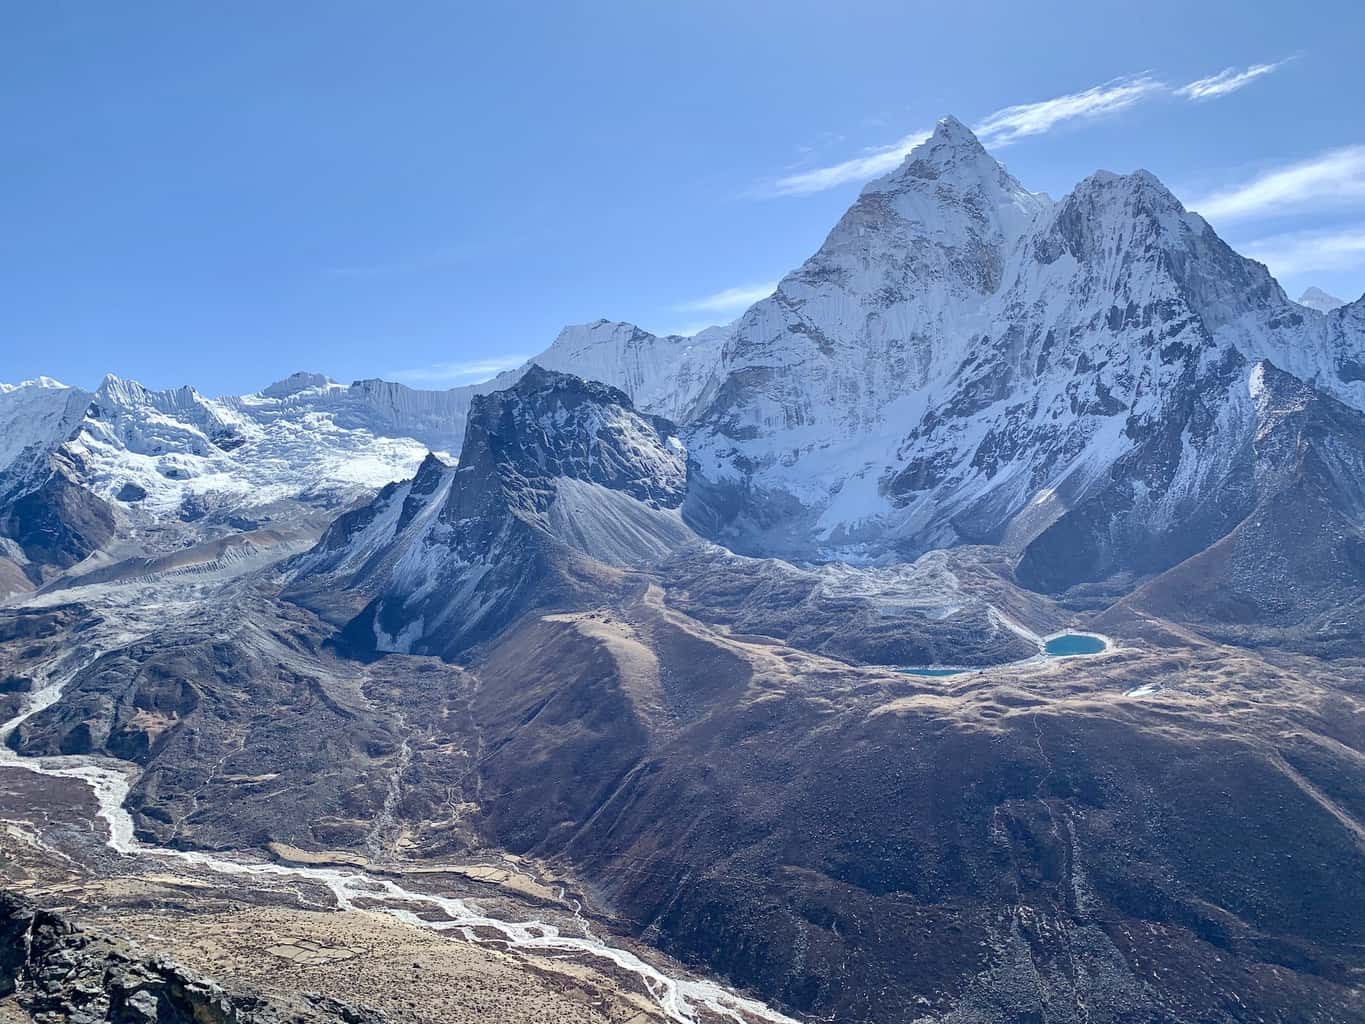
After leaving Tengboche it is a scenic hike mostly done on the valley wall, as you continuously head higher up the valley.
Ama Dablam will be getting closer and closer on your right hand side, and you will pass through the village of Pangboche along the way.
Continue to follow the etched pathway in the mountainside before crossing over the river and then up to Dingboche to end your day.

Everest Base Camp Trek Day 6: Dingboche Acclimatization Hike – Nangkartshang Peak
Duration: 5 Hours
Distance: 3.2 miles / 5.1 km
Starting Elevation: 14,469 ft / 4,410 m
Ending Elevation: 16,677 ft / 5,083 m
True Elevation Gain: 2,208 ft / 673 m
Net Elevation Gain: 2,208 ft / 673 m
Learn More → Dingboche Acclimatization Day 6
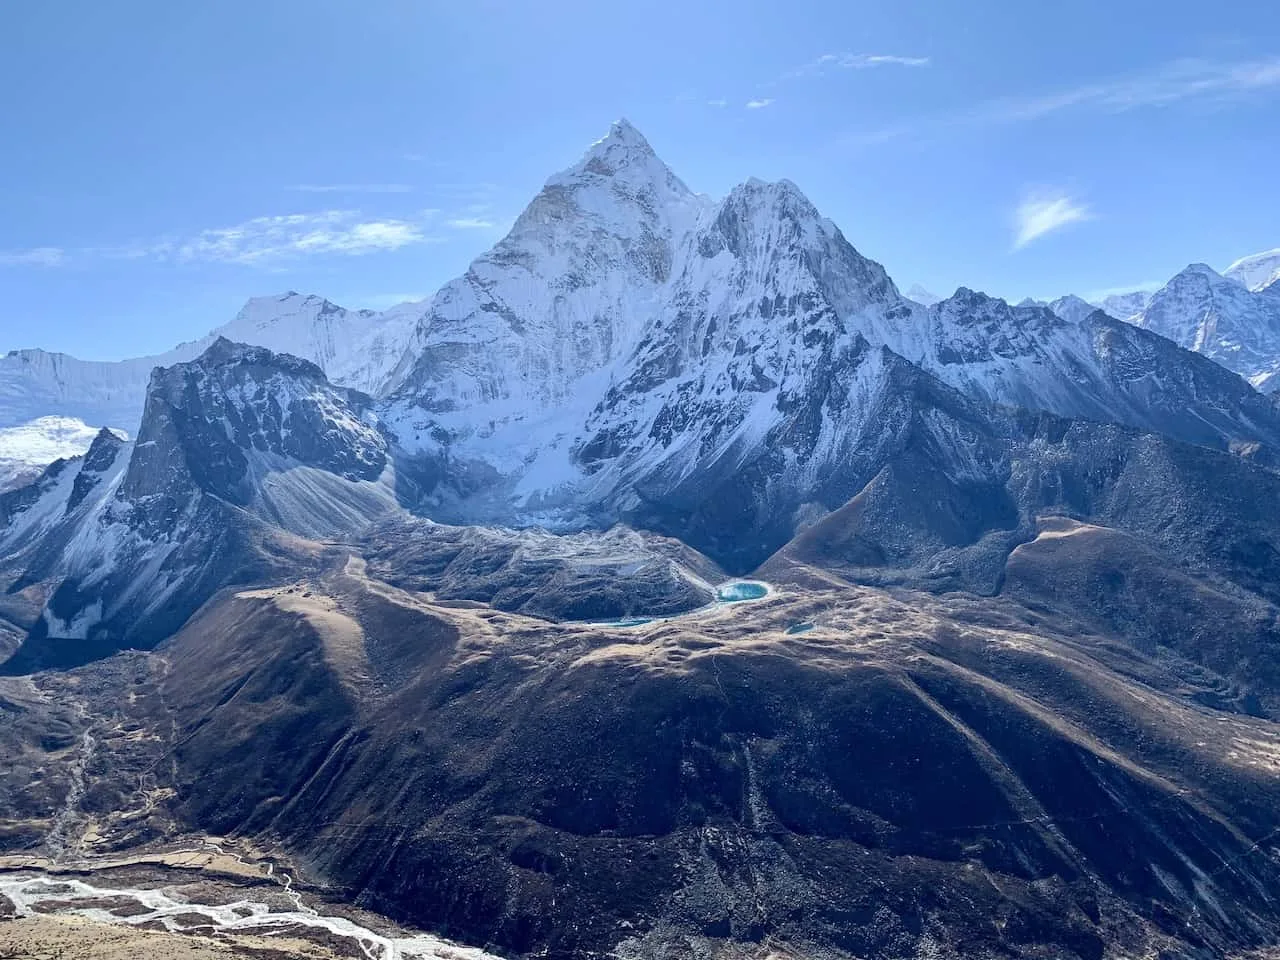
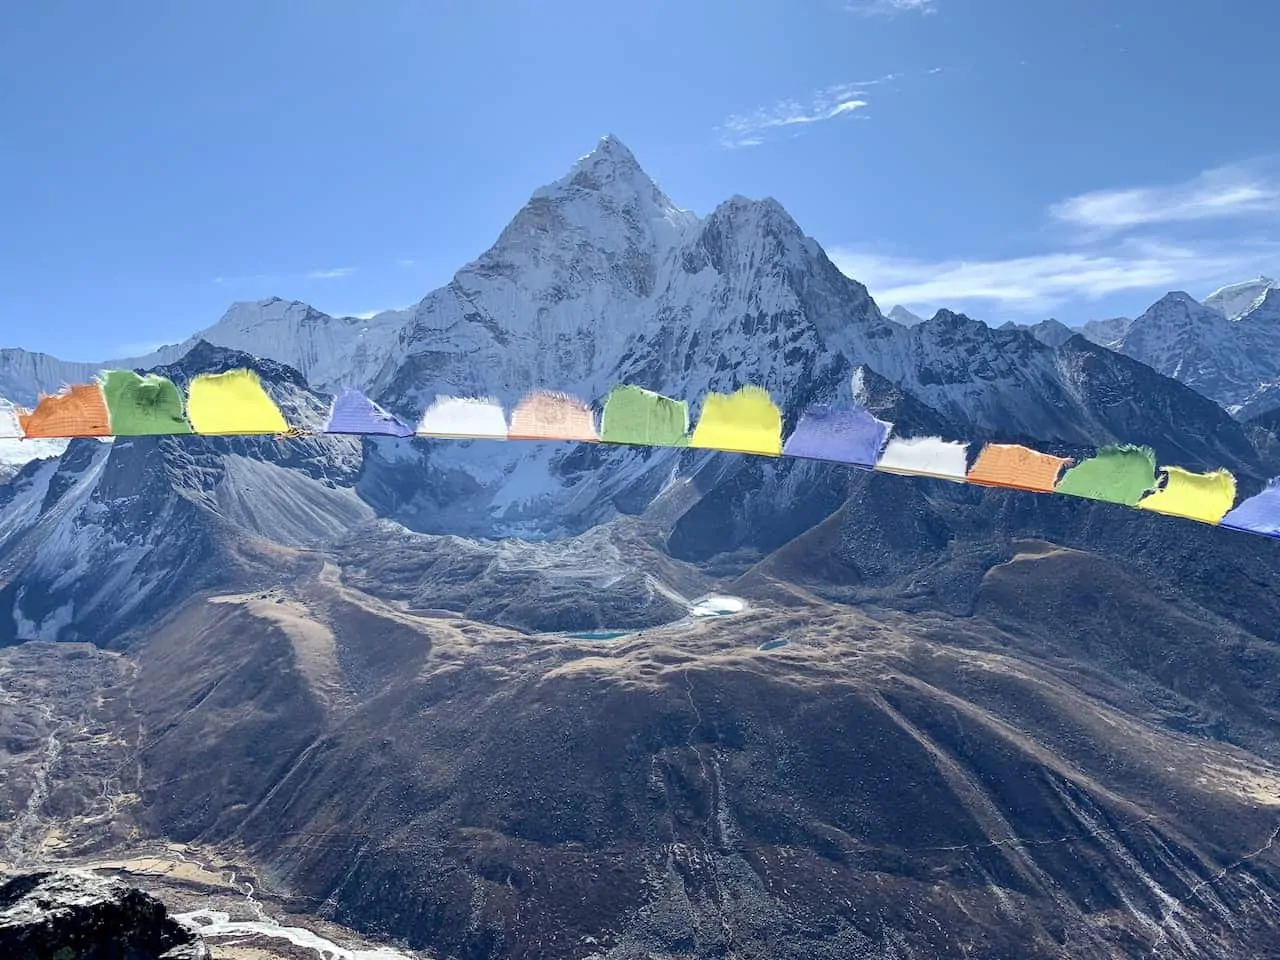
Similar to day 3 of the trek, day 6 will be your second acclimatization day to take part of. This time you will get the chance to hike up Nangkartshang Peak, the mountain that sits right behind Dingboche village.
It is no easy climb to the top as you make your way up 2,208 ft / 673 m, but the views along the way and at the summit are some of the best you will get on the trail.

Everest Base Camp Trek Day 7: Dingboche to Lobuche
Duration: 5 Hours
Distance: 4.9 miles / 7.9 km
Starting Elevation: 14,469 ft / 4,410 m
Ending Elevation: 16,109 ft / 4,910 m
True Elevation Gain: 2,008 ft / 612 m
Net Elevation Gain: 1,640 ft / 500 m
Learn More → Dingboche to Lobuche Day 7
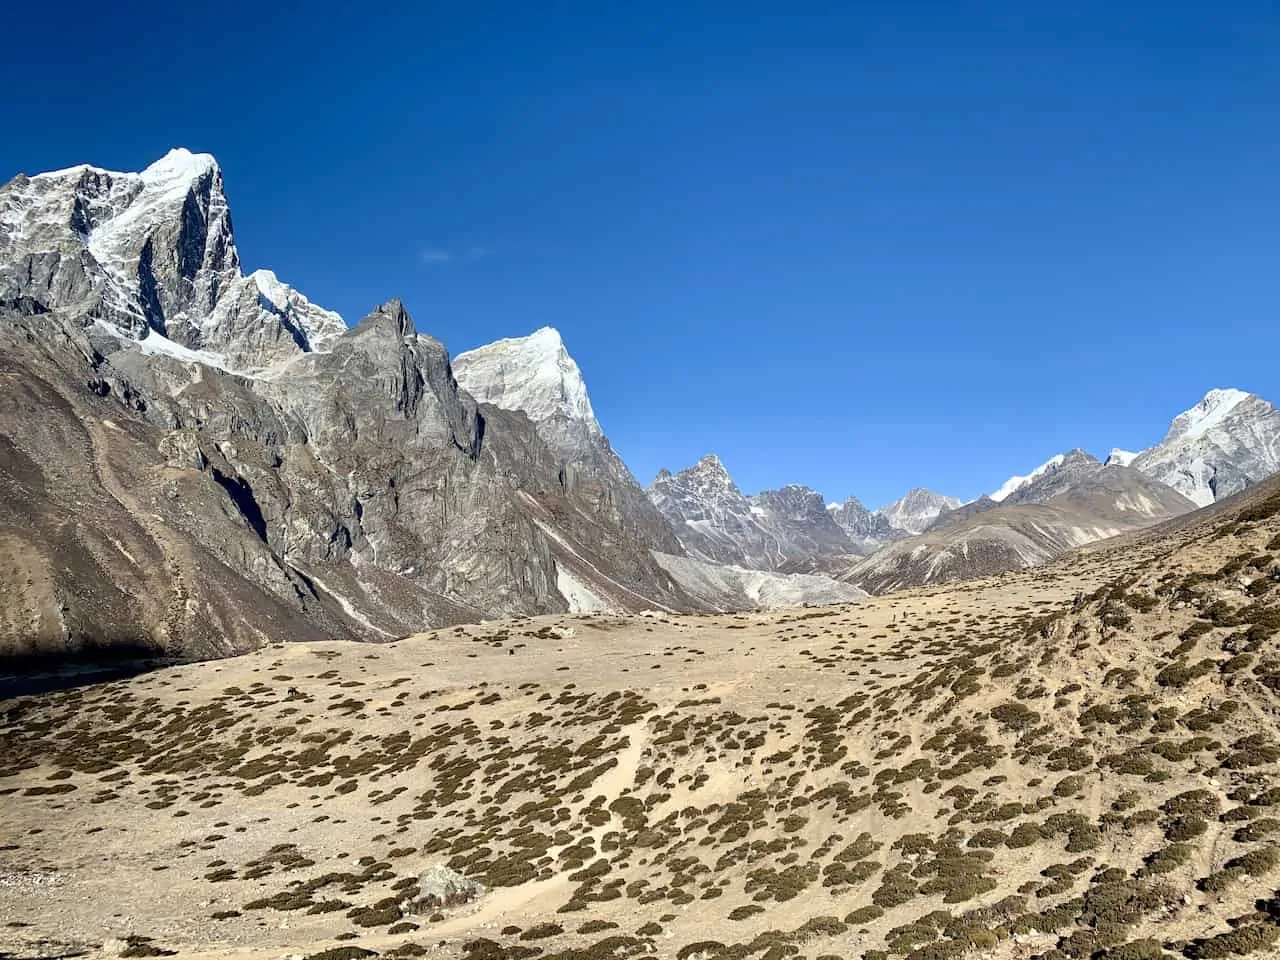
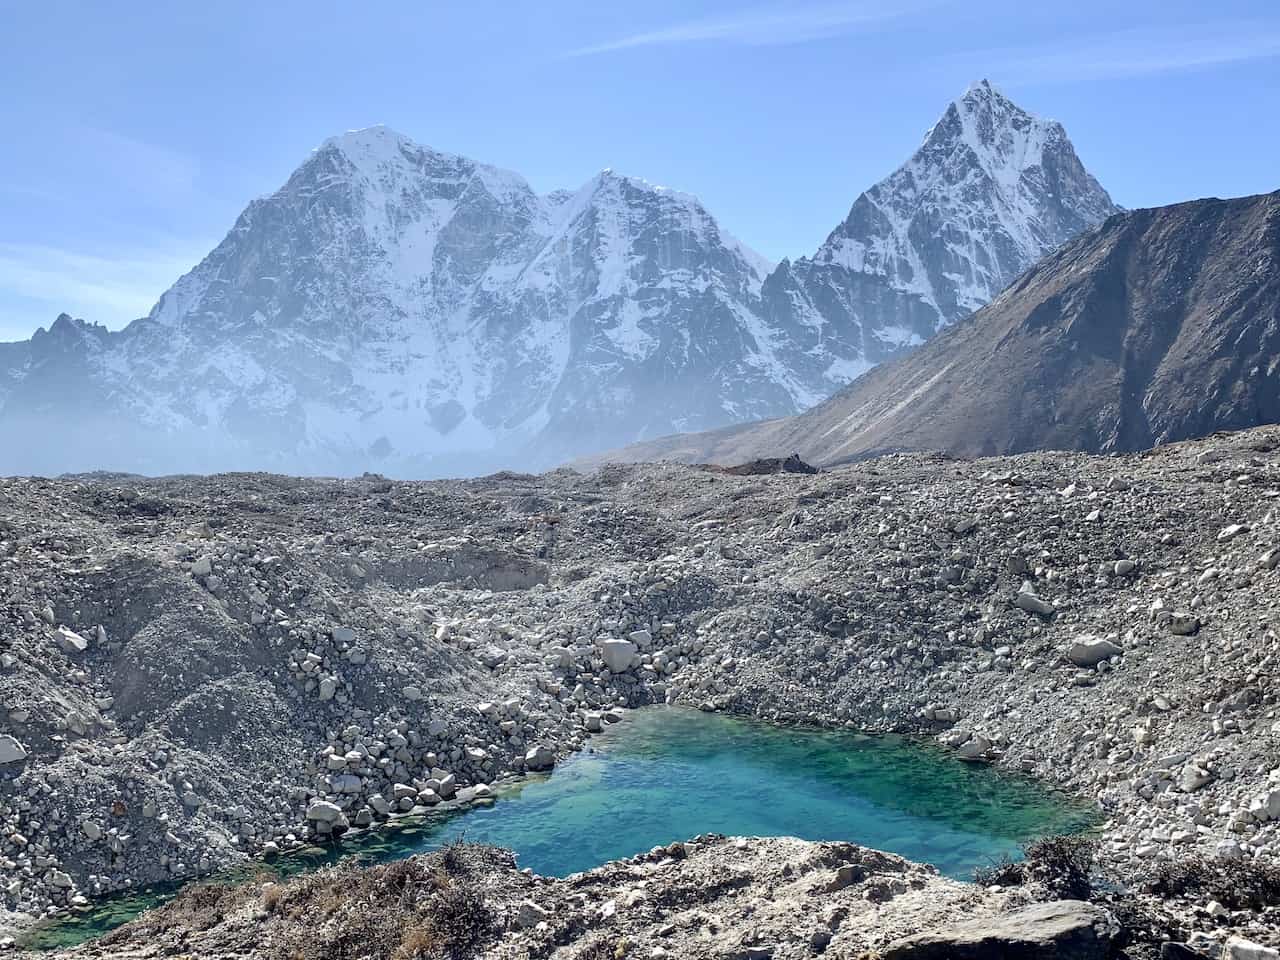
Now that you are better acclimatized to the altitude, you will continue the trek up the valley to the village of Lobuche.
Today is a relatively easy day as you won’t be dealing with much steep/technical terrain, as you hike alongside the mountainside towards the Khumbu glacier out in front of you.
During the trek, you will pass by the small village of Thukla before climbing the Thukla pass (the toughest section of today’s climb), and then walking alongside the Khumbu glacier to Lobuche.

Everest Base Camp Trek Day 8: Lobuche to Gorak Shep + Everest Base Camp
Duration: 7 Hours
Distance: 7.3 miles / 11.7 km
Starting Elevation: 16,109 ft / 4,910 m (Pheriche)
EBC Elevation: 17,598 ft / 5,364 m
Ending Elevation: 16,814 ft / 5,125 m (Gorak Shep)
True Elevation Gain: 1,647 ft / 502 m
Net Elevation Gain: 1,489 ft / 454 m (Lobuche to EBC)
Learn More → Lobuche to Gorak Shep & Gorak Shep to EBC Day 8
Day 8 is a big one on the Everest Base Camp trek as you will be heading to the highest village of the trek – Gorak Shep, followed by an afternoon of visiting Everest Base Camp itself.
You will begin the day early leaving Lobuche and hiking the 3 hour trail alongside the Khumbu glacier towards Gorak Shep.
Once you arrive in Gorak Shep, you can head to your teahouse, drop off your bags, have some lunch, and then begin the second part of the day.
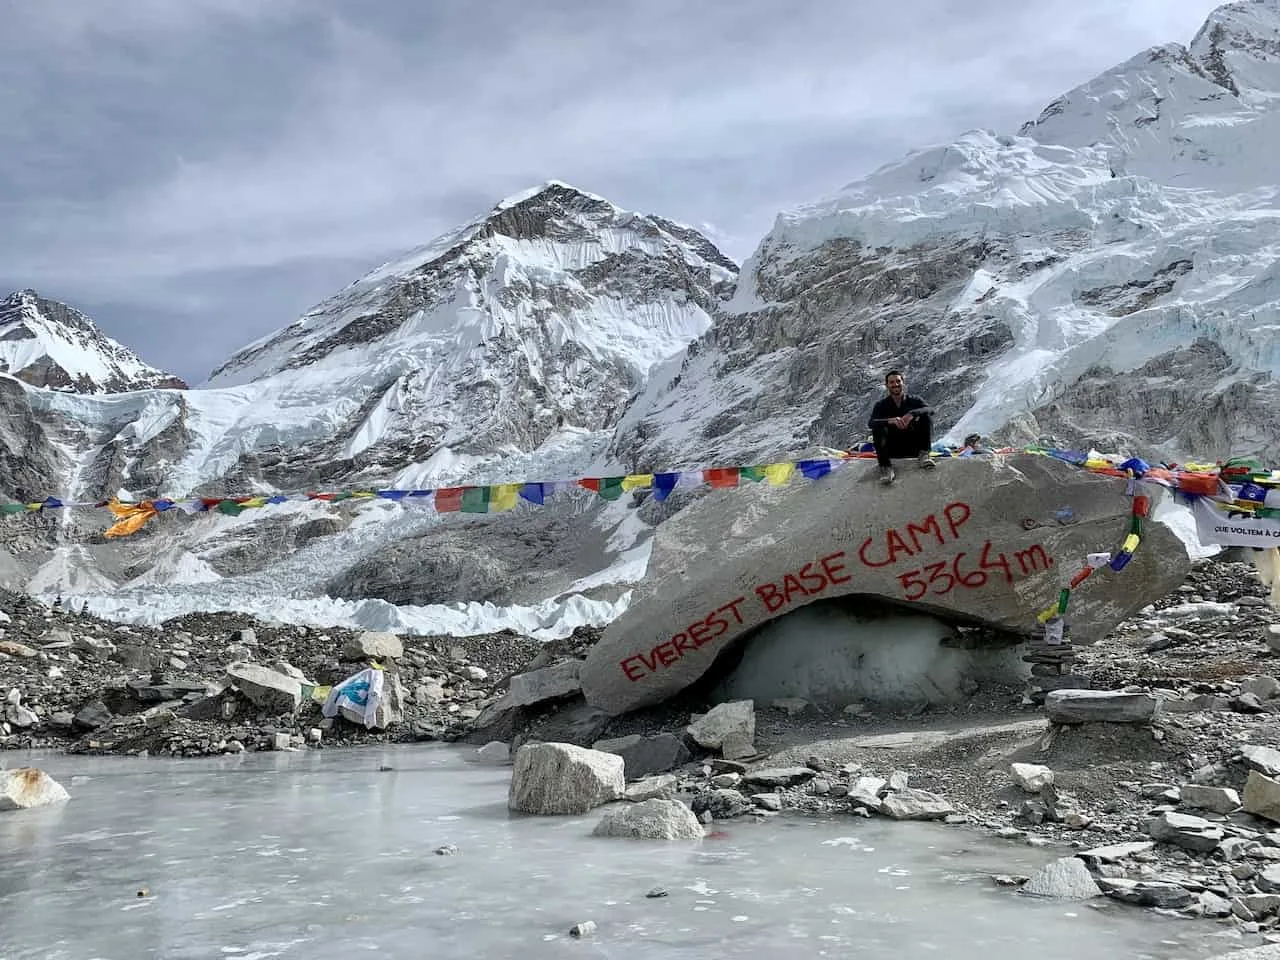
Once you are all set, it is time to set off for Everest Base Camp. This 4 hour round trip hike, will take you from Gorak Shep, right alongside the Khumbu Glacier and ultimately to the final destination of Everest Base Camp.
At Everest Base Camp, you can enjoy the views of the Khumbu icefall that sits below Mount Everest alongside the surrounding mountains and landscape. You will be able to see just the tip of Everest from base camp, as you sit back and take in the views.
Once done, it is just right back to Gorak Shep, where you will spend the night before heading back towards Lukla on day 9.
Hiking Tip: If it is a clear day in the afternoon of day 8 I would recommend switching Everest Base Camp to day 9 and Kala Patthar to day 8 for sunset.
The clouds usually build up as the day goes on which can ruin sunsets over Everest, and is why most people just opt for Kala Patthar on the morning of day 9. If it does happen to be clear though in the afternoon of day 8, then I would opt for the switch.

Everest Base Camp Trek Day 9: Kala Patthar + Gorak Shep to Pheriche
Duration: 8 Hours
Distance: 9.4 miles / 15.2 km
Starting Elevation: 16,814 ft / 5,125 m (Gorak Shep)
Kala Patthar Elevation: 18,176 ft / 5,540 m
Ending Elevation: 13,911 ft / 4,240 m (Pheriche)
True Elevation Gain: 1,480 ft / 451 m
Net Elevation Gain: -2,903 ft / -885 m (Gorak Shep to Pheriche)
Learn More → Kalapathar Trek & Gorak to Pheriche Day 9
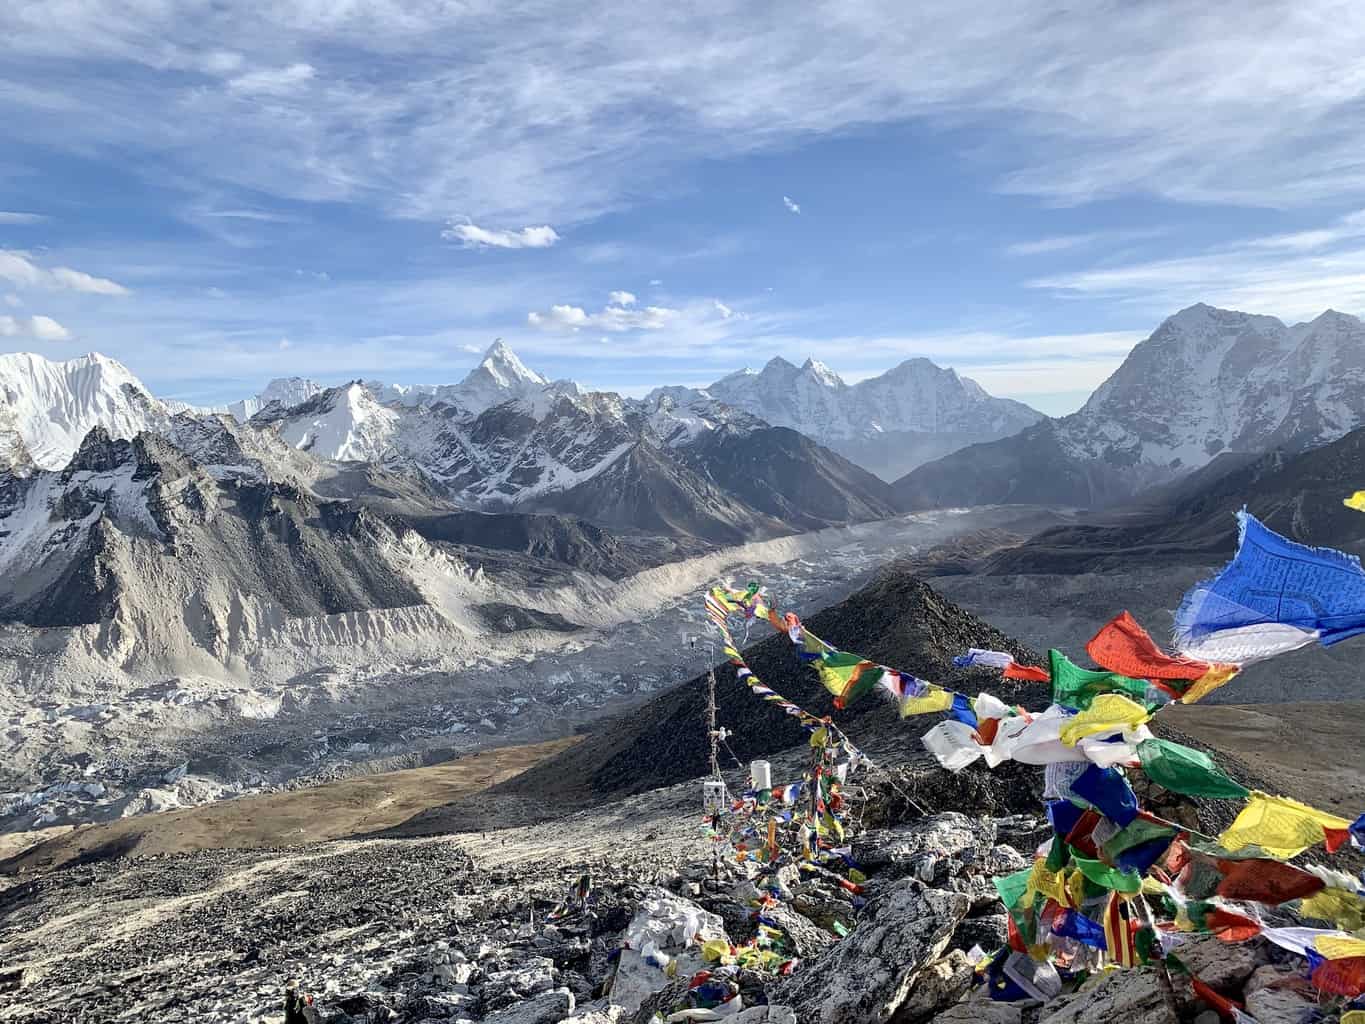
Before heading back towards Lukla, you will have the chance to climb to the highest point of the Everest Base Camp trek – Kala Patthar. At 18,176 ft / 5,540 m, it not only is the highest point of the trek, but it also offers the best views of Mount Everest.
If you didn’t head there for sunset on day 8, you can opt for a sunrise or early morning trek on day 9 to the summit. Throughout the climb up, the views will just get better and better until you reach the peak.
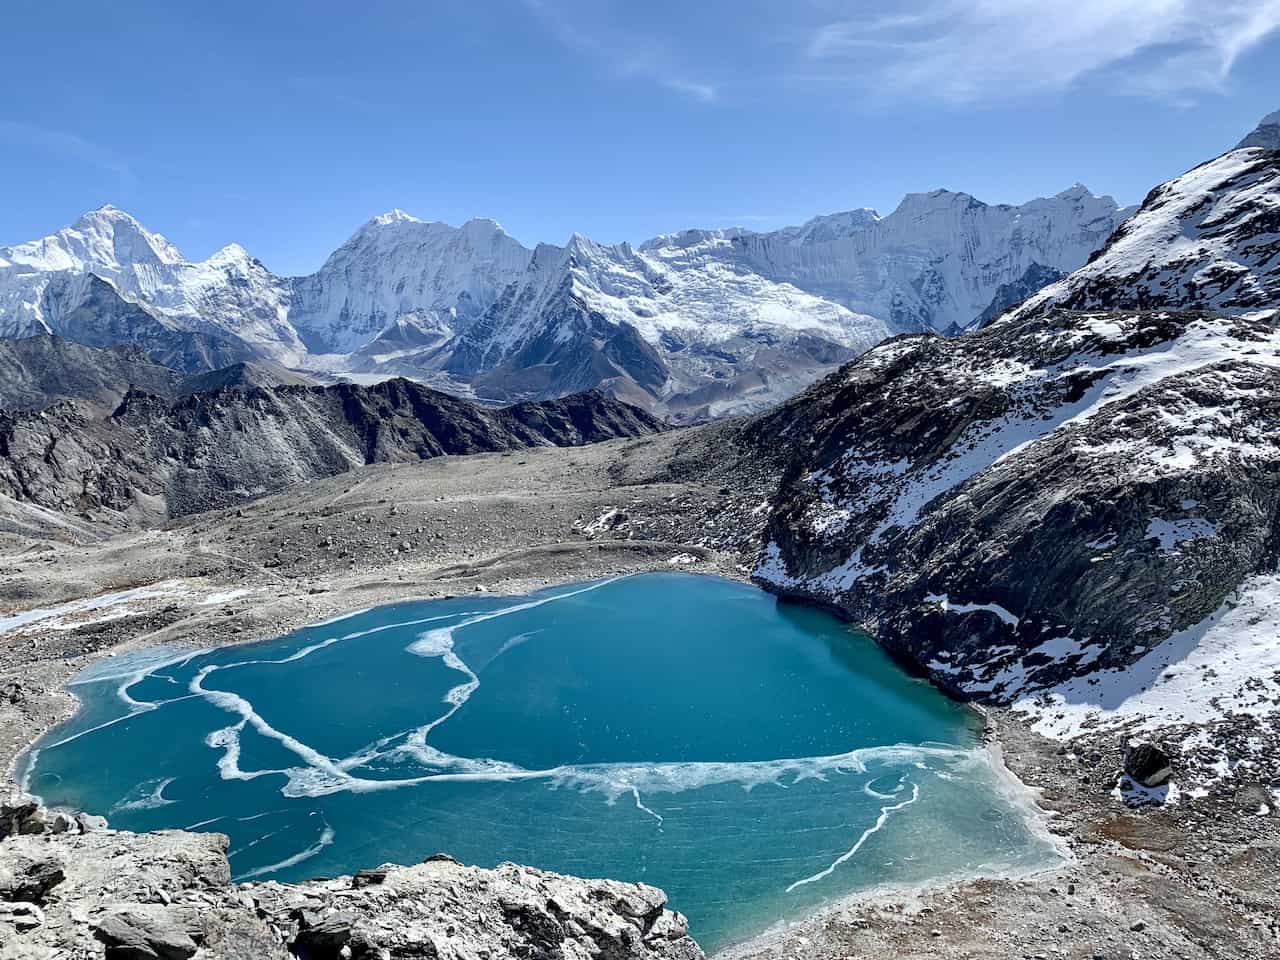
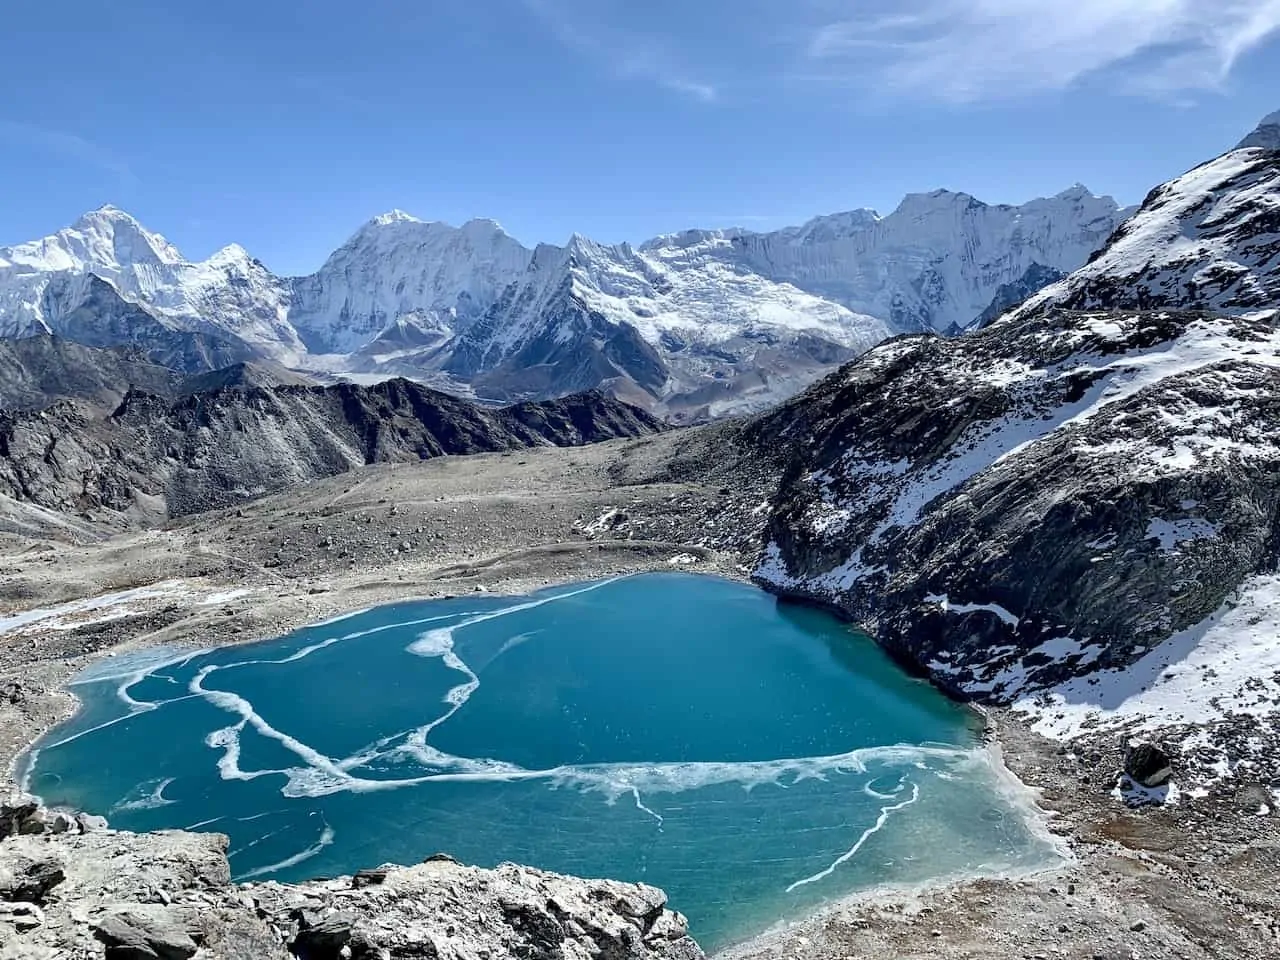
From there you will have a good chunk of Everest out in front of you with the icefall, glacier, lakes, and surrounding mountains completing the landscape.
Once complete with your time up on Kala Patthar, it is back to Gorak Shep, where you will pack up and begin the trek back. The rest of the day will be spent heading from Gorak Shep to Pheriche as you retrace your route through the Khumbu.

Everest Base Camp Trek Day 10: Pheriche to Namche Bazaar
Duration: 6 Hours
Distance: 12.1 miles / 19.5 km
Starting Elevation: 13,911 ft / 4,240 m
Ending Elevation: 11,286 ft / 3,440 m
True Elevation Gain: 2,234 ft / 681 m
Net Elevation Gain: -2,625 ft / -800 m
Learn More → Pheriche to Namche Bazaar Day 10
Day 10 will have you continuing that route back to Lukla as you make the long 12.1 miles / 19.5 km trek from Pheriche to Namche Bazaar. Most of the day will be similar to days 4 & 5 as you just head in the opposite direction.
While this is a day where you will be losing a lot of elevation, there will still be some strenuous uphill sections throughout the trek. At day’s end though you will be right back in Namche Bazaar, where you will spend the night.
Tip: if you did not visit the Sagarmatha National Park Museum above the village earlier on in your trek, I would recommend heading there when you arrive in Namche on day 10 or on day 11.


Everest Base Camp Trek Day 11: Namche Bazaar to Lukla
Duration: 7 Hours
Distance: 11.9 miles / 19.1 km
Starting Elevation: 11,286 ft / 3,440 m
Ending Elevation: 9,318 ft / 2,840 m
True Elevation Gain: 2,904 ft / 885 m
Net Elevation Gain: -1,968 ft / -600 m
Learn More → Namche Bazaar to Lukla Day 11
The final day of the Everest Base Camp trek takes you from Namche Bazaar back down to Lukla. This will be the same route as days 1 and 2 as you retrace your steps and make your way to the starting point of the trail.
Along the way you will pass by that first initial viewpoint area (day 2), where you can get a final glimpse of Mount Everest before losing a good amount of elevation towards Phakding. There will be plenty of suspension bridges, river views, and small villages to enjoy along the way.
Once you arrive in Phakding, you can take a nice break before finishing up the last portion of trail towards Lukla. This final section from Phakding to Lukla will be an uphill climb as you complete 11 days of trekking the Himalayas.
After arriving back in Lukla on day 11, it is just one more overnight in a teahouse before catching your flight back to Kathmandu on day 12.

18) Additions to the Trek
While the Everest Base Camp trek is the fan favorite here, there are many other additions that can be added to your time on the trail if you would like to spend even more time exploring the Himalayas. Below are a few of those options:
Three Passes Trek
The Three Passes trek is a longer 16+ day journey that takes you up and down three strenuous mountain passes as you make more of a loop around the region.
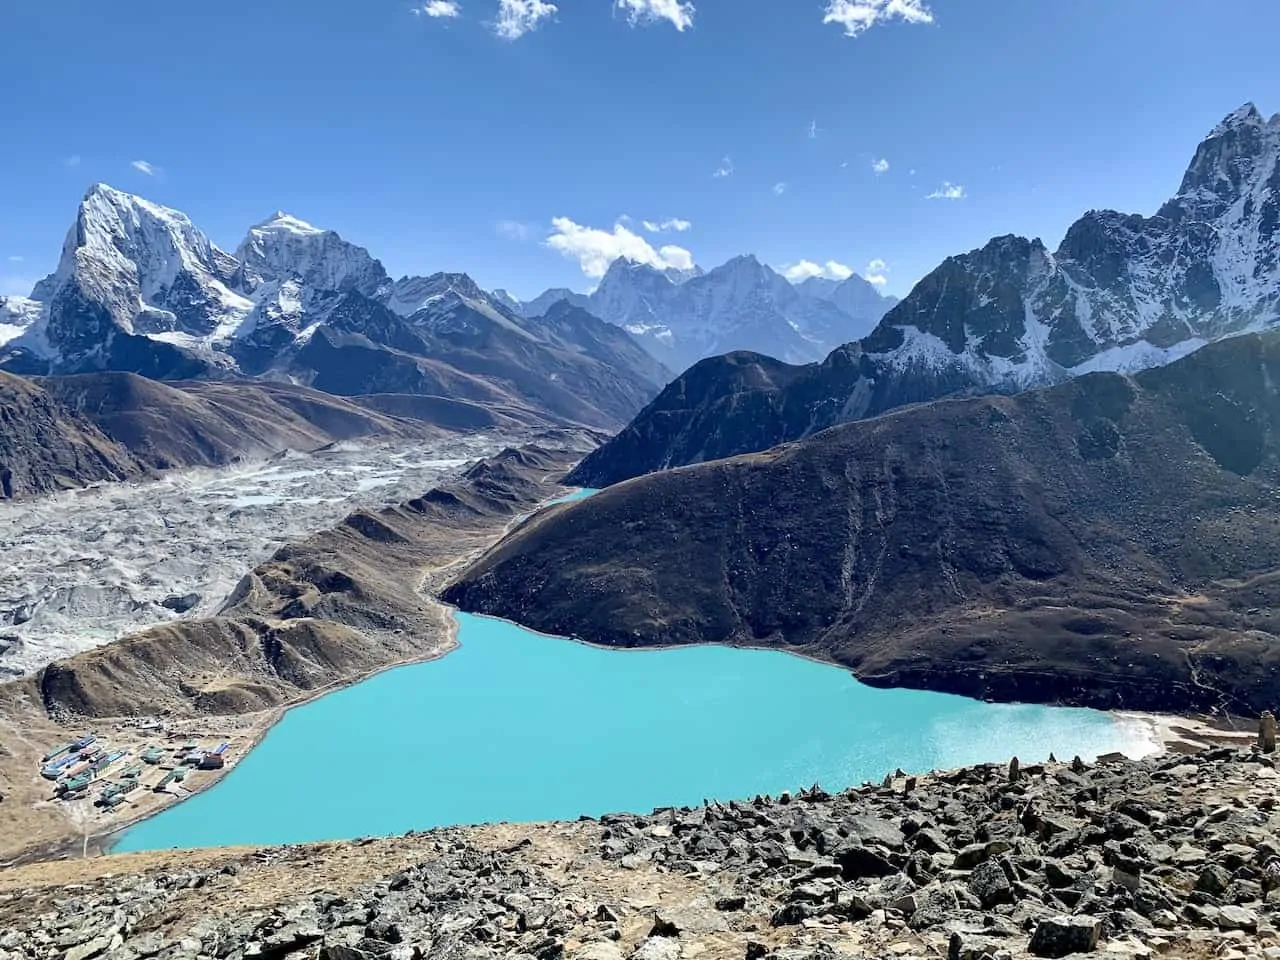
There will be plenty of overlap with the normal EBC route, but you will also get to enjoy highlights such as Chhukung Ri, Kongma La Pass, Cho La Pass, Renjo La Pass, Gokyo Lakes, and Gokyo Ri.
Gokyo Lakes
Another option here is to just add in the Gokyo Lakes on top of Everest Base Camp.
This can be done in a few ways but one of the most popular choices is to visit EBC, then head towards the Cho La Pass to Gokyo, and then back to Namche, which can be done via the Renjo La Pass if you choose.

Island Peak
For the more intense climbers, there is an option to climb up Island Peak (20,305 ft / 6,189 meters) from the village of Chhukung.
While it is a high climb, it is not the most technical one, and could be a great option for those that want to finally cross the 20,000 feet / 6,000 meter threshold.
Jiri/Salleri
You also have the chance to avoid the flights to and from Kathmandu. Instead of flying in, you could take an 8 hour bus ride to either Jiri or Salleri.
From these two towns you are looking at a 4+ day route that takes you up to (or down from) Lukla as you explore a much less frequented region of the Himalayas.
19) Everest FAQs
By now you should be a full-on expert about the EBC trek. But I thought it may also be helpful to answer some of the most frequently asked questions regarding the trek in general (many of which can be found somewhere in the guide).
How Long Does It Take to Trek to Everest Base Camp?
11 days is the standard amount of time for the Everest Base Camp trek (as this guide has laid out).
However, you can extend the trek by a couple days if you would like to better acclimatize on the way up by spending 3 nights in Namche instead of 2. You can also add a day on the way down to better spread out some of the longer hiking days.
How Hard is it to Trek to Everest Base Camp?
It really depends on your hiking experience and your general fitness. For some people, this can be a walk in the park.
For others, it can be extremely difficult and an unattainable goal. In general, this is considered a more difficult trek than other multi day hiking routes you may have come across.
This is mostly due to the fact that you are not only hiking 5+ hours and gaining a couple thousand feet of elevation per day, but you also are doing it all above 10,000+ feet of altitude.
How Fit Do I Have to be to Trek to Everest Base Camp?
As just mentioned above, you do need to be relatively fit and have some solid hiking experience to complete the trek to Everest Base Camp.
It is not only about spending so much time on your feet each day, but it is also the large amount of elevation gain and loss that you will come across throughout the entirety of the trek.
I would be sure to spend time training, whether that be at the gym on a stairmaster or out in your local mountains.
Is the Trek to Everest Base Camp Dangerous?
From a terrain standpoint, the Everest Base Camp trek is no more dangerous than any other hike around. However, from an altitude standpoint, the trek can be quite dangerous for those who do not acclimatize well.
During my time on the trail I came across several groups of people, who had fellow hikers evacuated out by helicopter to Kathmandu or by foot down to Lukla.
You may be as fit as can be, but if your body does not react well to the altitude then you will be putting yourself in more danger.
When is the Best Time to Trek to Everest Base Camp?
In my eyes, November is the best time to trek to Everest Base Camp. This is mainly due to two reasons – the weather and the crowds.
In order to truly enjoy the Himalayan landscape, you will want the weather to be as clear as possible. You will also want to enjoy a less crowded trail and not worry about teahouses filling up.
A trek in November works for both these reasons and I would highly recommend heading there during that time. If that doesn’t work for you then a Spring visit would be my next recommendation.
Is Everest Base Camp Worth It?
The trek to Everest Base Camp is 100% worth the effort. From the natural beauty of the Himalayas to sleeping at local teahouses, the EBC trek offers it all and more.
Not only that but you also get to hike near the highest mountain in the world! No other trek can offer such an opportunity.

I hope this guide has given you a good sense of how to prepare for the experience and what to expect on the Everest Base Camp trek.
If you have any questions/comments about any of the above feel free to write them in below. I am happy to help out with any and all questions regarding the EBC trek.
All the guides linked throughout the article can be found on the Nepal itineraries and guides page up on the site.
Have fun out there and safe travels!

Letstrip Nepal
Tuesday 14th of July 2026
Everest Basecamp Trek is Not Just a Trek its Life Changing Jorney !!!!
Team Himalaya
Friday 30th of August 2024
Great ost about everest base camp trek . Thank you for sharing
Chitra Ghosh
Wednesday 31st of May 2023
Hi TripTins,
Kindly share your mail id for further communication about The Everest Base Camp Trek.
Thanks, Chitra
Victoria
Monday 20th of March 2023
Hello. I have a (small) fear of heights. I have trekked over bridges and paths with drop offs, but am wondering if there are any (or many) sections of the trek on paths with particularly large drop offs to the side of the trail. Thank you.
Charles
Wednesday 22nd of March 2023
Hi Victoria - there is nothing I can remember about the trail that included large drop offs. You will have very high suspension bridges to cross over, and there will be instances where you are hiking along the mountainside. But the trail is certainly wide enough to have a safe enough area to hike without being close to the edge. If you are hiking up the side hikes such as Nangkartshang / Kala Patthar, you will expect some steeper inclines where a fear of height may come more into play.
Lars
Sunday 26th of February 2023
Hi there, thank you for all the great information. Do you have a tip how and where to book accommodation upfront? I found lots of places on Google maps, but most of them don't have a website. We are planning to go there in April (EBC and Gokyo without agency)
Charles
Monday 27th of February 2023
Hi Lars - there really isnt a way to book teahouses ahead of time (unless you have a local agency help you out). You really should have no problem finding availability once you arrive. The one spot where accommodation may be an issue would be Gorak Shep. But as long as you get a head start on the day and arrive on the earlier side there, you should not have an issue. Hope you have a great time!