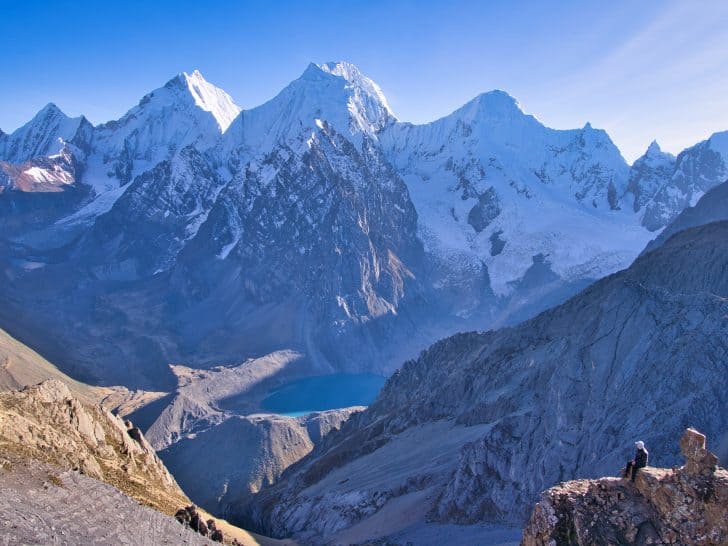
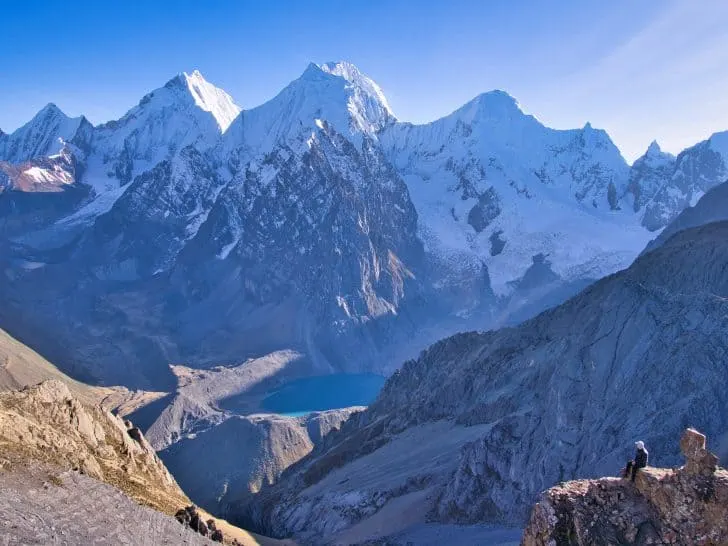
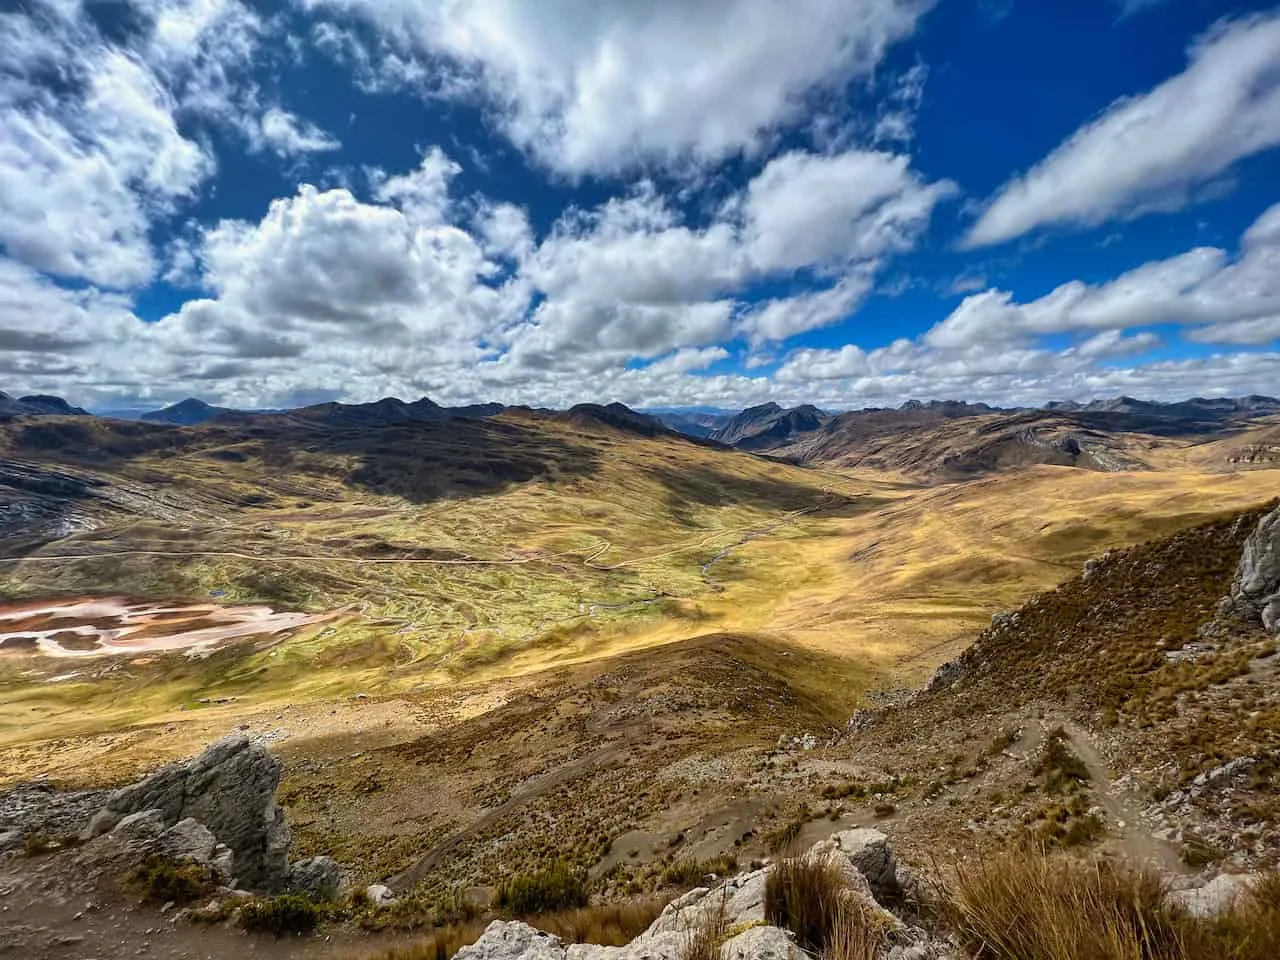
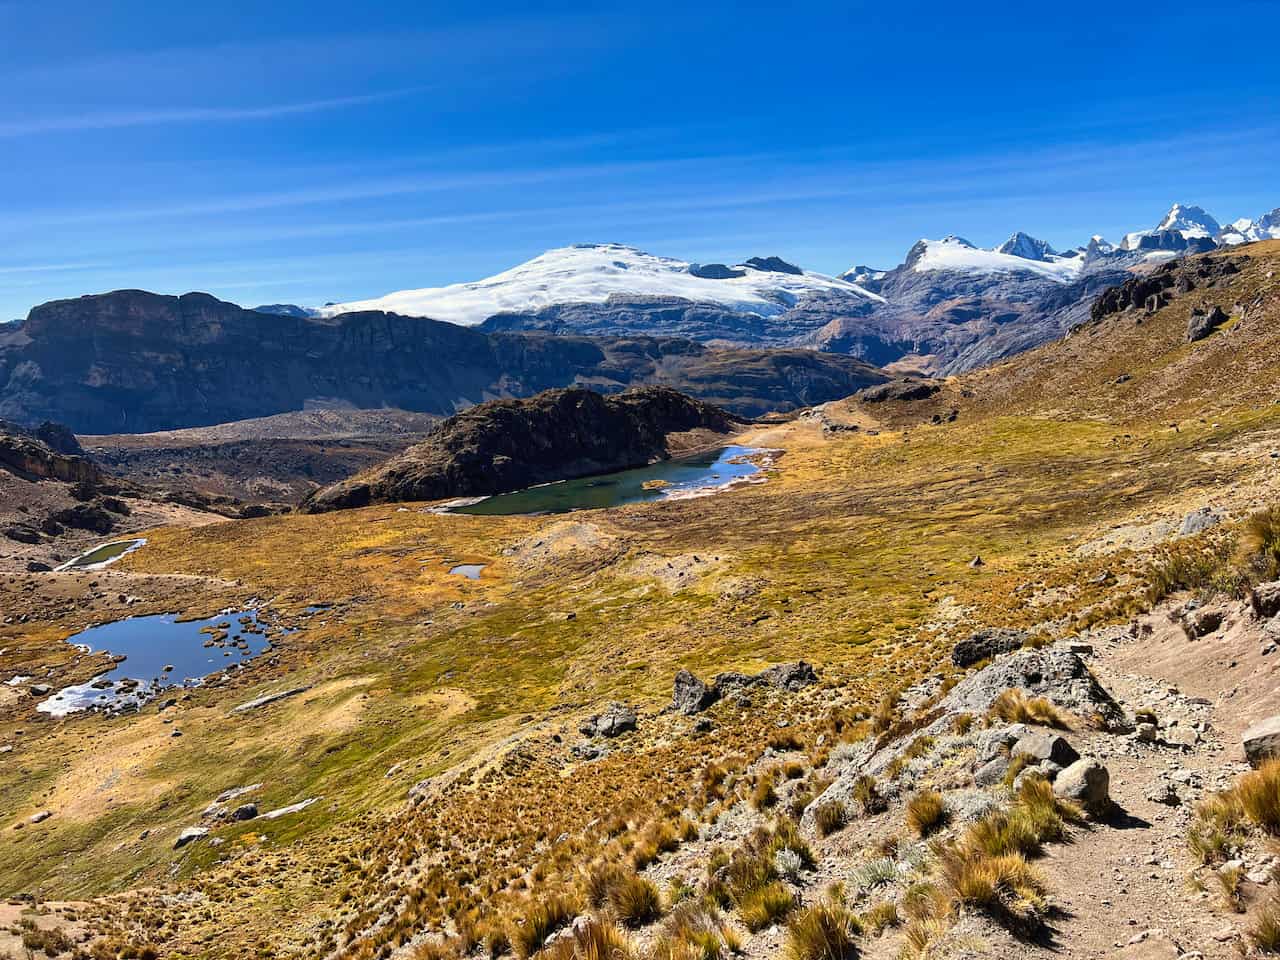
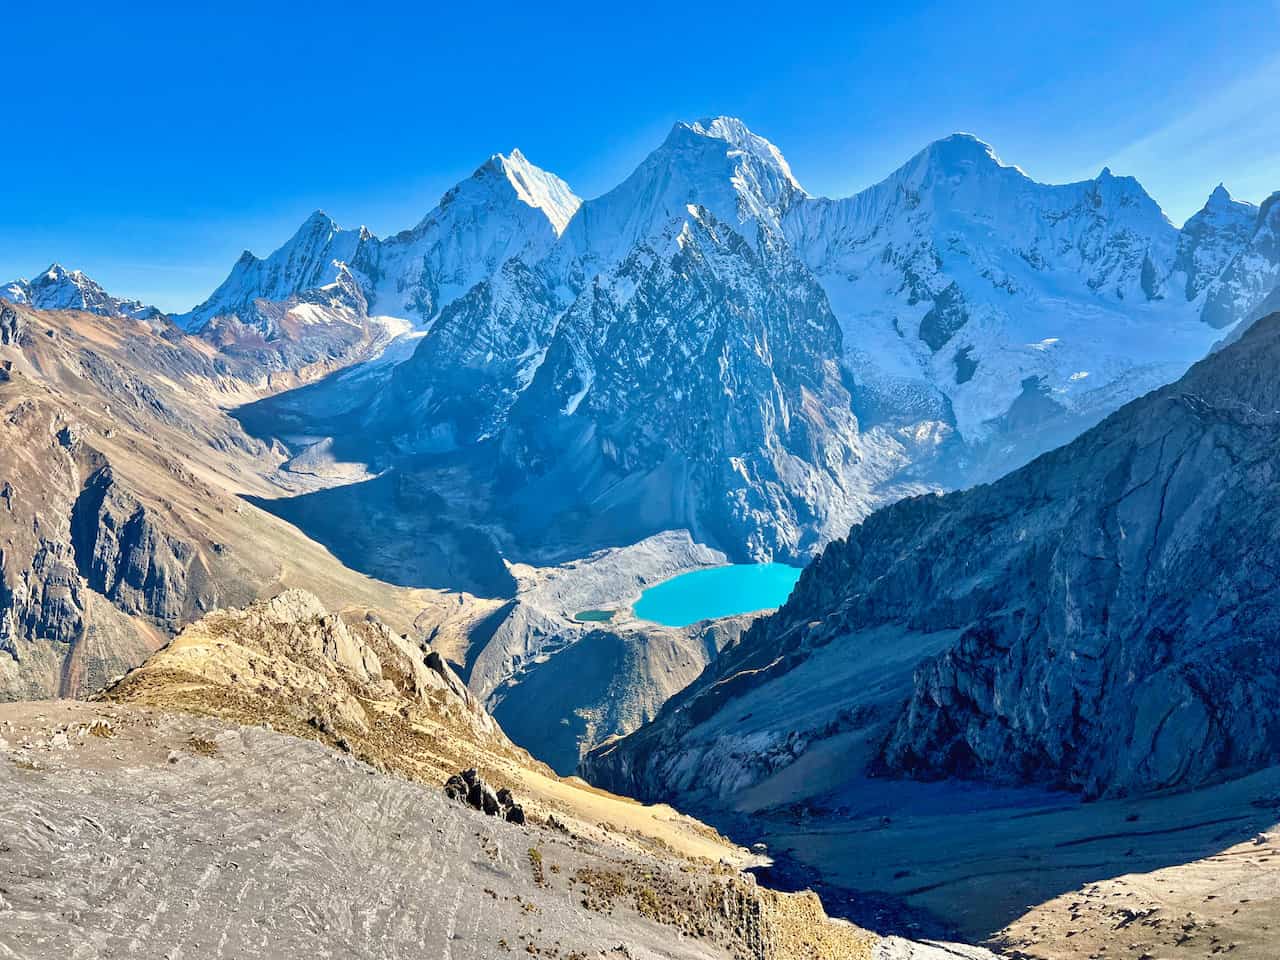
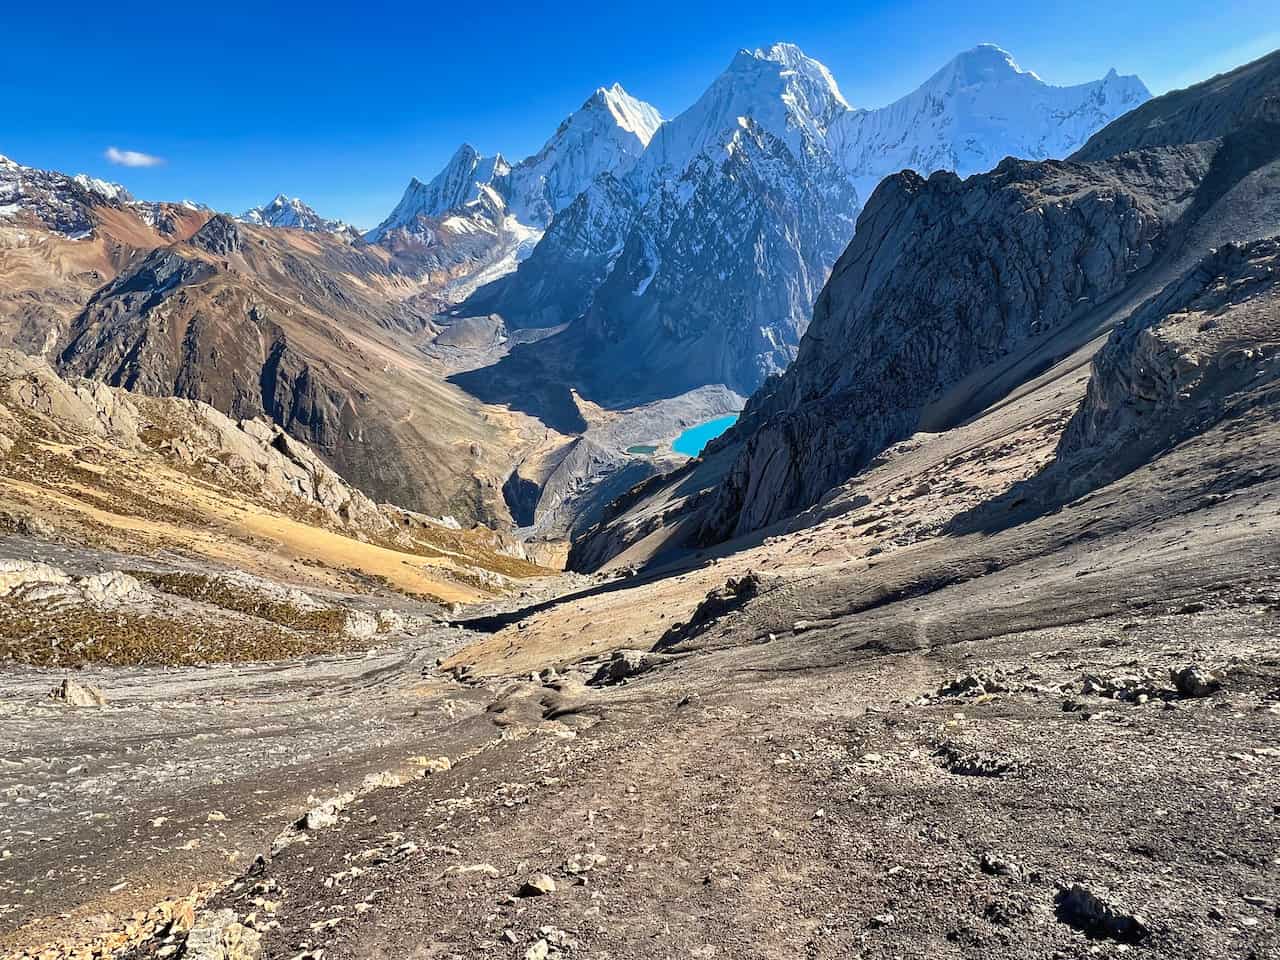
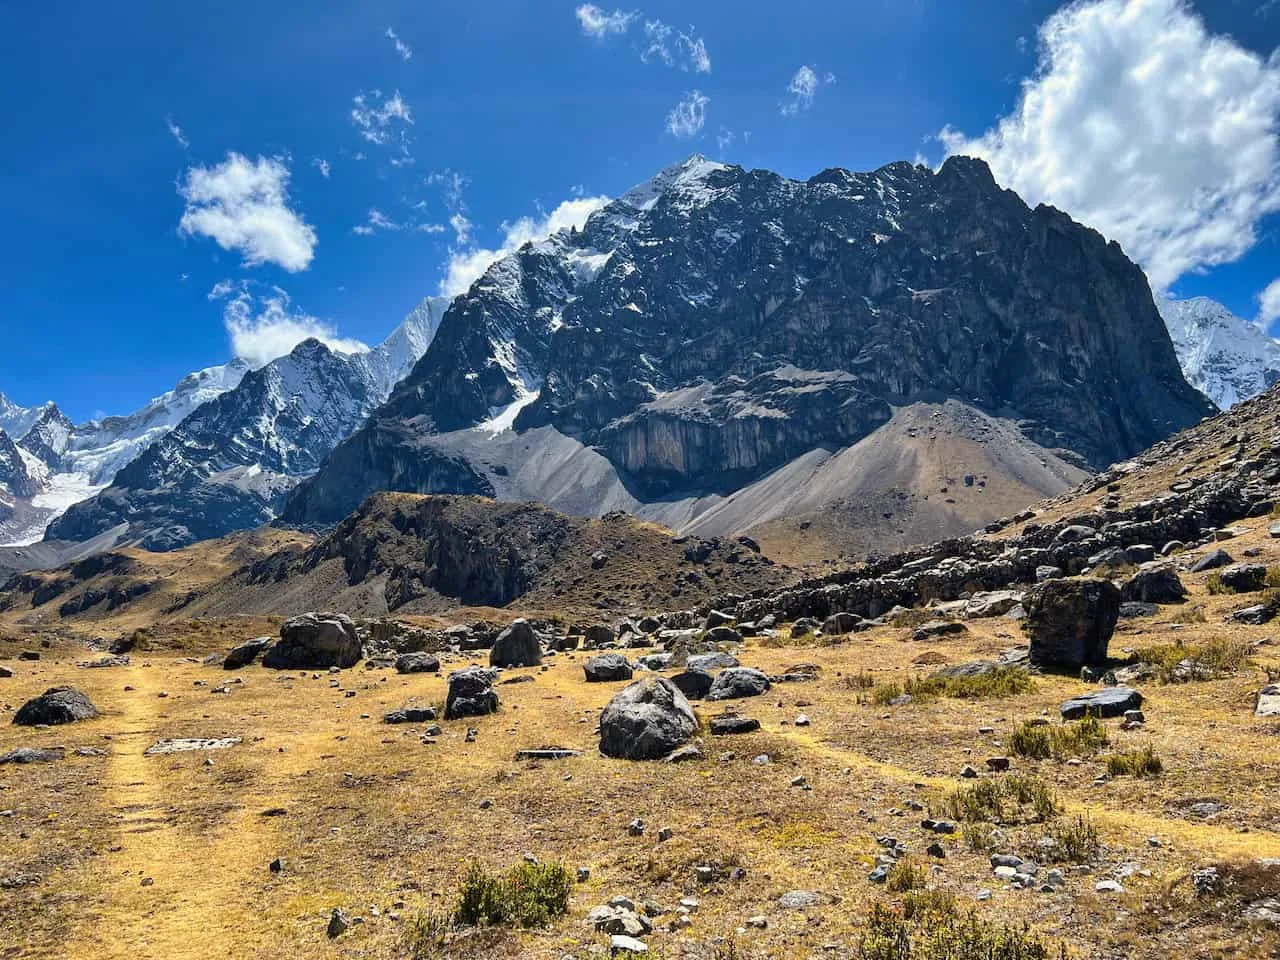
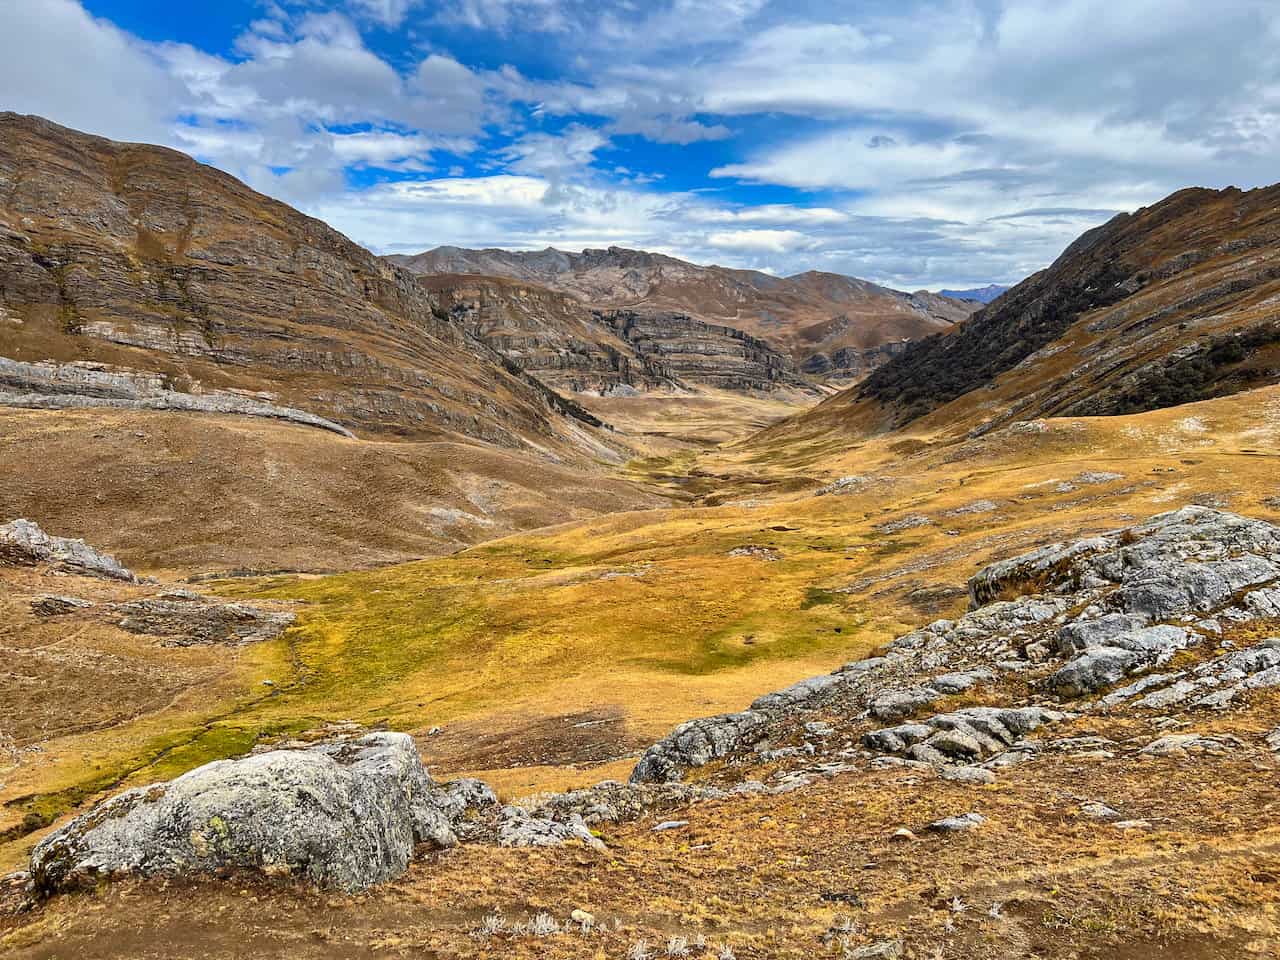
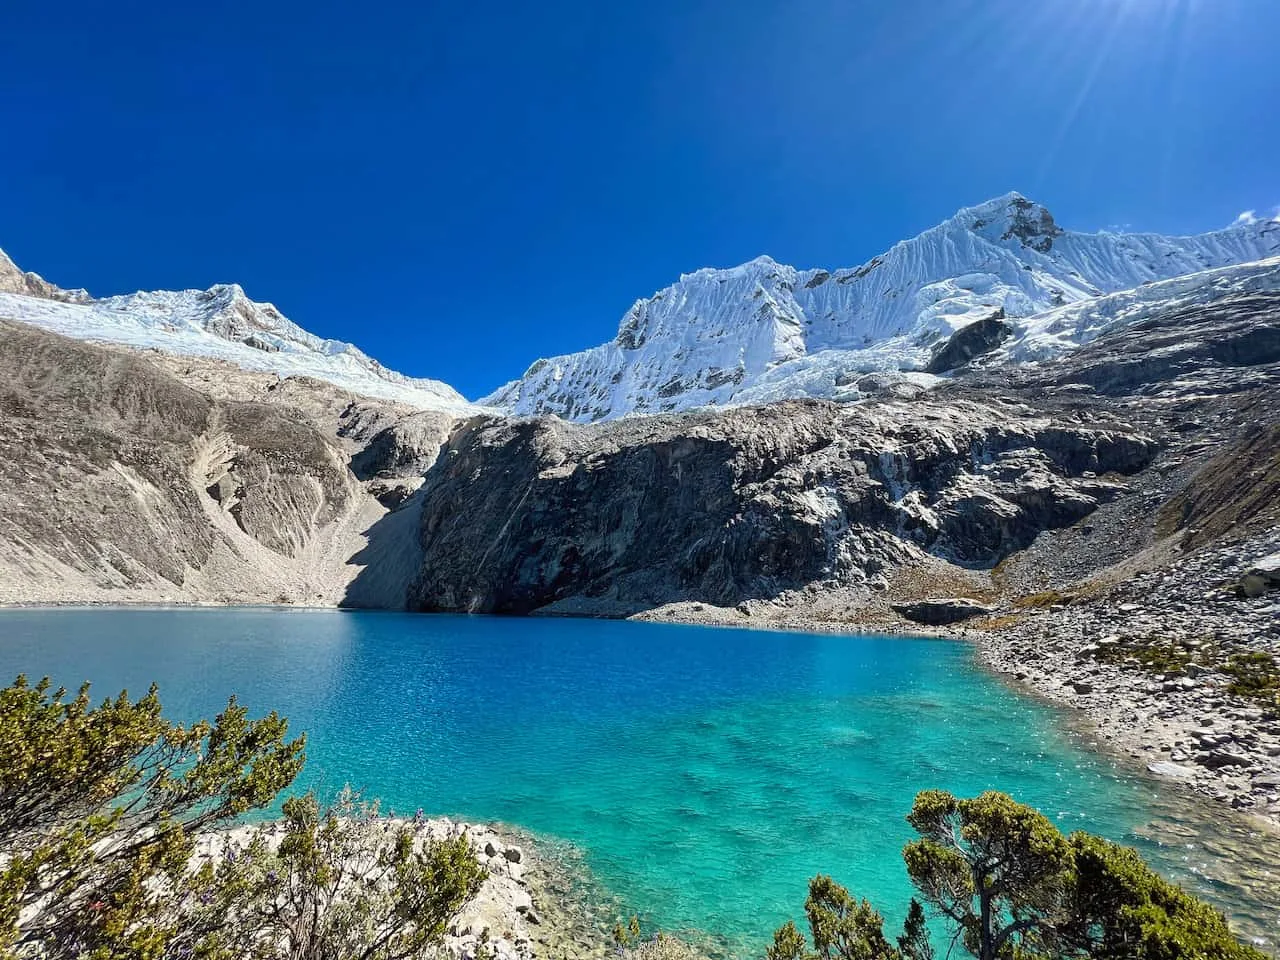
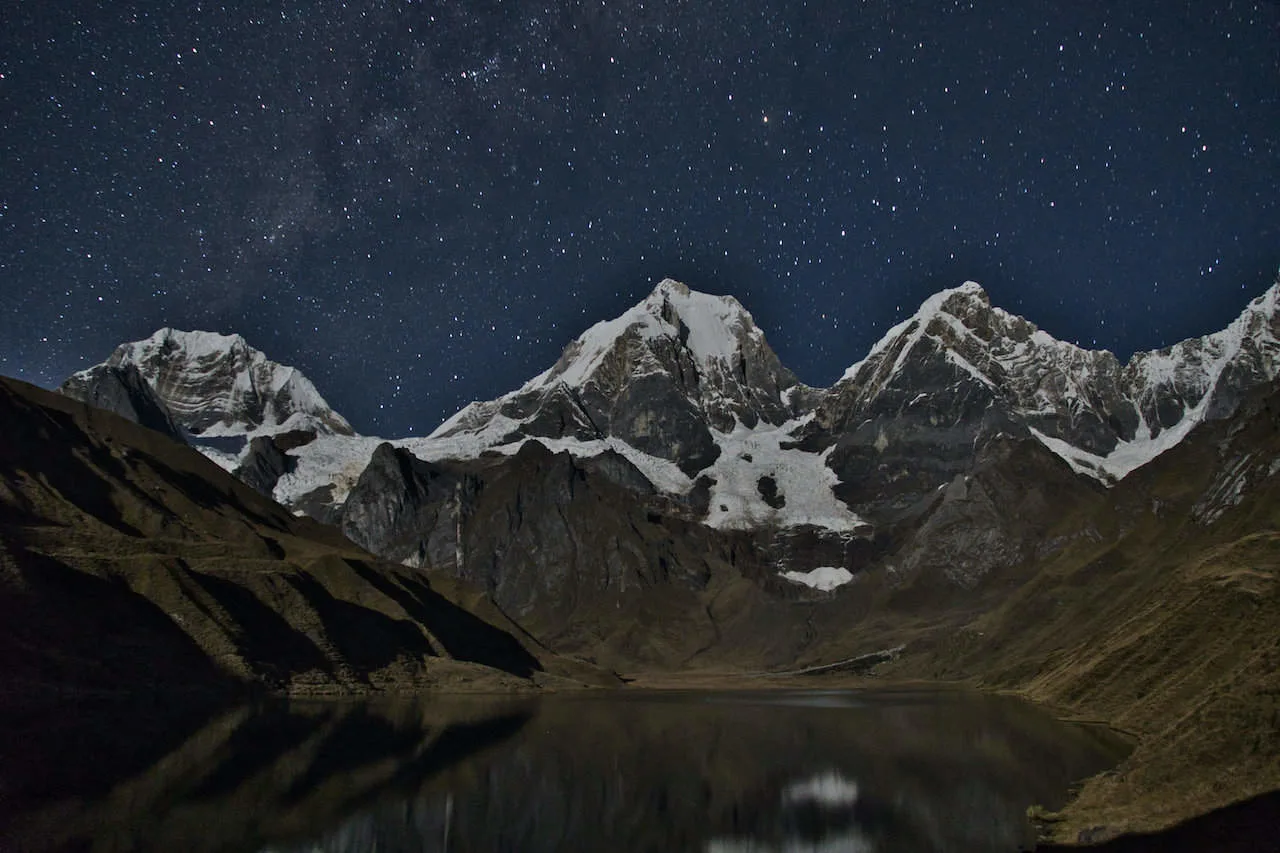
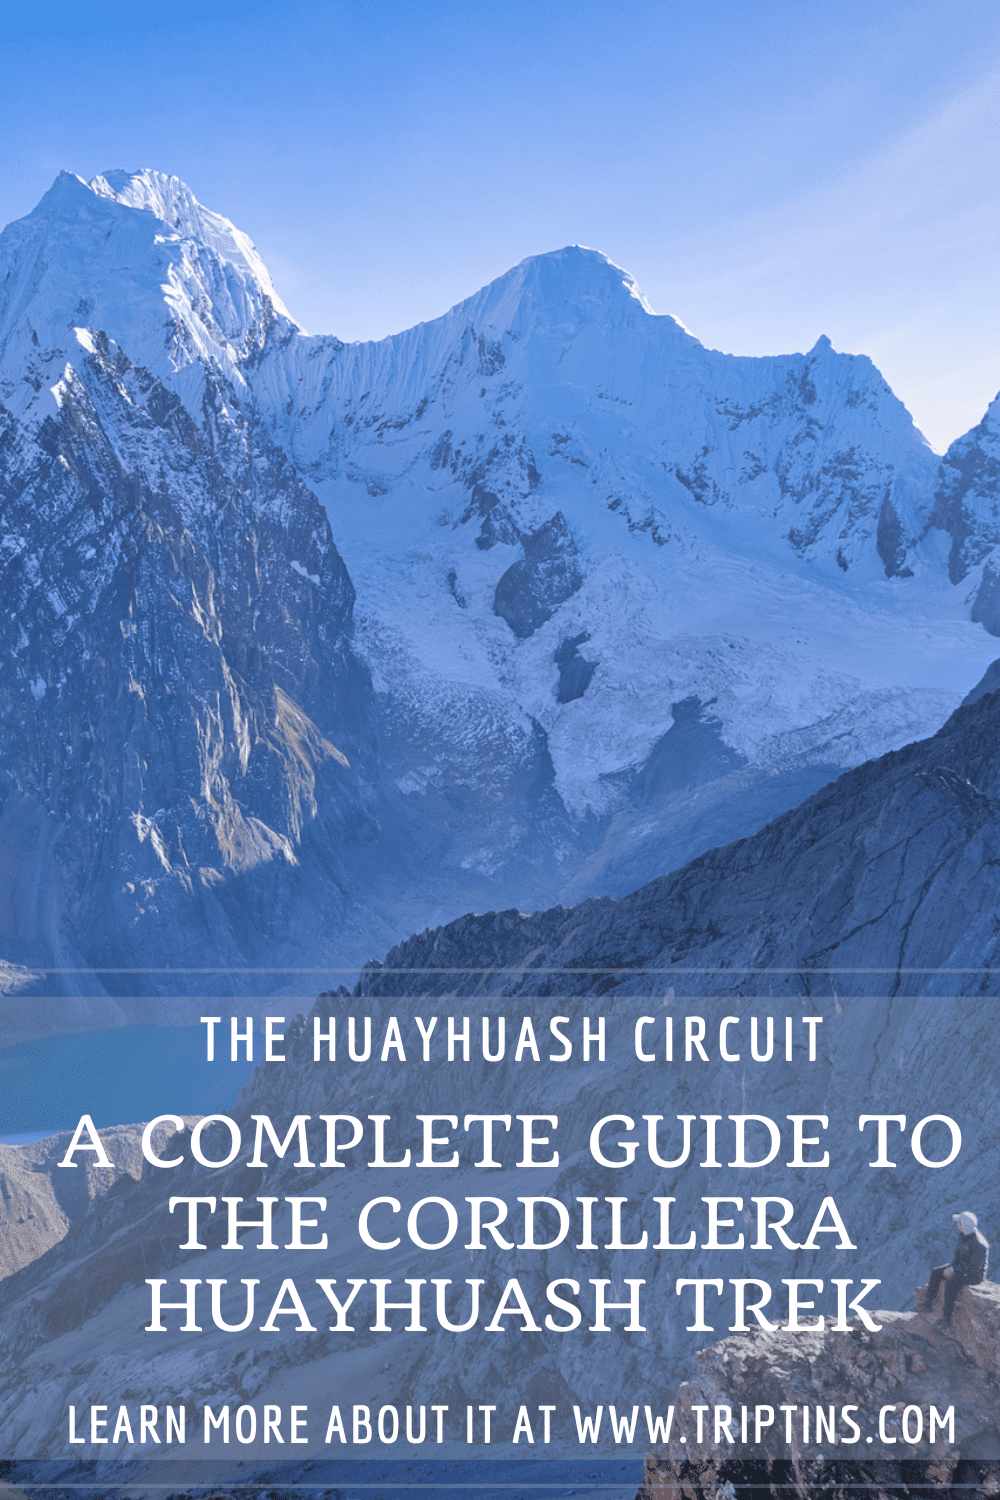
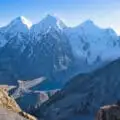
The Cordillera Huayhuash Circuit trek of Peru is known to be one of the top hiking circuits in the world.
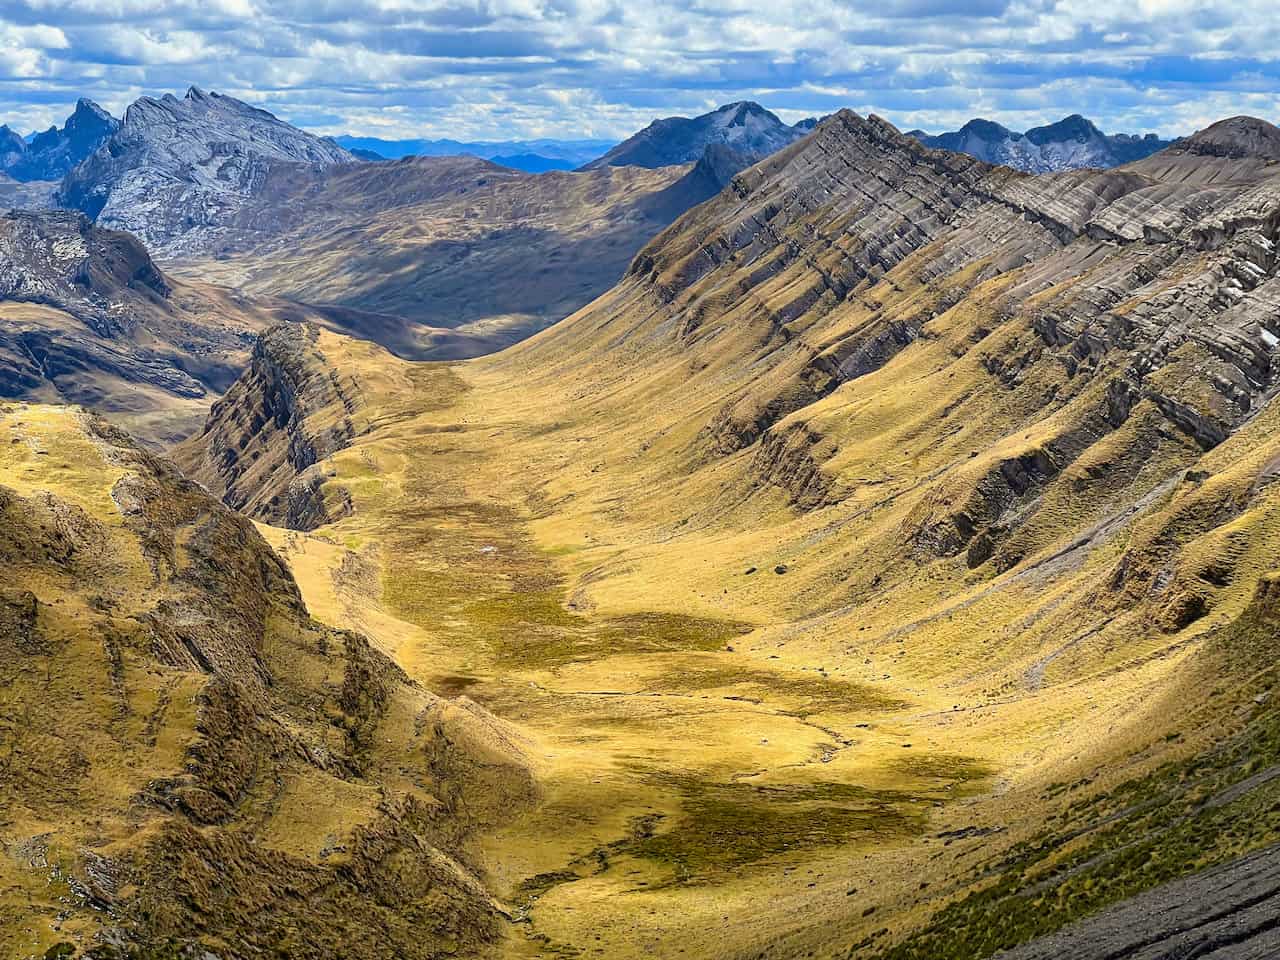
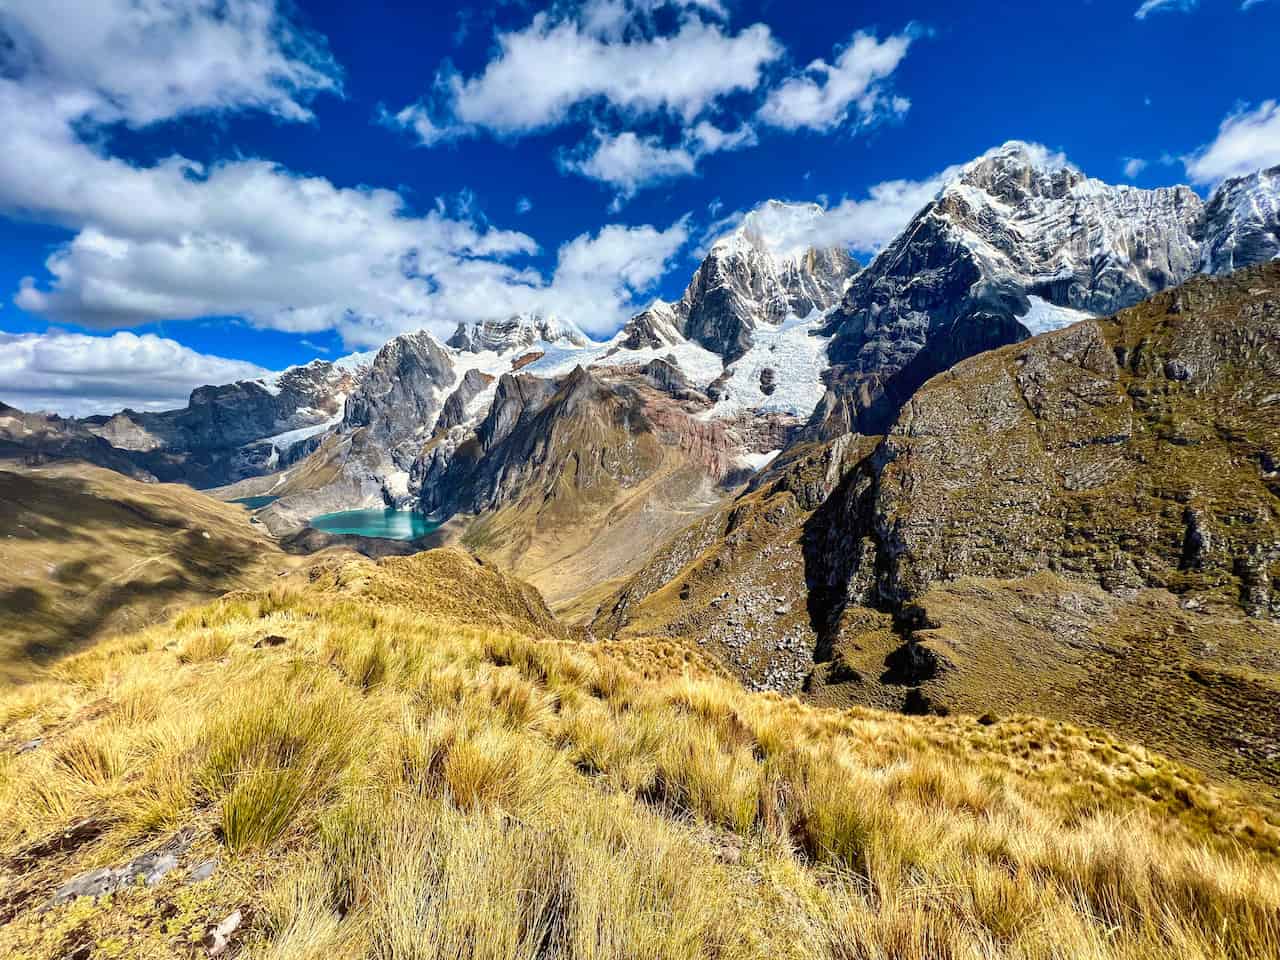
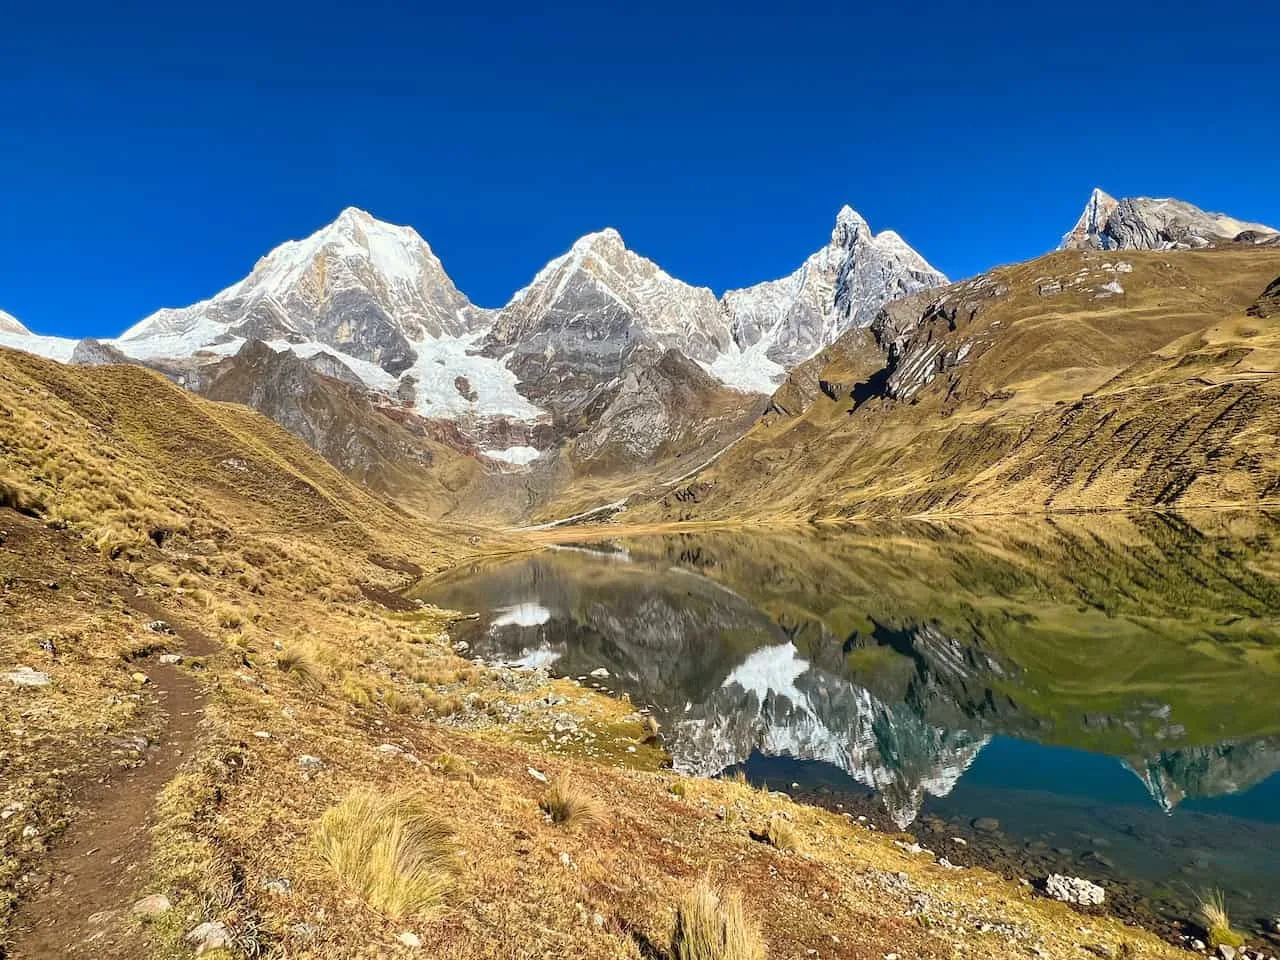
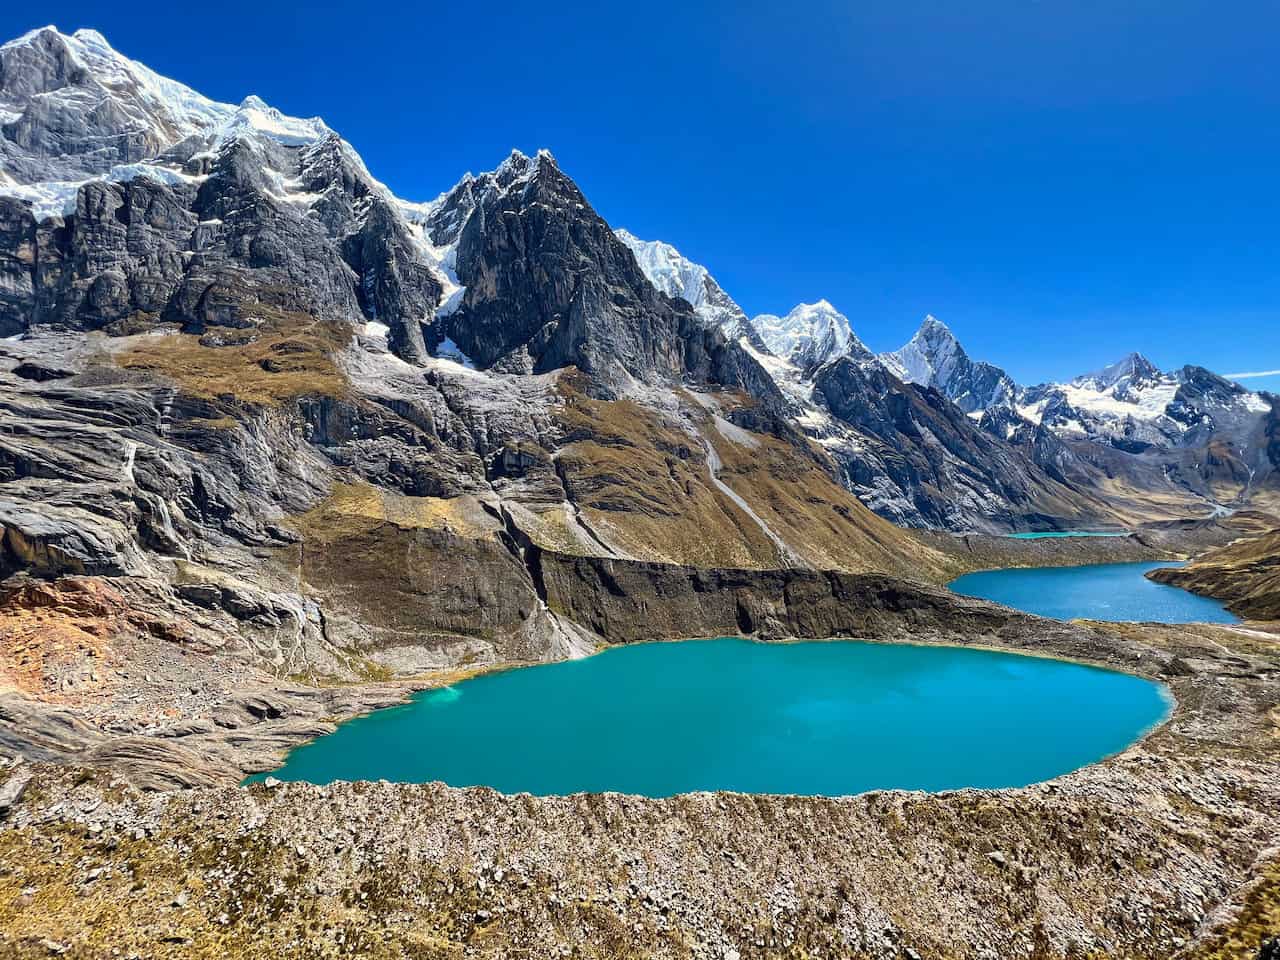
Throughout a Huayhuash trek, you will encircle this mountain range full of snowcapped peaks, alpine lakes, glacier rivers, and plenty of jaw dropping viewpoints.
Taking on the Cordillera Huayhuash is no easy task though. The full circuit entails around 10 days of strenuous hiking, up and over mountain passes, and all at a very high altitude.
But if you are up for the task, you will be rewarded with one of the most beautiful experiences that the hiking world has to offer. For years to come, you will get to look back at your time on the Cordillera Huayhuash circuit as one of your most memorable trekking journeys.
This Cordillera Huayhuash Circuit trek guide is meant to be the most comprehensive and thoughtful overviews out there. By the end of reading through, you should have all the relevant information you need to know to enjoy the Huayhuash trek for yourself.
* Affiliate Disclosure: This post may contain affiliate links, which means I may receive a commission if you make a purchase through the links provided, at no additional cost to you. Thanks for supporting the work I put into TripTins!
1) Cordillera Huayhuash Circuit Overview
The Cordillera Huayhuash is a mountain range in Peru part of the larger Andes range, and measures just 30 km long by 15 km wide (18.5 miles by 9.3 miles).
Within the mountain range there are seven peaks that rise higher than 6,000 meters (19,685 feet) in elevation and more than 40 mountains above 4,000 meters (13,210 feet).
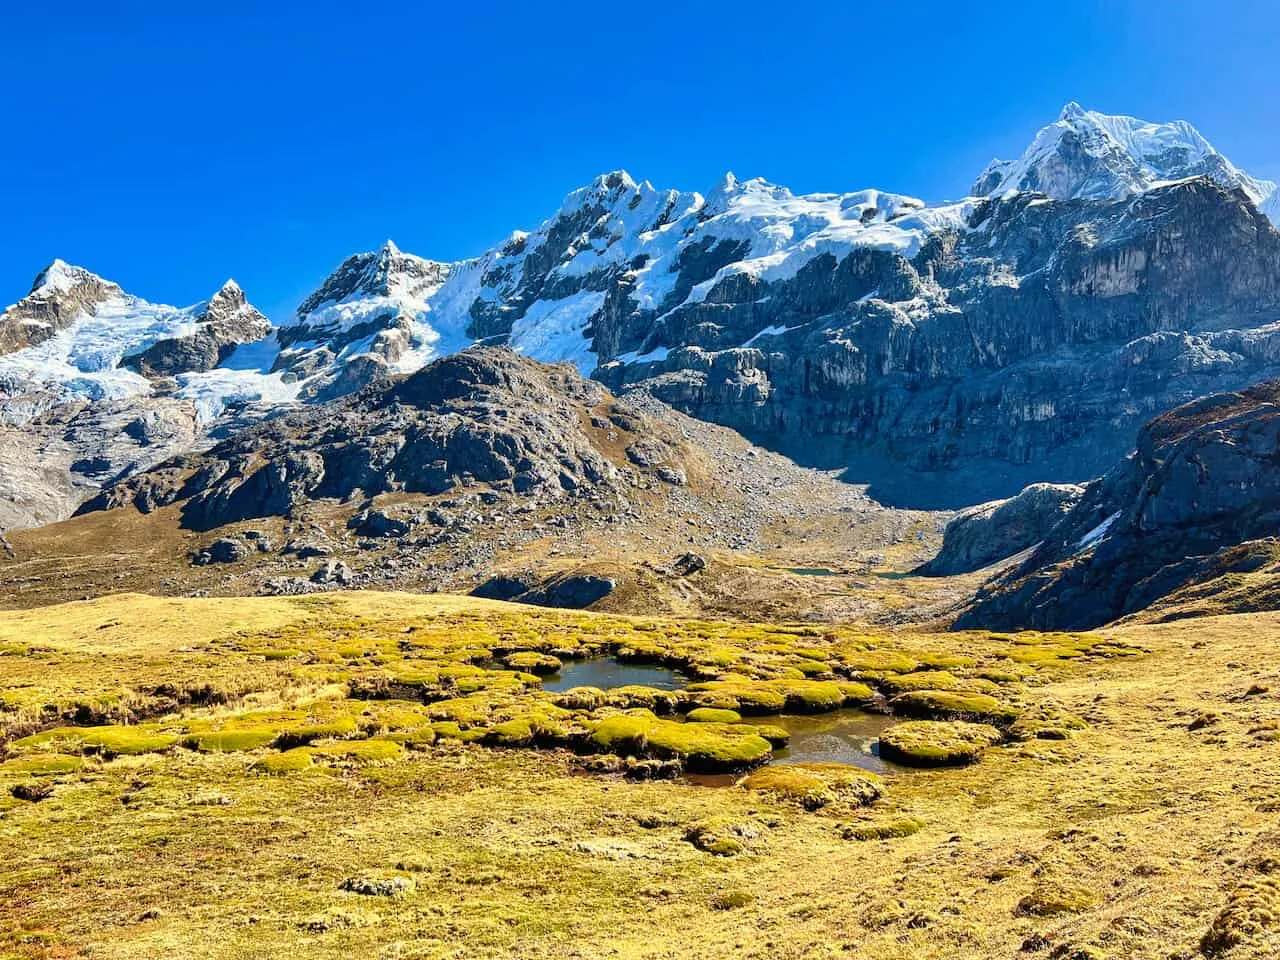
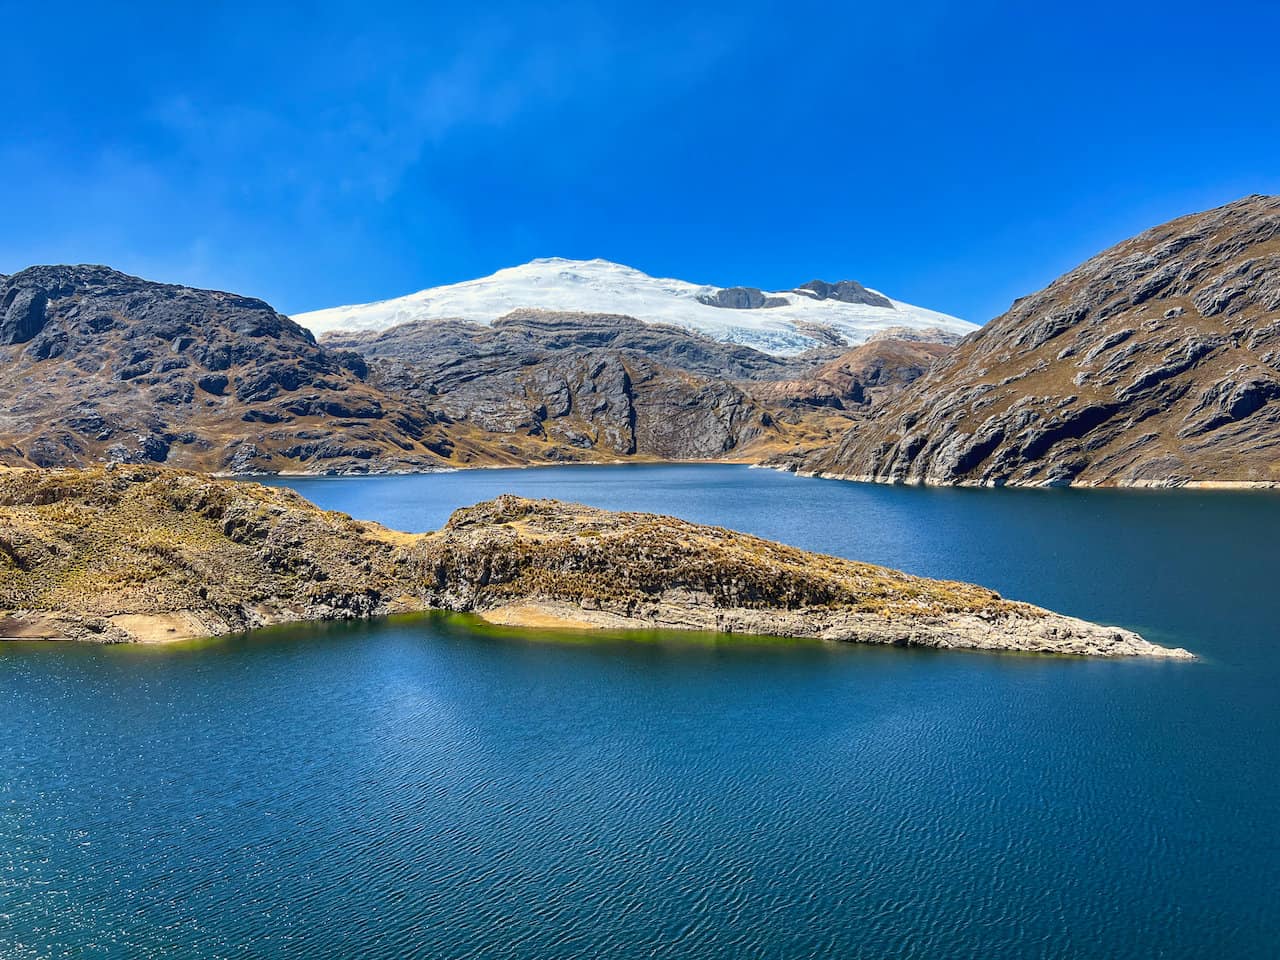
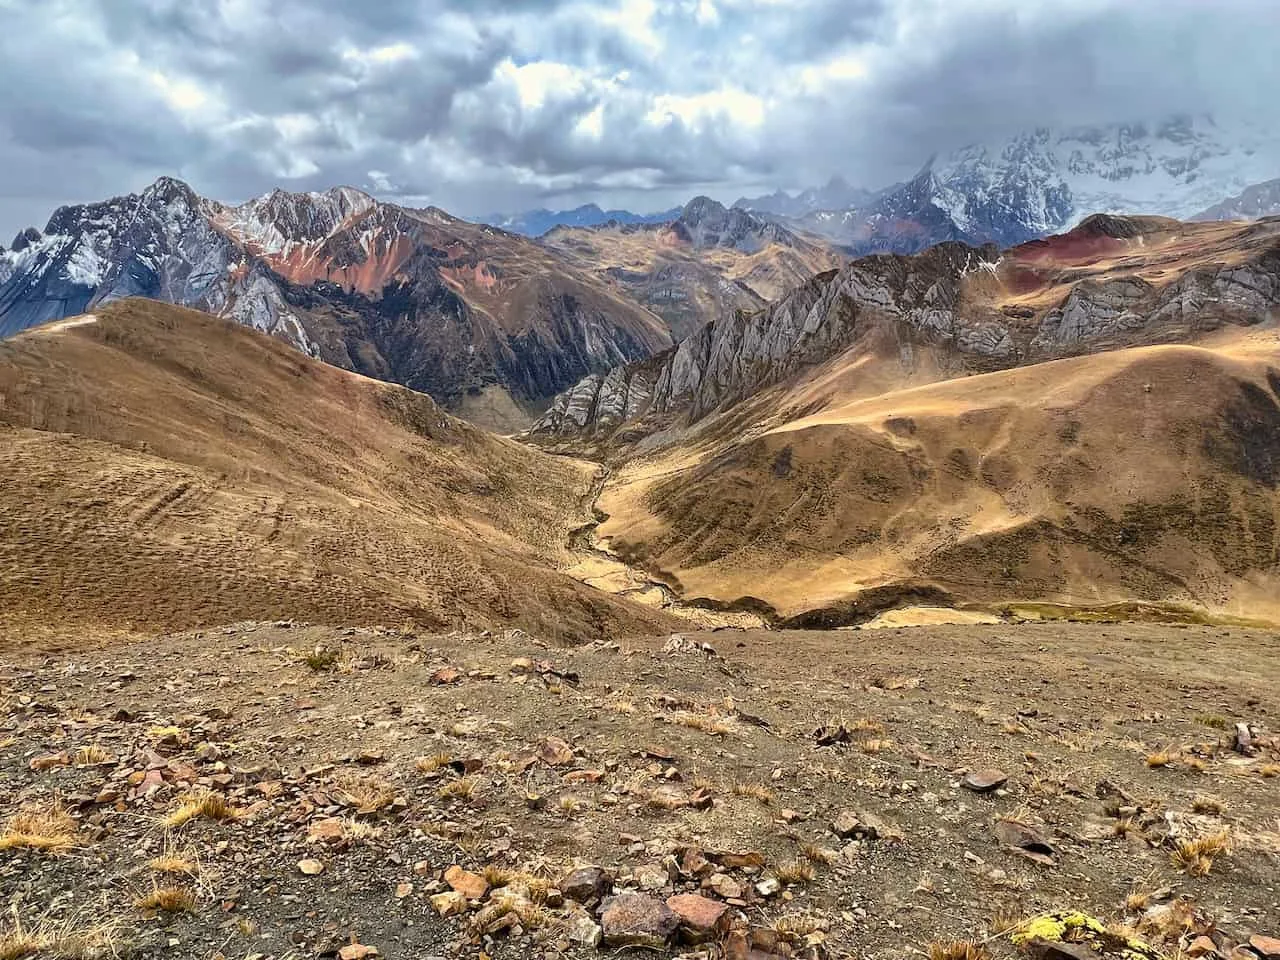
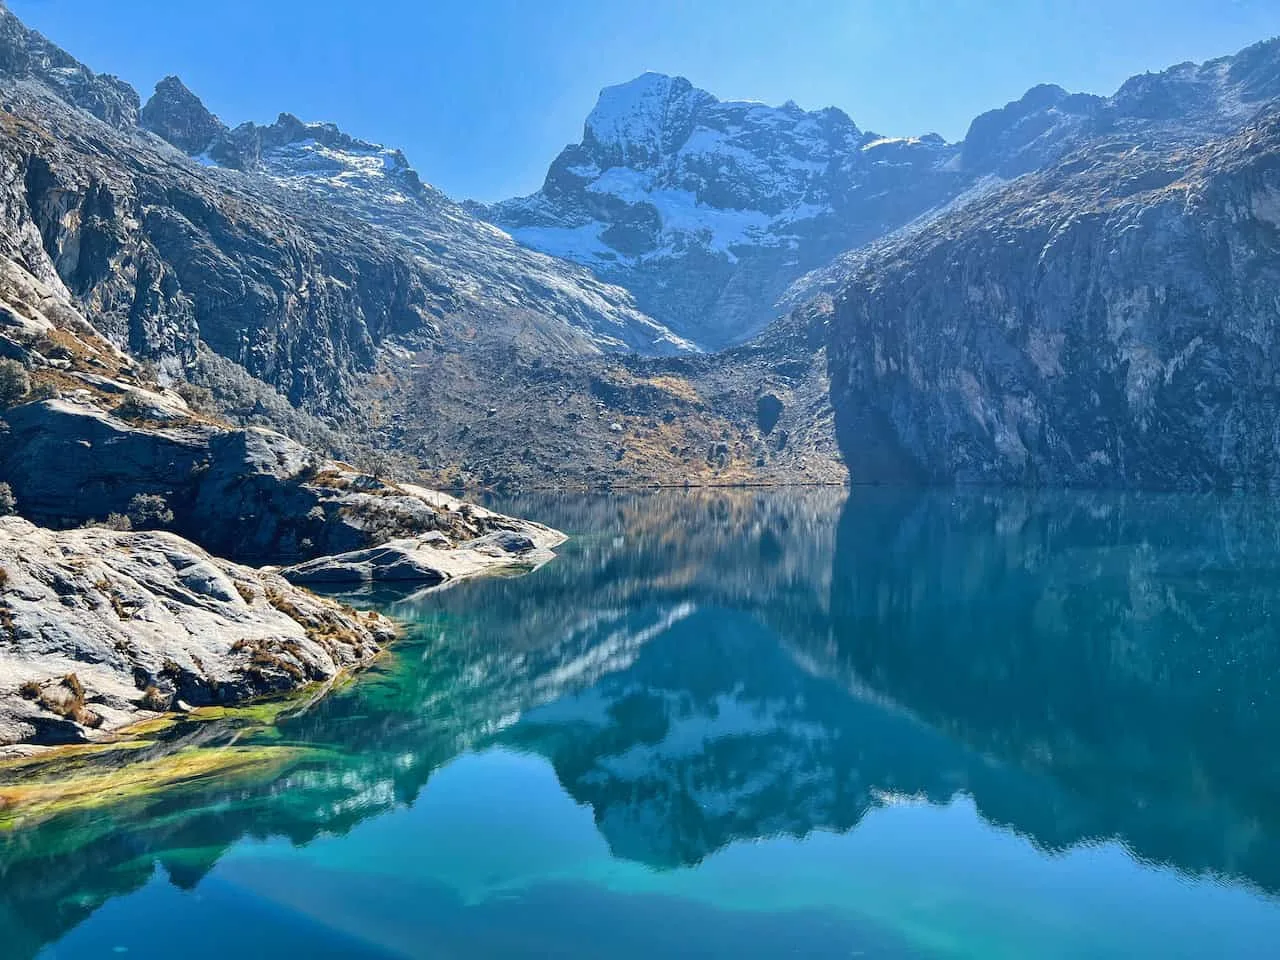
In addition to the mountains, you can find plenty of alpine lakes, glaciers, rivers, valleys, passes, and more that bring together the landscape.
Having so much mountainous landscape in such a small area of land, makes it an ideal trekking circuit location.
In essence, the main Cordillera Huayhuash route encircles this mountain range, as you get to experience the landscape from all different angles. Over the course of a classic circuit, trekkers will move from campsite to campsite, taking in new views each and every day.
While it is certainly a beautiful trek to take part of, it is also a difficult trek. Most of the circuit is above the 4,000 meter mark, which certainly can bring strain on the body with the lower oxygen levels. In addition, the route entails some long hiking days with mountain passes to trek over on a nearly daily basis.
However, at the end of the day, this is certainly one of the top treks in the world and should be on your hiking bucket list if you have it in you.
The remainder of this guide will dive into much more detail about each and every thing to consider when going about the Cordillera Huayhuash trek.
Note: I will go about most of this guide as if you were doing the trek independently. However, I will touch on all relevant topics that will be helpful even for those going on a guided trek as well.
Learn More: Be sure to check out the Huayhuash Circuit resource page that includes many helpful travel guides to get you prepared for the trek.
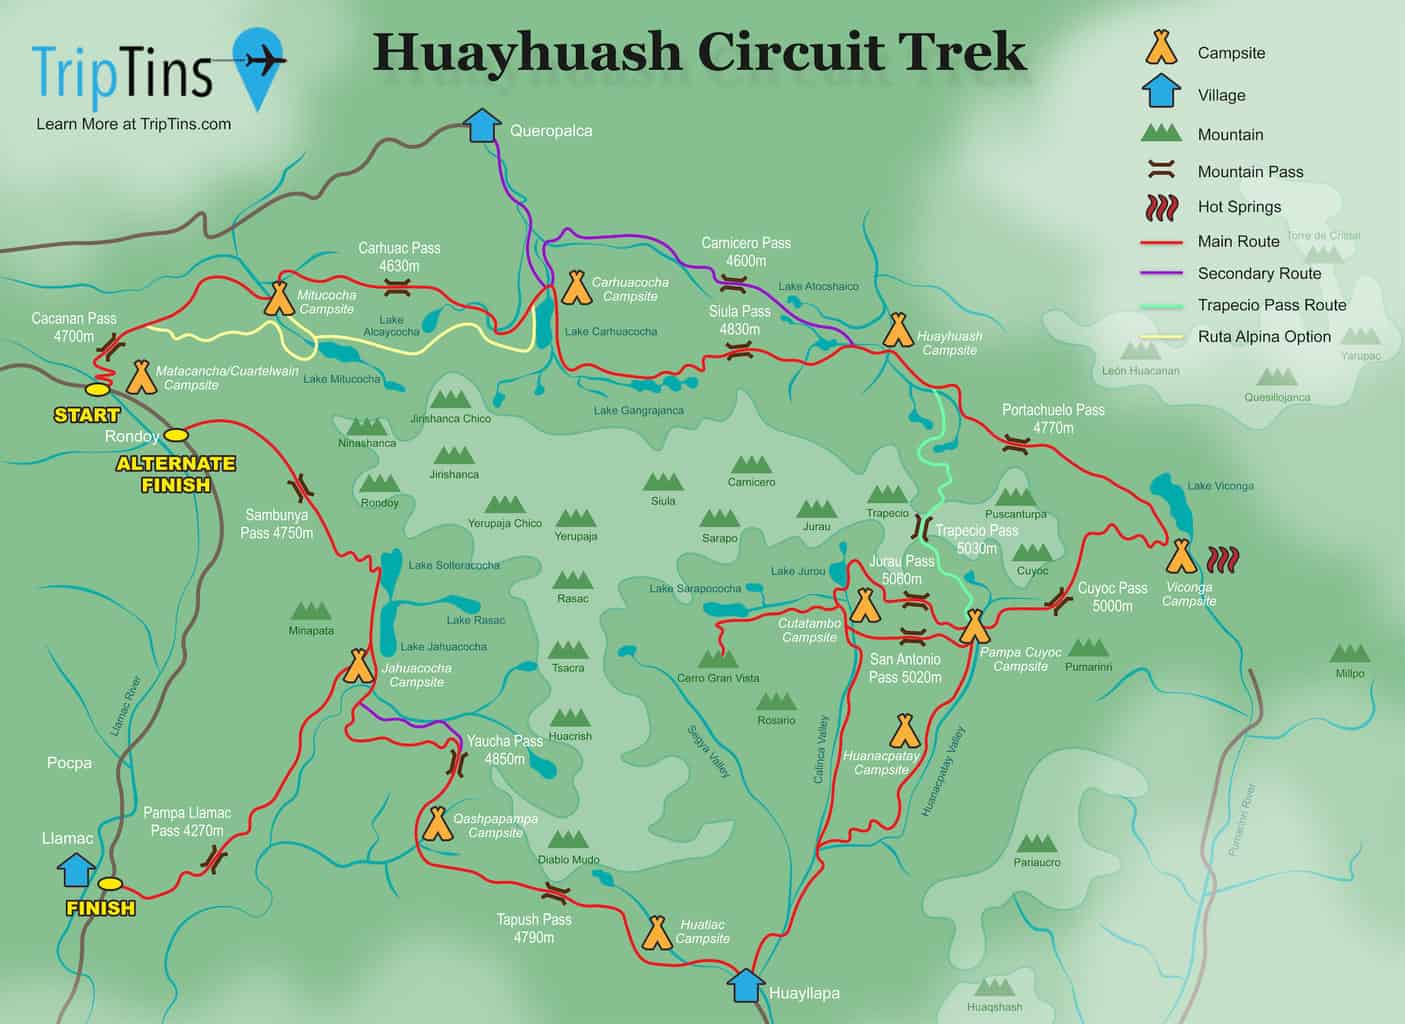
2) Huayhuash Circuit Map
Before jumping into any more detail about the trek, I believe it will be most helpful to get familiar with the Huayhuash Circuit map.
Below is a map that I put together, which clearly shows what the Cordillera Huayhuash entails. On the map you can find many important points of interest including:
• Start / Finish Points
• Main Route & Alternate Routes
• Mountain Passes
• Campsites
• Mountains / Lakes / Valleys & More
Throughout this overview, I will be constantly referencing various parts of the map. Feel free to continually study this map, to better acquaint yourself with what the circuit is all about.
Learn More: The Huayhuash Map deep dive will go into detail about each and every part of the map in general
Huayhuash GPX / KML File
I will highly recommend that you have the trekking route downloaded onto a navigation app like Maps.me, AllTrails or Gaia. Below you can find a similar map as above in a Google Maps format.
If you simply download this map, you will be able to get it right onto your phone to help you with your time on the trail.
Learn More: Check out the Huayhuash GPX guide that can walk you through this process
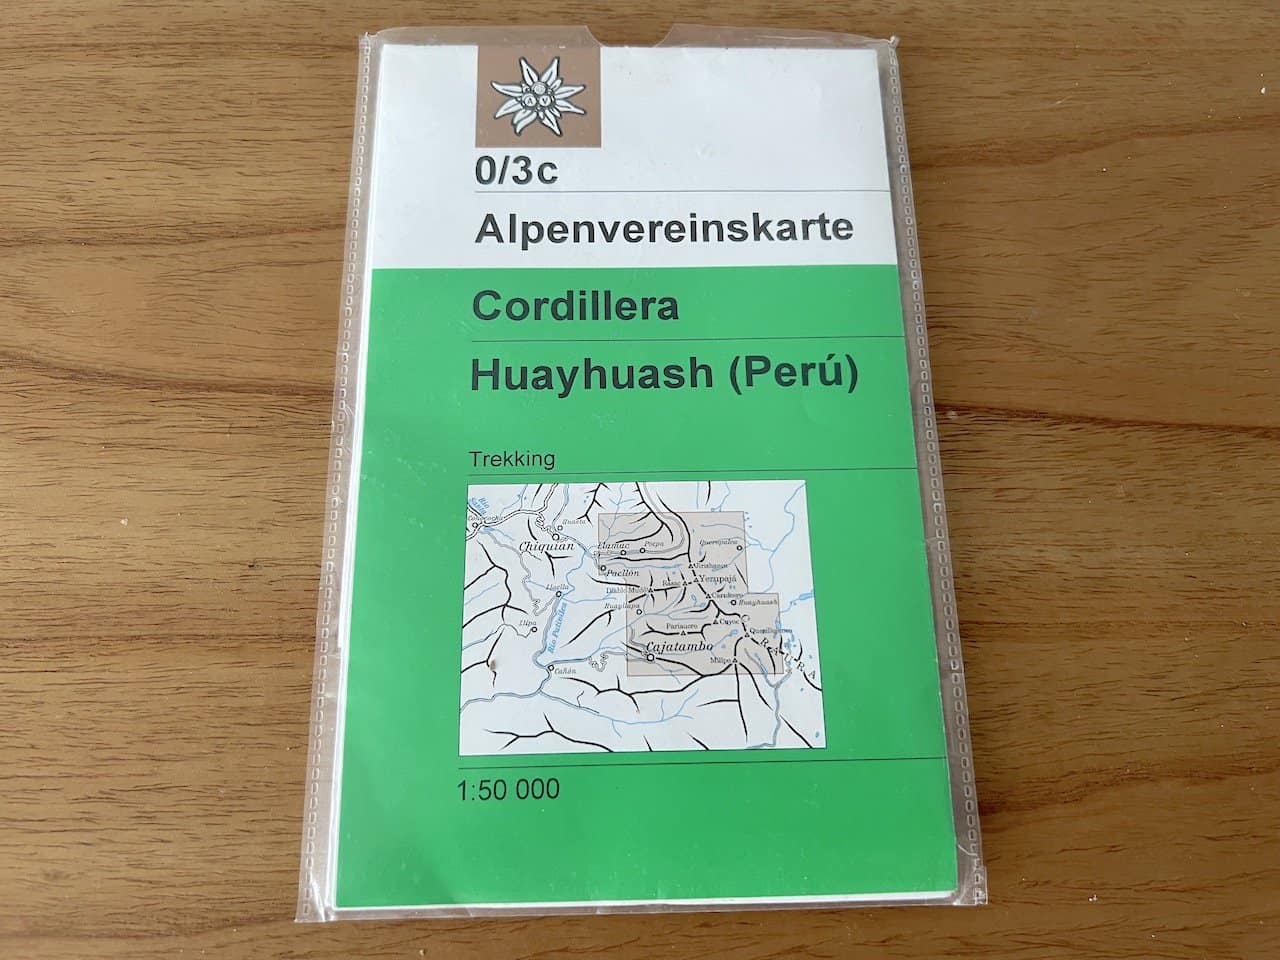
Huayhuash Guidebook & Map
Two helpful pieces of reading material (on top of this overview of course) is the Peru’s Cordilleras Blanca & Huayhuash: The Hiking & Biking Guide and the Cordillera Huayhuash Alpenvereinskarte 1:50,000 Map.
→ Peru’s Cordilleras Blanca & Huayhuash The Hiking & Biking Guide: this is one of the only printed guidebooks out there that talks in detail about the Huayhuash Circuit. While I did find it helpful in some regards, other parts did seem a bit outdated or just outright difficult to follow. I still think its helpful overall, but don’t take every word for what its worth in there.
Note: A new version is set to be released, so hopefully there are some helpful updates in the revised copy.
→ Cordillera Huayhuash Alpenvereinskarte 1:50,000 Map: while having the map downloaded onto your phone is going to be needed, it is also helpful to purchase a paper map as well. It does not include every part of the Huayhuash Circuit but does give you a lot to work off of.
3) How to Get to Huayhuash
Before you actually take part of the hike, you first need to get yourself there and back. Below are all the logistics when it comes to getting yourself to the Huayhuash starting point and back from the ending point.
This will breakdown into three sections:
1) Lima to Huaraz
2) Huaraz to Cuartelwain (starting point)
3) Llamac (ending point) to Huaraz
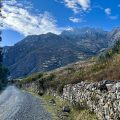
How to Get to Huaraz
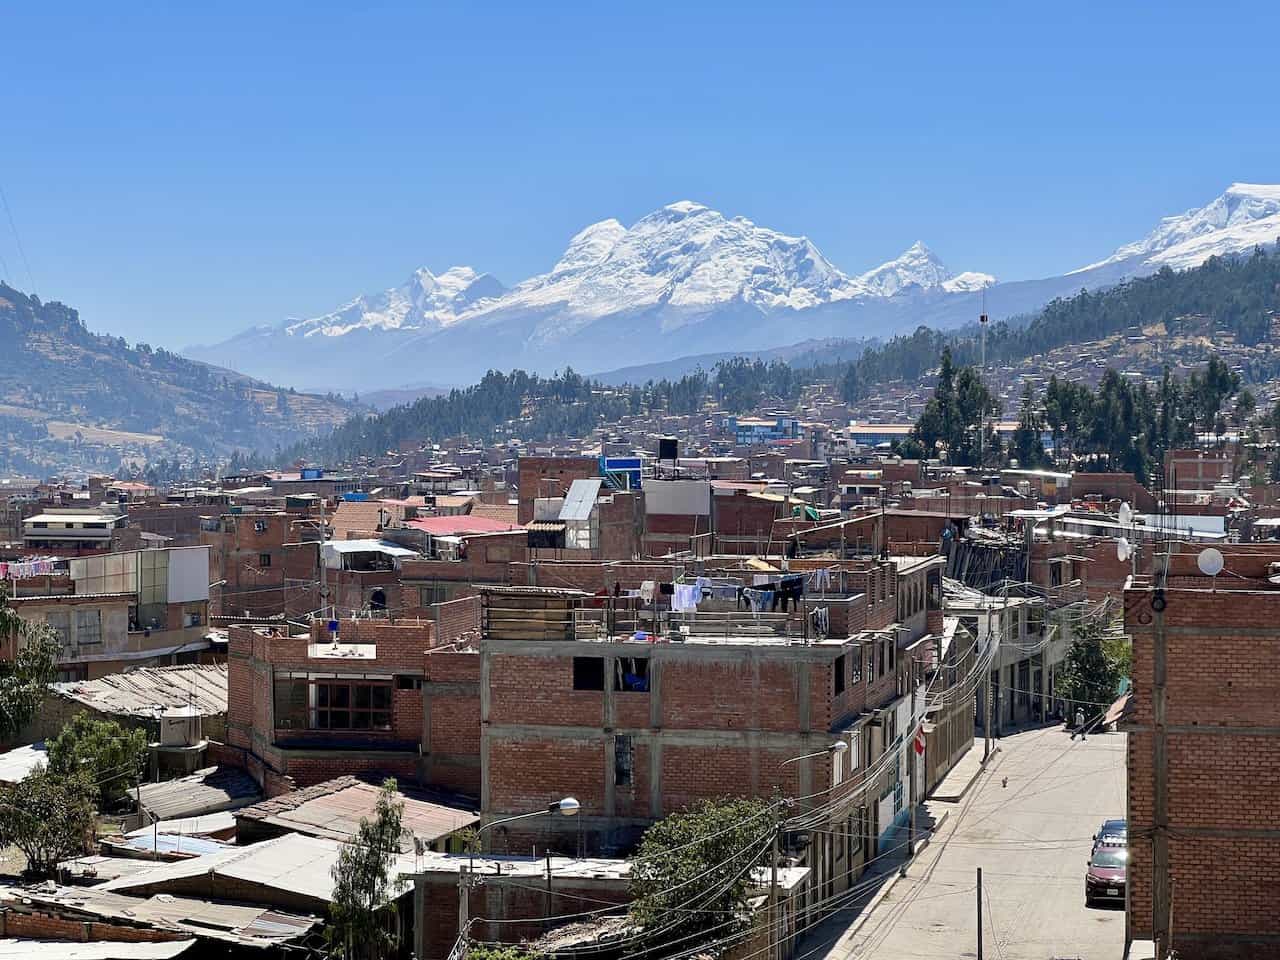
The first step of this process is getting yourself to Huaraz, Peru. Huaraz is the closest major city to the Cordillera Huayhuash, and is where most people base themselves before and after a trek.
Currently, the only main way to get yourself to Huaraz is by bus. In the past, flying was an option but that is no longer the case. However, before booking a bus ticket, I would recommend checking if flights did happen to make their way back.
The bus ride from Lima is a long one, taking anywhere from 8-10 hours on average. There are many companies that offer this route at all hours of the day.
My recommendation would to go with Cruz del Sur or Movil Bus as your top two options. You can also browse through redBus for additional options.

How to Get to Cuartelwain
Once you are ready to leave Huaraz after a few days of acclimatizing, it is time to make your way to the starting point of the circuit in Cuartelwain (also known as Matacancha).
If headed out with a guide, this will all be taken care of for you, so there is not much to worry about. However, for those heading out on their own, logistics will be something to think about.
There are two main options here – either take private transport from Huaraz directly to Cuartelwain (~$125 USD), or take public transport.
See below for the steps on how to get there on your own (Huaraz – Chiquian – Llamac – Cuartelwain).
Step #1
Starting Point: Huaraz
Ending Point: Chiquian
Transport Method: El Rapido Bus
Departures: 5:00AM and 2:00PM
Bus Station: Jirón 28 de Julio, Huaraz 02001, Peru
Ticket Cost: ~$4 USD (15 Soles)
Bus Duration: 2.5 Hours
Step #2
Starting Point: Chiquian
Ending Point: Llamac
Transport Method: Mini Bus / Collectivo
Departures: Timing matches up with Huaraz-Chiquian El Rapido bus (hopefully)
Bus Station: Plaza Principal de Chiquián
Ticket Cost: ~$5 USD (20-30 soles)
Bus Duration: 2 Hours
Step #3
From Llamac, you must then hike along a dirt road for ~5 hours until your reach Cuartelwain (or get lucky and catch a ride). This means your first day of hiking will really just be to get yourself to the starting point. While it is not the most exciting of hikes, you will get to gear up your body for the circuit itself.

How to get from Llamac to Huaraz
There are two main exit points for the Huayhuash Circuit from the last campsite of Jahuacocha. You can either take the easy route down directly to Llamac, or head on the more scenic route over the Sambunya Pass to Rondoy.
Unless you have private transport already set up, here is the breakdown to get yourself back to Huaraz from the finish
From Llamac
The last mini bus / collectivo goes from Llamac to Chiquian at around 11:00AM, so be sure you leave early the last morning to get there in time. Once back up in Chiquian, there should be an El Rapido bus that heads back to Huaraz at 2:00PM.
From Rondoy
The issue of ending in Rondoy, is that it is about a 4 hour walk along the main dirt road back to Llamac (Rondoy is pretty close to the starting point at Cuartelwain).
If you opt to go to Rondoy, there is little chance you catch the 11:00AM bus back to Chiquián from Llamac. So this means, you will need to stay the night in Llamac (check out the Santa Rosa Guesthouse for simple accommodation).
The next morning, you can take the 11:00AM bus back or wake up very early for a 5:00AM collectivo to Chiquián (this is what I opted for). However, there is no bus from Chiquián to Huaraz until later in the afternoon (at least when I was there).
→ Learn more about it all in the Huayhuash Logistics guide up on the site

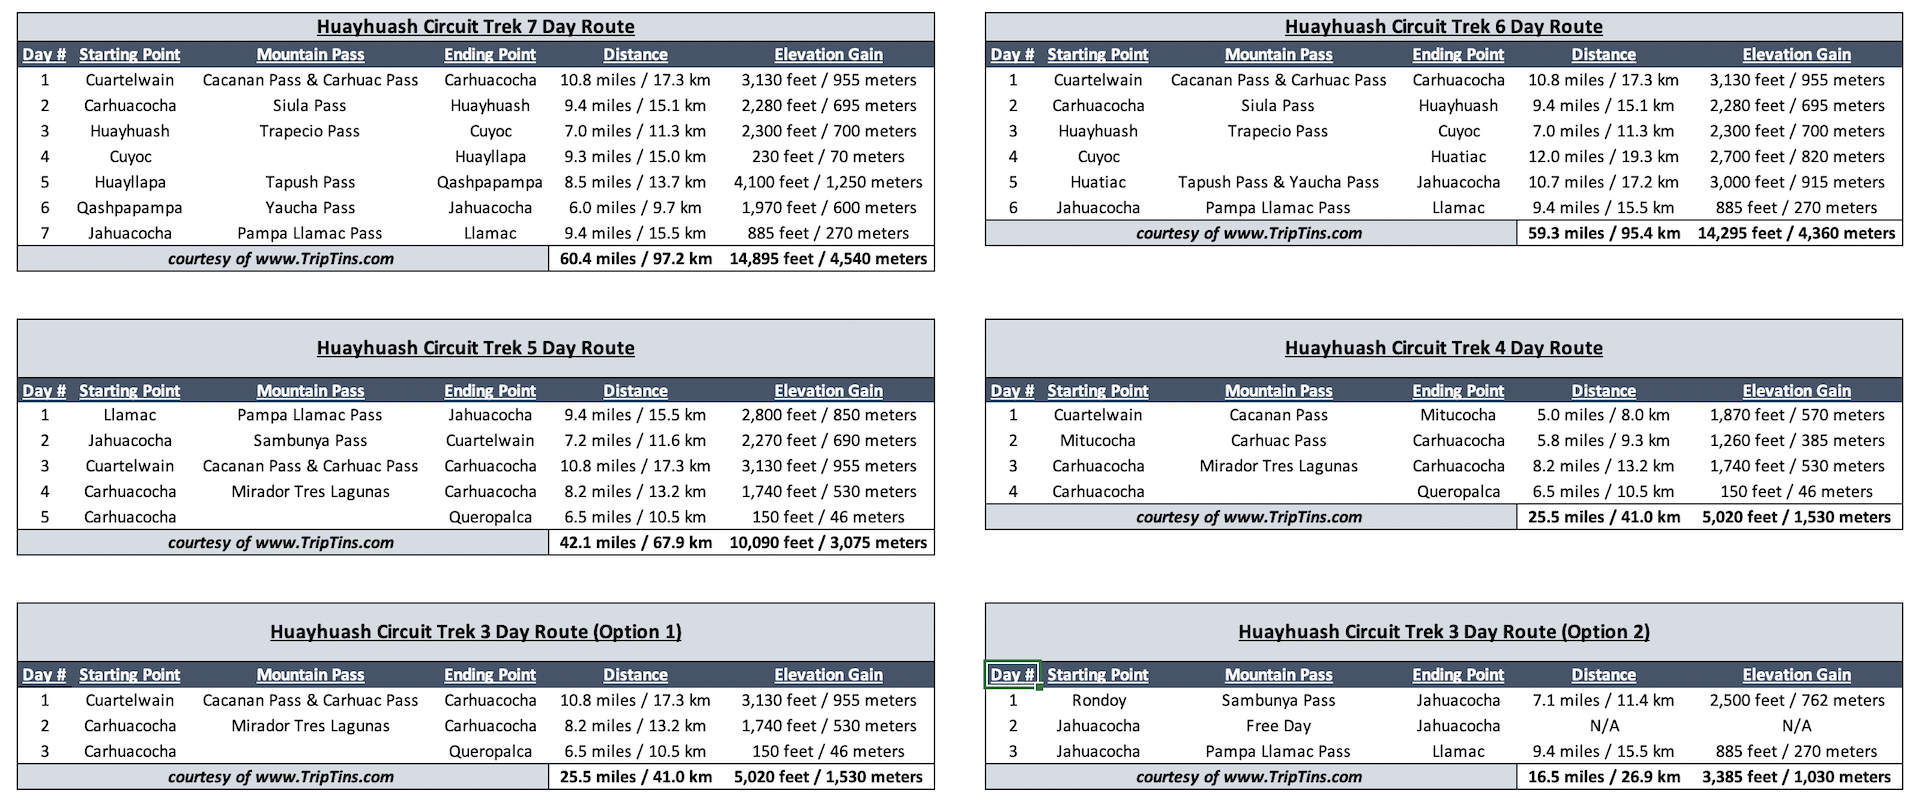
4) Huayhuash Circuit Route
As you may be able to tell already, the Huayhuash Circuit is not a simple “one route fits all” type of trek. Instead you can pick and choose the route that you are most interested in.
These routes can be anywhere from a quick 3-day mini trek, to a longer 11-day full circuit.
On one hand, shorter routes in the 3-5 day range will most likely not encircle the entirety of the mountain range. Instead, these routes will just focus on a portion of the trek.
Routes that are 6 days or longer can encircle the mountain range, but as you get closer you get to that 11 day route, the more of the Huayhuash you will get to experience.
Below is a high level overview of how to complete a circuit around the entire mountain range given your time period on the trail.
Shorter Treks
Spending between 6 and 8 days on the circuit is certainly possible, but you may be missing out on a few highlights along the way:
6 Days: combining multiple days into one, longer days on the trail, & taking some shortcuts
7 Days: combining multiple days into one & taking some shortcuts
8 Days: taking some shortcuts but still a great & comfortable experience
Longer Treks
Once we get to 9 days and more, you are giving yourself more opportunity to fully enjoy everything that circuit has to offer:
9 Days: Potentially missing out on a highlight or two (but can work things in if need be)
10 Days: Full Circuit without Quebrada Sarapococha (more on that soon)
11 Days: Full Circuit covering everything without rushing through
Highlights to Consider
As you are considering routes, you will want to understand some highlights that may be skipped or missed out on. The below are some spots that are not on each route:
Viconga Hot Springs
At Viconga, you will not just find a normal campsite there. Instead, you will also find three hot spring pools (two for bathing and one for washing). Not all routes go through Viconga, but it is a definite highlight and a relaxing place to spend an afternoon.
Trapecio Pass
One of the top viewpoints of the trek is from a top the Trapecio Pass. However, the pass is not included on all itineraries. That is because it is more of a short cut (and would cut out the Viconga Hot Springs).
If you want to enjoy the view, don’t mind skipping the hot springs, and you want one less day of hiking, then the Trapecio Pass may be for you.
San Antonio Pass
This is one of the highest points of the Huayhuash Circuit if you end up making it there. It also offers one of the top viewpoints of the entire trek. However, be aware that it is a very dangerous descent down to Cutatambo from the top.
On some routes it may be possible to add a side trip ascent up the San Antonio Pass from Cuyoc and then back down the same way. So, this will let you enjoy the views without the dangerous descent.
Santa Rosa / Jurau Pass
A safer alternative to the San Antonio Pass but one that offers a slightly lesser view. If the San Antonio descent scares you off, then this is the one to choose from instead.
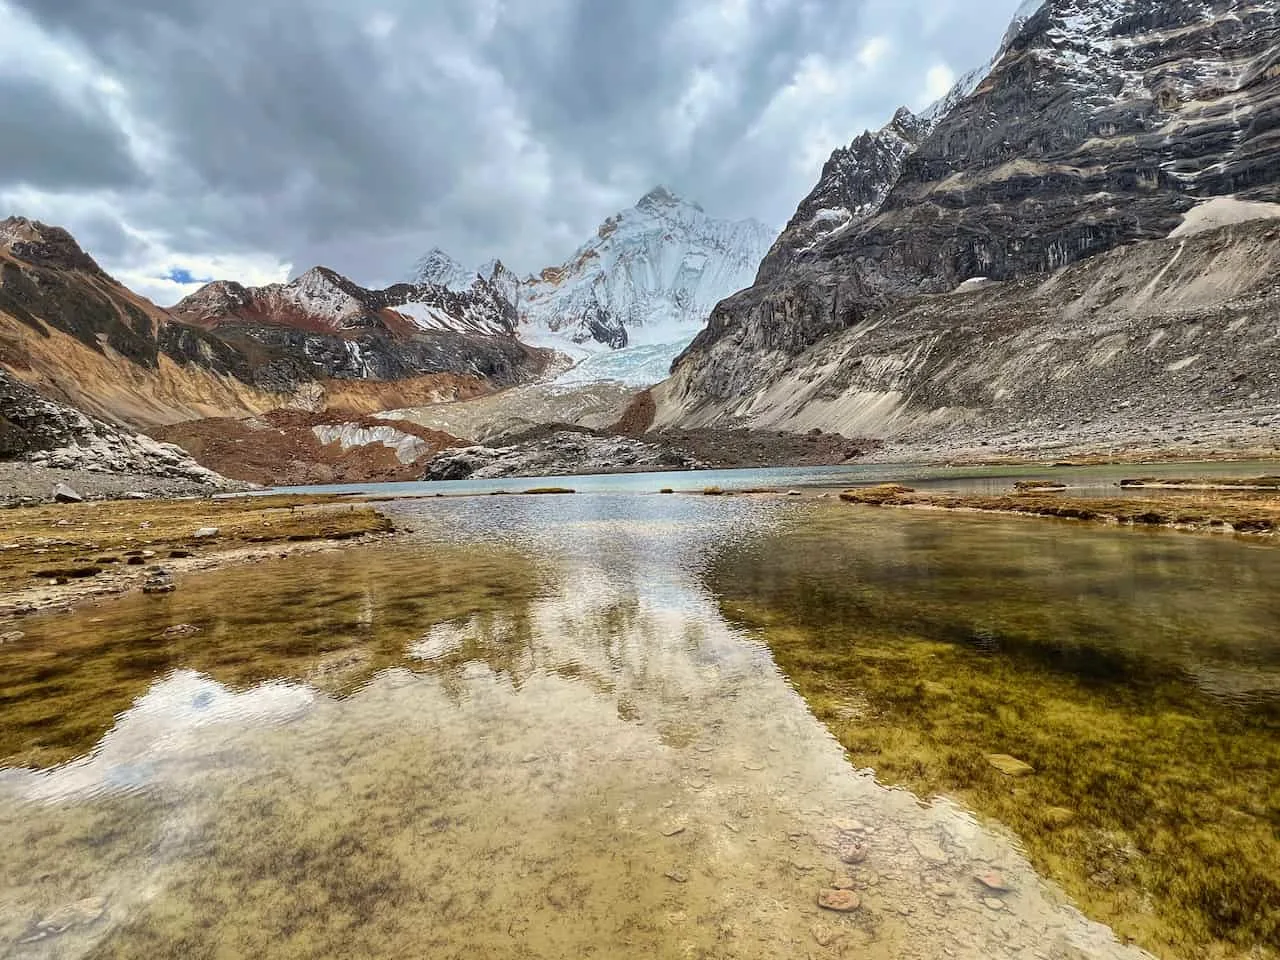
Quebrada Sarapococha
There is an option to explore the Quebrada Sarapococha for a day trip from Cutatambo. This would add an additional day to your route in general as you explore the lakes, glaciers, and viewpoints that make up the valley. I have included the Quebrada Sarapococha on the longest 11 day route option.
If you would like to spend the day hiking the Quebrada Sarapococha, you can expect to hike anywhere from 6-8+ miles depending on exactly how far you want to explore. I had a more relaxing day just doing the back and forth ~6 mile hike to Laguna Sarapococha.
Huayllapa
The main village along the route is Huayllapa, with many routes passing by it on the day 6-7 range. Some routes skip staying in Huayllapa though and go straight up to a campsite at Huatiac. If you want to stay in a bed for a night and/or restock food, then staying in the village itself would be a good option for you.
You will see with many of the treks listed below that I have included a stay in Huayllapa for the night.
However, if you want to spend one less day on the trail, you can stay in the Huatiac campsite instead (essentially combining 3 days into 2).
Below is a high level view of explaining on how staying in Huatiac will save a day:
With Huayllapa
• Cutatambo or Cuyoc to Huayllapa (7.3 miles / +100 feet elevation gain)
• Huayllapa to Qashpapampa (8.5 miles / +4,100 feet elevation gain)
• Qashpapampa to Jahuacocha (6.0 miles / +1,970 feet elevation gain)
With Huatiac
• Cutatambo or Cuyoc to Huatiac (10.7 miles / +2,700 feet elevation gain)
• Huatiac to Jahuacocha (10.7 miles / +3,000 feet elevation gain)
At the end of the day, you should always be able to add /remove Huayllapa from the route as you see fit.
Sambunya Pass
Instead of taking the route directly down to Llamac at the end of your hike, the more scenic route heads up to the Sambunya Pass (and Rondoy Pass), before dropping down to Rondoy to end the trek. Choosing an exit may depend on whether you have transport set up / whether you are fine with spending a night in Llamac at the end of the hike.
If you rather head up and over the Sambunya Pass, expect the hike out to Rondoy to be about 7 miles and 2,300 feet of elevation gain (+ potential mileage hiking back to Llamac).
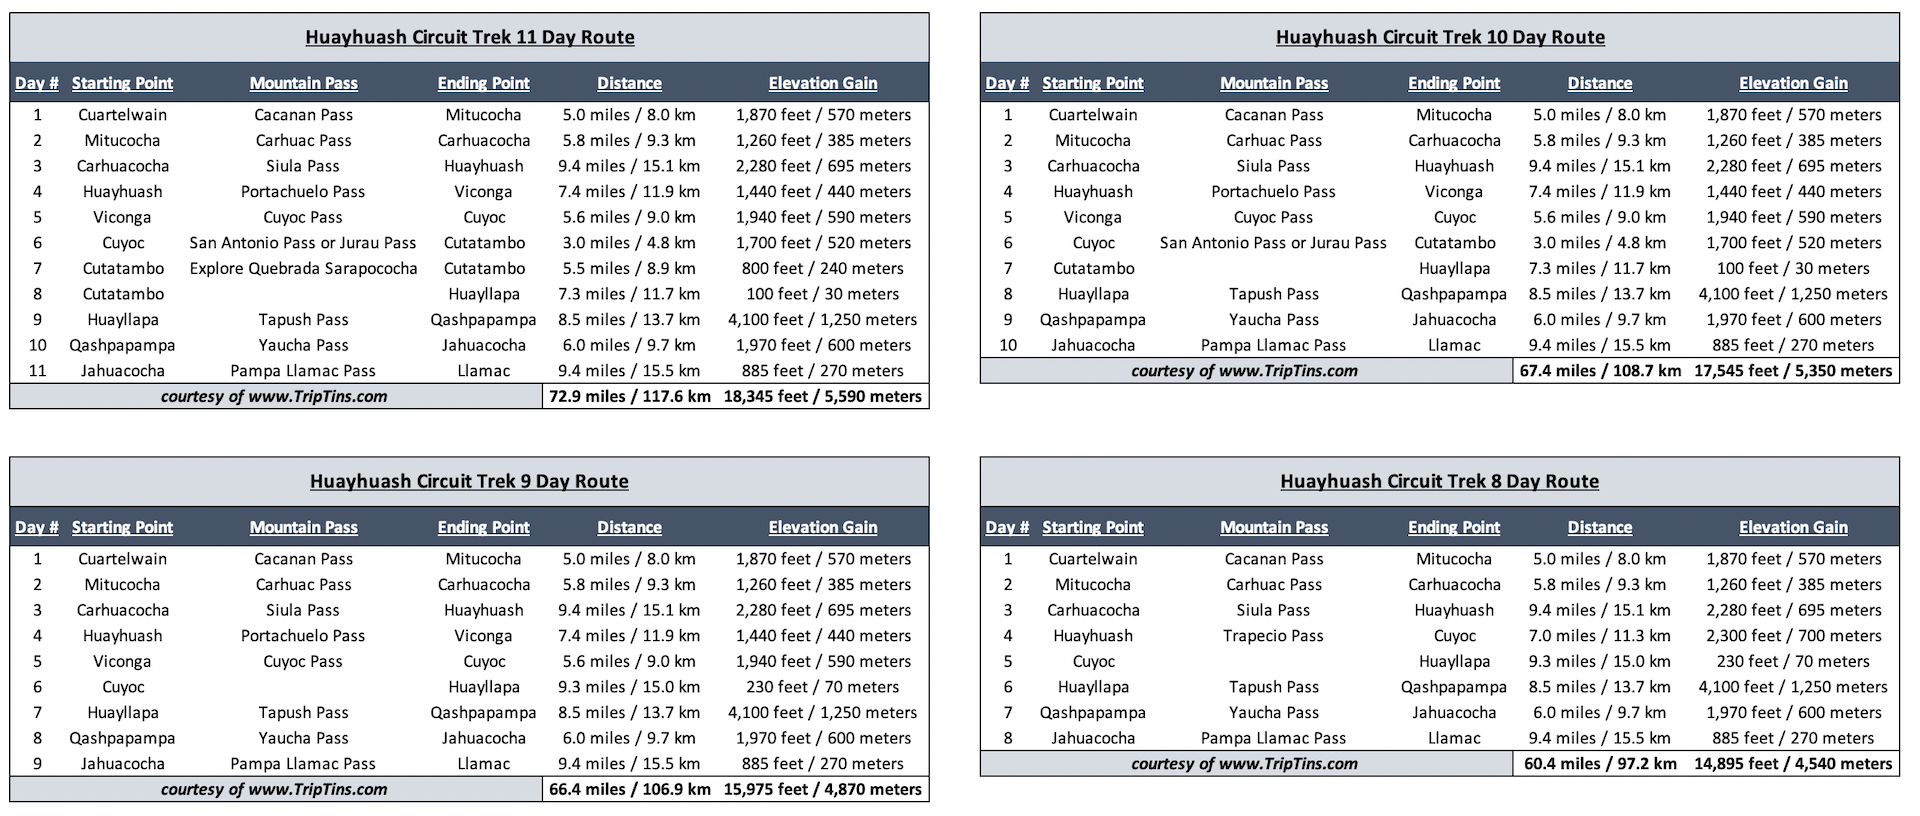
Classic 10 Day Route
With all of that said, below is a “classic” 10 day route option for the Huayhuash Circuit:
Day 1: Cuartelwain / Matacancha to Mitucocha
Day 2: Mitucocha to Carhuacocha
Day 3: Carhuacocha to Huayhuash
Day 4: Huayhuash to Viconga
Day 5: Viconga to Cuyoc
Day 6: Cuyoc to Cutatambo
Optional Add On Day: Quebrada Sarapococha
Day 7: Cutatambo to Huayllapa
Day 8: Huayllapa to Qashpapampa
Day 9: Qashpapampa to Jahuacocha
Day 10: Jahuacocha to Llamac
→ Some people spend less time on the trail and skip over the passes down to Cutatambo (or simply take a side trip up the pass the afternoon they arrive in Cuyoc). Instead they head straight from Cuyoc to Huayllapa. You can see that route on the map as well (passing by the alternative Huanacpatay Campsite).
My general advice for someone who wants to encircle the Cordillera Huayhuash, is to spend somewhere between 8-11 days on the trail. While this is just my opinion, I do feel like anything less than that would either entail missing out on too much or needing to rush through things.
Learn More: Below you can find day by day routes that includes everything from 3 day options to longer 11 day options.

5) Ruta Alpina
As you read through some other resources including the previous mentioned guidebook, you will come across the “Ruta Alpina” – the Alpine Route.
Now, the full Ruta Alpina is a tremendously technical trail that makes its way through the mountain range instead around it. This is a route that should be attempted by the most experienced of climbers.
However, the Ruta Alpina does make its way across the main route at times, and there are two sections of the Ruta Alpina that can be added into an overall route. These two sections occur on day 1 and day 2 of the circuit (Cuartelwain to Mitucocha & Mitucocha to Carhuacocha).
While these are more difficult portions of trail vs. the “normal route”, they don’t require any technical aspects (where ropes, etc would be needed).
I won’t talk about the full Ruta Alpina, because that won’t apply to the vast majority of people reading this. However, I will touch on the first two days of the trail, where the Ruta Alpina can be added in.
These two routes are much less frequented so you will want to be very confident in your navigational skills and preparation. I included the Ruta Alpina routes in the Google Maps view above. This should give you a better idea of the trail here.
Ruta Alpina Day 1
The first day of the circuit takes trekkers from Cuartelwain to Mitucocha. While the first portion of the route up to the Cacanan Pass is the exact same between the normal route and the Ruta Alpina, the descent is where things split off.
Instead of heading down into the valley to the Mitucocha campsite, you can take a right hand fork in the path that will take you high above the valley. This will give you the chance for some elevated views throughout the full hike (vs. just seeing some elevated views from the pass).
While the trail is pretty non existent, beyond for some rock cairns and faded paths, you should be able to follow your navigation app when need be.
I also loved the fact, that the route takes you right down to Lake Mitucocha, where you can set up camp (instead of the more frequented campsite 30 minutes further down the valley).

Ruta Alpina Day 2
The second day of the Huayhuash Circuit goes between Mitucocha to Carhuacocha. The normal route is pretty low key, heading through the valley over the Carhuac Pass and onto the campsite. This can certainly be seen as one of the easier, less exciting days on the trail.
However, the Ruta Alpina option is a whole other experience. First, you will head up to the opposite side of Lake Mitucocha, where you will get some breathtaking views of the lake and the rolling hills. After getting up and over into the Hidden Valley, you will be welcomed to more jaw-dropping views all around you.
It is then past Lake Alcaycocha, and towards what is most likely the best “least visited” view on the entirety of the circuit.
You may be familiar with the Mirador de las Tres Lagunas viewpoint ( which will be seen on day 3). However, from the Ruta Alpina on day 2, you will be welcomed to views of the three lakes from the opposite direction – a truly special place to be.
From the viewpoint, the trail takes a very steep descent, meeting back up with the main trail and onto the Carhuacocha campsite.

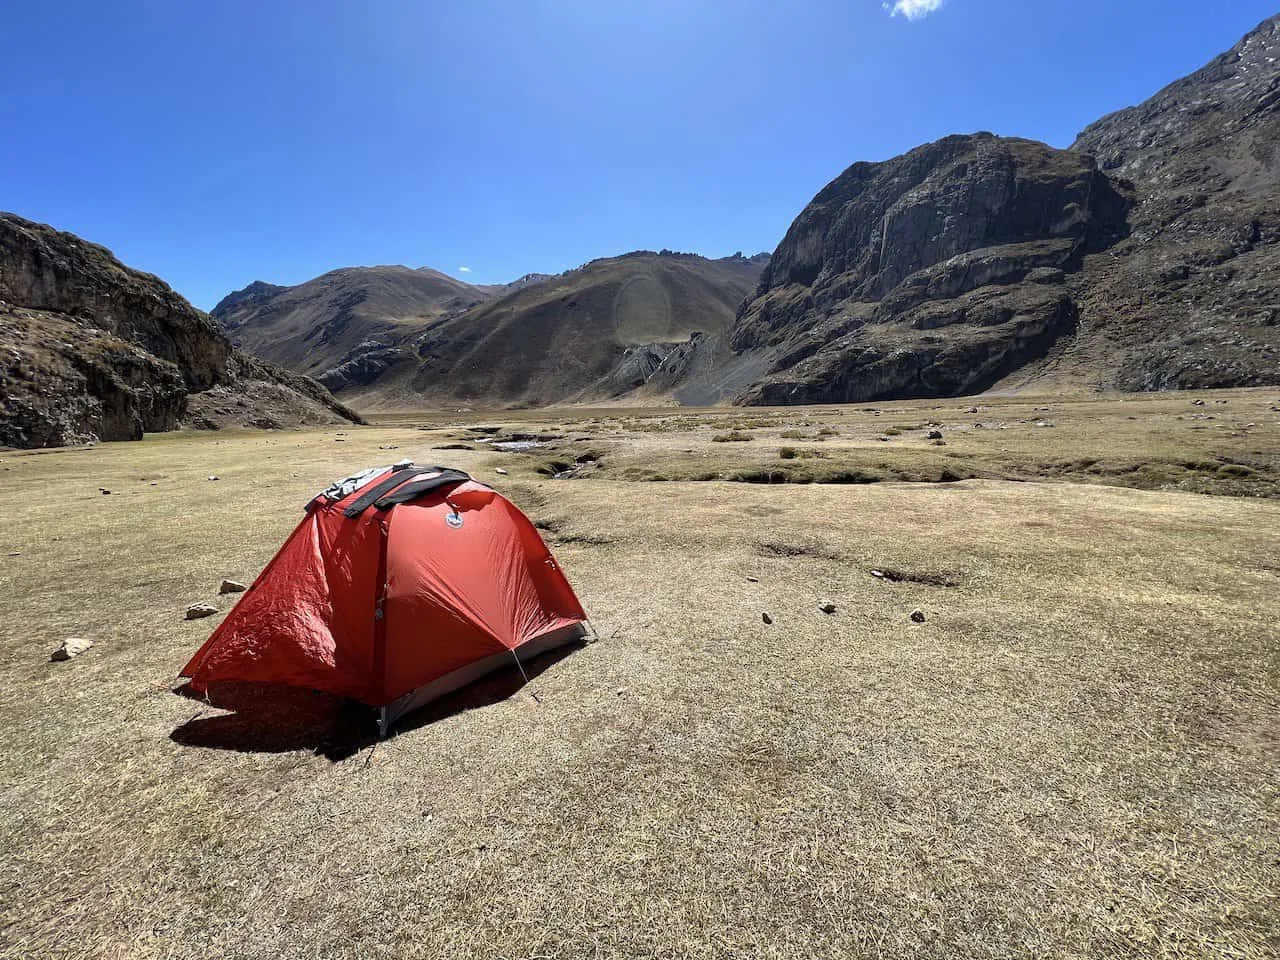
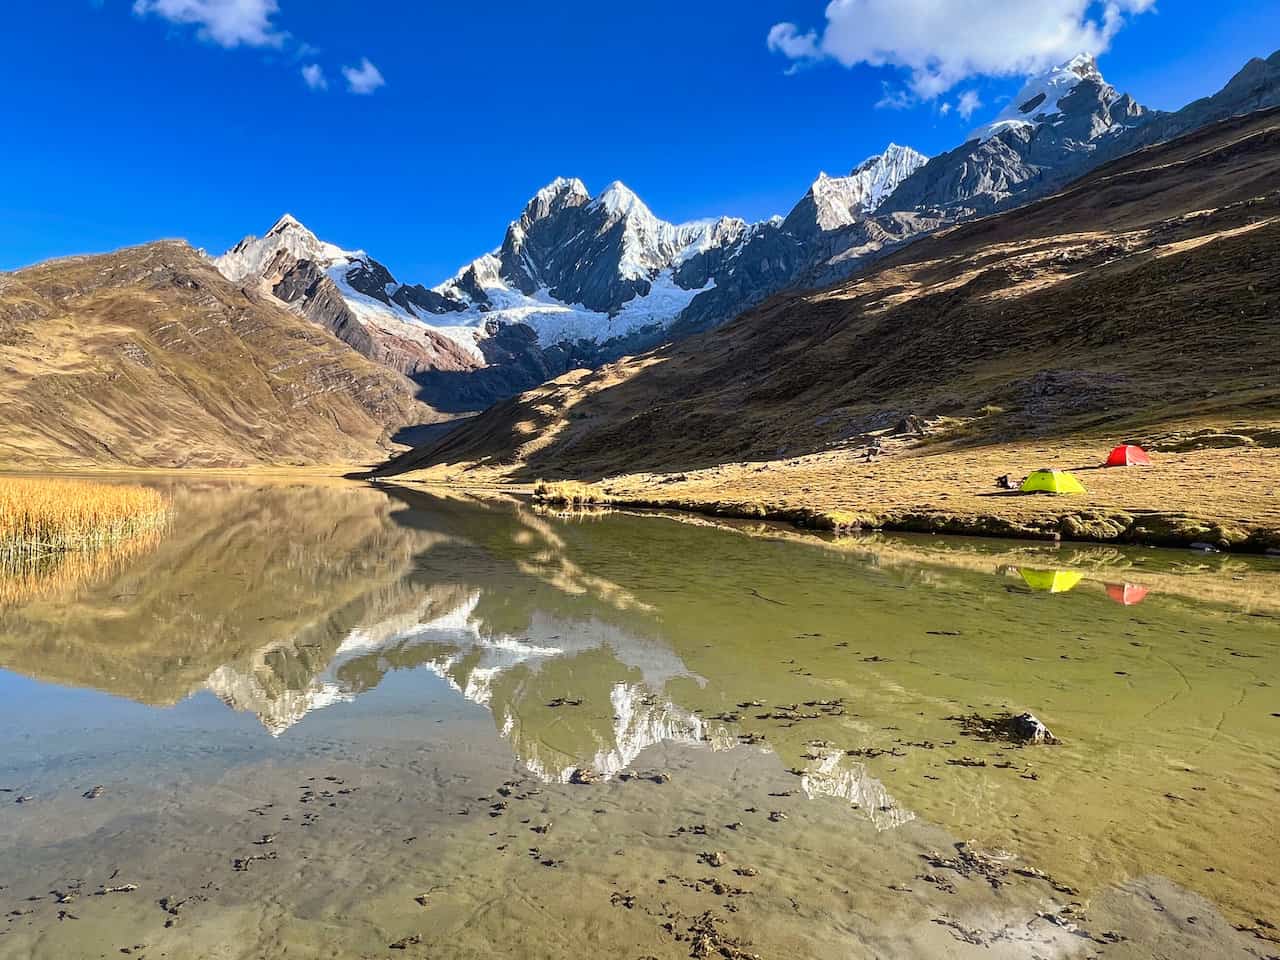
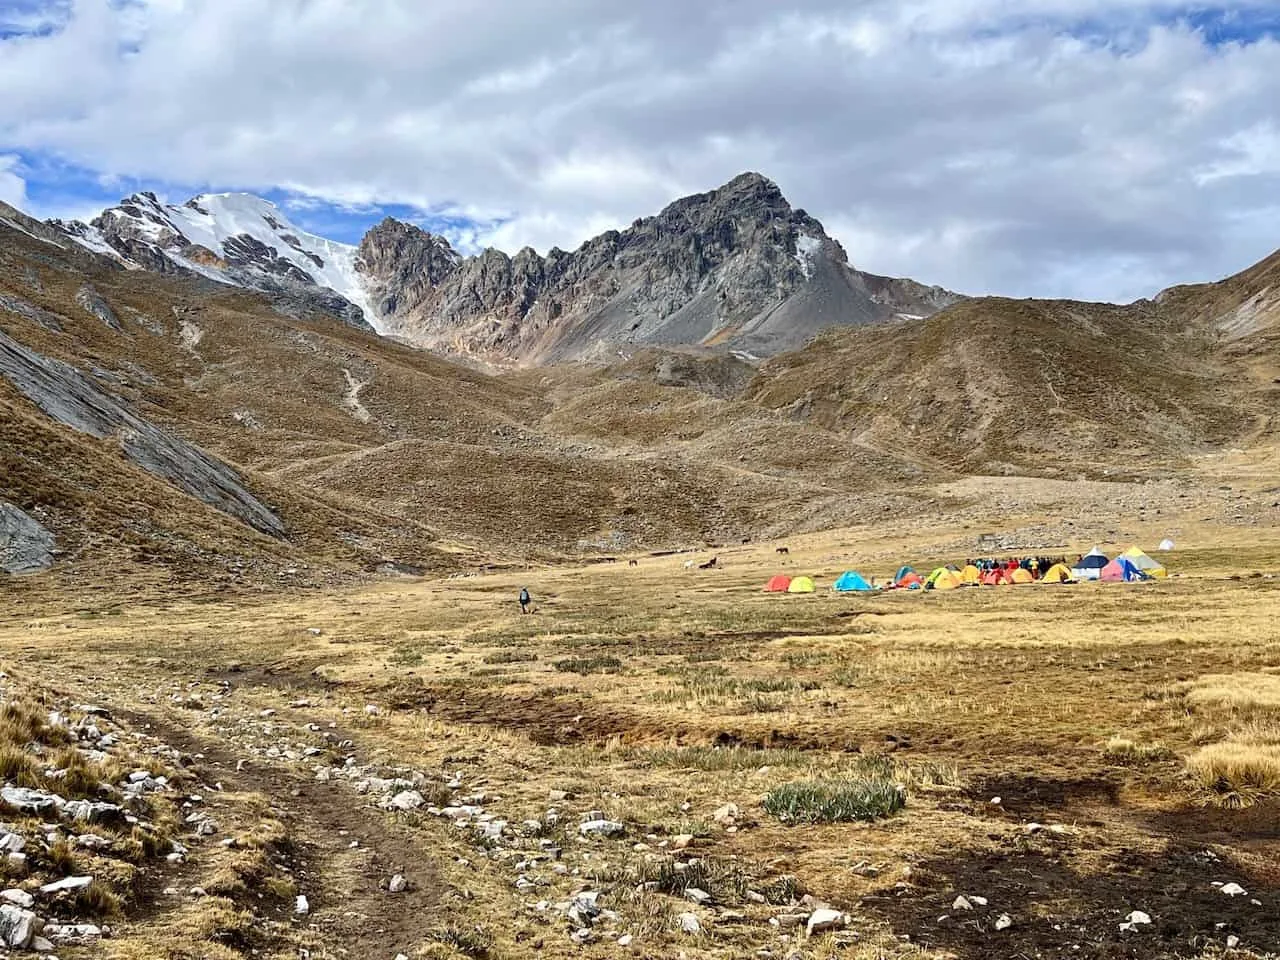
6) Huayhuash Campsites
To better familiarize yourself withe circuit in general, below is a list of most of the important campsite locations you will find yourself passing through during your time on the trail. Note you will not be staying at each one of these campsites (it will depend on your route choice).
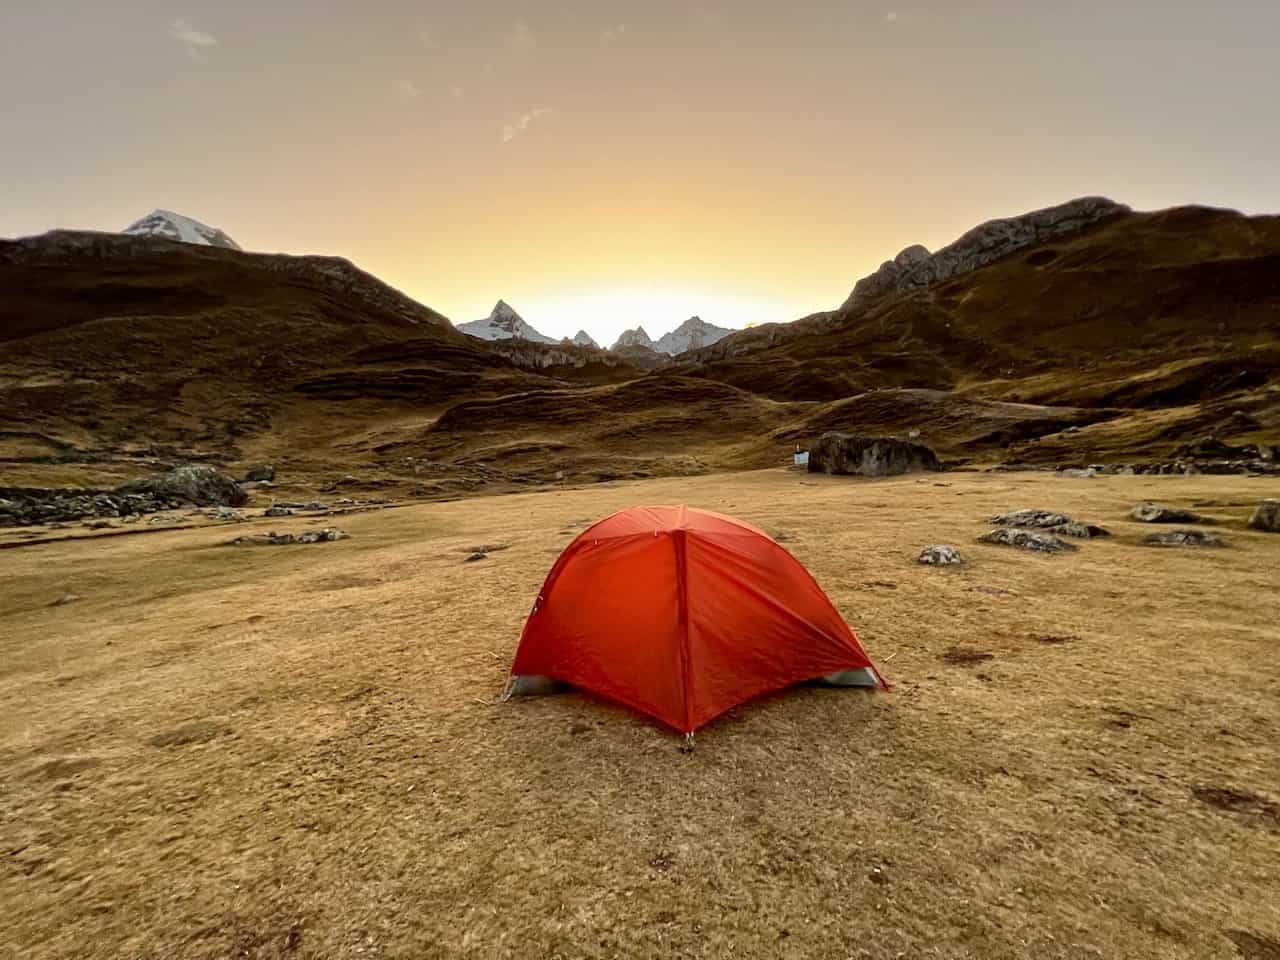
Each campsite is very basic. For the most part, it will just be an open area of land, where you can pitch your tent.
The only potential “amenities” you will find at them include a basic outhouse (although some have flushable toilets), and water sink/fountains (at a select few).
However, at the Viconga campsite, you will find a hot springs to enjoy, so that is most definitely an added benefit to staying there.
Note that each campsite is located near a lake or river, giving you easy access to fill up your water for drinking and cooking.
→ Llamac (village with campsite & end of trail)
→ Matacancha / Cuartelwain / Quartelhuain (campsite & start of trail)
→ Mitucocha (campsite)
→ Carhuacocha (campsite)
→ Huayhuash (campsite)
→ Viconga (campsite & hot springs)
→ Pampa Cuyoc / Elefante (campsite)
→ Cutatambo (campsite)
→ Huanacpatay (campsite)
→ Huayllapa (village with campsite)
→ Huatiac (campsite)
→ Qashpapampa / Gashpapampa (campsite)
→ Jahuacocha / Incahuain (campsite)
Either at your arrival or departure from the campsite, someone from the nearby local community will collect a small fee for the use of the campsite.
It is not necessarily that you are paying just for the campsite, but also just to walk through the land. For example, you will pay a Pocpa fee as you are driving/hiking from Llamac to Cuartelwain.
These fees range from S/ 20 to S/ 50 ($5 – $12 USD) depending on the campsite, and may change slightly over time. I would highly recommend bringing along small denominations of currency for these fees (+ some extra $ in case of emergency).
Below are the latest fees for the Huayhuash Trek:
Llamac: S / 50 (paid in Llamac)
Pocpa: S / 20 (paid on the drive/hike from Llamac to Cuartelwain)
Mitucocha: S / 40 (paid at camp)
Carhuacocha: S /30 (paid at camp)
Huayhuash: S/ 30 (paid at camp)
Viconga: S / 20 (paid on route near Lake Viconga)
Cutatambo: S /10 (fee was not collected)
Huayllapa: S/ 50 (paid on route just outside of town)
Jahuacocha: Part of Llamac fee
Ticket Tip: Be sure to keep your tickets throughout the trek as some may be needed later on.

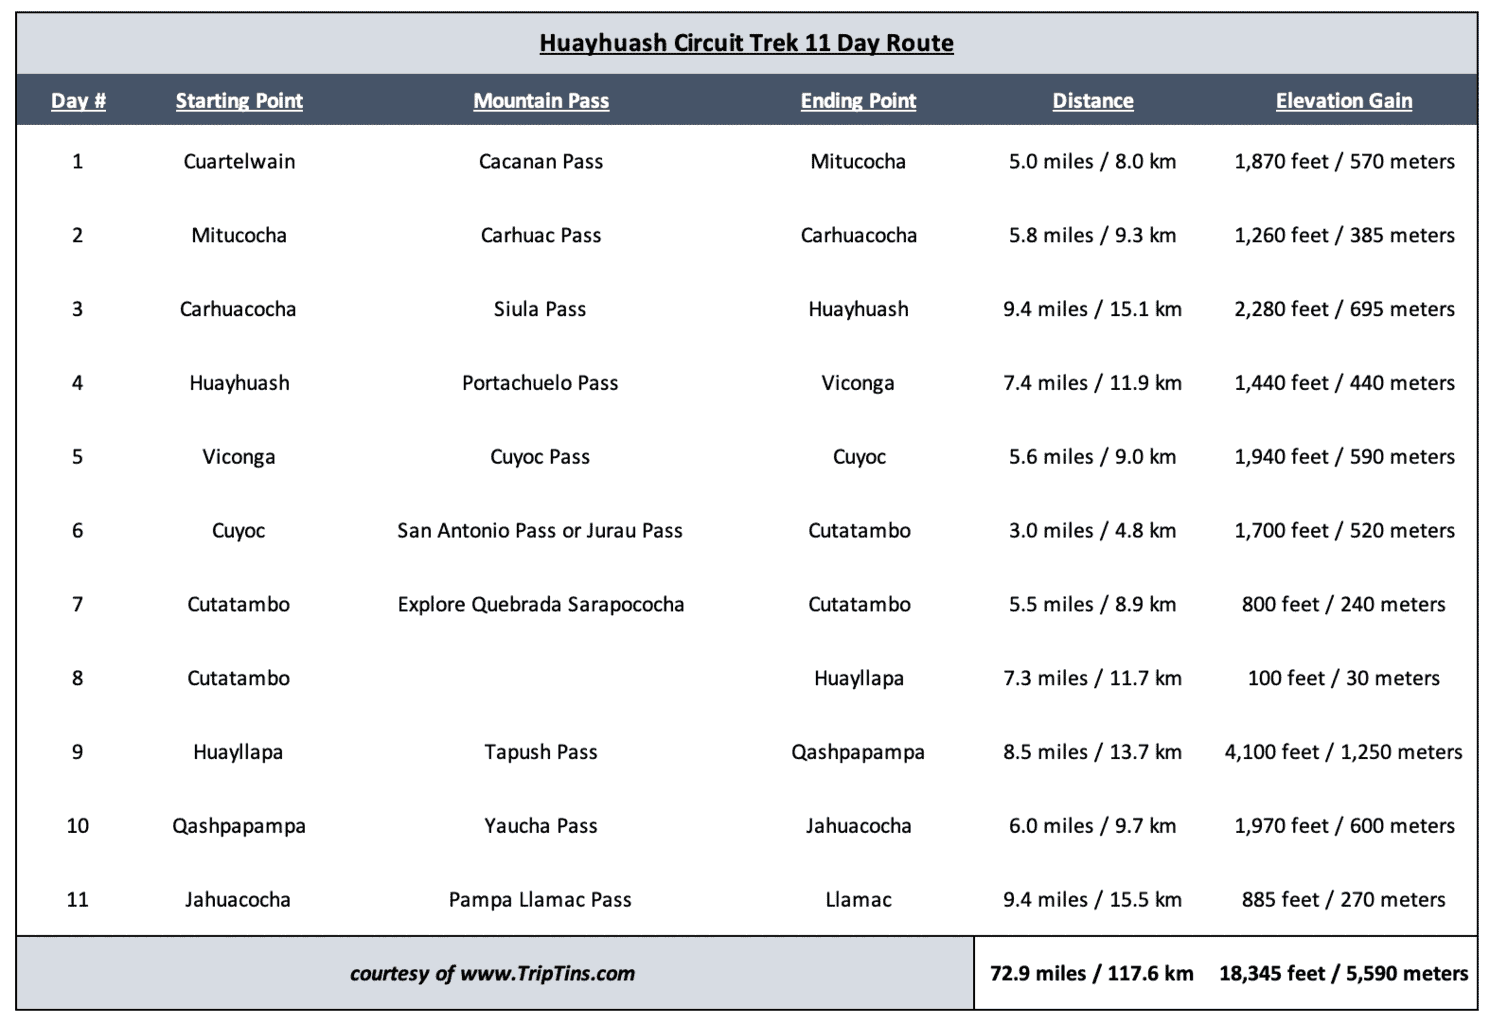
7) Huayhuash Trail Statistics
When it comes to the distance, elevation gain, and duration of the Huayhuash Circuit, it all comes down to what type of route you choose.
In this example, I will talk through a classic 10 day route. By adding in an extra day though, you will be able to visit the Quebrada Sarapococha.
Huayhuash Trek Statistics
Trail Length: 109 km / 67 miles
Elevation Gain: 5,350 meters / 17,545 feet
Average Daily Hiking Time: 5 Hours
Duration: 10 Days / 9 Nights
Including Quebrada Sarapococha (+1 Day): +5.5 miles / +8.9 km | +800 feet / 240 meters elevation gain
Trail Length
While you may see various trail lengths, I did measure the Huayhuash Circuit at 109 km / 67 miles in length. This means an average day entails 10.9 km / 6.7 miles of trekking. Around half of this will be uphill with the second portion of the route going downhill.
Elevation Gain
When it comes to elevation gain on the Huayhuash Circuit, the 10 day route comes in at around 5,350 meters / 17,545 feet.
Essentially, each day you will be starting at a campsite, heading over a mountain pass and descending down to the next campsite. So it is really that first portion of the day that will be tough on most people.
On average, each day will entail around 535 meters / 1,754 feet of gain (and a similar amount of elevation loss).
While it may not seem like a ton of elevation gain, remember that you will also be above 4,000 meters / 13,000 feet for the majority of the trek. Higher elevation means less oxygen. This in turn makes each and every foot of gain even that much tougher.
Huayhuash Trek Difficulty
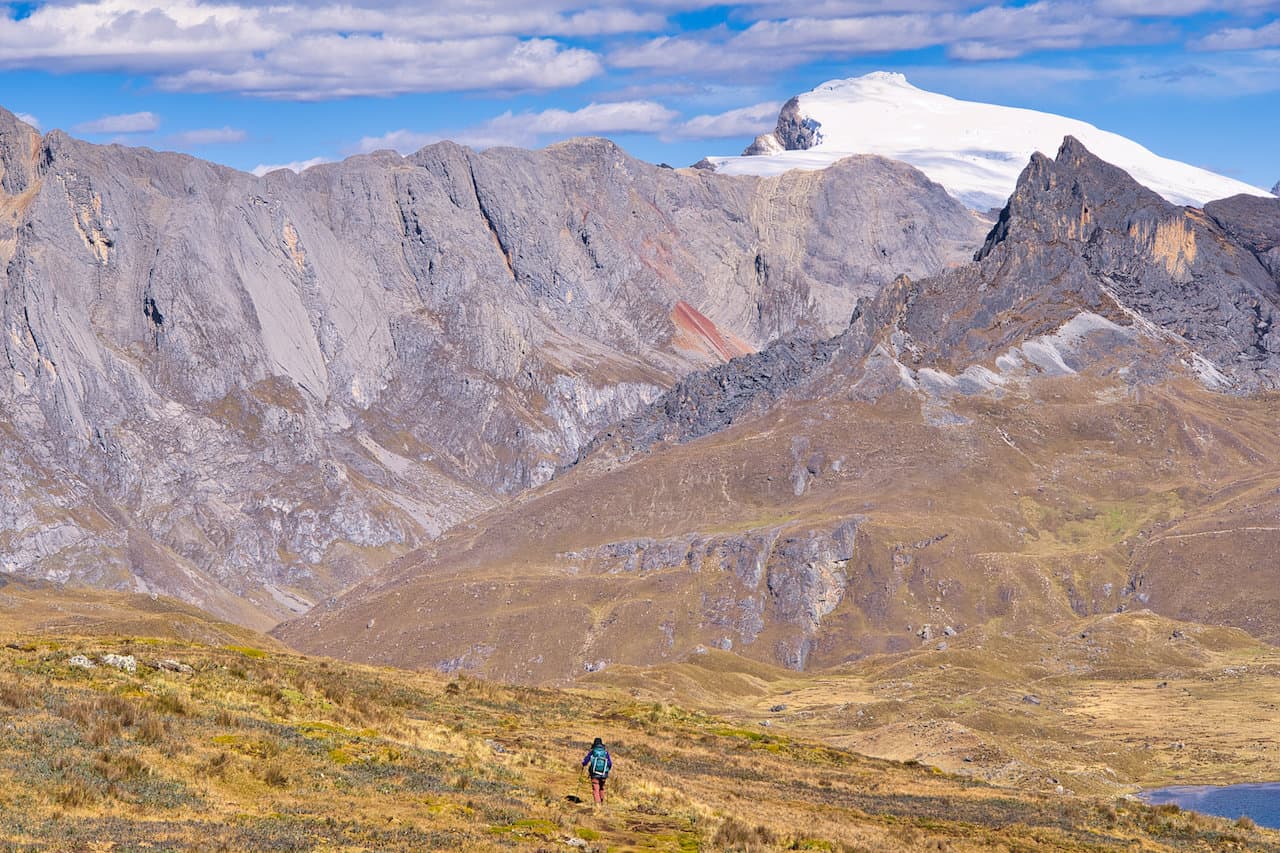
Overall, the Huayhuash trek is a very difficult circuit. This especially holds true for those independent hikers out there that don’t have the support of guides & porters.
You will need to be very comfortable with the hiking lengths, elevation gain, and altitude on a day to day basis. In addition, navigation will also come into play from time to time.
The trail itself is not a technical route. However, it is not a smooth path all the way through either. Expect a lot of rocks, uneven paths, river crossings, and more to navigate around.
You will need to be very aware of your steps all the way through. The last thing you will need is a rolled ankle or similar injury.
Learn More | Huayhuash Circuit Trek Difficulty
Day by Day Breakdown
Below is a day by day overview of the 10 day route with the additional 1 day option:

8) Huayhuash Circuit Insurance
Considering travel insurance for the Huayhuash Circuit?
World Nomads offers coverage for more than 150 adventure activities as well as emergency medical, lost luggage, trip cancellation and more.
For years, World Nomads has been protecting, connecting & inspiring independent travelers, offering travel insurance & safety advice to help you travel confidently. Their mission is to support and encourage travelers to explore their boundaries.
World Nomads has simple and flexible travel insurance that has been designed by travelers for travelers. Even if you leave home without travel insurance or your policy runs out, you can buy or extend out on the road.
Get a quote for a World Nomads travel insurance policy today!
9) The Cordillera Huayhuash Trek Day by Day
It is now time to talk some more about the trek itself from a day by day view. I will give daily trail logistics, followed by a short summary of the day, and some photos of the route.
The below will cover a standard 10 day hike around the Huayhuash mountain range, with an optional 11th day for those that want to spend an extra day exploring the Quebrada Sarapococha.
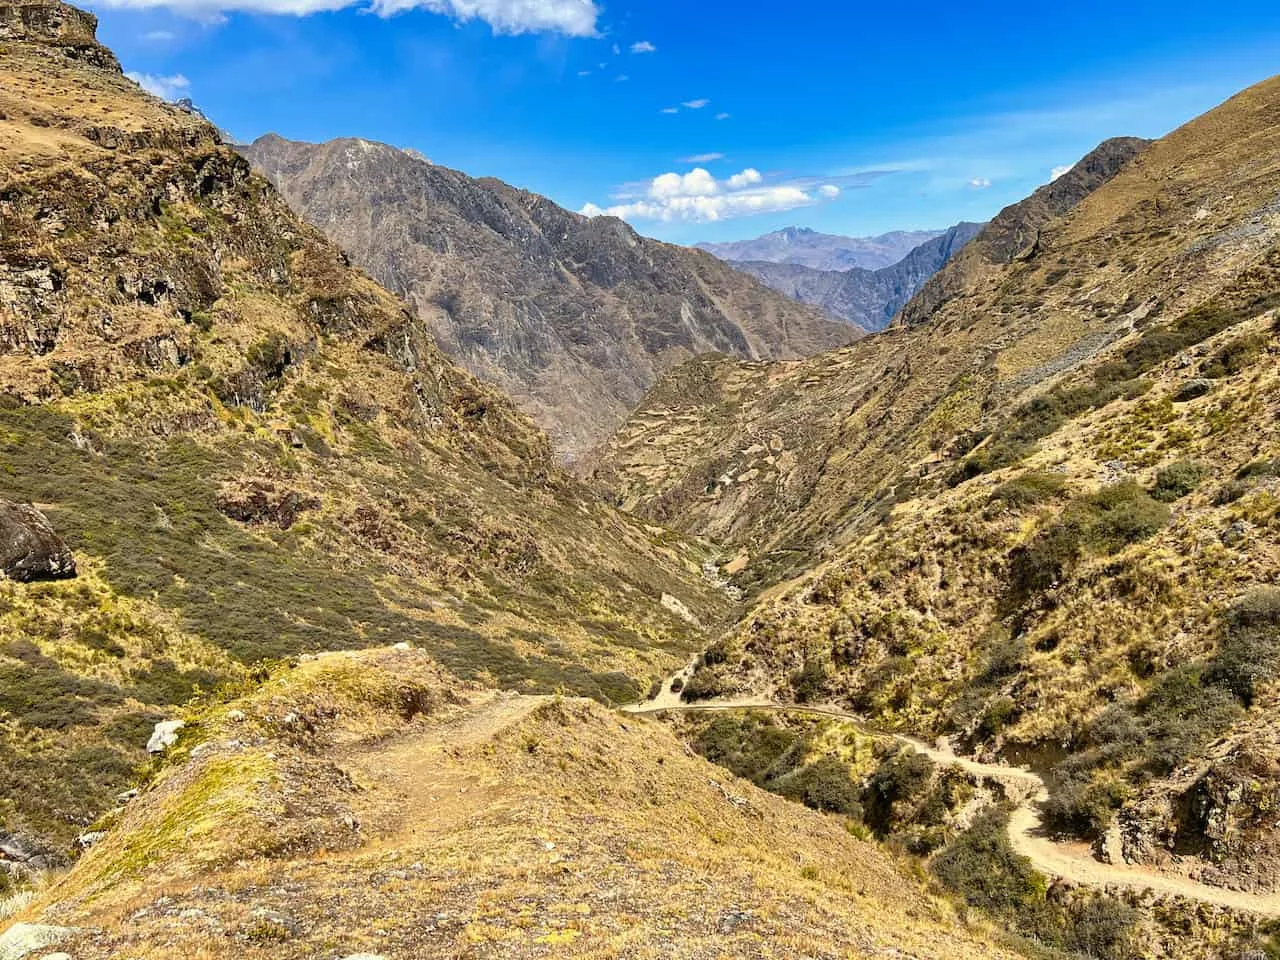
Day 1: Cuartelwain / Matacancha to Mitucocha
Starting Point: Cuartelwain / Matacancha (4,100 meters / 13,450 feet)
Mountain Pass: Cacanan Pass (4,700 meters / 15,420 feet)
Ending Point: Mitucocha (4,230 meters / 13,880 feet)
Trail Length: 5.0 miles / 8.0 km
Elevation Gain: 1,870 feet / 570 meters
Hiking Duration: 4-5 Hours
Day 1 Highlights
• Starting the Circuit!
• Views from Cacanan Pass
• Ruta Alpina option
• Alternate campsite on Lake Mitucocha with views of Jirishanca
Day 1 Hiking Guide: Cuartelwain to Mitucocha
Day 1 Summary
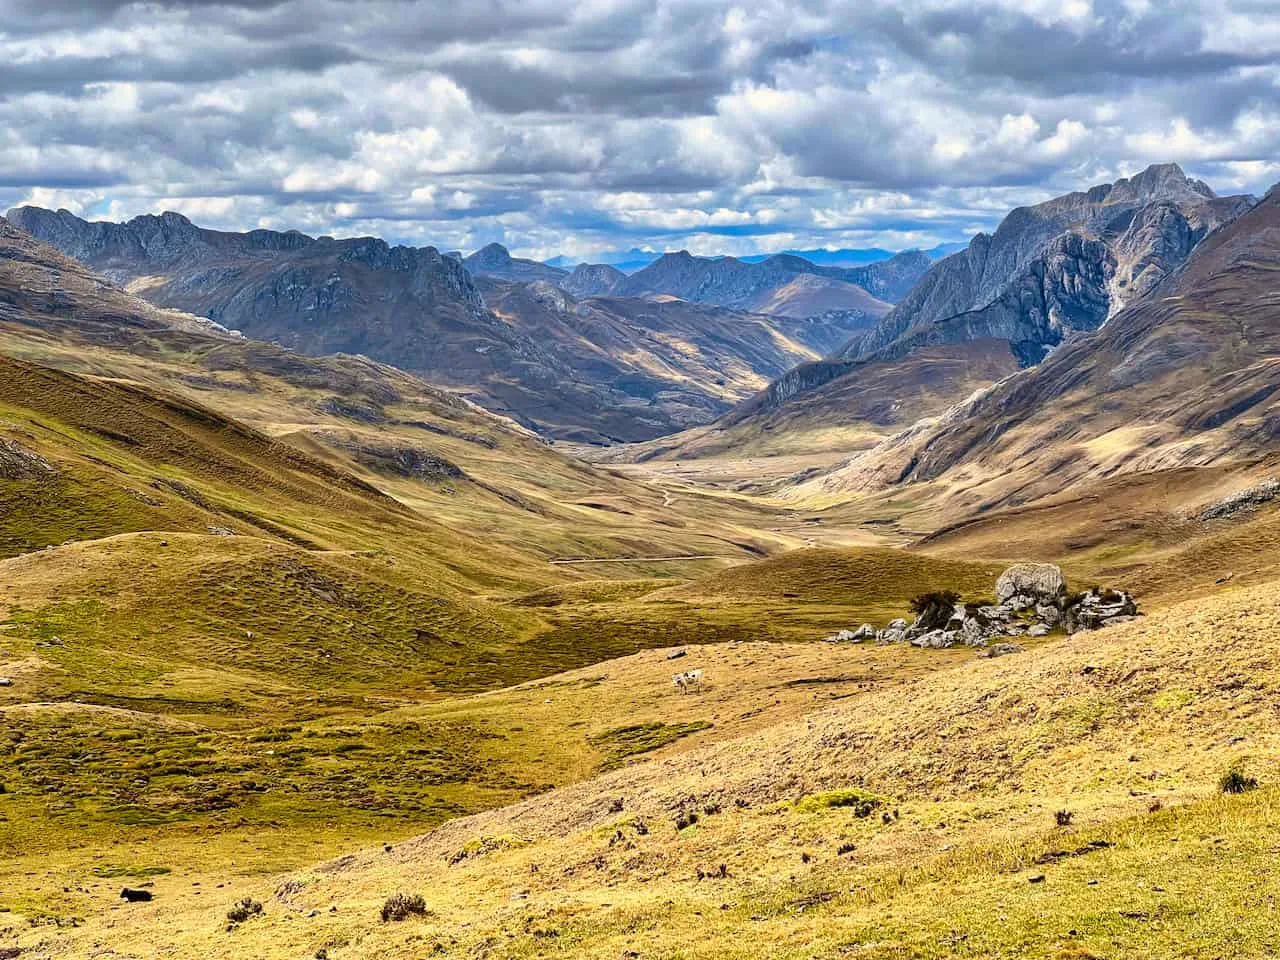
After getting yourself to Cuartelwain (more on that at the end of this guide), it is time to begin the Huayhuash Circuit. From the roadside/campsite, you will catch the trail that immediately begins to gain elevation towards the Cacanan Pass.
This isn’t the easiest way to start the circuit but it will give you some great views as you continue to head on up. As you gain elevation, the landscape out behind you will get grander with the winding river and surrounding hillsides.
The trail then begins its second stage as you make it over the first ascent and head deeper into the Huayhuash. Soon enough, out in the distance you will see the Cacanan Pass. Continue the ascent along the trail, take your time to enjoy your surroundings, and make the last push up to the pass itself.
From up top, you will now be welcomed to views of the other side of the pass, with even more mountains, valleys, and rivers popping up into view.
It is then time to descend the pass and to the valley floor. The zigzagging route will take you from the Cacanan Pass down to the bottom of the valley. From there, it is an easy stroll to the Mitucocha campsite, where you can set up your tent for the night.

Ruta Alpina Alternative
Now, instead of heading down to the valley floor, you also have the choice to head on the Ruta Alpina to the campsite.
As mentioned previously, this route is not well maintained and is more so directional. But as you are making the descent, pay close attention to your GPS, and take the faded turnoff path that hugs the mountainside.
Instead of heading down into the valley, the Ruta Alpina path will give you the chance to enjoy some more elevated views of the area.


The goal is to stay higher along the hillside, and not lose too much elevation as you are traversing across. You will come across some additional elevation gain here as you make your way up and down some rolling hills.
Eventually some rock cairns will show up, reassuring you are on the correct route. From here the trail will continuously lose elevation as the route heads down, across a river, and then slowly to Lake Mitucocha. Jirishanca mountain will be hovering up above among some other Huayhuash peaks.
You have two options here – either camp at Lake Mitucocha or continue the hike for 30 minutes to the official Mitucocha campsite. If taking part of Ruta Alpina on day 2, I would recommend staying at the lake. If taking the normal route, make your way to the official campsite.

Day 2: Mitucocha to Carhuacocha
Starting Point: Mitucocha (4,230 meters / 13,880 feet)
Mountain Pass: Carhuac Pass (4,630 meters / 15,190 feet)
Ending Point: Carhuacocha (4,140 meters / 13,580 feet)
Trail Length: 5.8 miles / 9.3 km
Elevation Gain: 1,260 feet / 385 meters
Hiking Duration: 3 – 4 Hours
Day 2 Highlights
• Views from the Carhuac Pass
• Views of Yerupaja, Siula Grande, and Jirishanca
• Top campsite at Lake Carhuacocha
• Ruta Alpina option – for experts only
Day 2 Hiking Guide: Mitucocha to Carhuacocha
Day 2 Summary
Since I took part of the Ruta Alpina on day 2, I can’t speak as much about the normal route.
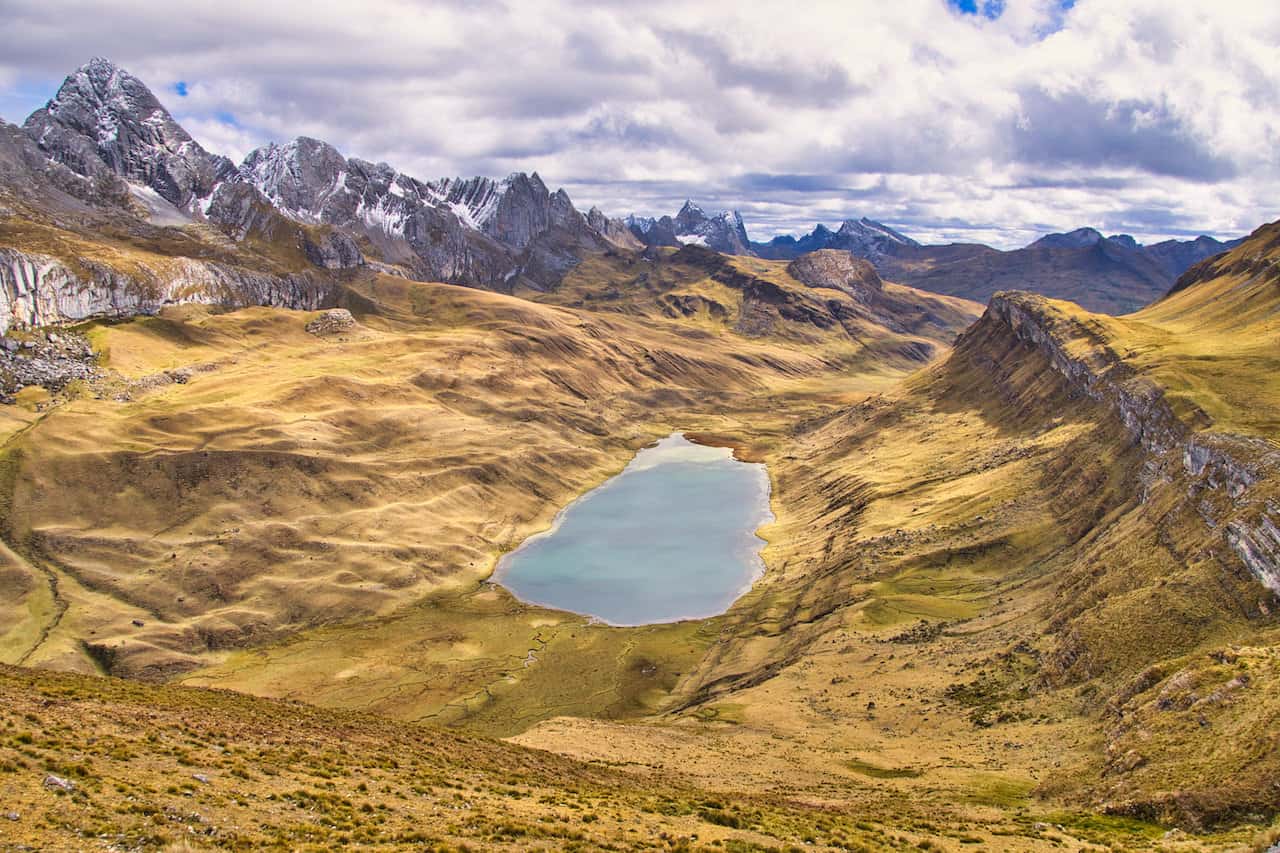
From the Mitucocha campsite though, the trail heads through the valley and up and over the Carhuac mountain pass, where you will get some nice views of Yerupaja Chico, Yerupaja and Siula Grande.
After heading over the mountain pass, the trail descends towards Lake Carhuacocha, where you will spend the night.
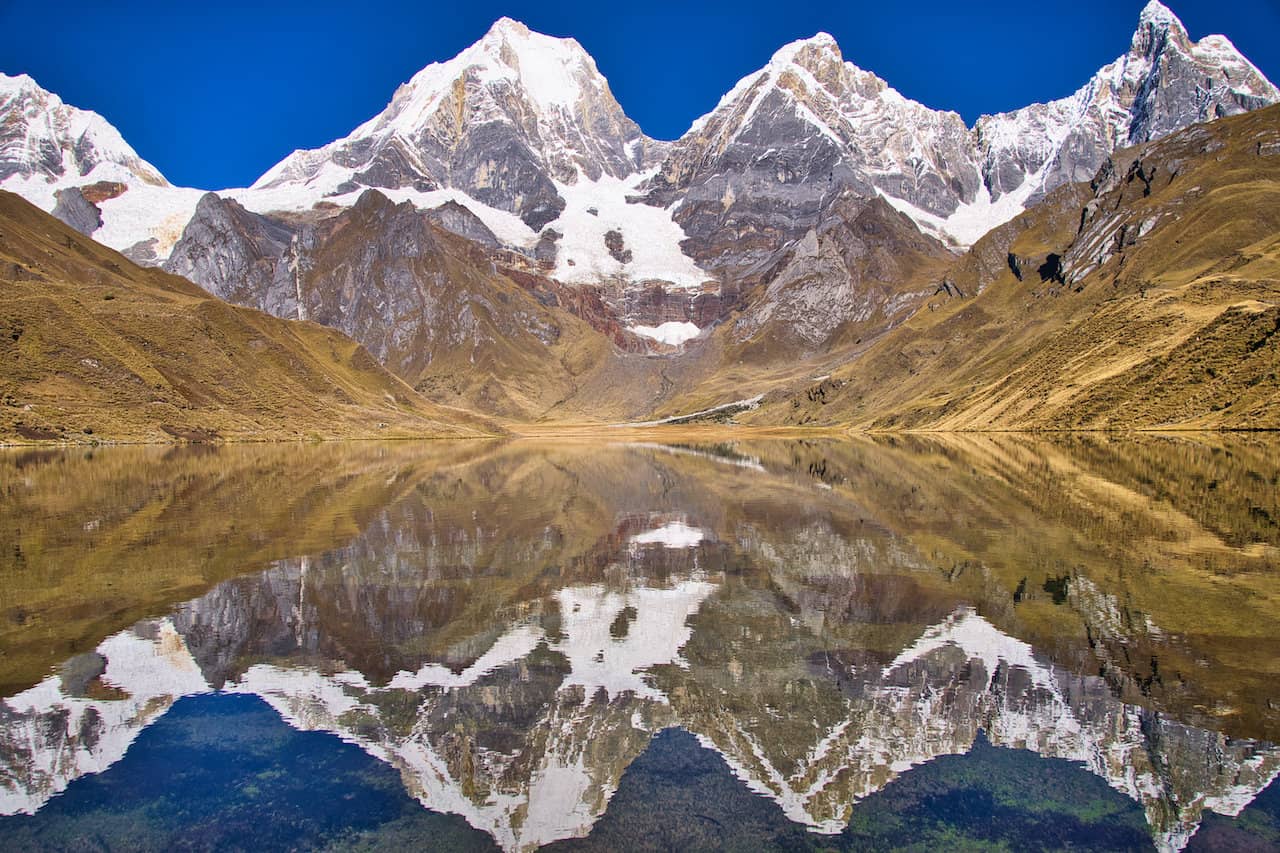
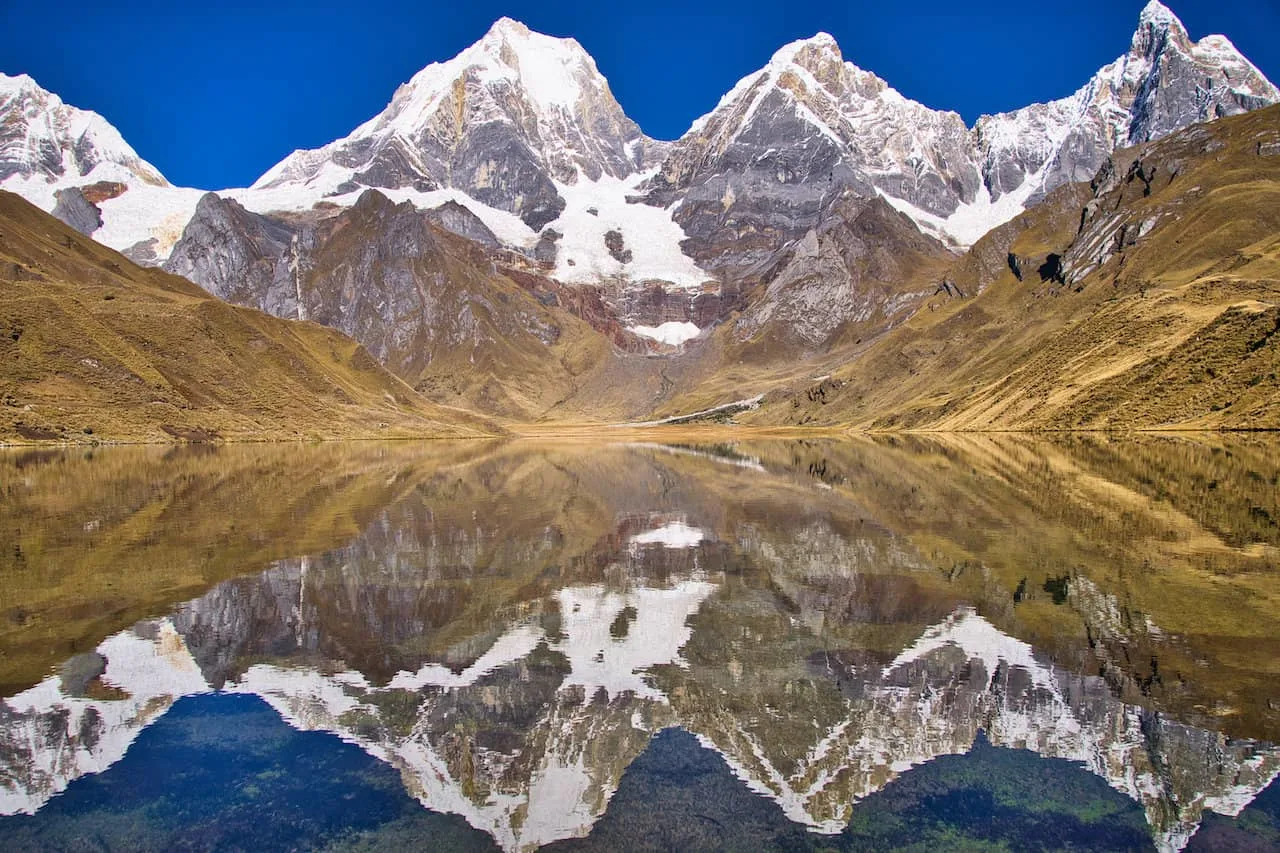
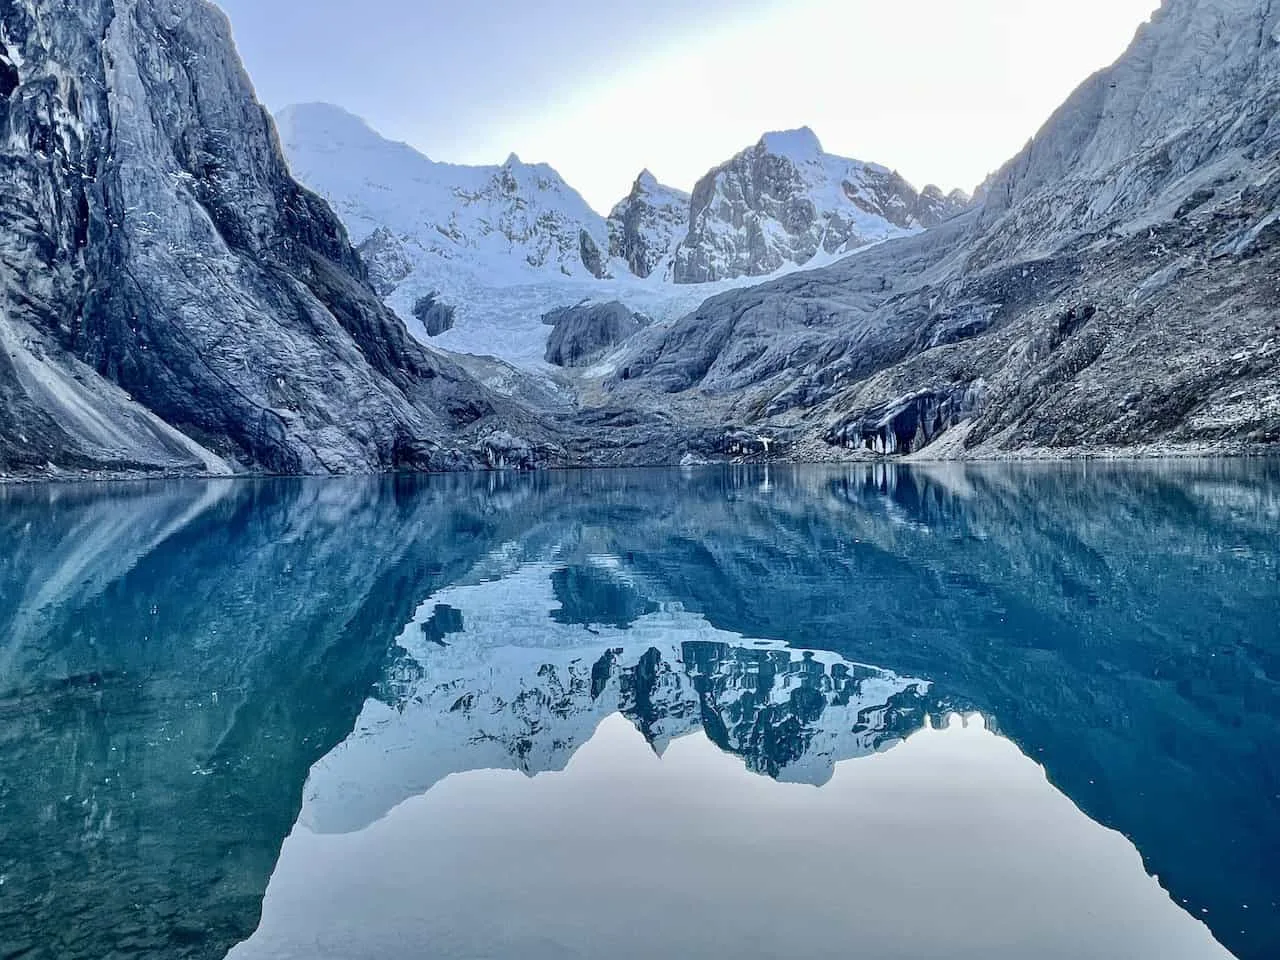
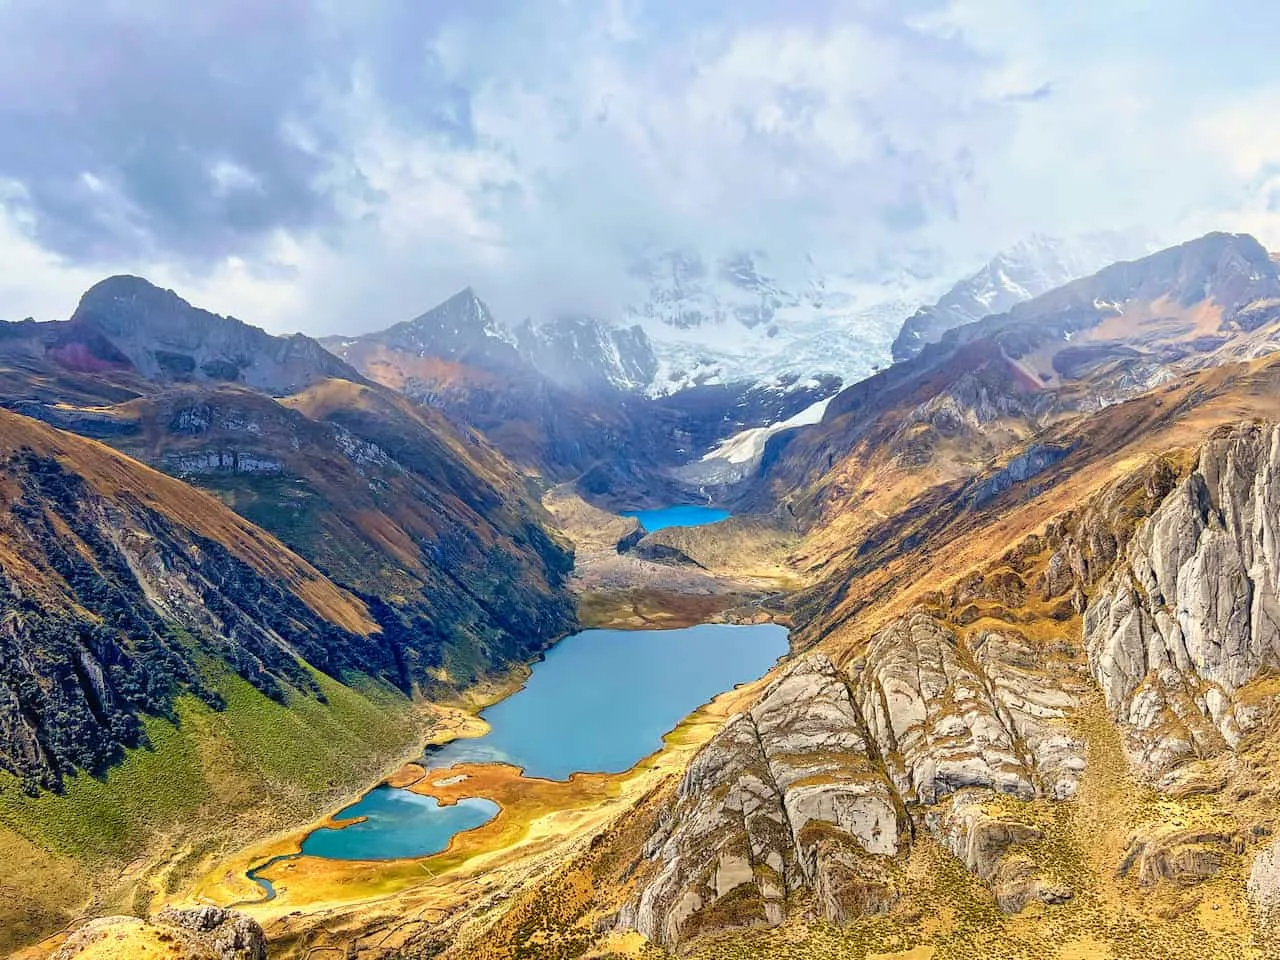
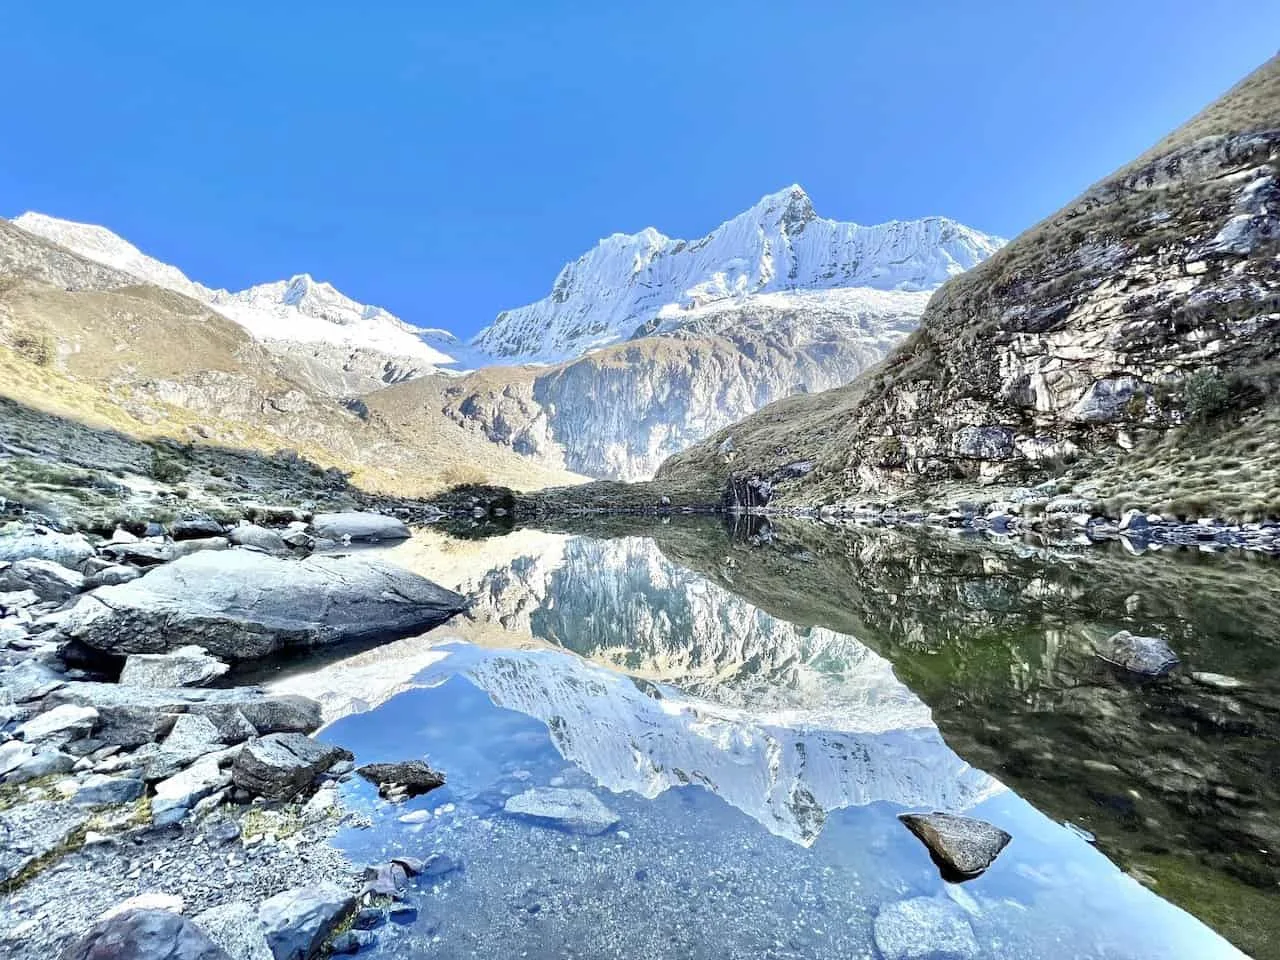
Since this would be one of the easier days on the trail, you should have time to explore the lake once you arrive. This is one of, if not the top campsite of the entire circuit.
Out in front of you will be the mountains of Jirishanca, Yerupaja, Siula Grande, among others. Spend time circling some of the lake, head up the hillside over the lake, and just enjoy some of those views.
Ruta Alpina Alternative
The Ruta Alpina on day 2 between Mitucocha and Carhuacocha was the most strenuous day on the trail for me. I still had a heavy pack on, the route was tough to navigate, and there was a fair share of elevation gain and loss happening.
Again, I would only recommend the Ruta Alpina for those that are truly confident in all of their hiking and navigating abilities.
Starting by the Lake Mitucocha lakeside, the trail encircles the lake as you aim to make your way up the hillside on the far end of it.
You then will slowly head up and get further and further away from the lake itself. As you gain elevation on the non existent trail, the views behind you will continue to get better and better.
Once you are further up the hillside, pay very close attention to your navigation app (most apps don’t even have this route on it, so you may need to rely on the GPX file I included). The goal is to get up and over into the Hidden Valley, however it can be confusing on what line to take up.
I actually ended up taking a much more difficult route as I gained too much elevation along the hillside (corrected in the GPX file though). Instead, if you follow the route, you should more easily get yourself up and over into the Hidden Valley.

Once in the Hidden Valley, do not go down it. Instead, you will want to stay high alongside the wall of the valley as you follow a variety of mule paths.
At some point as you are making this walk, rock cairns will begin to pile up. Thankfully this will now greatly help the navigation as you simply will just want to get yourself from one cairns to the next.
Continue to gain elevation as you wrap around the end of the valley and reach the high point. Take in the views before continuing onwards to Lake Alcaycocha.
From the lake, you will find a path that continuously hugs the hillside. It is then towards that Mirador de las Tres Lagunas viewpoint from the the opposite direction.
Continue the steep path down to the lakeside, where you will soon meet up with the normal route into camp.

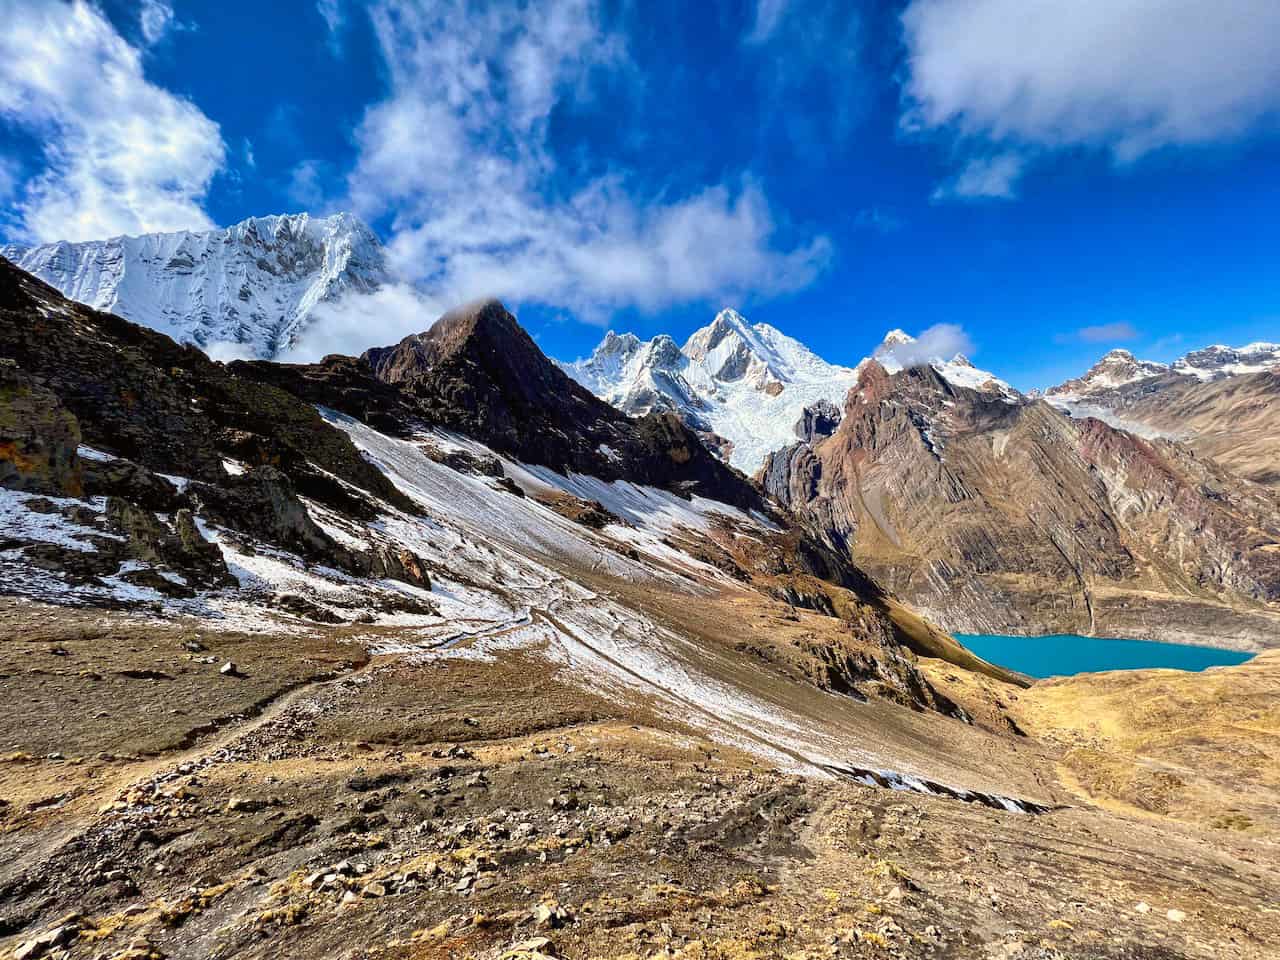
Day 3: Carhuacocha to Huayhuash
Starting Point: Carhuacocha (4,140 meters / 13,580 feet)
Mountain Pass: Siula Pass (4,830 meters / 15,845 feet)
Ending Point: Huayhuash (4,330 meters / 14,200 feet)
Trail Length: 9.4 miles / 15.1 km
Elevation Gain: 2,280 feet / 695 meters
Hiking Duration: 5 -6 Hours
Day 3 Highlights
• More Lake Carhuacocha views
• Viewpoint between the three lakes
• Mirador de los Tres Lagunas!
• Views from Siula Pass
• Relaxing hike down to Huayhuash campsite
Day 3 Hiking Guide: Carhuacocha to Huayhuash
Day 3 Summary
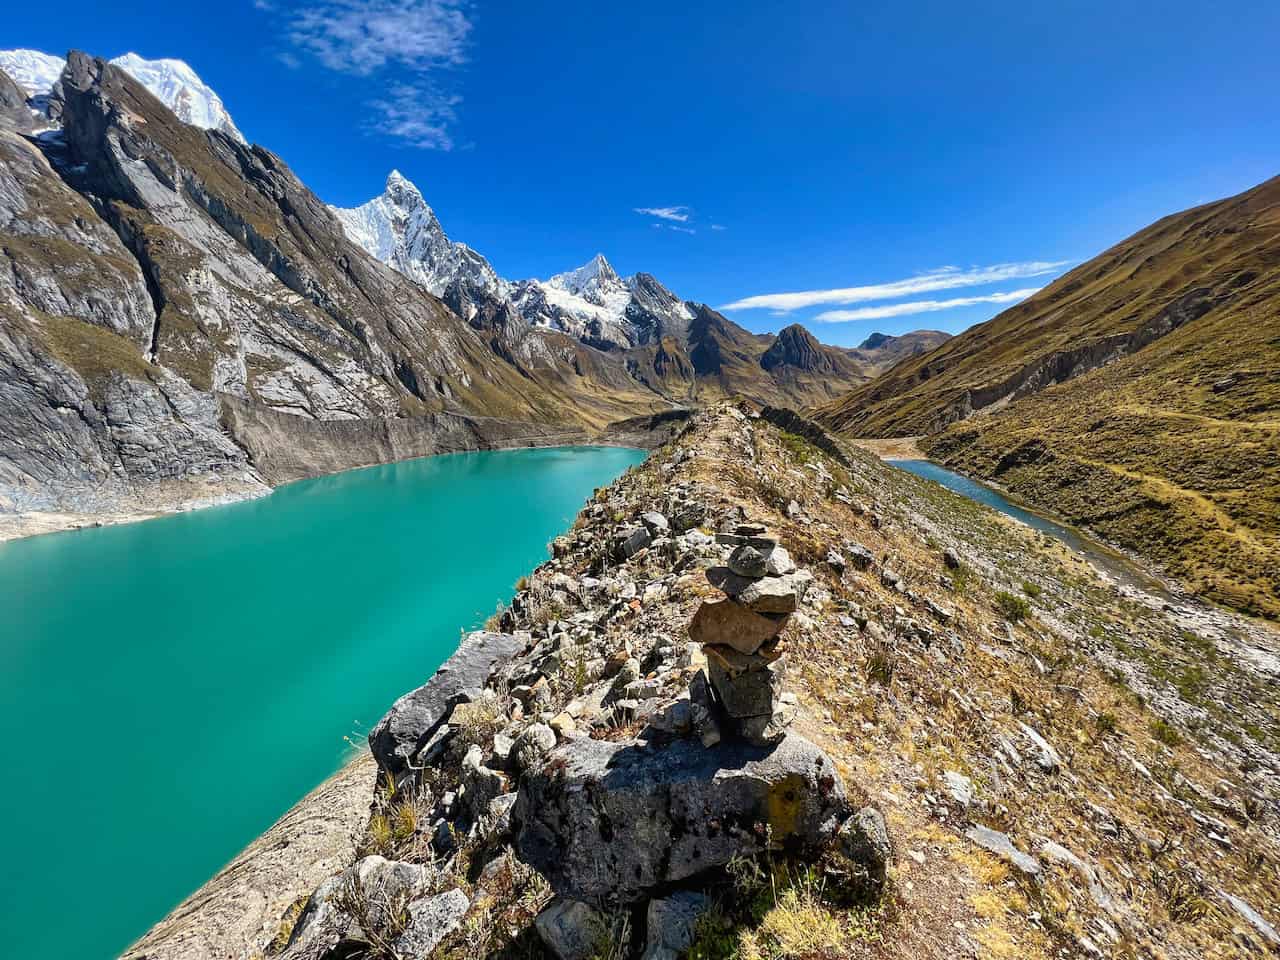
Day 3 of the Huayhuash Trek is most definitely one of the most memorable days on the circuit. From the campsite, the trail encircles the lake with the Cordillera Huayhuash mountains towering up above.

After passing by the lake, the trail then makes a left hand turn down the valley. As you continue along, you will reach an optional viewpoint area that is located between two of the lakes.
I would highly recommend checking out this viewpoint as you really get a new perspective of the landscape all around.

It is then further along the trail, until you reach a point where the incline begins. Up until this point, the trail is relatively flat. However, now it is an ascent up to the Mirador de los Tres Lagunas.
At the viewpoint, you will be welcomed to the famous three lakes view with the snowcapped peaks towering up above. Enjoy your time here before continuing along.

The viewpoint is not the high point of the day though. Instead, you will have an additional ascent up to Siula Pass, where you will get some more great views.
It is then descending down to the opposite side of the valley, where you will head along a long but easy trail towards the Huayhuash campsite.


Day 4: Huayhuash to Viconga
Starting Point: Huayhuash (4,330 meters / 14,200 feet)
Mountain Pass: Portachuelo Pass (4,770 meters / 15,650 feet)
Ending Point: Viconga (4,410 meters / 14,470 feet)
Trail Length: 7.4 miles / 11.9 km
Elevation Gain: 1,440 feet / 440 meters
Hiking Duration: 4 – 5 Hours
Day 4 Highlights
• Trapecio mountain views
• Views from Portachuelo Pass
• Lake Viconga
• Hot Springs at campsite
Day 4 Hiking Guide: Huayhuash to Viconga
Day 4 Summary
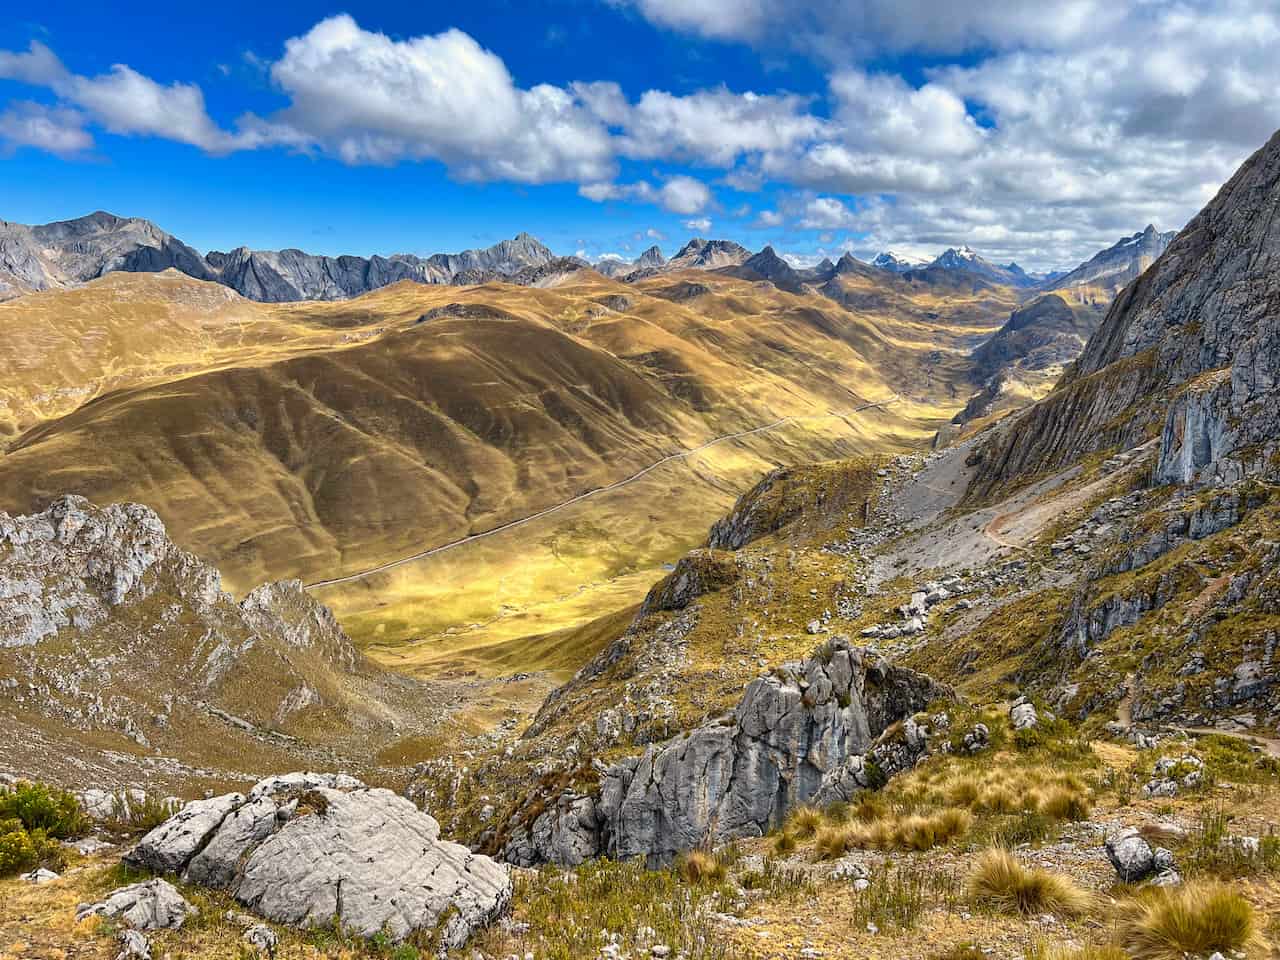
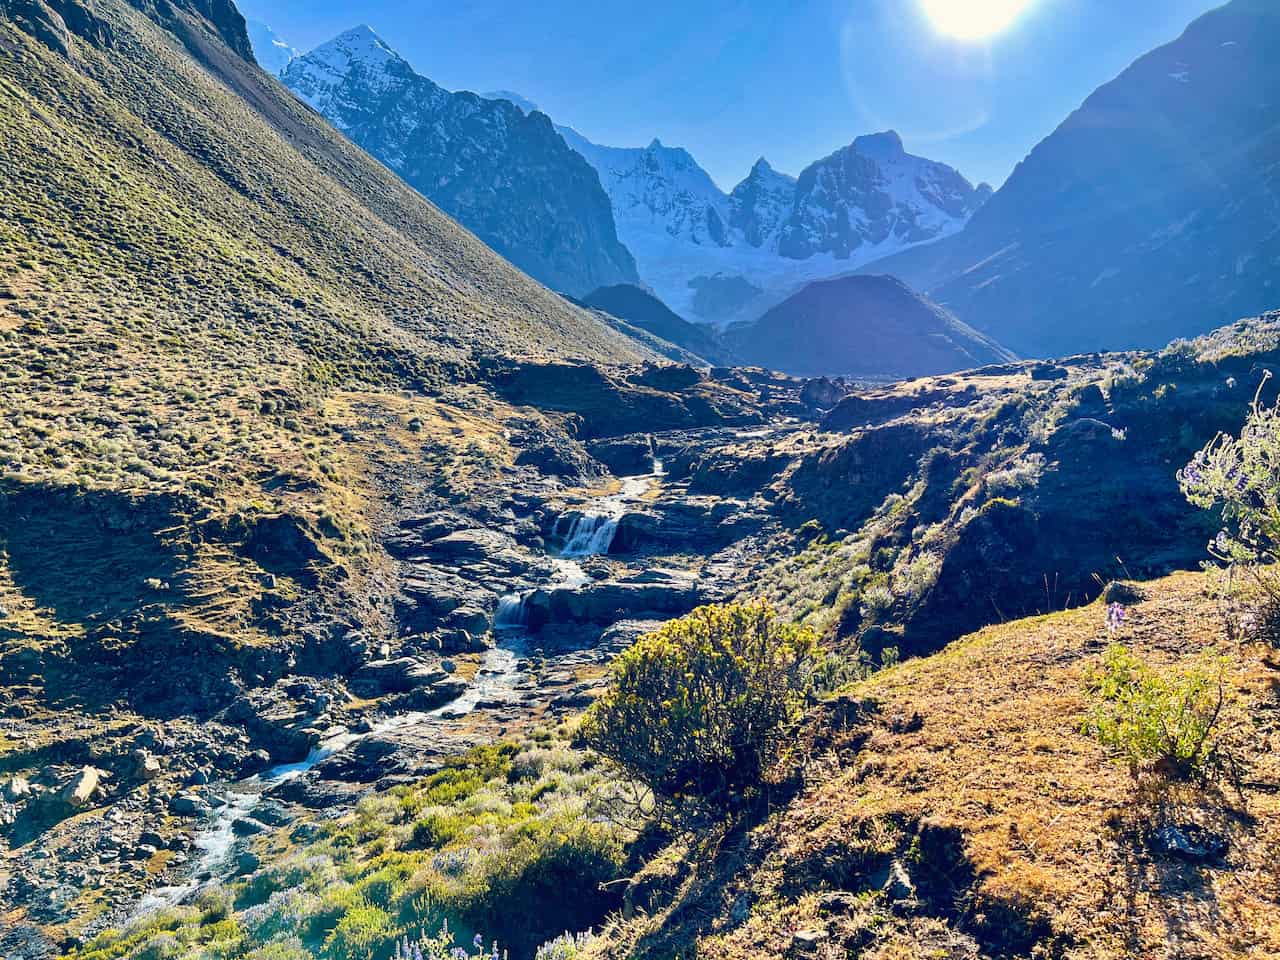
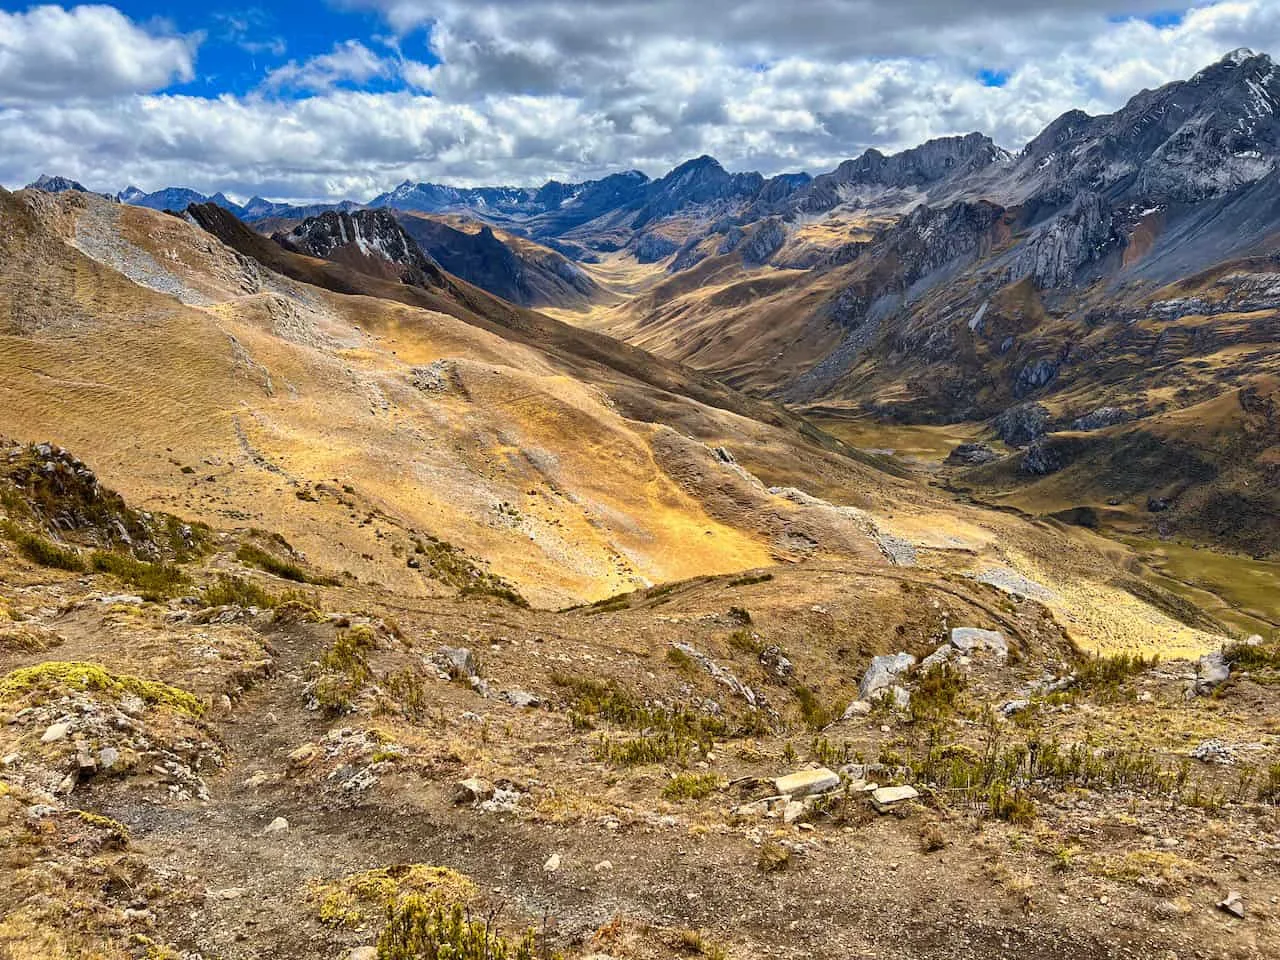
After a long previous day, today you will be able to enjoy a bit of an easier day on the trail. From the Huayhuash campsite, the trail heads around the mountainsides and through a picturequese landscape.
You will be walking among some new mountains (such as Trapecio and the Cordillera Raura mountain range), lakes, and scenery as you slowly approach and descend Portachuelo Pass.


The trail then moderately descends and after a little while Lake Viconga will come into view. The rest of the hike will be about enjoying those views as you approach the lake and then hike alongside it.
Once past the lake, the trail turns down into the valley, where you will find the Viconga campsite and hot springs.
Spend the rest of the afternoon enjoying these hot springs and taking some time to just relax among nature.


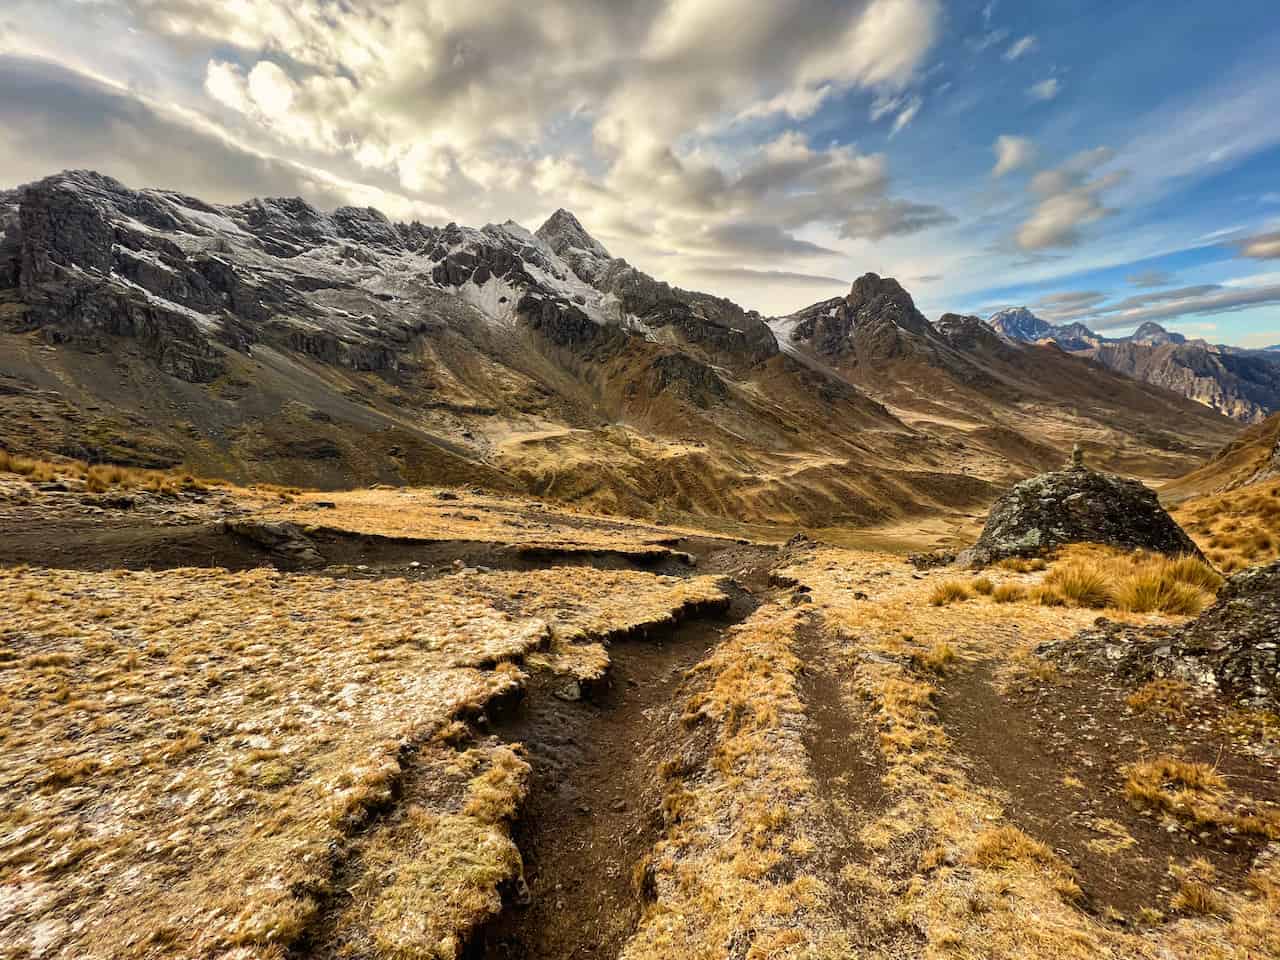
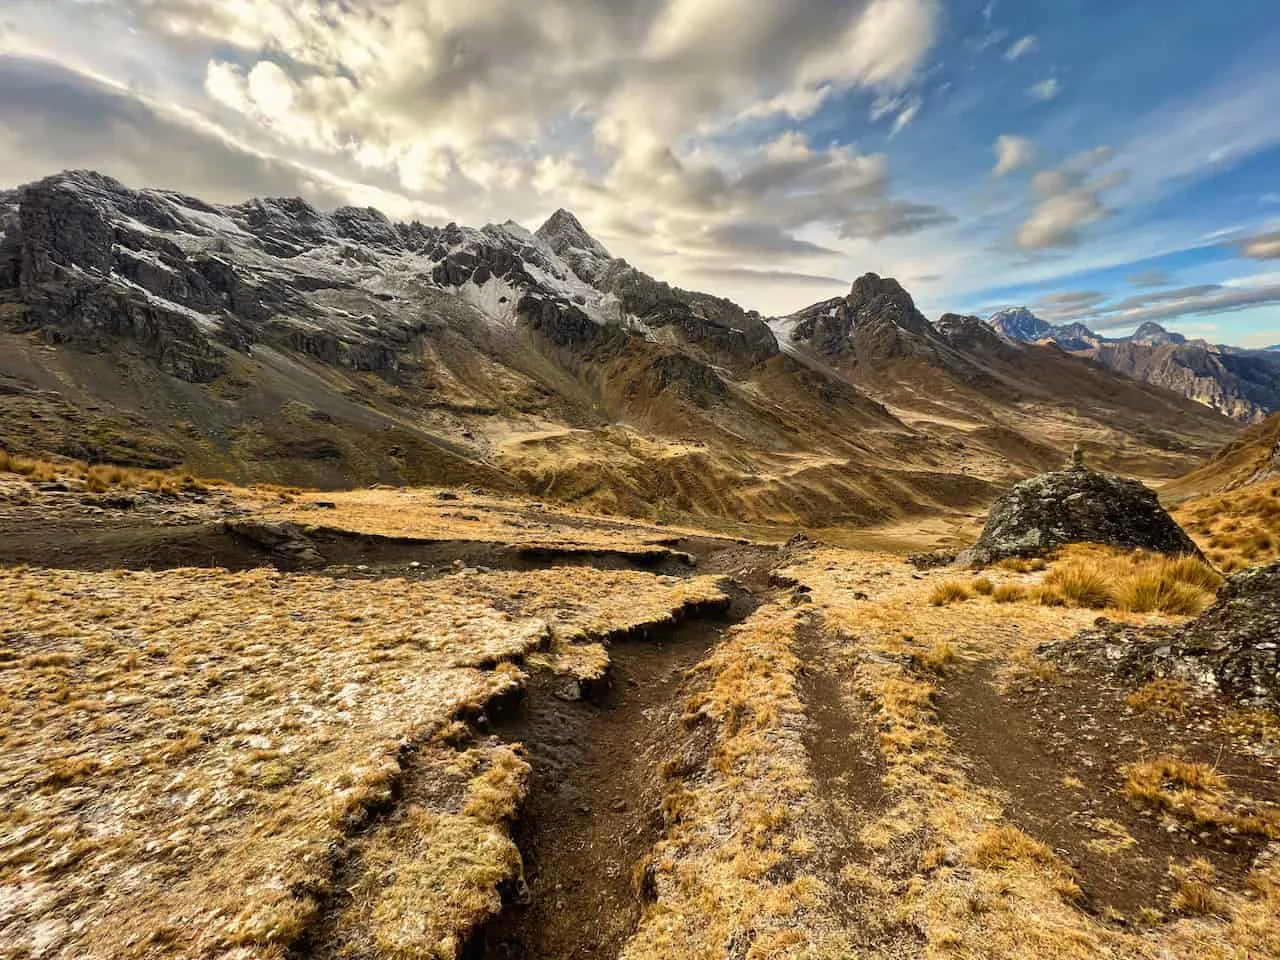
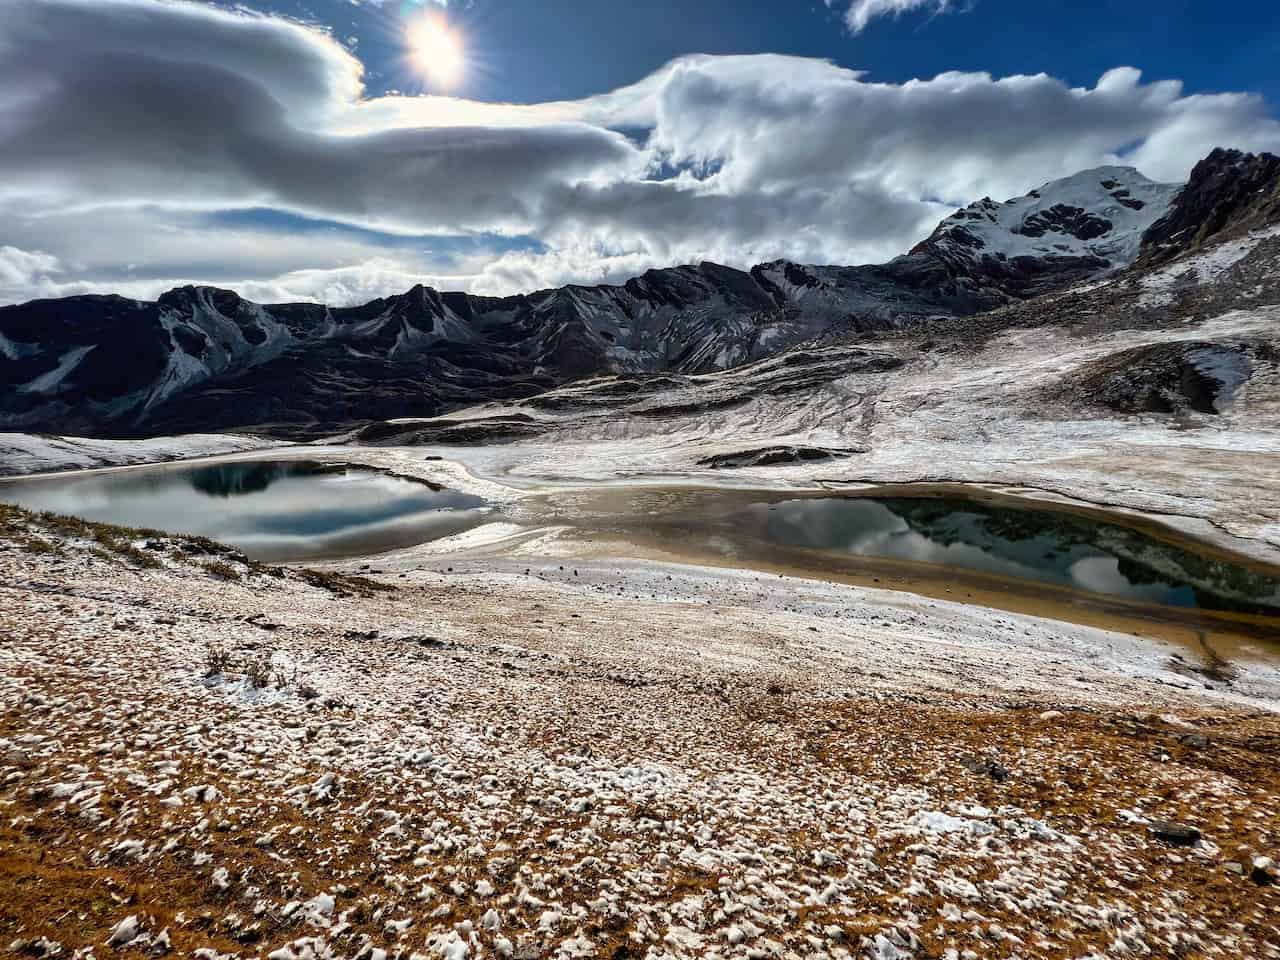
Day 5: Viconga to Cuyoc
Starting Point: Viconga (4,410 meters / 14,470 feet)
Mountain Pass: Cuyoc Pass (5,000 meters / 16,400 feet)
Ending Point: Cuyoc (4,500 meters / 14,765 feet)
Trail Length: 5.6 miles / 9,0 km
Elevation Gain: 1,940 feet / 590 meters
Hiking Duration: 3 – 4 Hours
Day 5 Highlights
• Views of Cuyoc mountain
• Elevated views over alpine lakes
• Views from Cuyoc Pass
Day 5 Hiking Guide: Viconga to Cuyoc
Day 5 Summary
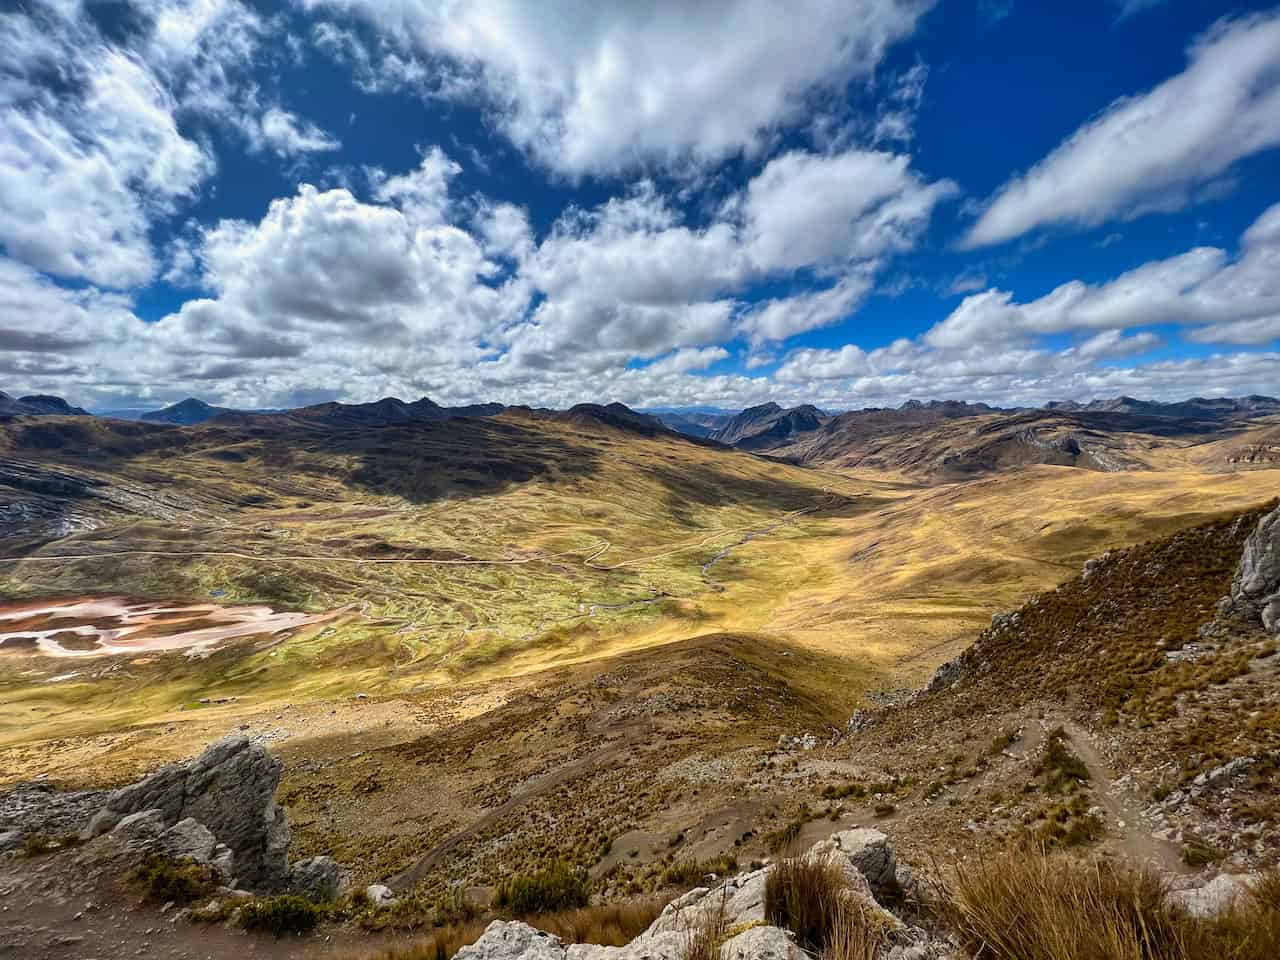
Up next is one of the highest points of the Huayhuash Circuit at the Cuyoc Pass. To get there, you will backtrack on the same trail that you came in on, before veering off to the left.
While there is a bit of elevation gain today, I did find it to be moderate and not that demanding. You will continue to get some beautiful views of the surrounding mountains as Puscanturpa, Cuyoc, and Cuyoc Norte come into view.
You will wrap around a lake (be sure to fill up water here), gain elevation along the hillside and get some unreal views out behind you. It is then up to the Cuyoc Pass, where you can take some time to enjoy the view from up top.
The views down the other side of the valley just get better, as you now will take a zig zagging trail down to the next campsite. Be aware of alternate trails heading to Huanacpatay campsite. You will want to stay to the right towards the Cuyoc (Elefante) campsite.


Cuyoc Notes
→ If you are taking a shorter route and don’t plan to head over to Cutatambo, you do have an option to take an afternoon hike up to San Antonio Pass and come back down to Cuyoc. This will give you the chance to still see the views, without the need to head over to the other side.
→ While the San Antonio Pass is the more popular option, the Jurau Pass (Santa Rosa), is the safer option to descend.
Once you arrive on day 5, you can take that afternoon hike up to the San Antonio Pass and come back down to camp. On day 6, you can take the Jurau Pass over to Cutatambo. This will give you the best of both worlds. While I didn’t opt to do that, I would recommend it.
Day 6: Cuyoc to Cutatambo
Starting Point: Cuyoc (4,500 meters / 14,765 feet)
Mountain Pass: San Antonio Pass (5,020 meters / 16,470 feet)
Ending Point: Cutatambo (4,265 meters / 13,990 feet)
Trail Length: 3.0 miles / 4.8 km
Elevation Gain: 1,700 feet / 520 meters
Hiking Duration: 3 – 4 Hours
Day 6 Highlights
• Surreal views from San Antonio (or Jurau) Pass
• Demanding descent down to Cutatambo
Day 6 Hiking Guide: Cuyoc to Cutatambo
Day 6 Summary
Next up is the hike from Cuyoc to Cutatambo over the San Antonio Pass (or Jurau Pass). Since I took the route over San Antonio, I will talk through that route.
While only a few miles in length, it is a demanding ascent and more importantly a demanding descent.
You should see the trail across from the campsite etched up in the hillside. The trail zigzags up the mountain and continues to gain elevation. While there are some flatter portions on the way up, most of it will be on an incline.
Once up top on the pass, you can take in some unbelievable panorama views of the Huayhuash mountains, lakes, and valleys.
For even better views, head up further on the left side of the pass. Here you will gain a little bit more elevation along some rocky terrain.
The descent is by far the hardest individual portion of trail on the Huayhuash trek. For this reason is why many opt to take the Jurau Pass instead.
To be extremely clear here – you must pay attention to your navigation app. While the first portion of the descent is easy enough to follow, the trail then heads towards the left hand side.
It is not obvious, as there also seems to be another path that heads straight down. While this can technically be considered a trail, it requires an immense amount of technical down climbing.
As long as you follow the route on Maps.me or another navigation app, you should be following the correct trail. Just be extremely cautious.
Once you make it down safely, you will approach the Cutatambo campsite, where you will stay the night.


Optional Add On: Quebrada Sarapococha
Starting Point: Cutatambo
Mountain Pass: N/A Explore Valley
Ending Point: Cutatambo
Trail Length: 5.5 miles / 8.9 km
Elevation Gain: 800 feet / 240 meters
Hiking Duration: 4 Hours
*Trail statistics above just reflect the hike to Laguna Sarapococha
Quebrada Sarapococha Highlights
• Hike to Laguna Sarapococha and Laguna Santa Rosa
• Views of Siula Grande
• Option to head to Cerro Gran Vista
• Juraucocha Lake near camp
Hiking Guide: Quebrada Sarapococha
Summary
Here is where you have an optional day to spend along the Quebrada Sarapococha. This can be spent in a variety of ways depending on your interests.
One of the most popular options here is an easy out and back 6 mile hike to Laguna Sarapococha. You will get up close and personal to the Siula Grande glacier (and the location of Joe Simpson’s base camp – be sure to read Touching the Void for more details).
You can also visit the smaller Laguna Santa Rosa on the way there or back.
A second option is to head all the way up to the Cerro Gran Vista view. While I would have loved to do so myself, I knew my body needed a bit more of a rest this day so I just opted to just go to the lake.


You should also check out the nearby Juraucocha Lake, which is just a 20-30 minute walk away from the campsite.

Day 7: Cutatambo to Huayllapa
Starting Point: Cutatambo (4,265 meters / 13,990 feet)
Mountain Pass: N/A
Ending Point: Huayllapa (3,500 meters / 11,480 feet)
Trail Length: 7.3 miles / 11.7 km
Elevation Gain: 100 feet / 30 meters
Hiking Duration: 4 Hours
Day 7 Highlights
• Easy, beautiful hike through valley
• Rivers & waterfalls make it a relaxing hike
• Rest & recovery in Huayllapa Village
Day 7 Hiking Guide: Cutatambo to Huayllapa
Day 7 Summary
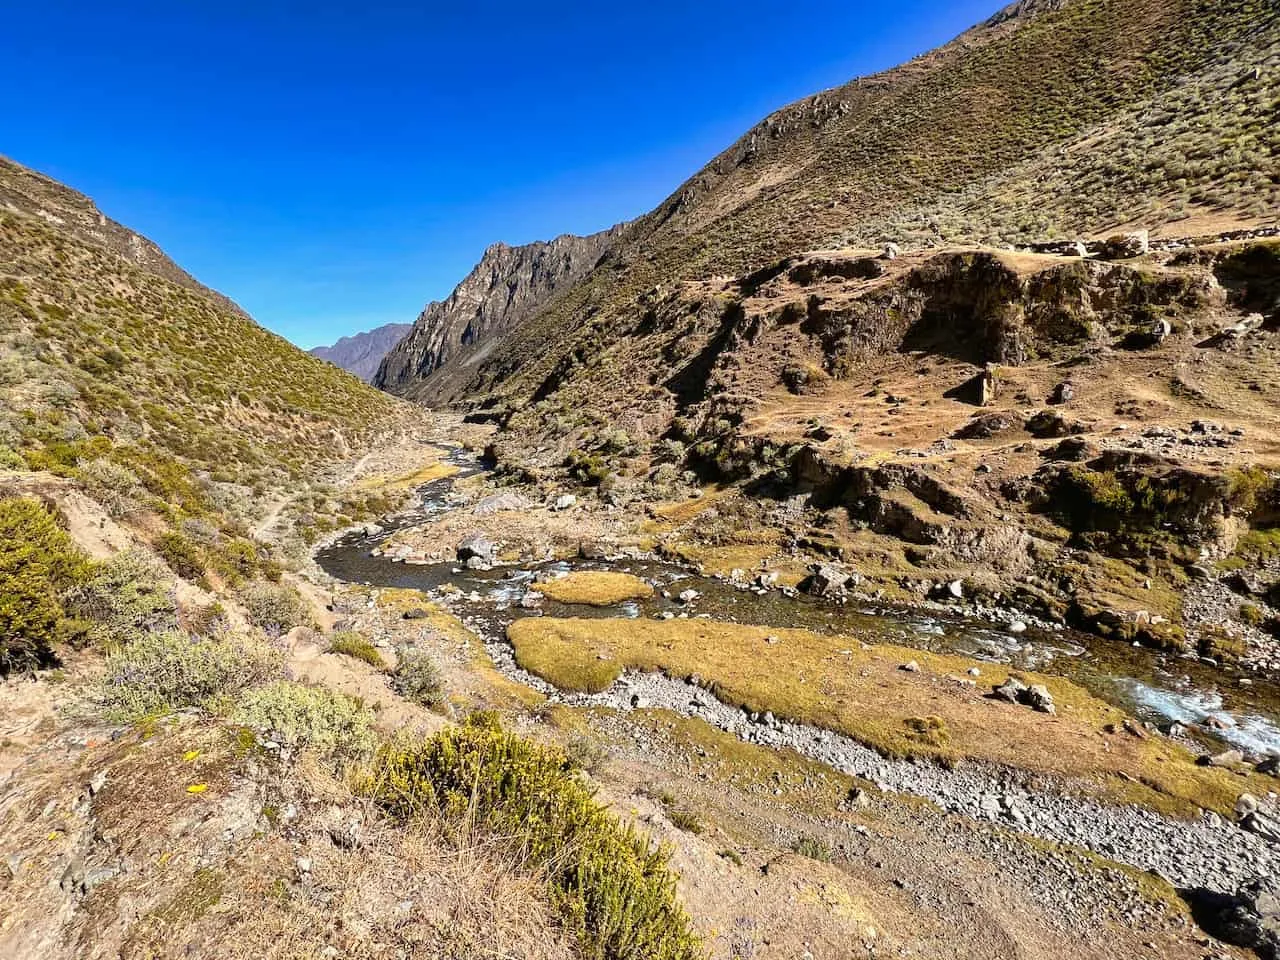
What is considered the easiest day of the trail is the route down the valley to the village of Huayllapa. While it is a bit of a longer route, it is essentially all flat / downhill.
As you are making your way through the first half of the trail, be sure to continuously look behind you. The views down the valley with the mountains out in the distance are just beautiful to take in.
After several hours of hiking, you will see Huayllapa village out in the distance. Make your way down to the village and find a homestay/hostel/hotel to stay at for the night.
This will be a nice change of pace as you can have a home cooked meal, a bed, and some electricity for the evening.
You will find some local stores to buy additional food and snacks but don’t expect much here.


Day 8: Huayllapa to Qashpapampa
Starting Point: Huayllapa (3,500 meters / 11,480 feet)
Mountain Pass: Tapush Pass (4,790 meters / 15,715 feet)
Ending Point: Qashpapampa (4,500 meters / 14,765 feet)
Trail Length: 8.5 miles / 13.7 km
Elevation Gain: 4,100 feet / 1,250 meters
Hiking Duration: 5 – 6 Hours
Day 8 Highlights
• Hiking along the river to Huatiac
• Views from Tapush Pass
• Susucocha Lake
• Views of Diablo Mudo from camp
Day 8 Hiking Guide: Huayllapa to Qashpapampa
Day 8 Summary
Day 8 will be the most elevation gain you will experience on the Huayhuash Circuit. Since Huayllapa is just at 3,500 meters / 11,480 feet in elevation, you will find the first half of the hike a bit easier as you have some more oxygen to deal with.
The trail heads up on a steeper ascent towards the Huatiac campsite as you hike along and around the river. This campsite is used by those that want to save a day on the trail (Cutatambo to Huatiac & then Huatiac to Juhuacocha).
From Huatiac, the trail continues to ascend towards the Tapush Pass, followed by hiking past the Susucocha Lake, and then down to Qashpapampa for the night.


Day 9: Qashpapampa to Jahuacocha
Starting Point: Qashpapampa (4,500 meters / 14,765 feet)
Mountain Pass: Yaucha Pass (4,850 meters / 15,910 feet)
Ending Point: Jahuacocha (4,070 meters / 13,350 feet)
Trail Length: 6.0 miles / 9.7 km
Elevation Gain: 1,970 feet / 600 meters
Hiking Duration: 3 -4 Hours
Day 9 Highlights
• Gorgeous valley views
• Views from Yaucha Pass
• Elevated ridge hike
• Lake Jahuacocha viewpoint
Day 9 Hiking Guide: Qashpapampa to Jahuacocha
Day 9 Summary
On day 9 it is time to head to the final campsite of the circuit. From Qashpapampa, the trail navigates around the valley with new views of some mountain ranges further out in the distance.
It then begins to gain elevation towards Yaucha Pass. More views await as you gain that elevation and make your way to the pass itself.
Once on top of the pass, the Cordillera Huayhuash peaks will once again appear out in front of you. From here you have two options – head straight down to the lake on the mule route (not recommended), or take the route that maneuvers along the ridge.
By taking this route you will get to have more elevated views of the surrounding landscape and beautiful views of Lake Jahuacocha.
It is a steep descent down towards the campsite, so take your time and watch your step as you finish up the day.


Day 10: Jahuacocha to Llamac
Starting Point: Jahuacocha (4,070 meters / 13,350 feet)
Mountain Pass: Pampa Llamac Pass (4,270 meters / 14,010 feet)
Ending Point: Llamac (3,250 meters / 10,660 feet)
Trail Length: 9.4 miles / 15.5 km
Elevation Gain: 885 feet / 270 meters
Hiking Duration: 4 – 5 Hours
Day 10 Highlights
• Finishing the circuit!
• Option to head over Sambunya Pass
• Saying goodbye to the Cordillera Huayhuash
Day 10 Hiking Guide: Jahuacocha to Llamac
Day 10 Summary
On the final day of the Huayhuash Circuit, you will head out from Jahuacocha to Llamac. The vast majority of people take the easy, less scenic route over the Pampa Llamac Pass. This is because that trail ends right in Llamac village, and gives trekkers enough time to catch the last bus back to Huaraz.
However, during my time on the trail, I opted to head on the alternate route to Rondoy. Since I did not have transport waiting for me in Rondoy, I did need to spend an extra night in Llamac before getting back to Huaraz the following day. Luckily though, I did not need to walk the dirt road from Rondoy to Llamac, as I was able to hitch a ride with some locals.
The route out to Rondoy entails heading around Lake Jahuacocha, and climbing up the hillside, where you will get some beautiful elevated views of the mountains.
It is then slowly towards the Sambunya Pass and the nearby Rondoy Pass, before descending down the opposite side of the valley to Rondoy.
Decision Recap
→ If you need to make it back to Huaraz on your final day of trekking & don’t have private transport waiting, then opt for the route directly down to Llamac over the Pampa Llamac Pass.
→ If you don’t need to be back to Huaraz on your final day of trekking OR you have private transport waiting, I would recommend trekking over the Sambunya Pass to Rondoy.

10) With or Without Guide
The biggest decision you will need to make when it comes to the Huayhuash Circuit is whether or not you are doing it with a guided trek or doing it independently.
For context, I did my trek independently (and solo at that). For someone that is going part of a guided tour, the overall experience will be different.
Huayhuash Guided Trek
Many people who take part of the Huayhuash Circuit do so as part of a guided tour. There are several tour companies based in Huaraz that put together treks throughout the trekking season (Quechuandes being a top option).
A guided trek can be done as part of a group tour (anywhere from 8-12+ people) or as a private tour (for a heftier fee of course).
If you opt for a guided trek, many important aspects of a trek will be taken care of for you by the company. The most important of these include:
→ Transport to and from the trailhead
→ Local guides who know the route
→ Porters & Donkeys to carry your gear & set up camp
→ Cooks to make your daily meals
At the end of the day, going with a guided trek really does take a lot of stress and preparation off of your plate. You will be able to just focus on hiking with a light day pack and have essentially everything else taken care of for you.
While there are many positives to going with a guided trek, I would say there are some downsides as well.
→ For one, it will be more expensive than going independently. On average, you can expect a guided trek to cost around $80-$100+ per day + any additional tips to the staff.
→ In addition, and most importantly for me, is that you lose the flexibility to create your own route and make your own decisions (unless you are on a private tour).
For example, I had one day on the circuit with terrible rainy overcast weather. While the guided trek at the campsite headed out, I opted to wait it out another day for the weather to clear.
→ Not all guided tours are going to be the same. I knew I wanted to visit Viconga, head over the San Antonio Pass, explore the Quebrada Sarapococha, and head to the alternate finish via the Sambunya Pass. Not every guided tour would be doing a route like that.
→ Lastly, many guided tours have set departure dates. So even if you found a company doing the route you want to do, there is a chance it just does not line up with your schedule.

Huayhuash Trek Solo / Independent
For myself, I just wanted to have a bit more freedom with my route and my experience in general. In addition, I wanted to accomplish something like the Huayhuash Circuit on my own. Without the help of support, I knew this was going to be a major step forward in my hiking journey and expertise.
So, given all of that, I opted for a solo independent hike of the Cordillera Huayhuash.
This decision though had a lot of considerations to it, and you should be sure to think through everything as well. Some of the most important topics to think about include:
→ Getting to/from the trailhead
→ Navigating the trail on your own
→ Carrying all of your gear (hiking gear, tent, sleeping bag, food, etc.)
→ Setting up camp & breaking down camp every day
→ Making your own food
Each one of these topics has to be approached in a deep and thoughtful manner. If you are uncomfortable with any of these, then I would not recommend an independent trek. But if you have the experience and knowledge needed, then the Huayhuash Circuit is certainly a special trek to accomplish on your own.
Learn More: Huayhuash Trek Cost Breakdown

11) When to Go / Weather
When it comes to Huayhuash weather, there are two main seasons to consider – the dry season and the wet season. The dry season begins in May and ends in September, while the wet season runs from October to April (with a little bit of overlap on either end).
During the dry season you can expect less rain and clouds that could ruin those views and the experience, and a better chance of clear weather. Due to this, most people taking part of a Huayhuash trek will opt to hike in the dry season.
For myself, I always think about weather considerations when traveling (especially hiking trips), and is why I chose a mid-July trip for my trek.
On the other hand, in the wet season you should be prepared for more rainfall. Whether that be rain throughout the daytime hiking or once you are in your tent in the evening.
With that said though, this is no “normal” type of weather seasons when it comes to the mountains. Dealing with such a mountainous landscape can really create its own weather at any time of the year.
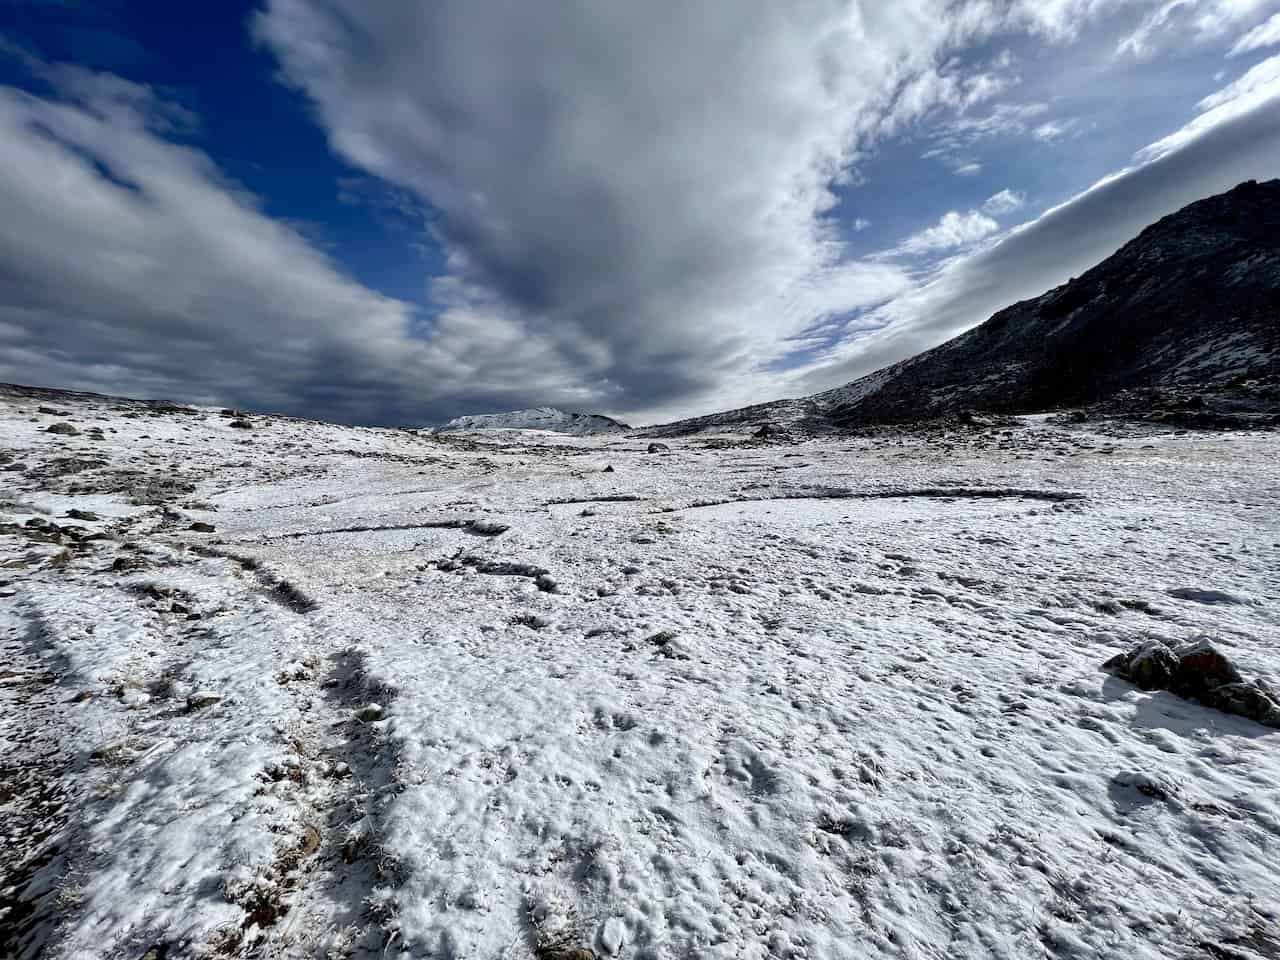
So, don’t just think if you are choosing a trip during dry season that the weather will be perfect for your entire trek (although it is possible!). Instead, be prepared for the elements – whether that be rain, wind, snow, or even some hail.
Read More: learn about more weather details by reading through the best time to trek the Cordillera Huayhuash

12) Where to Stay in Huaraz
Prior to and after your Cordillera Huayhuash hike, you will be basing yourself in Huaraz. During your time in Huaraz, you will be taking part of acclimatization hikes (more on that soon) and getting yourself ready for the trek.
My recommendation is to spend at least three nights in Huaraz before starting the trek. Day 1 can be spent settling in and getting any last minute gear, and day 2 & 3 can be used as acclimatization hikes.
After the hike I would recommend spending two nights in the city. The first day will be the day you arrive back from the circuit, and the second day can be used as a relaxation day / buffer day.
While there are many options to choose from in the city, the more highly rated options will sell out throughout the peak months. Once you know your dates, be sure to lock down your hotel choice.
Below are just a few of the hotel options I would recommend looking into for the trip:
→ Hotel & Bungalows Villa Valencia

13) Acclimatization
The Huayhuash Circuit is not one of those hikes where you can just get off the plane on day 1 and head to the starting point on day 2.
Due to the high elevation of the trek, it is of upmost importance that you take part of some acclimatization days in Huaraz prior to starting the hike.
For those that are not familiar with what acclimatization actually means, here is a quick rundown:
→ For most people out there, to be 10,000+ feet above sea level is not what the body is used to on a day to day basis. The higher you ascend, the less oxygen there will be in the atmosphere. This means that your body will need to adapt itself slowly over time to operate efficiently at these higher altitudes.
→ Going up in elevation too quickly can result in altitude sickness (dizziness, headaches, nausea) and potentially even more dangerous complications like cerebral and pulmonary edema.
To solve this, it is highly recommended to spend 2-3 days in Huaraz prior to the circuit itself. During this time, you can spend time around town and take part of a couple acclimatization hikes.
This will give your body the necessary time needed to get used to these higher elevations. It will also go hand in hand with the mantra of “hike high, sleep low”. During these day hikes, your body will be tested at higher altitudes similar to what you will experience on the circuit.
At night, you will have the chance to rest and recover at lower altitudes in Huaraz as your body gets more and more acclimatized.
I also want to note, that the Huayhuash Trek is not one of those hikes that continuously gains elevation throughout. Instead, you will more or less be sleeping at a similar altitude each night. Days will comprise of heading up and down mountain passes, as you sleep in the valleys.
Due to this, acclimatization is not needed on the trek itself. By just doing some acclimatization prior to the trek, you should be good to go.

14) Huaraz Day Hikes
There are many hikes to take part of in and around Huaraz that can be great day hike options. Some may be just outside of town, while others are a few hours drive away.
Laguna 69
Perhaps the most famous of day hikes in that of Laguna 69. This trail takes you up through a beautiful valley and onto the turquoise waters of the lake.
Here you will have some giant snow capped mountains all around as you take in one of the best views in all of Peru.
→ Learn all about the Laguna 69 hike in the trekking guide up on the site

Laguna Paron
Also located further away from Huaraz is Laguna Paron. The nice thing about Laguna Paron, is that you can drive right to the lake. This gives you the chance to take an easy stroll around the lake while not exerting too much energy.
There is a viewpoint to head up to as well if you are looking to get those panorama landscapes in from above.
Laguna Churup
One of the closest day hikes to Huaraz is that of Laguna Churup. Just outside of town, a trail starts up a hillside and towards another turquoise colored lake.
While there is plenty of elevation gain here, the hike overall isn’t too long. Once at the lake you can take in a whole variety of viewpoints to enjoy.
For those that want some additional hiking, head on the pathway on the left hand side of the lake to a secondary lake – Churupita.
There are certainly other day hikes to enjoy as well, but these three should certainly keep you busy during your days in Huaraz.
→ Learn all about the Laguna Churup hike to prepare yourself for the trail

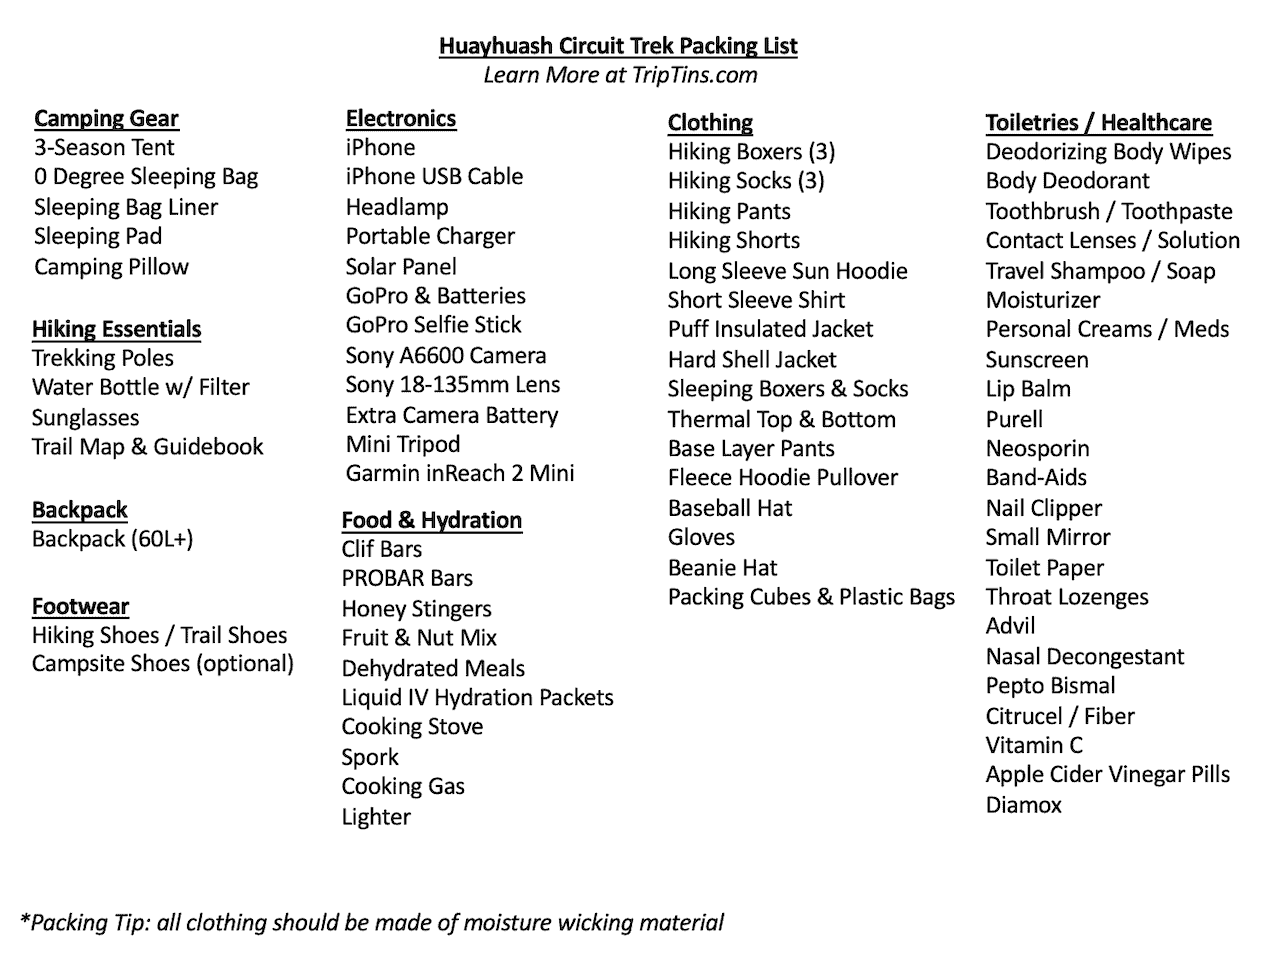
15) Huayhuash Circuit Packing List
Now it is time go over what a Huayhuash Circuit packing list entails. This list will be geared towards those who are doing the trek independently.
For those going with a guided trek, many of these items will be taken care of by the tour company.
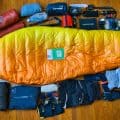
Hiking & Camping Gear
Let’s start off with the standard hiking & camping gear that will be needed on the Huayhuash Trek. For many items I have also included a recommended product that I went with or would recommend on the trail.
- Hiking Backpack | Hyperlite Southwest 3400
- 3-Season Tent | Big Agnes Copper Spur HV UL
- 0F Degree Sleeping Bag | Thermarest Questar 0
- Sleeping Bag Liner | Sea to Summit Liner
- Sleeping Pad | Thermarest NeoAir Xlite
- Camping Pillow | Thermarest Camping Pillow
- Trekking Poles | Black Diamond Distance Carbon FLZ Trekking Poles
- Water Bottle | Katadyn BeFree 1 Liter
- Hiking Shoes | Keen (Targhee Series)

Electronics
This next section will dive into the electronics that I brought along. Of course, each person may be different depending on their photography needs.
- iPhone & USB Cable
- Headlamp | Petzl Actik Core
- Portable Charger | Anker Portable Charger 10,000 mAH or Anker Portable Charger 26,800 mAh (depending on if you are bringing a solar charger)
- Solar Charger | GoalZero Nomad 10
Action Camera
- GoPro
- GoPro Stick
- Extra GoPro Batteries
Mirrorless Camera
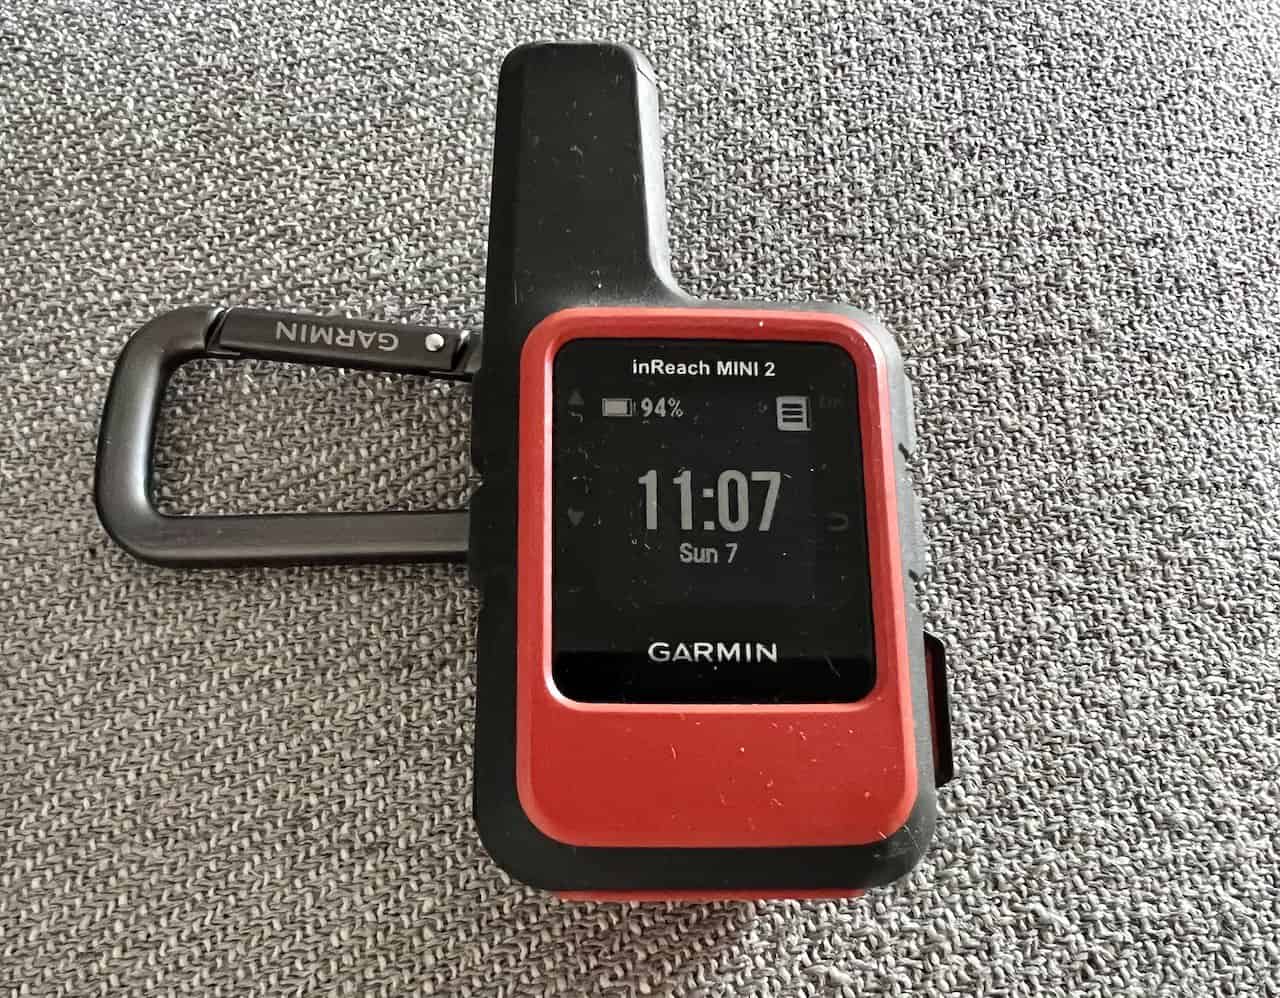
• Emergency Satellite Locater | Garmin inReach 2 Mini
This is truly one of the most important items to take with you on a trek. By bringing a Garmin, you will be able to share your location with others for them to track you. It also allows for emergency rescue and text messages if needed.

Clothing
The Huayhuash Circuit is located high up in elevation and it can really get cold at night. You will want to pack the appropriate clothing to be set for all types of conditions.
Hiking Clothes
- Hiking Boxers (3) | Under Armour Men’s Tech
- Hiking Socks (3) | Darn Tough Socks
- Hiking Pants (1)
- Hiking Shorts (1)
- Long Sleeve Sun Hoodie (1) | The North Face Wander Sun Hoodie
- Short Sleeve Shirt (1) | The North Face Wander T-Shirt
- Puff Jacket (1)
- Hardshell Jacket | Arcteryx Beta AR
Sleepwear
- Sleeping Boxers & Socks
- Thermal Layer | Smartwool Baselayer Bottom and Smartwool Baselayer Top
- Base Layer Pants
- Fleece Hoodie Pullover
Other
- Gloves
- Sunglasses
- Baseball Hat
- Beanie | Smartwool Beanie
- Microfiber Towel | Rainleaf Microfiber Towel.
- Packing Cubes | Shacke Pak Packing Cubes & Laundry Bag
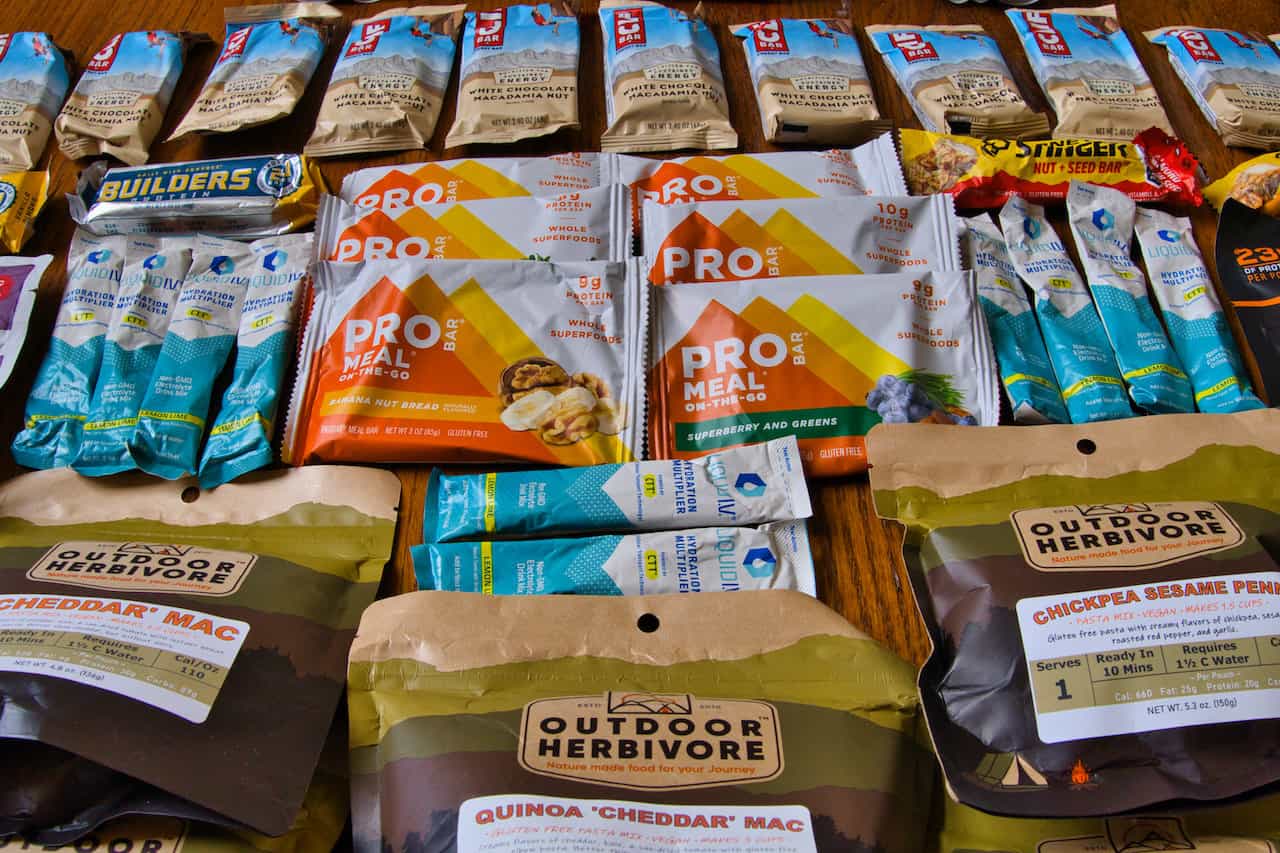
Food & Hydration
Next up is the food portion of the packing list. Here is where you can really get weighed down, so be sure to choose wisely (calorie dense options).
Breakfast
- Clif Bars (11)
Lunch/Snacks
- Variety of Bars including PROBAR Bars, Honey Stinger Bars, Clif Builder Protein Bars (11)
- 3lbs of Fruit & Nut Mixes
Dinner
- Variety of dehydrated meals including Peak Refuel, Outdoor Herbivore, and GOOD TO-GO (10)
I ended up bringing all the food necessary to last 11 days on the trail. While I could have restocked in Huayllapa, I was more comfortable just bringing the food that I wanted with me (even though it added more weight to my pack).
Hydration
As mentioned earlier, water was abundant throughout the trail so actual hydration was never an issue. However, I also brought along some Liquid IV hydration packets to increase those hydration levels in addition to some vitamins.
Cooking Gear
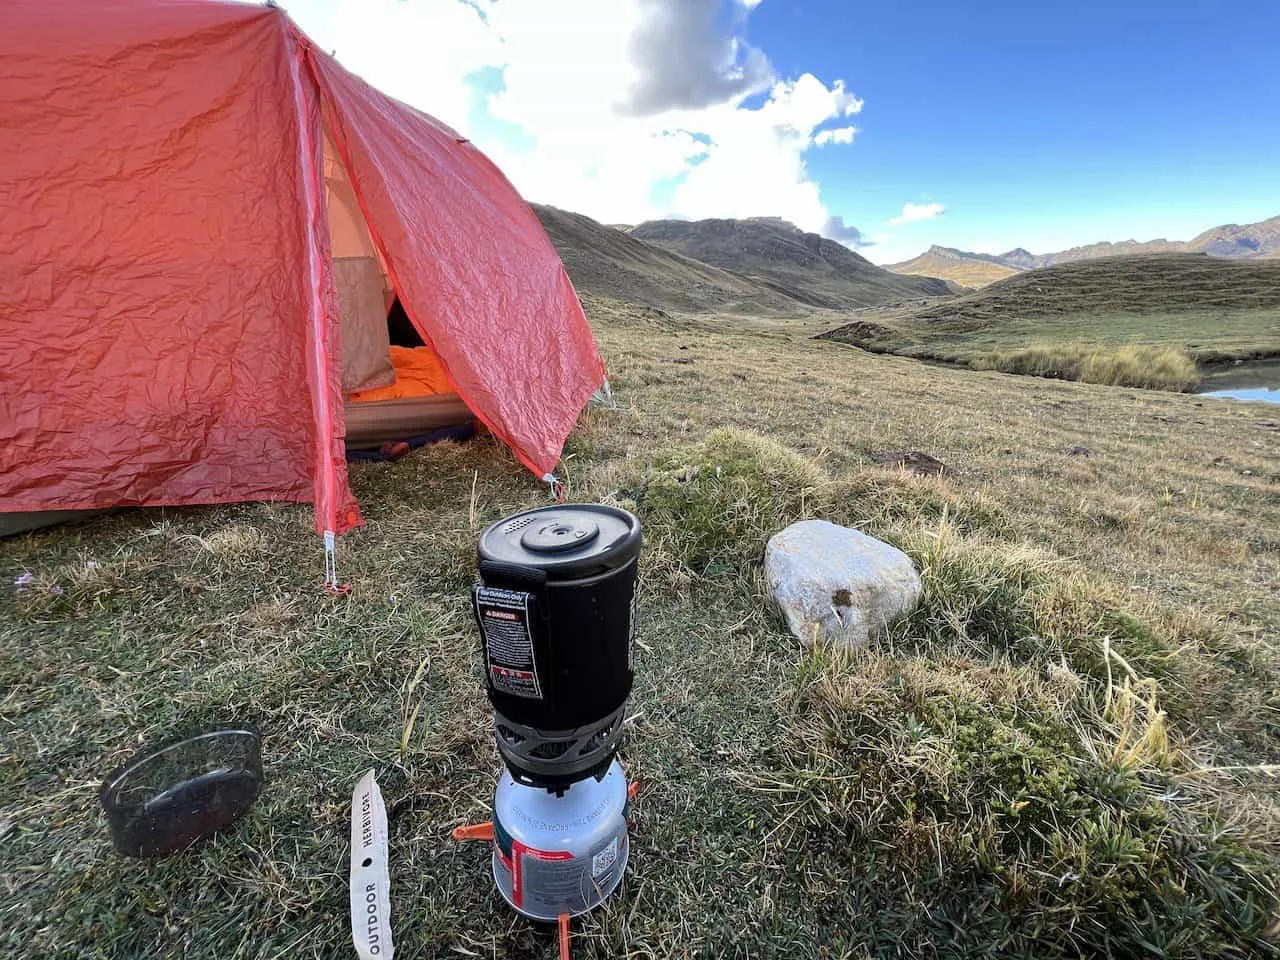
- Cooking Stove: The Jetboil Micromo was my choice here. Quick, easy, light and portable.
- Spork: I opted for this TiTo titanium spork that came along with a small bag
- Cooking Gas: I purchased this in Huaraz at a local store for around $7 USD
- Lighter: I also brought along a lighter as a backup for the cooking stove ignition (which I used several times)
Extra Plastic Bags – I brought along a few plastic bags to keep trash in before making it to the next campsite.
Toiletries
This last section of the packing list will be toiletries. Each person will also be different here, but below are the main items I brought along with me.
- Deodorizing Body Wipes | Alcala Bamboo Deodorizing Body Wipes
- Body Deodorant
- Toothbrush / Toothpaste
- Contact Lenses / Solution
- Travel Shampoo & Soap ⇔ for the times you do clean up in the river / hot springs
- Moisturizer
- Personal Creams & Medications
- Sunscreen ⇔ even in the cold, the sun is quite strong!
- Lip Balm
- Purell
- Neosporin
- Bandaids
- Nail Clipper ⇔ great to clean nails and to safely release potential blisters
- Small Mirror ⇔ helps with creams and contact lenses
- Toilet Paper ⇔ most campsites have bathrooms but not toilet paper
Medicines / Health Benefits
- Ricola Throat Lozenges
- Advil / Ibuprofen
- Nasal Decongestant
- Pepto Bismal
- Citrucel / Fiber
- Vitamin C
- Apple Cider Vinegar Pills
- Diamox for altitude sickness ⇔ be sure to consult your doctor ahead of time
Learn More: The Huayhuash Circuit Packing List dives into more detail about each and every item

16) Huayhuash Circuit Tips & Things to Know
To end this Huayhuash hiking guide, I did want to just throw out some helpful tips & recap some aspects of the trek.
→ There is plenty of water throughout the hike but you will need to filter the water due to the enormous amount of livestock around the Huayhuash. I opted for just a general filtered water bottle, but a UV Sterilizer Pen may be the safer option.
→ Speaking of animals, expect a lot of them around the trail. Cows, horses, sheep, llamas, mules and plenty more will be along the route. Due to this, you will find a lot of animal waste too on the trail and at campsites. Watch your step!
→ Bring small denominations of local currency to pay the campsite fees, and be sure to hold on to your tickets until the end.
→ If you do not speak Spanish, I would highly recommend installing Google Translate onto your phone and downloading Spanish. This way you will be able to communicate offline with locals when need be.
→ Be aware of sunset and sunrise times during a trek, and plan your hiking accordingly. You do not want to set off too late and then come into the next camp after dark.
→ You should be prepared for all types of weather and temperatures. While you may be hiking in a t-shirt during the day, once the sun goes down, you will want to be all bundled up in your sleeping bag.
→ Since it can be cold at night, be sure to put all electronics in your sleeping bag to keep them warm and conserve battery.
→ Pay attention to Maps.me or whatever navigation app you have. While the majority of the route can be easy to follow, there will be situations where it is not as obvious. Make it a habit to continuously check it, so you know you are heading in the correct direction.
→ With that said, the route on these navigation apps is not always picture perfect. As long as you are nearby that main line and heading in the obvious direction of the path, you should be good to go.
→ Please bring a Garmin inReach 2 Mini with you on the trail if hiking independently. It is such an important aspect of staying safe and connected.
→ In case your stove does not ignite in the colder temperatures, bring a lighter for backup. This ended up saving me during my time on the trail.
→ The sun is very strong during the day so a hat, sunglasses, and sunscreen are a must!
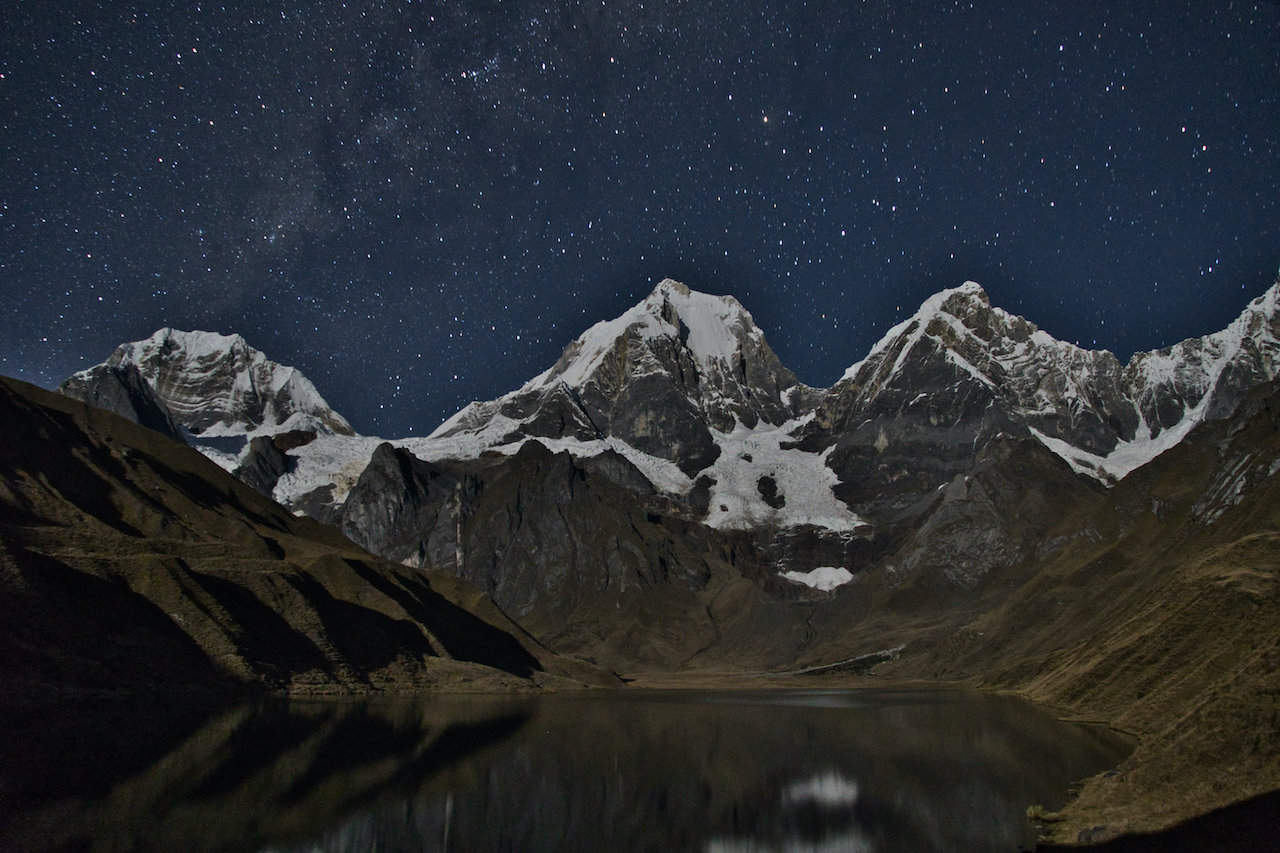
→ For those photographers out there, be sure to get out of your sleeping bag at night and take some photos of the beautiful night sky up above. It is truly a special experience to take part of.
And that wraps up your guide to the Cordillera Huayhuash Circuit trek of Peru. While I covered a lot in this article, there always may be additional questions. Be sure to write those in below and I will get back to you.
If spending more time in the country, check out some other Huayhuash hiking guides up on the site.
Have fun out there and safe travels!


Danny
Wednesday 4th of September 2024
Curious - how much did your pack weigh roughly when you began the trek?
David
Monday 1st of May 2023
Hi Charles,
Do you think is possible to do 2 days in one at Cuyoc? That would be Cuyoc - Cutatambo - Quebrada Sarapococha - Cutatambo. I've checked and would be 12,8 Km and +820m elevation.
Thanks and regards!
Charles
Monday 1st of May 2023
Hi David - yes that is possible. If that is your plan I would recommend starting early from Cuyoc in order to get up and over the San Antonio or Santa Rosa Pass. Remember these are some of the best views of the trek, so you may want to spend some time up there. For the Quebrada Sarapococha, I only believe you will be able to make it to the lake and back. I have a hard time believing you can get up and down the Cerro Gran Vista in time (unless you are an extremely fit hiker). Enjoy!
Dave
Saturday 4th of February 2023
Hi Charles,
thanks a lot for all the very useful information about the Huayhuash Trek. This might not be my last question, but I start from this:
- The 3-season tent is enough for camping? - You mention the sleeping bag is 0 degrees: but you mean C of F?
Thanks again!!
Charles
Sunday 5th of February 2023
Hi Dave - you are welcome, glad it has all helped. To answer your questions -> 1) yes a 3 season tent worked great for me (at least in July), 2) the sleeping bag would be 0F - that kept me warm, however I did meet people who had 20F bags too. Hope that helps!
silas
Tuesday 25th of October 2022
Hey,
Awesome trip report! amazing info and pics.
Question - did you bring the dehydrated meals from wherever you cam from or purchase them in Huaraz?
Thanks for all the great info in here :-)
Charles
Tuesday 25th of October 2022
Hi Silas - glad you enjoyed it. I did bring everything with me from back home as I wanted particular brands of dehydrated meals. The only items I bought in Huaraz were cooking gas and a lighter. Enjoy your trek!