
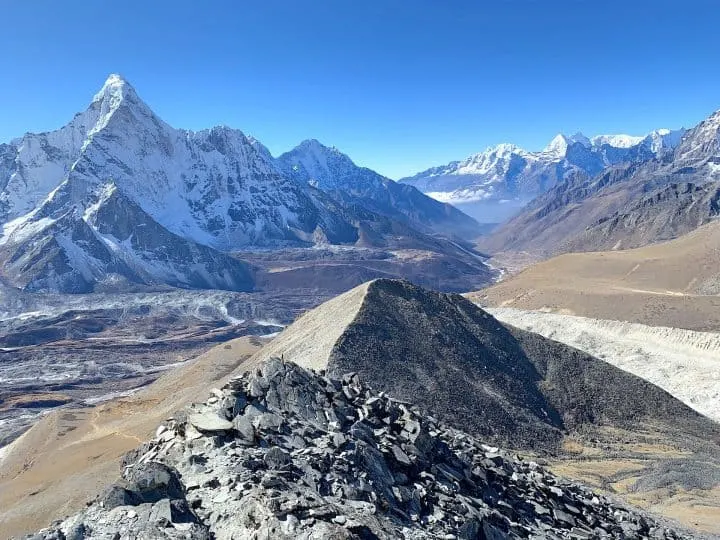
The Three Passes Trek of the Himalayas has to be one of the ultimate multi day hikes in the world. For nearly three weeks you will get to experience stunning landscapes, summit several high-altitude peaks, head over the majestic Three Passes, and even get to visit Mount Everest Base Camp.
There is just so much variety during the Three Passes Trek and once you finish your time in the Himalayas, you will be left with some truly one of a kind memories.
For any outdoor enthusiast who wants a little bit of everything and is willing to work for those views and experiences, then the Three Passes is for you.
The purpose of this guide will be to give you an absolute and complete detailed overview of what the trek entails. Everything from a day by day itinerary, costs & logistics, and helpful maps & trekking details, this guide will have it all.
As I am sure you may have some questions along the way, feel free to write them in at the end of this guide. Hope you enjoy the read!
* Affiliate Disclosure: This post may contain affiliate links, which means I may receive a commission if you make a purchase through the links provided, at no additional cost to you. Thanks for supporting the work I put into TripTins!
1) Trek Overview & Background
While most people who visit this region of the Himalayas just head on the classic 11-day Everest Base Camp (EBC) trek, there is also an option to extend the journey into a more holistic view of the region.
That is where the Three Passes Trek comes into play. You not only get to visit Everest Base Camp, but you also get to head over three stunning mountain passes (Kongma La, Cho La, and Renjo La), head to the Gokyo region, and take part of additional trekking peaks not on the classic EBC route.
This trek is not meant for everyone out there as it is a quite demanding journey to take part of. But if you have the time, the fitness, and the mindset, then I highly recommend you consider the Three Passes trek for your trip.
Below is a high-level breakdown of some of the main metrics of the trek. In the next couple of sections I will break this down into a day by day detail.
Trek Name: Three Passes Trek
What Are the Three Passes: Kongma La, Cho La, Renjo La
Location: Sagarmatha National Park | The Himalayas
# of Days: ~18 days
How Many Miles is the 3 Passes Trek: 112 miles / 181 km (including day hikes)
Elevation Gain of the 3 Passes Trek: 35,771 feet / 10,900 meters (including day hikes)
Duration: 4 – 10 hours per day (depending on fitness level)
You can see I mentioned “including day hikes”. That is because there are several “add on” acclimatization hikes / day hikes that can (and should) be added to your itinerary. You will see those listed out in the next section below as I dive into the day by day itinerary.
2) Three Passes Trek Itinerary
Below is the day by day Three Passes Trek itinerary that takes you from village to village around the region & on those additional day hikes. Note that there is not one size fits all itinerary.
The trip can be broken down in many different ways but I believe this is a fantastic option to start with.
Day 1: Fly to Lukla & Lukla – Phakding
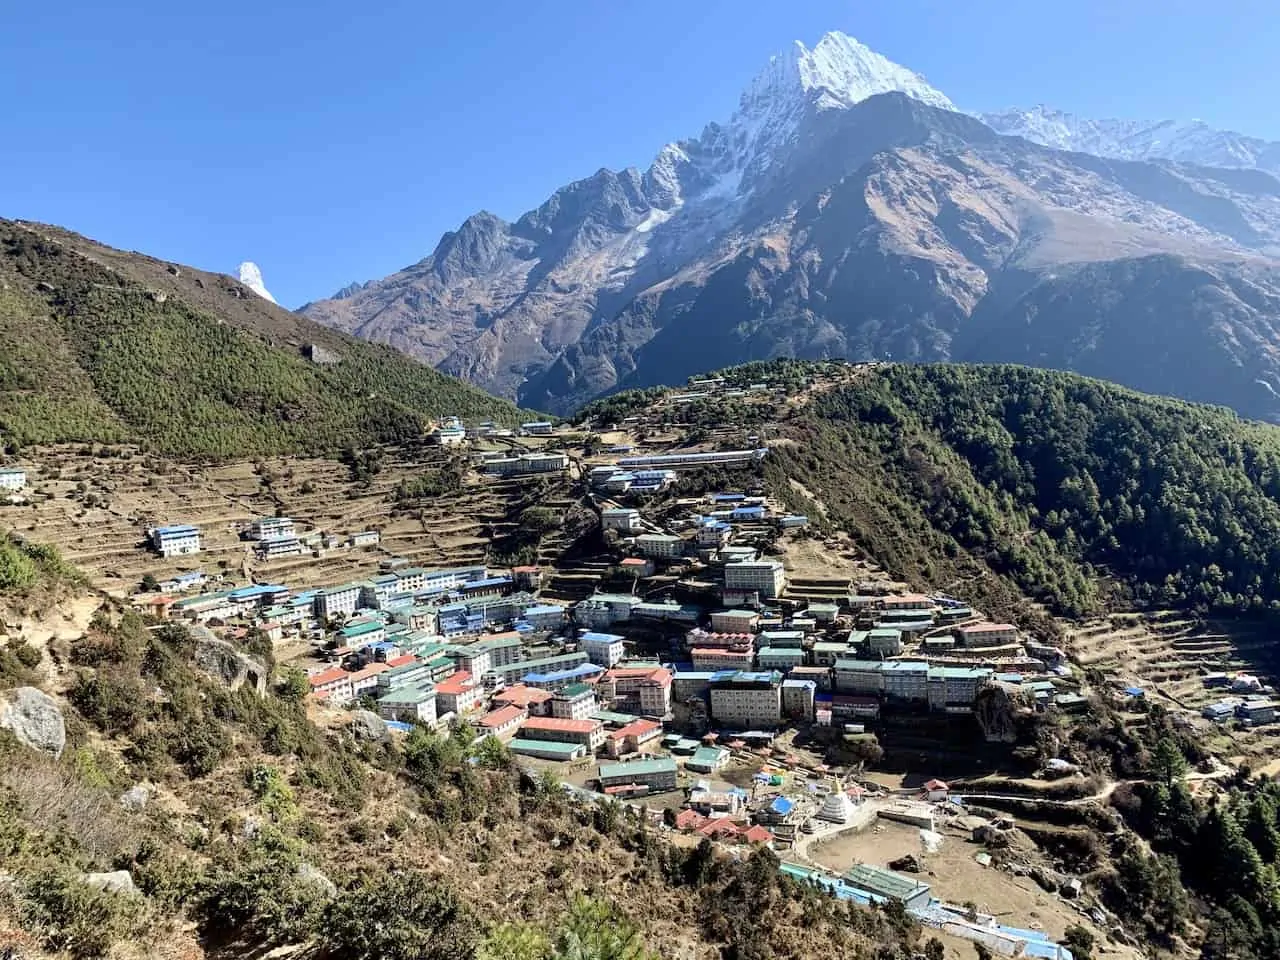
Day 2: Phakding – Namche Bazaar
Day 3: Acclimatization Hike to Hotel Everest View
Day 4: Namche Bazaar – Tengboche*
Day 5: Tengboche – Dingboche*
Day 6: Acclimatization Hike to Nangkartshang peak
Day 7: Dingboche – Chukhung**
Day 8: Acclimatization Hike to Chukhung Ri
Day 9: Chukhung – Kongma La Pass – Lobuche
Day 10: Lobuche – Gorak Shep & Trek to Everest Base Camp
Day 11: Kala Patthar & Gorak Shep – Dzongla
Day 12: Dzongla – Cho La Pass – Gokyo
Day 13: Hike up Gokyo Ri
Day 14: Hike to the 4th & 5th Gokyo Lakes
Day 15: Gokyo – Renjo La Pass – Lungde
Day 16: Lungde – Namche Bazaar
Day 17: Namche Bazaar – Lukla
Day 18: Depart Lukla
* There is also the option to add a visit to Ama Dablam Base Camp to your trek as well. This would not add any additional days to the trek. On Day 4 you can trek from Namche to Pangboche (Pangboche is right between Tengnoche & Dingboche), and then on Day 5 you can visit Ama Dablam BC in the morning before heading to Dingboche in the afternoon.
» Read more about that experience in the Ama Dablam Base Camp trekking guide
**After arriving in the village of Chukhung, you could also opt for an afternoon day hike to Island Peak Base Camp.
Later on in the guide I will give a bit more overview of each day and include links to each day’s hiking guide if you would like even more detail.
3) Three Passes Trek Map
Now that you have an idea of what the day by day itinerary will look like, let me show you what that looks like on a map. I have included the Three Passes trek on a Google Maps view so you can zoom in and out of the map and explore each day’s route.
» The blue routes are the trekking routes from village to village along the trek. You can see each village pinpointed with a blue pin as well.
» In red, yellow and purple you can see the routes for the days that the trek crosses over each of the three passes (Kongma La – red; Cho La – yellow; Renjo La – purple).
» You can also see pinpointed in black are several hiking markers. These represent all of those acclimatization and side hikes you can add onto your overall trekking journey.
Note: some of the routes I had to hand draw in there since the map wasn’t picking up the walking routes. Please consider what you see below to be estimates of the exact trail location. I would recommend an app like Maps.me for a GPS guided route on the trail.
4) Clockwise vs Counter Clockwise
While we are on the subject of the itinerary and map, let’s talk about which direction the route should be completed in. As you can tell by now, I went about it in the counter clockwise direction (starting with Kongma La and ending with Renjo La).
However, there is also the option to complete the trek in the clockwise direction – starting with Renjo La and ending with Kongma La.
During my time on the trail, I would estimate that around 75% of people on the Three Passes were doing so in the counter clockwise direction. Looking back at my trek, I see pros and cons for both directions.
Counter Clockwise Pros / Clockwise Cons
» There is one main reason why most prefer to do the trek counter clockwise, and that is due to the overall acclimatization of the hike.
If you go clockwise, on day 6 you will already need to climb up to 5,360 meters / 17,585 feet on the Renjo La Pass and then sleep at 4,750 meters / 15,584 feet in Gokyo.
This is compared to getting Dingboche on day 5 at 4,410 meters / 14,469 feet, spending a couple nights there with an acclimatization hike to 5,083 meters / 16,676 feet on Nangkartshang Peak.
Overall, it is just a better acclimatization schedule going counter clockwise vs. clockwise.
» Another reason why going counter clockwise is said to be better is due to the Kongma La Pass. If going uphill over the Kongma La Pass in the clockwise direction (Lobuche to Chukhung), it will probably be the hardest single push of trekking on the entire trek. It is a very long and tedious section of trail, and I can see why more people would rather go down it than up it.
» And lastly, a third reason why counter is preferred is because the views between Namche Bazaar and Chukhung are much better in the counter direction than the clockwise. Going counter clockwise, you will have the Everest mountain range and Ama Dablam out in front of you – something you would miss if going clockwise.
Clockwise Pros / Counter Clockwise Cons
In my opinion the biggest reason to hike clockwise is that the best views will always be out in front of you on the passes themselves.
As you head clockwise over Renjo La, Mount Everest and Gokyo will be awaiting, over Cho La the glacier will be right in view, and over Kongma La you will be walking towards the turquoise lakes.
While you will still have all of these views to enjoy in the counter clockwise direction, you will need to turn around to see them. Since you will probably have several breaks along the way, this may not be too big of an issue. You will also be able to sit back and enjoy the views from a top the passes too.
But if you want the best views out in front of you as you descend the passes, then clockwise is the better option.
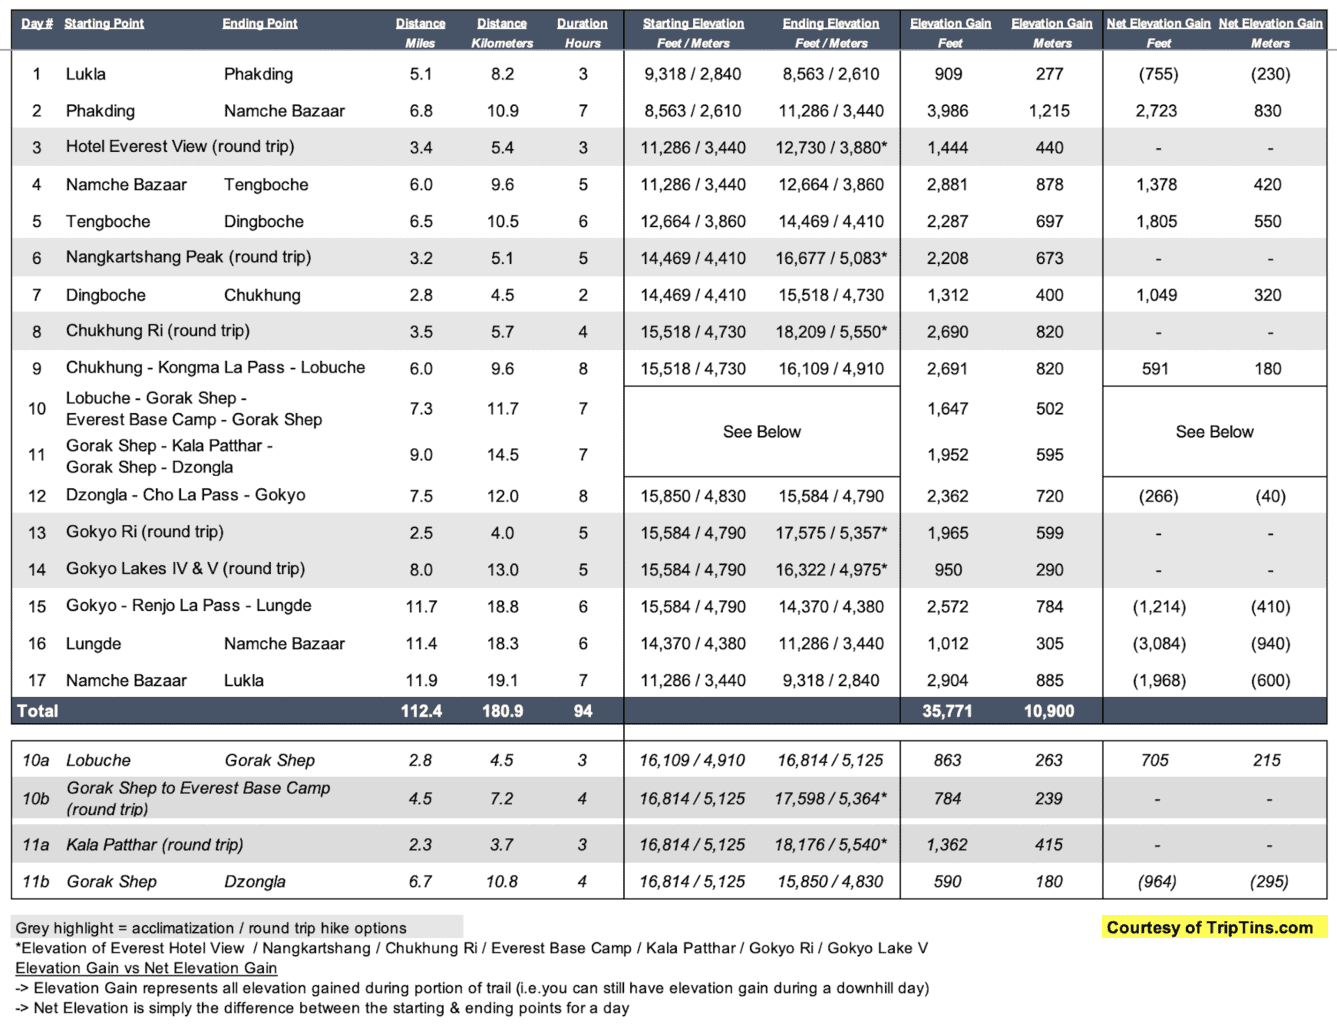
5) Elevation Gain Profile & Distance Breakdown by Day
I believe the chart below is one of the most helpful pieces of information you should study for your trip. It is a complete breakdown of the daily distance, elevation gain, and trekking times for each day of the journey.
This will give you a much more accurate representation of what to expect out on the trek compared to more high-level numbers you may come across.
I put together a similar chart for the Everest Base Camp trek distance & elevation gain if you are interested in checking that out as well.

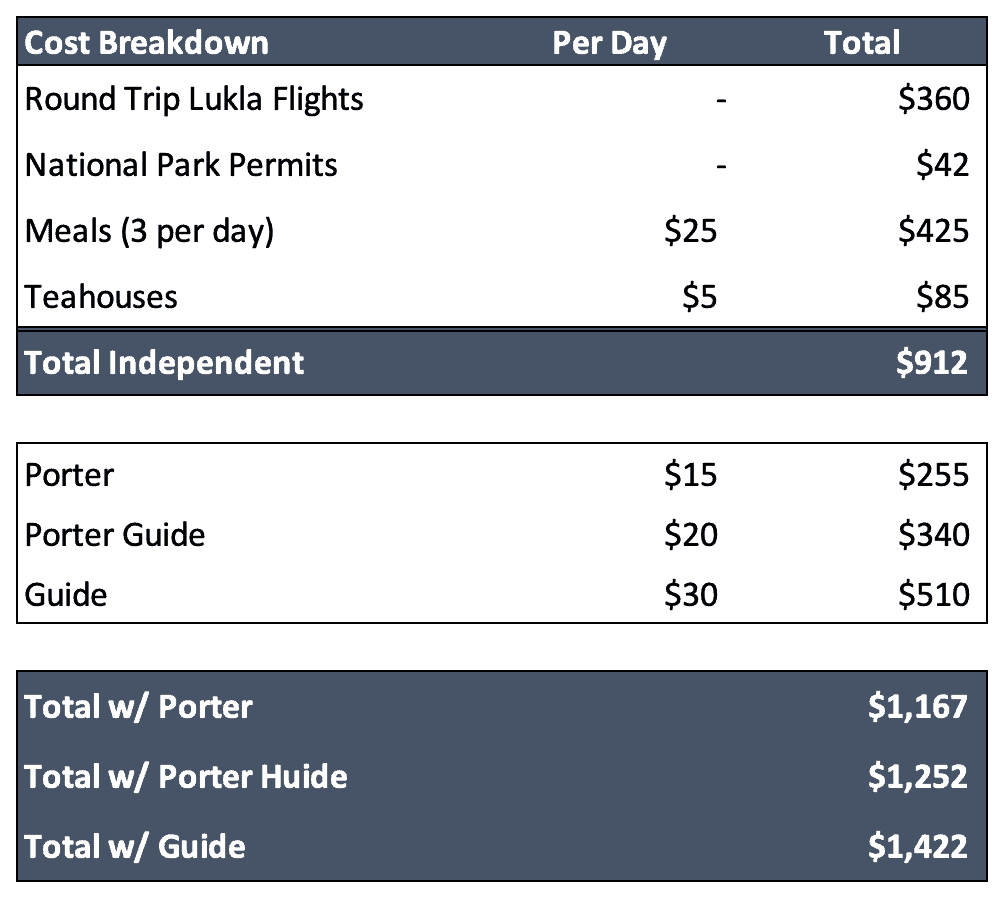
6) Three Passes Trek Cost Breakdown
There are a few different ways to go about the Three Passes Trek and depending on your choice, that can have a significant impact on the cost of your trip. The main options here include:
1) Fully Independent
This option really speaks for itself. You take care of all logistics, carry all your own gear, and head out into the Himalayas on your own.
2) Hire a Porter / Porter Guide / Guide (or multiple)
If you would like to support the local community a bit more, hiring a porter, porter guide or guide is a great way to go about the trek.
» A porter is someone who simply will carry your belongings from one village to the next while you may just carry a daypack. Porters usually do not speak any English at all.
» A porter guide is someone who will carry your belongings and speaks broken English.
» A guide is someone who speaks good English but will not carry any of your gear.
As you may imagine a porter is the cheapest option (+$15 per day), porter guide is in the middle ($20 per day), and a guide is in the most expensive ($30 per day). During my time on the trail I also saw small groups (2-4 people) who would hire a couple porters and a main guide, so you can opt for something like that too.
3) Join a Fully Guided Trek
The most expensive option here is to join a fully guided trek that will take care of all logistics for you from beginning to end. These costs usually include teahouses, food, porters, guides, logistics pre and post trek, flights, etc. For the most part, you can simply show up and be on your way.
These can really range in price. You can join a trek put together by a local trekking company which can cost around $1,500 or you can join a western based operator whose prices can reach well over $2,000.
If you don’t opt for the third option here, the below cost breakdown for an independent 17 day trek will get you going in the right direction. If you decide to hire a porter, porter guide, or guide then you simply can look at the bottom of the chart below (don’t forget about tipping your porter/guide too!).

7) Himalayas Packing List
To have a successful Three Passes trek, you will need to come prepared with the right gear. Remember, this is an 18 day trek and it will very likely include some cold conditions along the way. By utilizing the packing list below, you should be in great shape with all necessary gear and other essentials.
The Everest Base Camp Trek Packing List I put together goes into detail about everything to bring along and will explain more thoroughly why certain items are recommended.
While the list is geared more towards the EBC trek, the only change I would make is to maybe bring a a couple additional pairs of base layer clothing.
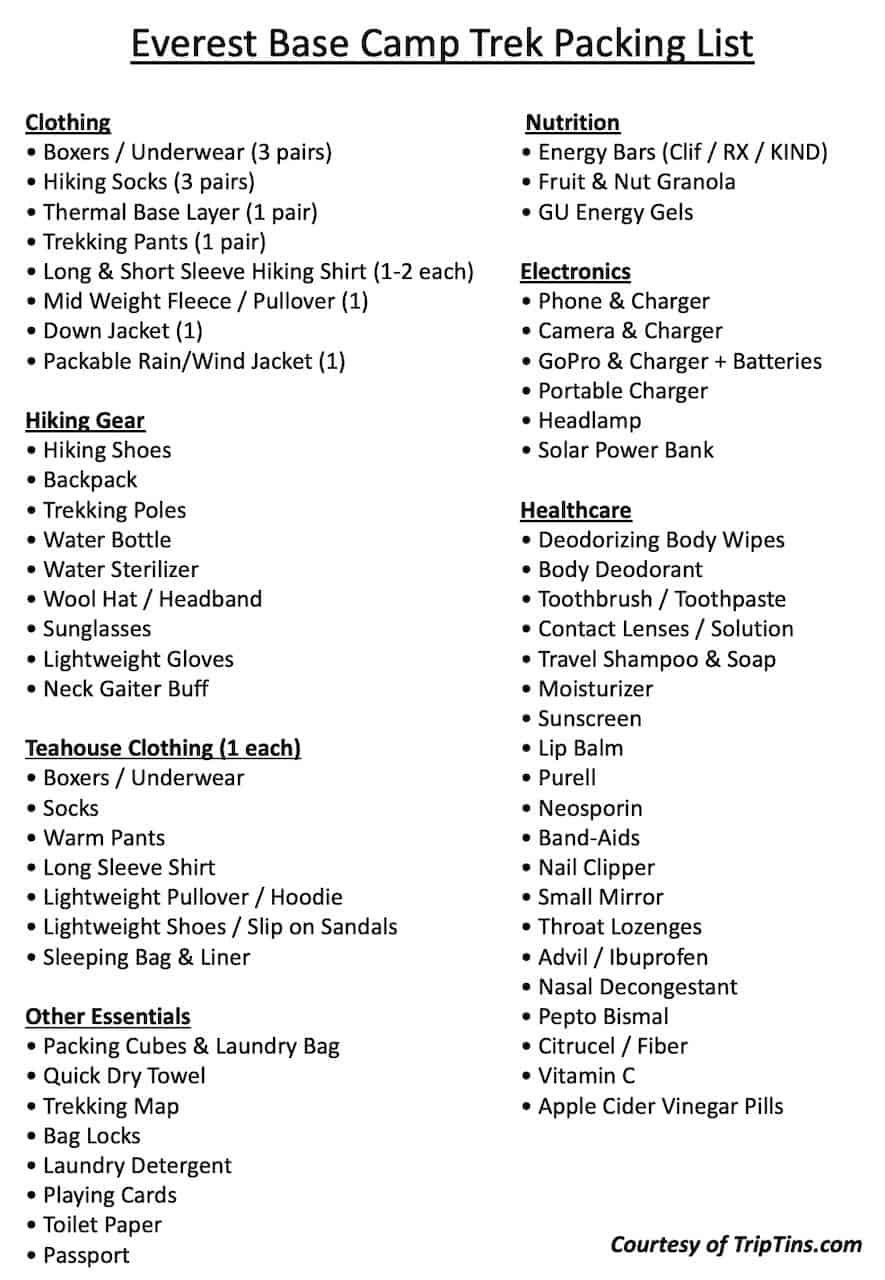

Here are a few additional tips when it comes to the packing list:
» All of your clothing should be made of moisture wicking materials such as Dri FIT, polyester, or wool. These types of materials do not trap moisture and instead keep you dry and comfortable as you are hiking the trails.
» Be sure to keep your electronics in your sleeping bag at night. If you did not know, leaving electronics out in the cold kills their batteries much faster than normal.
If you keep all your electronics / batteries in your sleeping bag at night, you have a better chance to preserve those much needed charges during the duration of the hike.
» You can rent a down jacket and sleeping bag in Kathmandu if you do not want to bring those two larger items with you from abroad. If you are missing any other items, you should also be able to find most of them in Kathmandu before you head off to Lukla.
» Bring along more cash than you will need. Cash is king on the trek and you will need to pay for all your food, accommodations, tips, and other purchases with local Nepalese Rupees (you may be able to pay with USD for permits but rupees will be needed otherwise).
Be sure to bring enough cash (and then some) from Kathmandu.
Considering travel insurance for the Three Passes Trek?
World Nomads offers coverage for more than 150 adventure activities as well as emergency medical, lost luggage, trip cancellation and more.
For years, World Nomads has been protecting, connecting & inspiring independent travelers, offering travel insurance & safety advice to help you travel confidently. Their mission is to support and encourage travelers to explore their boundaries.
World Nomads has simple and flexible travel insurance that has been designed by travelers for travelers. Even if you leave home without travel insurance or your policy runs out, you can buy or extend out on the road.
Get a quote for a World Nomads travel insurance policy today!
8) A Day by Day Breakdown
Below you will find a day by day breakdown of the Three Passes trek with a short overview of what to expect out on the trail on each day.
If you would like to learn more about certain days, check out the linked guides that will take you to articles I put together for each day of the trip.
» I took part of the trek in November, which is a month that offers plenty of sunshine and little rain. Feel free to check out this Everest Base Camp weather guide to learn more about why I choose this time of year to hike.
Day 1: Fly to Lukla & Lukla – Phakding
Starting Elevation: 9,318 feet / 2,840 meters
Ending Elevation: 8,563 feet / 2,610 meters
Distance: 5.1 miles / 8.2 km
Duration: 3 hours
Elevation Gain: 909 feet / 277 meters
Net Elevation Gain: (755 feet) / (230 meters)
After taking an early flight from Kathmandu to Lukla, it is time to begin the journey on the Three Passes Trek. Once you land, you can collect your bags and head off into Lukla to have some breakfast before taking off for the day.
Important Note: Flights sometimes only depart from Ramechhap, a 5-6 hour drive from Kathmandu. Be sure to check the latest flight schedules to better understand if Kathmandu offers departures during your trip.
Today will be an easy hike towards Phakding, and it is actually a net elevation loss. It is a perfect way to just get used to the altitude and get your body warmed up for what is yet to come.
» Learn more in the Lukla to Phakding guide up on the site
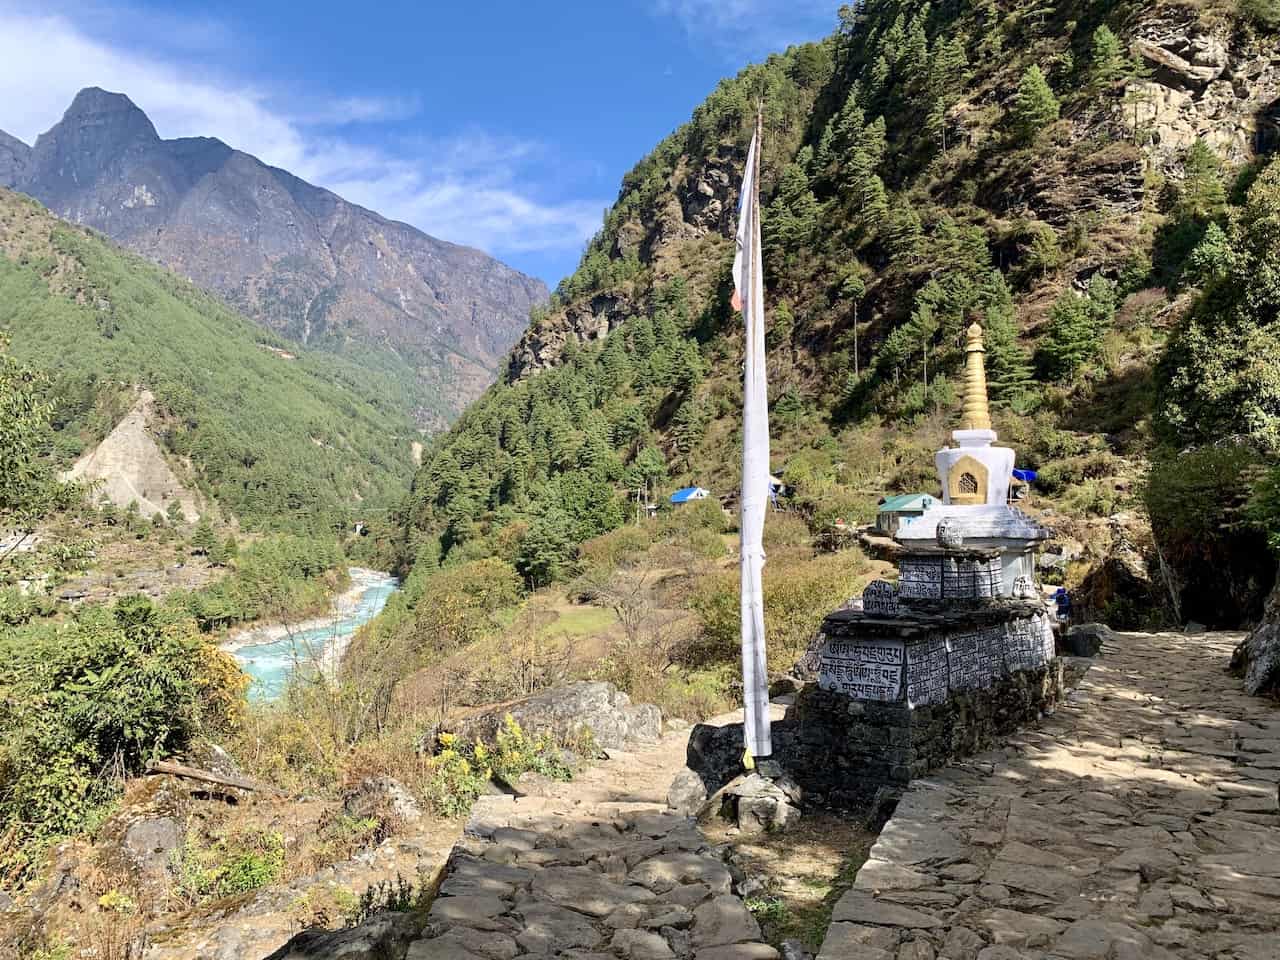

Day 2: Phakding – Namche Bazaar
Starting Elevation: 8,563 feet / 2,610 meters
Ending Elevation: 11,286 feet / 3,440 meters
Distance: 6.8 miles / 10.9 km
Duration: 7 hours
Elevation Gain: 3,986 feet / 1,215 meters
Net Elevation Gain: 2,723 feet / 830 meters
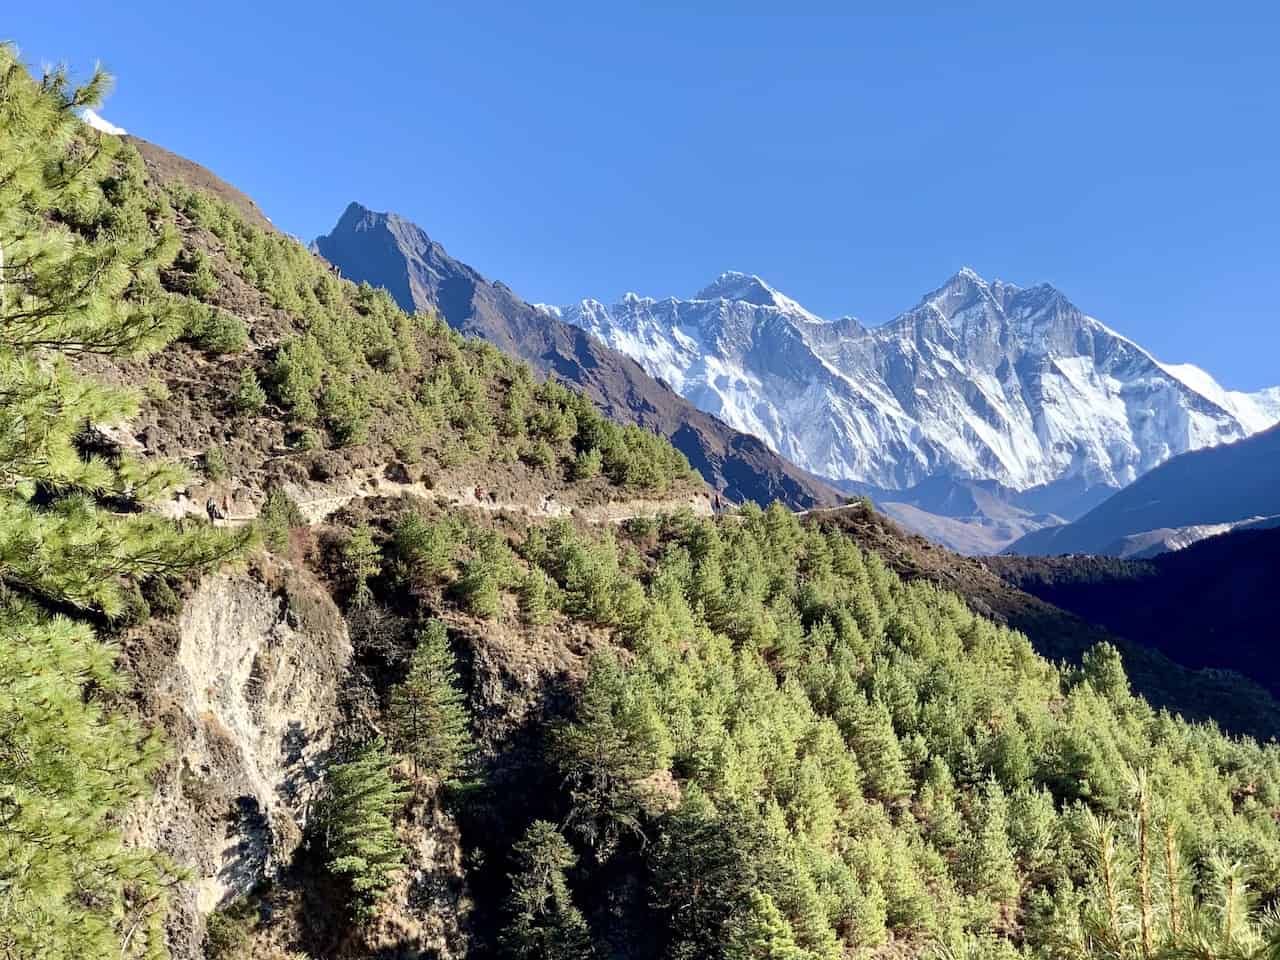
While the first day was nice and easy, day 2 will be one of the more difficult trekking days as you head all the way up to Namche Bazaar.
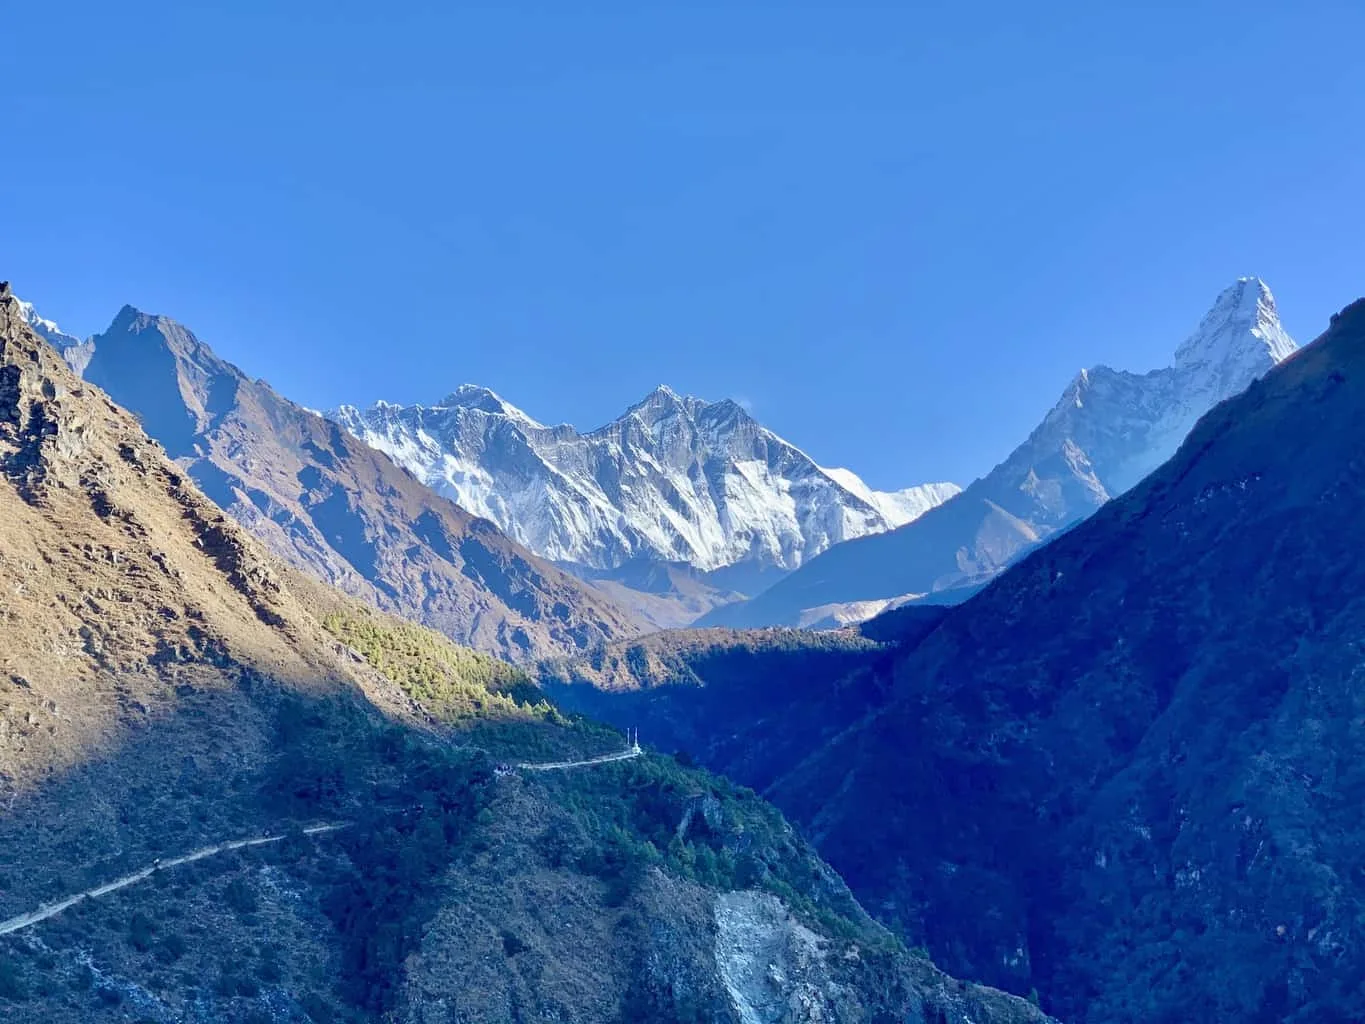
There will be quite a bit of elevation gain throughout the way as you head across suspension bridges, take in those first real mountain views, and even get a sneak peek at Mount Everest itself.
» Learn more in the Phakding to Namche Bazaar guide up on the site

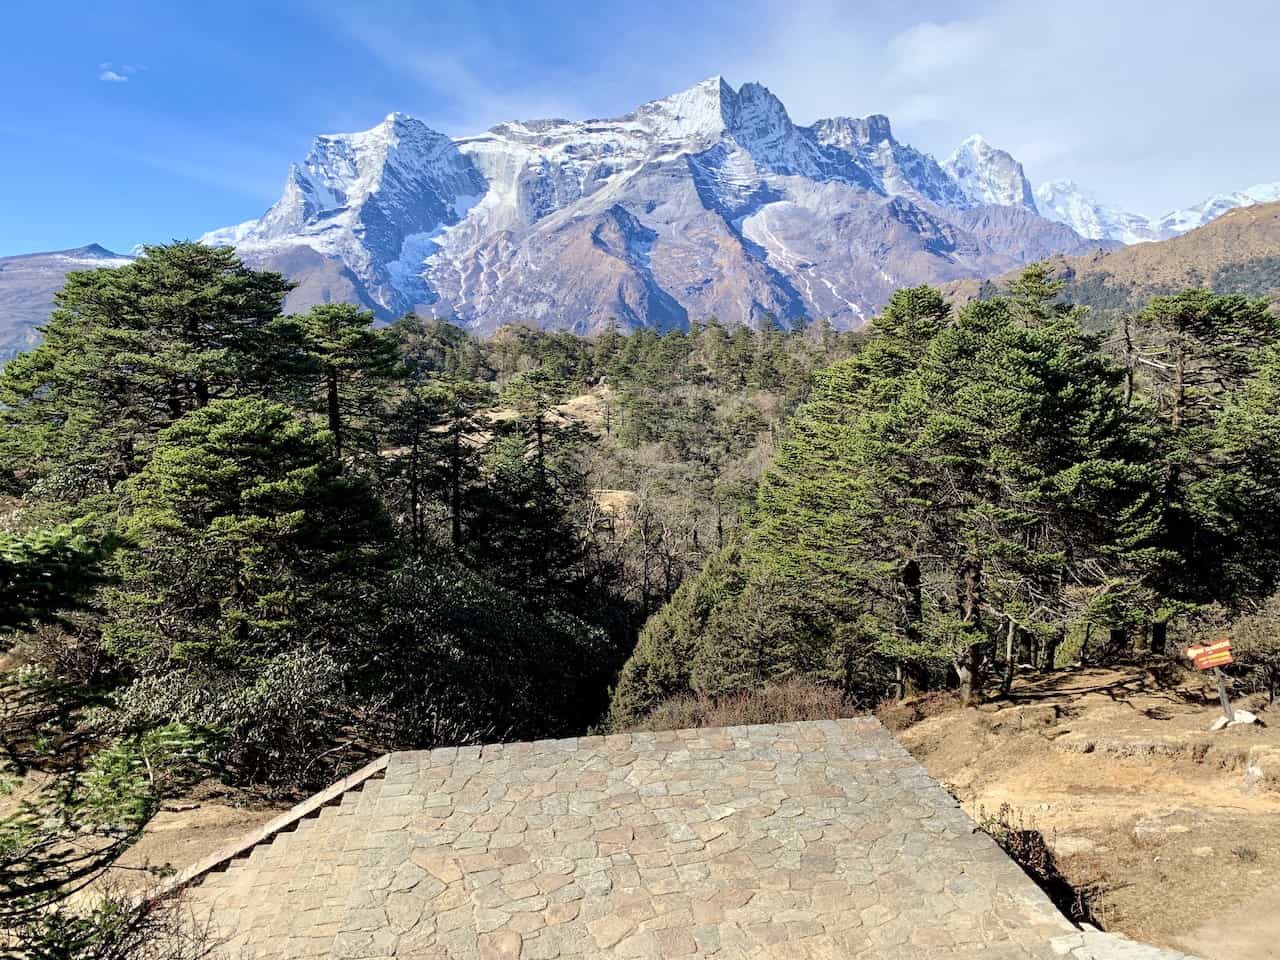
Day 3: Acclimatization Hike to Hotel Everest View
Starting Elevation: 11,286 feet / 3,440 meters
Hotel Elevation: 12,730 feet / 3,880 meters
Distance: 3.4 miles / 5,4 km
Duration: 3 hours
Elevation Gain: 1,444 feet / 440 meters
Net Elevation Gain: –
It is time to acclimatize as you spend your third day of the trek above the village of Namche Bazaar. You can leave most of your gear behind as you take a light day pack up to Hotel Everest View.
Along the way and at the hotel itself, you will get some nice views of the Everest mountain range way out in the distance.
Once all finished up and you have had some time to relax up top, follow the path back down to the village, where you will spend a second night in Namche.
» Learn more in the Hotel Everest View hiking guide up on the site
Day 4: Namche Bazaar – Tengboche
Starting Elevation: 11,286 feet / 3,440 meters
Ending Elevation: 12,664 feet / 3,860 meters
Distance: 6 miles / 9.6 km
Duration: 5 hours
Elevation Gain: 2,881 feet / 878 meters
Net Elevation Gain: 1,378 feet / 420 meters
Although you are netting 1,378 feet of elevation gain today, the total gain is closer to 2,900 feet due to the ups and downs of the trail between Namche and Tengboche.
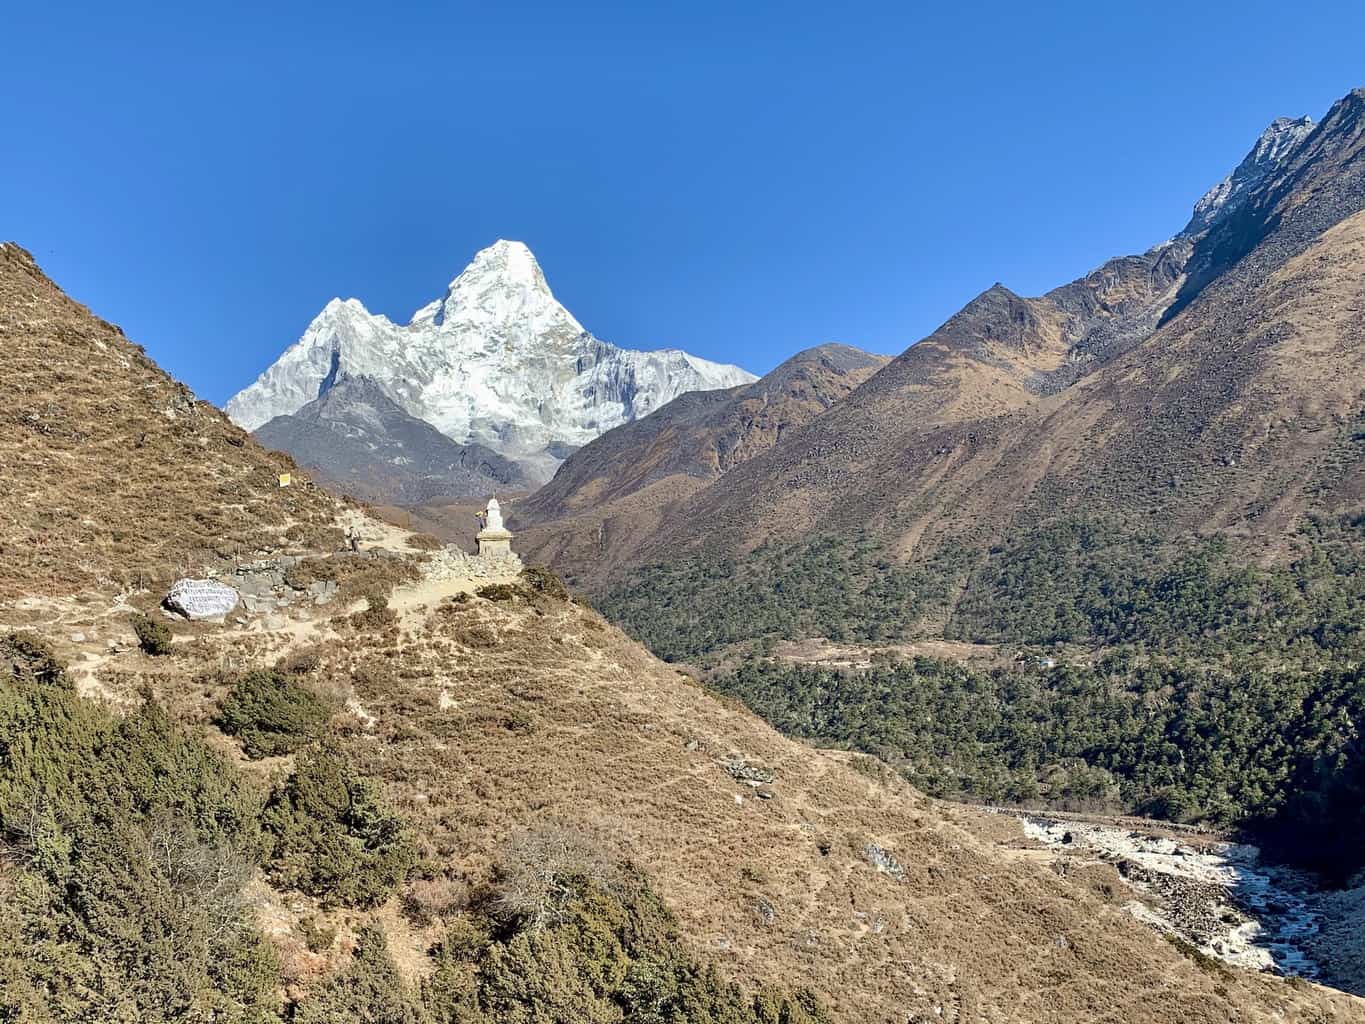
During a good portion of today’s trail you should be able to see the top of Mount Everest as well as some one of a kind views of Ama Dablam.
Once you reach Tengboche, feel free to head to the village’s monastery, one of the most famous in the Himalayas.
» Learn more in the Namche Bazaar to Tengboche guide up on the site

Day 5: Tengboche – Dingboche
Starting Elevation: 12,664 feet / 3,860 meters
Ending Elevation: 14,469 feet / 4,410 meters
Distance: 6.5 miles / 10.5 km
Duration: 6 hours
Elevation Gain: 2,287 feet / 697 meters
Net Elevation Gain: 1,805 feet / 550 meters
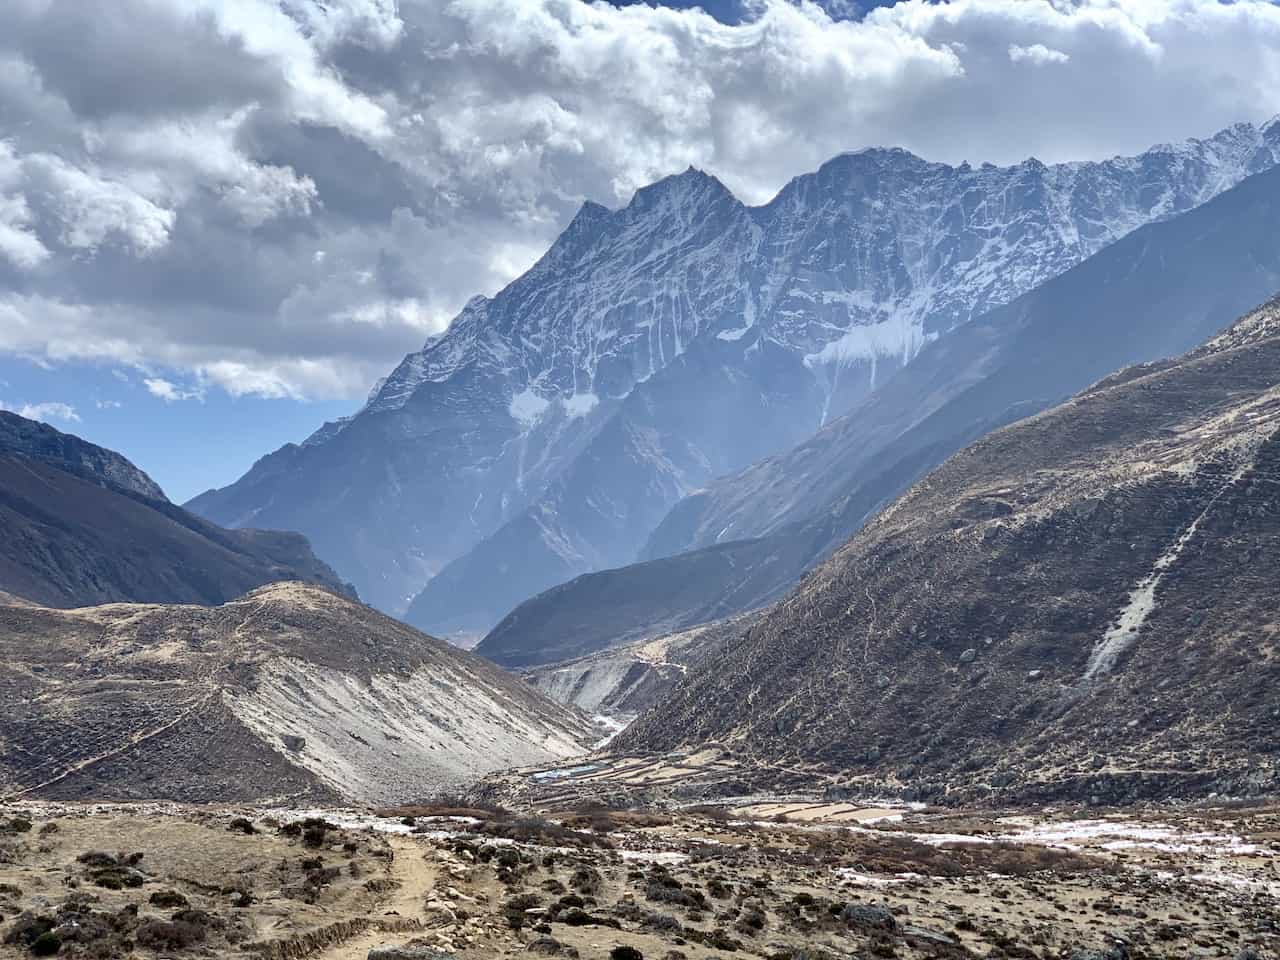
It is now further down the valley onwards to the village of Dingboche. Along the way you will pass Pangboche and the turn off for Ama Dablam Base Camp, if you decide to change up the itinerary a bit.
Today is a relatively easy day all things considered, as you gain a some more elevation on a slight incline all the way through and finish up in Dingboche, where you will stay a couple nights to better acclimatize.
» Learn more in the Tengboche to Dingboche guide up on the site

Day 6: Acclimatization Hike to Nangkartshang Peak
Starting Elevation: 14,469 feet / 4,410 meters
Peak Elevation: 16,677 feet / 5,083 meters
Distance: 3.2 miles / 5.1 km
Duration: 5 hours
Elevation Gain: 2,208 feet / 673 meters
Net Elevation Gain: –
Directly behind the village, you will see a winding trail up to Nangkartshang Peak. While a tough peak to conquer, you will get some of the best views you can ask for.
Off to your right will be Ama Dablam and to either side, the stunning valley with the mountains hovering up above.
» Learn more in the Nangkartshang Peak guide up on the site

Day 7: Dingboche – Chukhung & Optional Hike to Island Peak Base Camp
Starting Elevation: 14,469 feet / 4,410 meters
Ending Elevation: 15,518 feet / 4,730 meters
Distance: 2.8 miles / 4.5 km
Duration: 2 hours
Elevation Gain: 1,312 feet / 400 meters
Net Elevation Gain: 1,049 feet / 320 meters
Here is where things veer off from the main Everest Base Camp route. Instead of heading to the western valley towards Lobuche, the Three Passes route heads to the eastern valley towards Chukhung.
This is going to be an easier day on the trail that should only take a few hours. If you want to take in more, you can opt for the 4 hour round trip hike to Island Peak Base Camp from Chukhung.
» Learn more in the Dingboche to Chukhung guide up on the site

Day 8: Acclimatization Hike to Chukhung Ri
Starting Elevation: 15,518 feet / 4,730 meters
Peak Elevation: 18,209 feet / 5,550 meters
Distance: 3.5 miles / 5.7 km
Duration: 4 hours
Elevation Gain: 2,690 feet / 820 meters
Net Elevation Gain: –
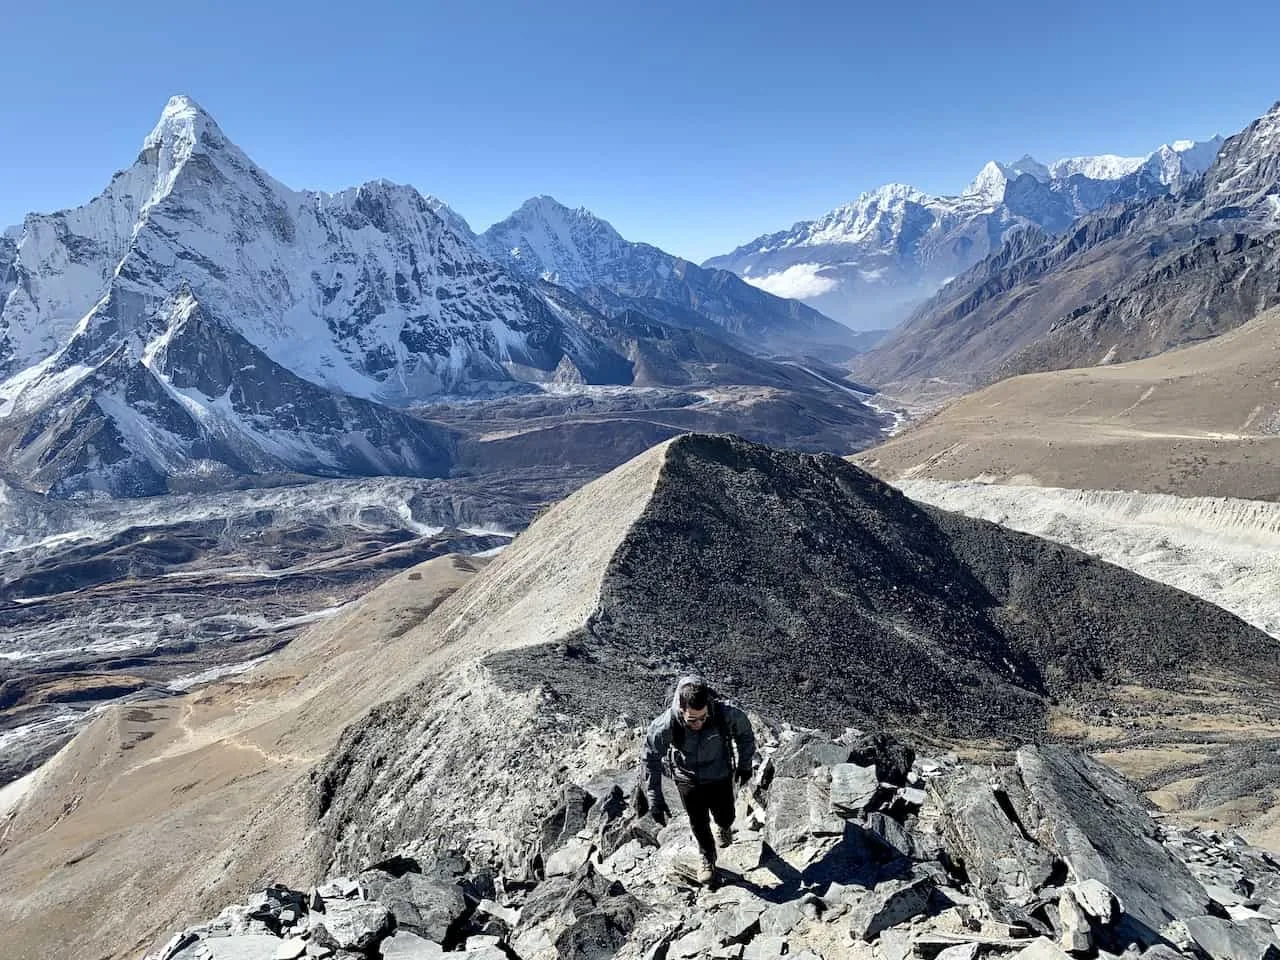
While you don’t necessarily need to consider the trek up Chukhung Ri an acclimatization hike, it is an add on I would highly recommend. Behind the village of Chukhung you will find this peak at 18,209 feet in elevation (tied for highest point of the trek).
While a tough climb up to the top, it sure is a rewarding one. Staring down right in front of you from the top is the south face of Nupste, and behind you will be one of the coolest ridge views you can ask for.
Once back down in the village, be sure to rest those legs and get ready for one of the toughest days of the trek over the Kongma La Pass.
» Learn more in the Chukhung Ri guide up on the site

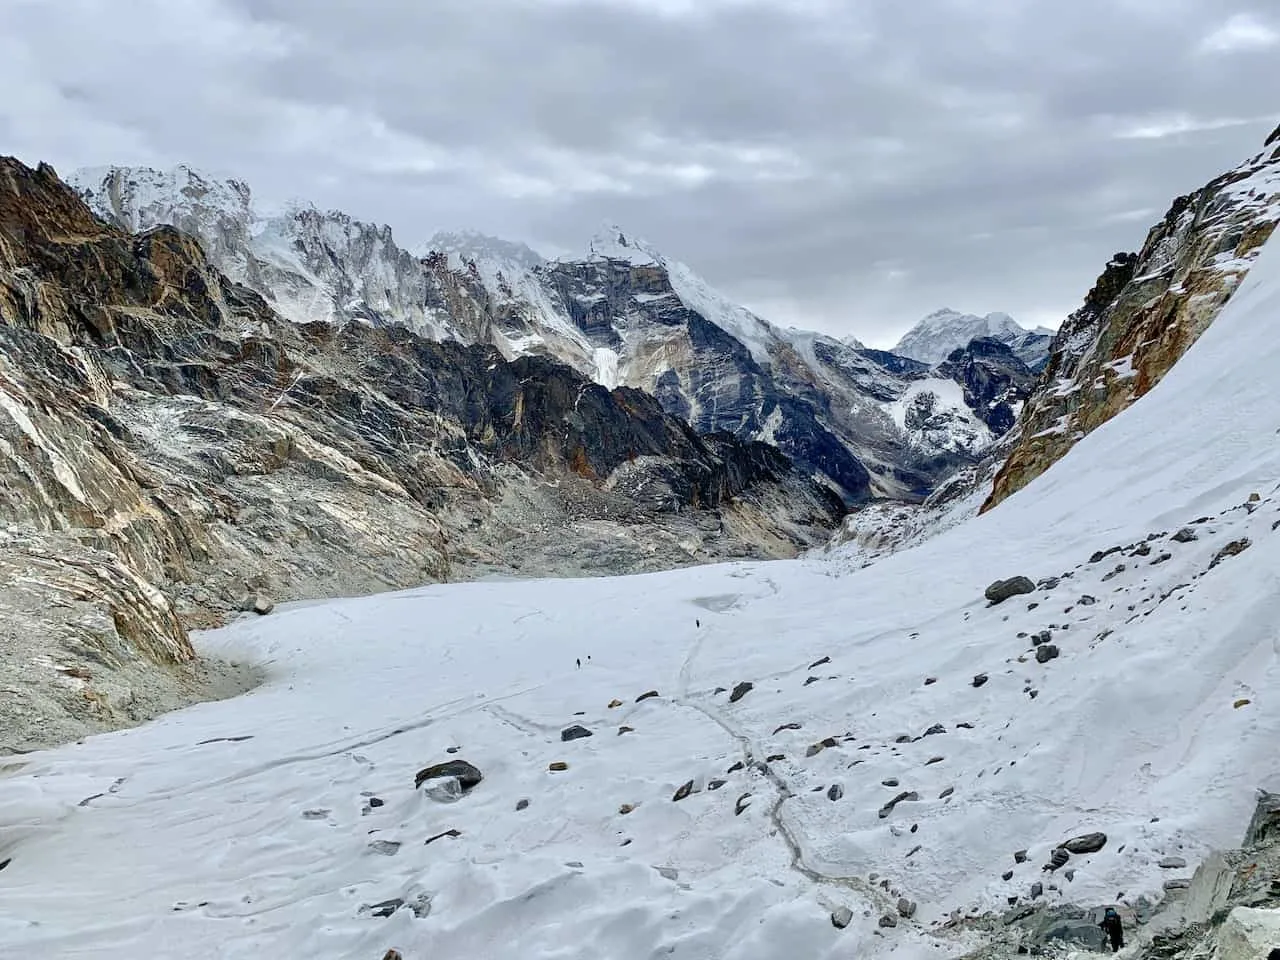
Day 9: Chukhung – Kongma La Pass – Lobuche
Starting Elevation: 15,518 feet / 4,730 meters
Ending Elevation: 16,109 feet / 4,910 meters
Distance: 6 miles / 9.6 km
Duration: 8 hours
Elevation Gain: 2,691 feet / 820 meters
Net Elevation Gain: 591 feet / 180 meters
In my opinion, the hike over the Kongma La Pass is the most difficult out of any day of the Three Passes trek.
You not only gain 2,700 feet of elevation but you also lose 2,100 feet of elevation down to Lobuche. And the trek down is not an easy one either.
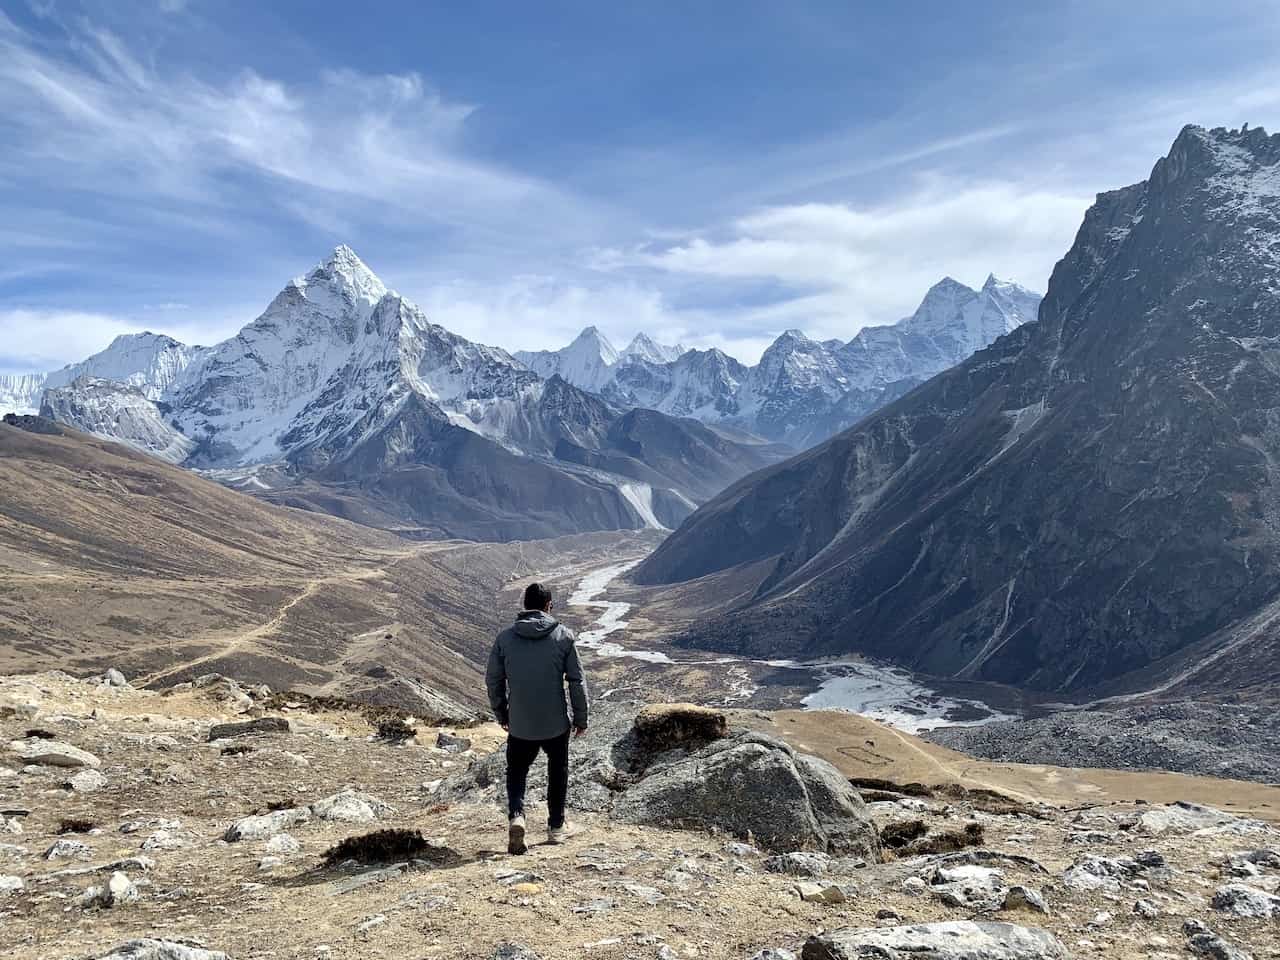
Over the course of this 8+ hour day, you will however get some very special views of the Himalayas. Most memorable is the one atop Kongma La, as you get to take in the absolutely breathtaking views of the turquoise lakes down below.
Once down in the village of Lobcuhe, you will officially be back on the standard Everest Base Camp route.
» Learn more in the Kongma La Pass guide up on the site

Day 10: Lobuche – Gorak Shep & Trek to Everest Base Camp
Starting Elevation: 16,109 feet / 4,910 meters
Ending Elevation: 16,814 feet / 5,125 meters
Distance: 7.3 miles / 11.7 km
Duration: 7 hours
Elevation Gain: 1,647 feet / 502 meters
Net Elevation Gain: 705 feet / 215 meters
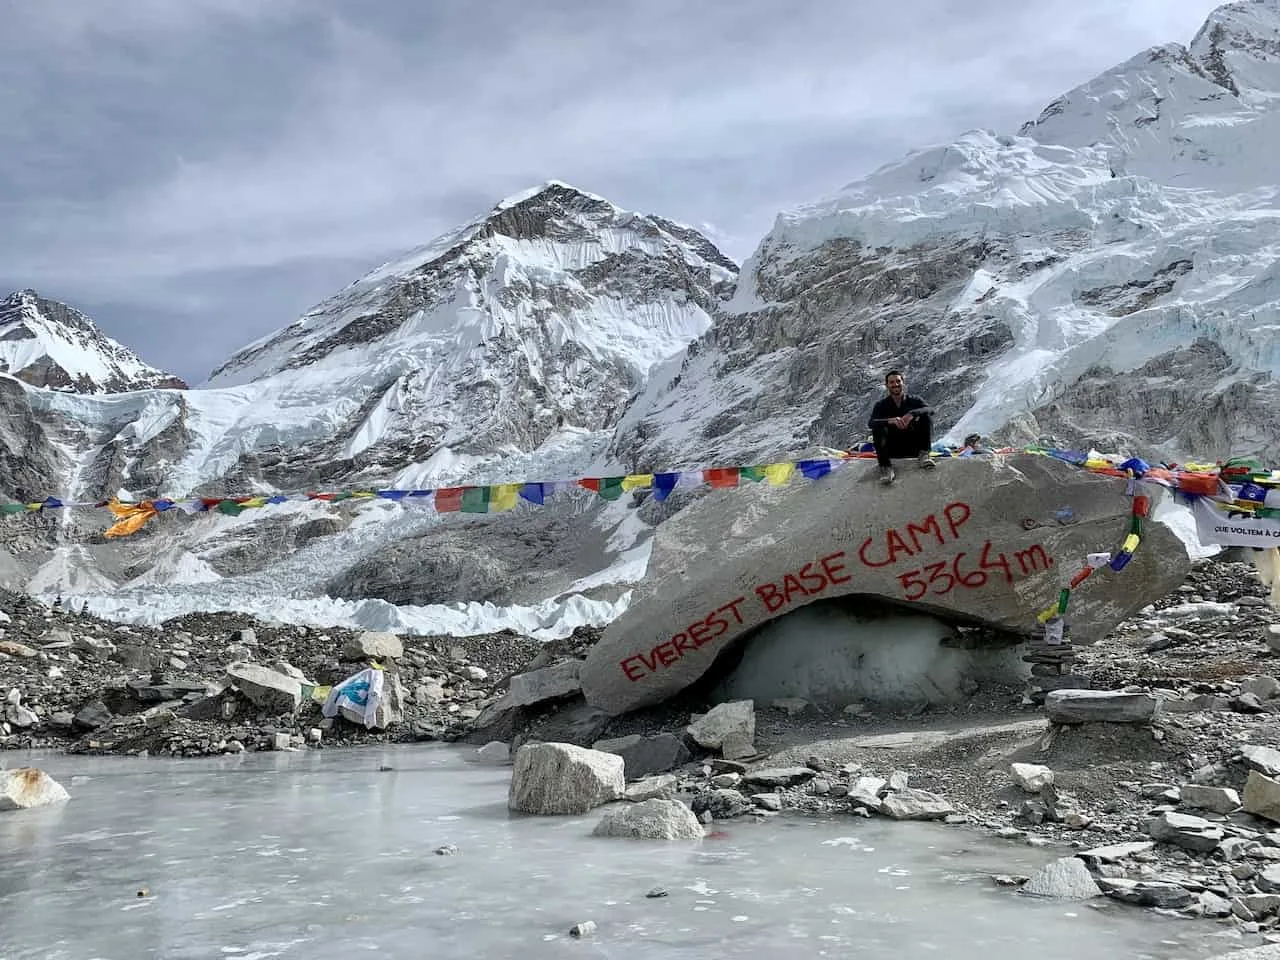
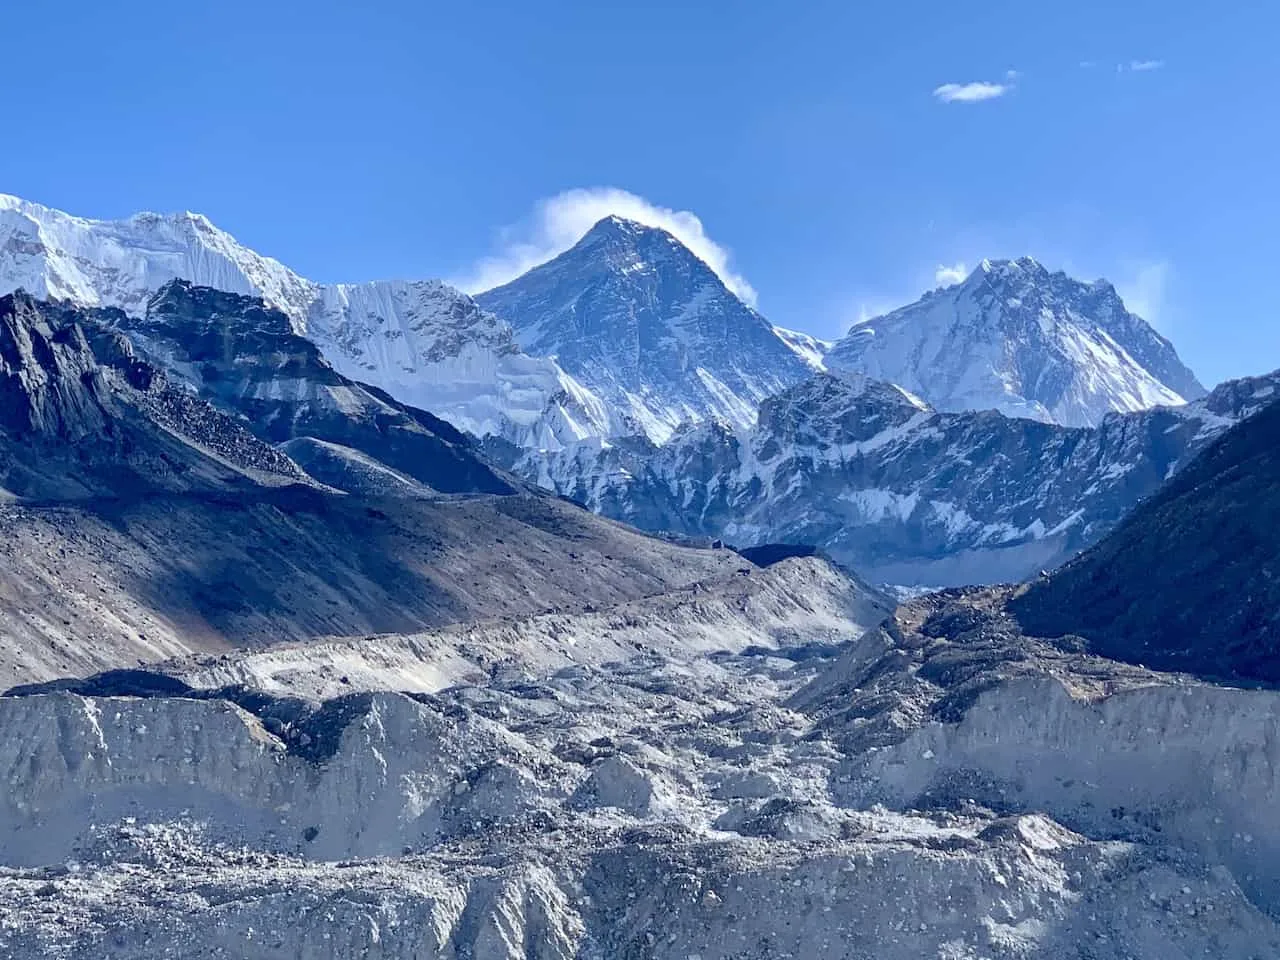
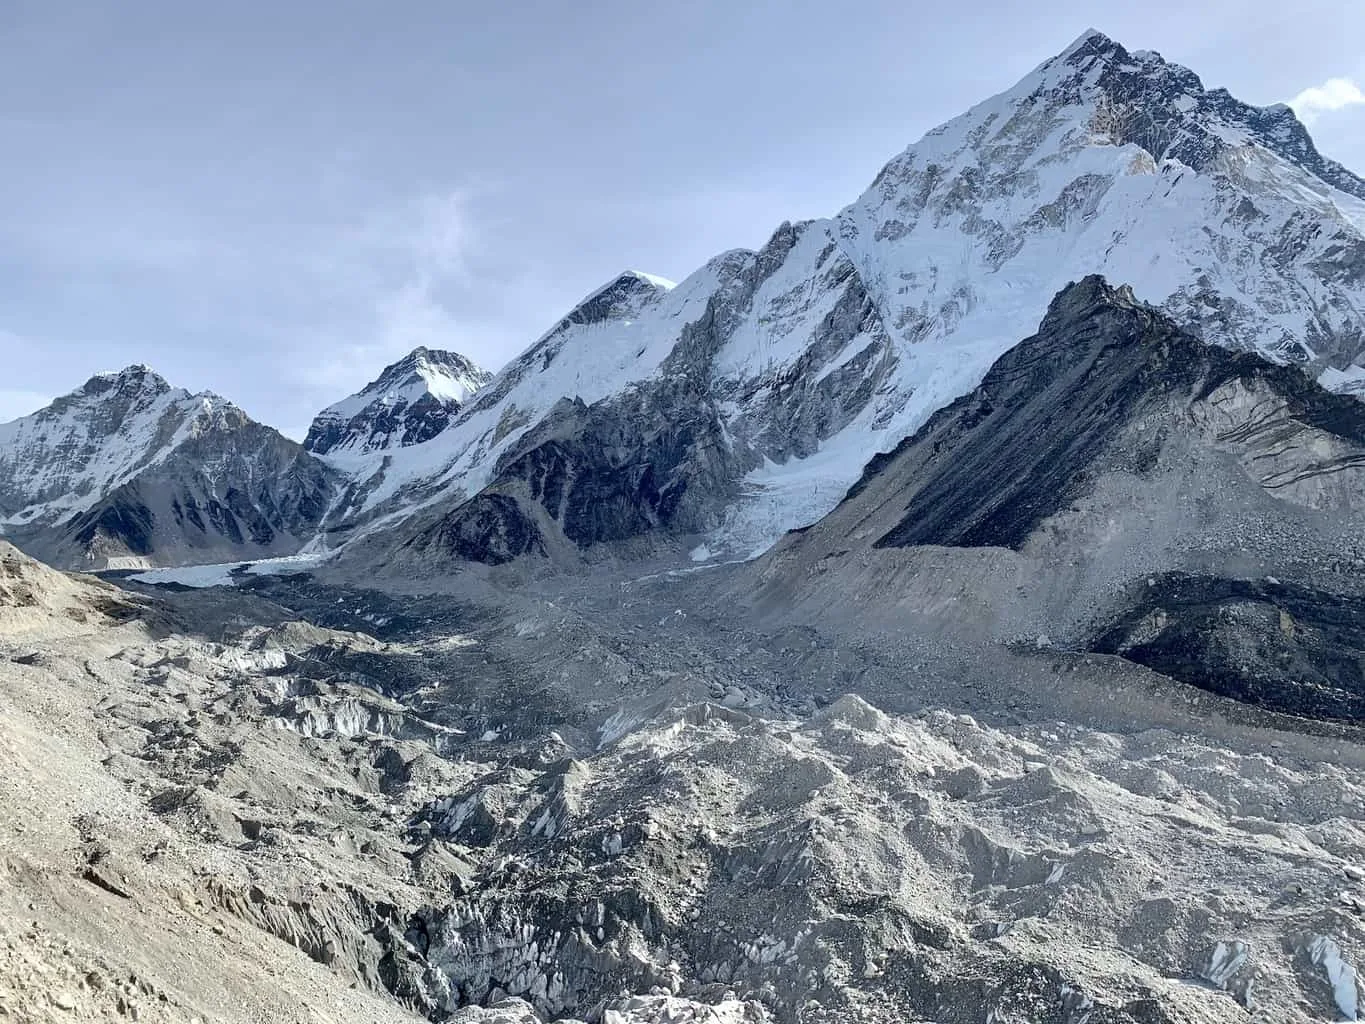
Today is a big day as you will make it to Everest Base Camp itself. First it the 3 hour hike to Gorak Shep, where you can check into your teahouse and drop off your stuff.
It is then further down along the Khumbu Glacier until you reach Everest Base Camp! Spend some time exploring the area, taking some photos, and enjoying the views of the Khumbu Icefall.
Once all finished up there, head back towards Gorak Shep, where you will spend a night above 5,000 meters.
Trekking Tip: IF the forecast is looking clear in the late afternoon, you may want to swap Everest Base Camp to day 11 and head up to Kala Patthar for sunset on day 10. Getting to see the alpenglow hit Everest for sunset is quite the view to take in, however it is only worth it if the weather is clear.
» Learn more in the Lobuche to Gorak Shep & Everest Base Camp guides up on the site

Day 11: Kala Patthar & Gorak Shep – Dzongla
Starting Elevation: 16,814 feet / 5,125 meters
Ending Elevation: 15,850 feet / 4,830 meters
Distance: 9 miles / 14.5 km
Duration: 7 hours
Elevation Gain: 1,952 feet / 595 meters
Net Elevation Gain: (964 feet) / (295 meters)
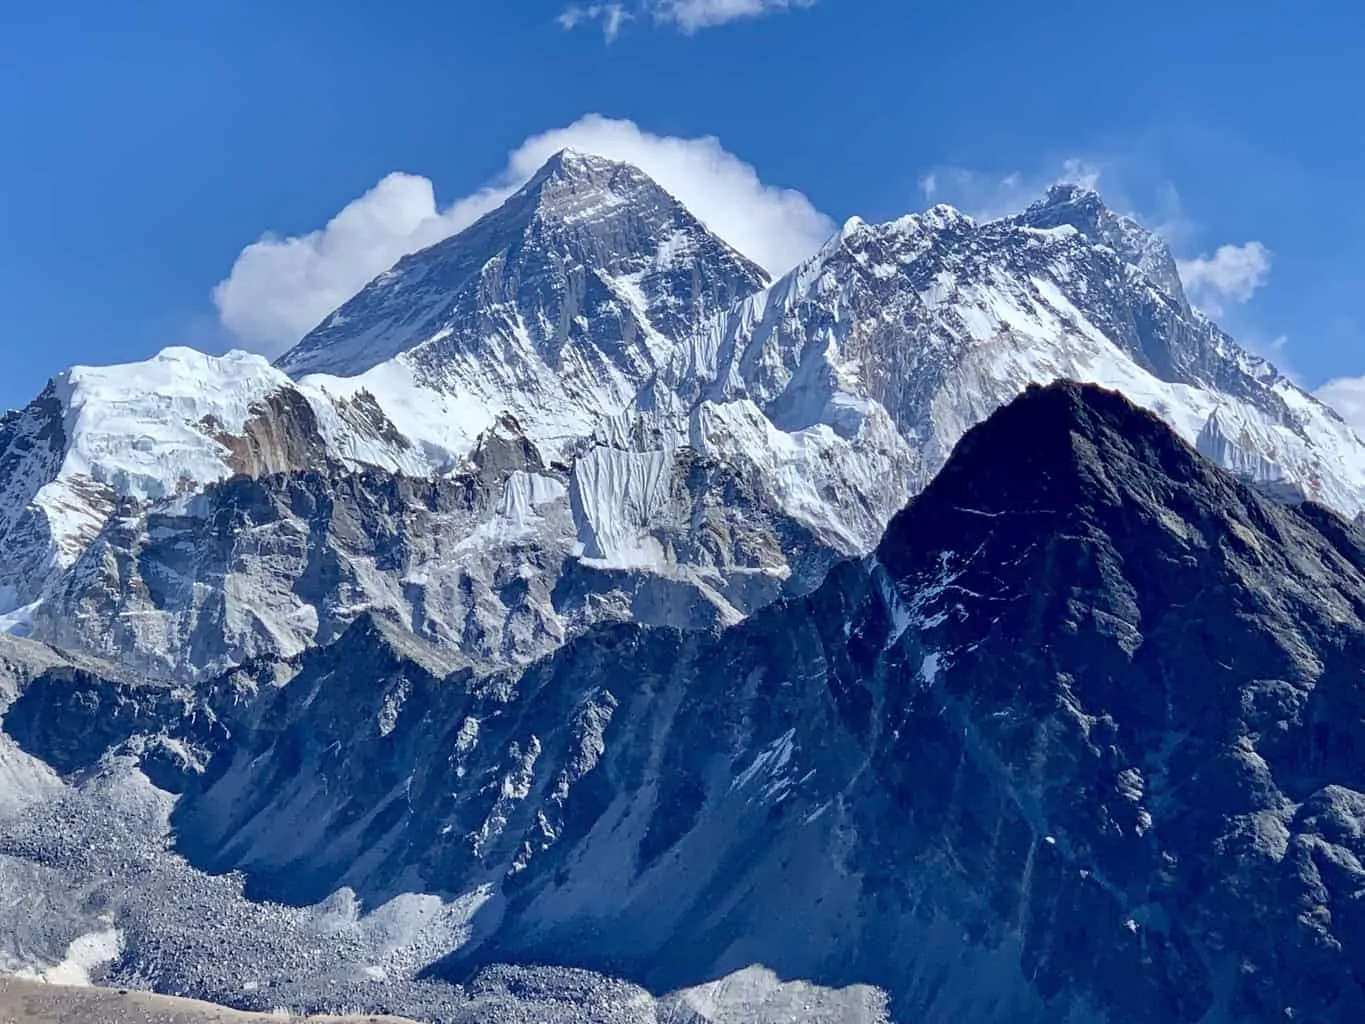
Sitting behind Gorak Shep lays Kala Patthar, home of one of the best views of the Everest region. Along the hike up and from up top you will get to see Mount Everest right out in front of you. This is essentially tied with Kongma La as the highest point of your trek.
Many people decide to head up for sunrise as the weather it clearer in the mornings and sunrise is also a pretty special experience.
Once back in Gorak Shep, pack up your bags and begin the walk back towards Lobuche. You can stop there for some lunch before continuing on to Dzongla. Be careful not to miss the turn here as you will be getting back off of the main Everest Base Camp route.
The trekkers on the main EBC route will be heading straight back towards the Dingboche/Pheriche area, while you will be heading right towards Dzongla to prepare for the Cho La Pass.
» Learn more in the Kala Patthar and Gorak Shep to Dzongla guides up on the site

Day 12: Dzongla – Cho La Pass – Gokyo
Starting Elevation: 15,850 feet / 4,830 meters
Ending Elevation: 15,584 feet / 4,790 meters
Distance: 7.5 miles / 12 km
Duration: 8 hours
Elevation Gain: 2,362 feet / 720 meters
Net Elevation Gain: (266 feet) / (40 meters)
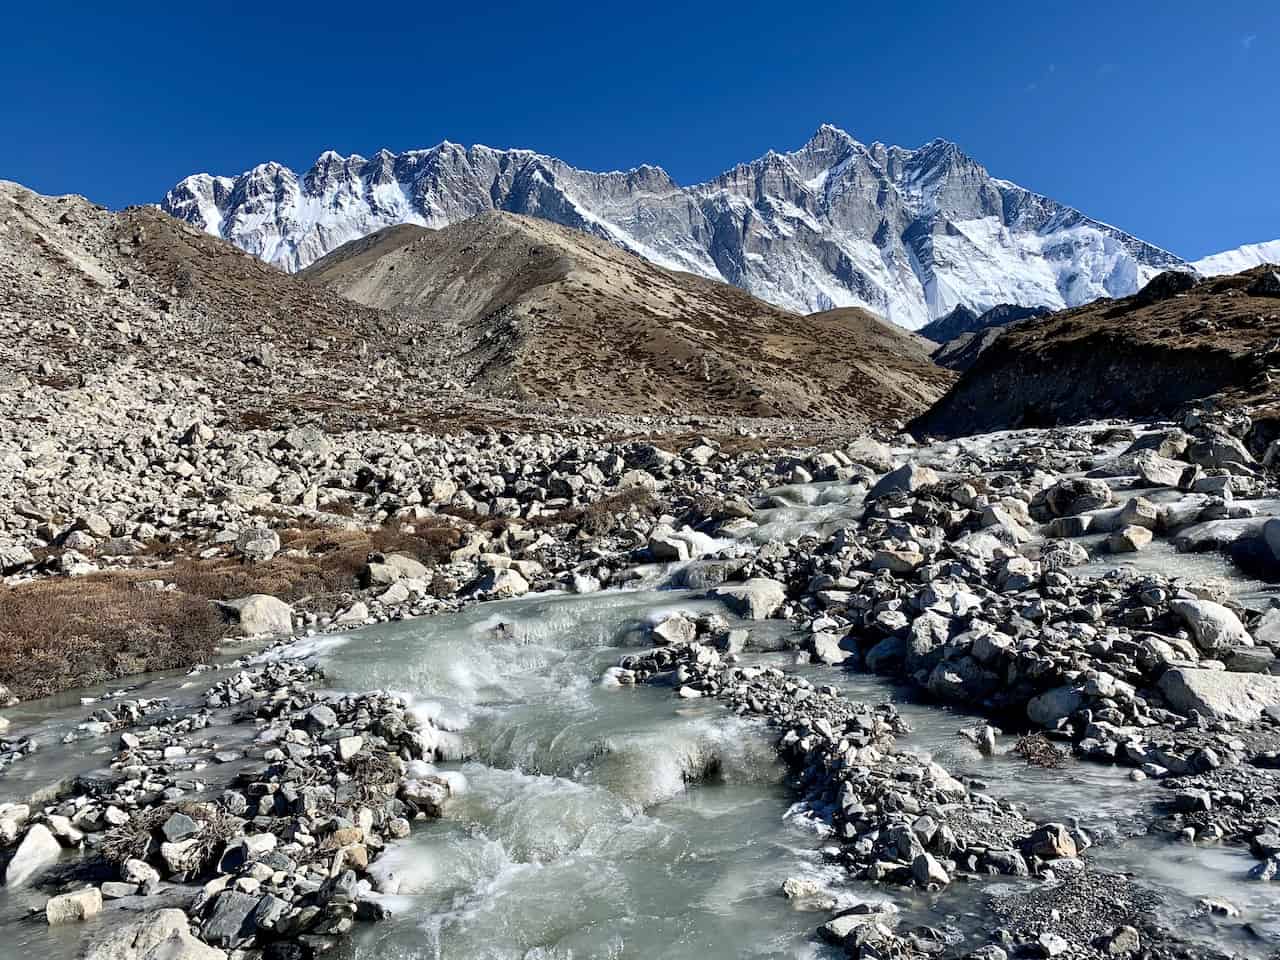
Out of the three passes, Cho La has to be the most unique in nature. That is because this is not just a simple hike. Once you reach the bottom portion of the pass, you will need to put on your micro spikes (beginner level crampons) to head across the glacier.
It is an experience like no other here as you get to enjoy this glacier walk up to the top of the Cho La Pass. The fun isn’t over yet though! Once down from the pass you will continue towards the small village of Thagnak, where you can enjoy some lunch.
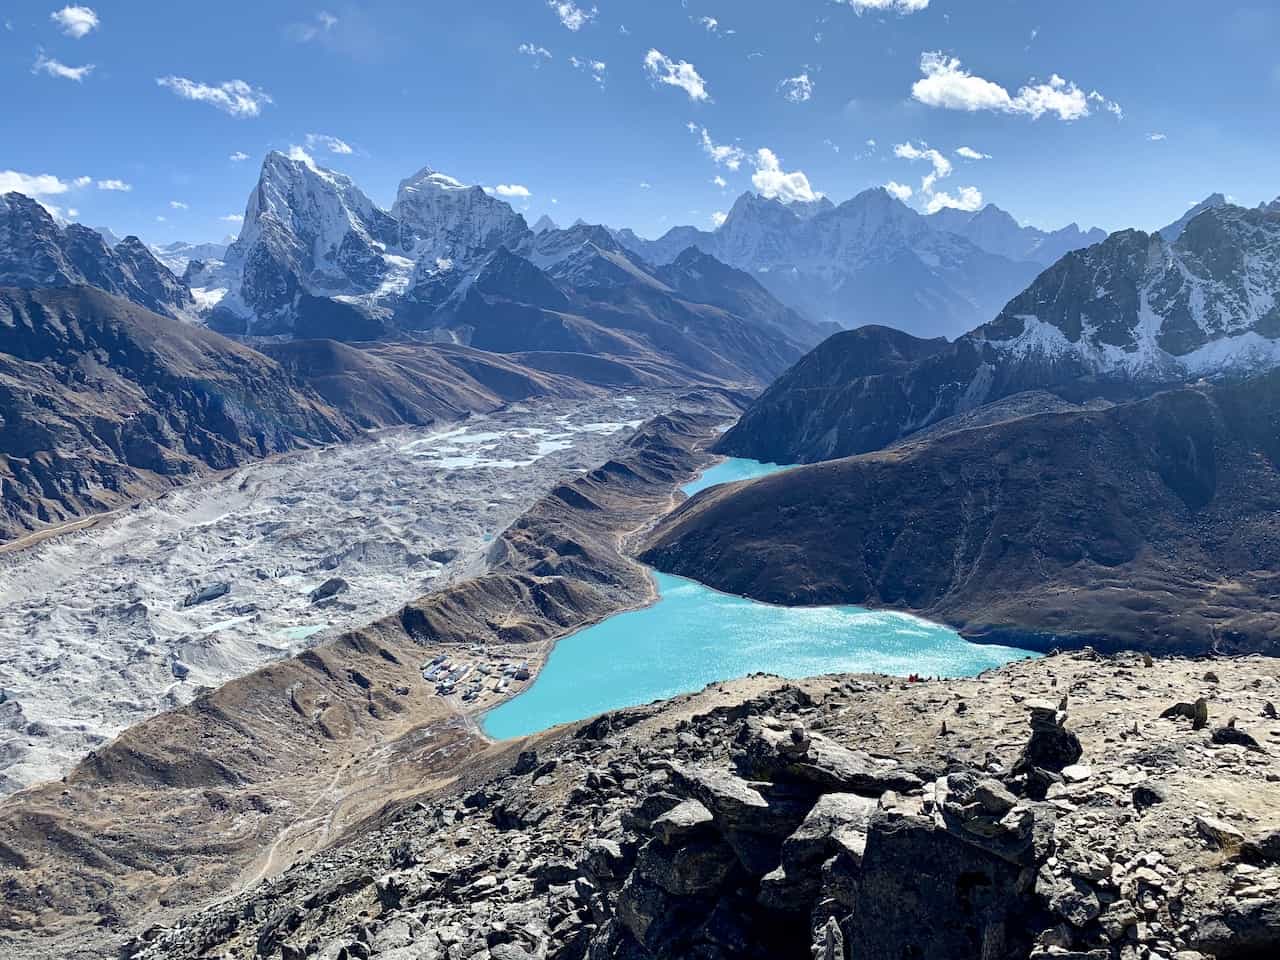
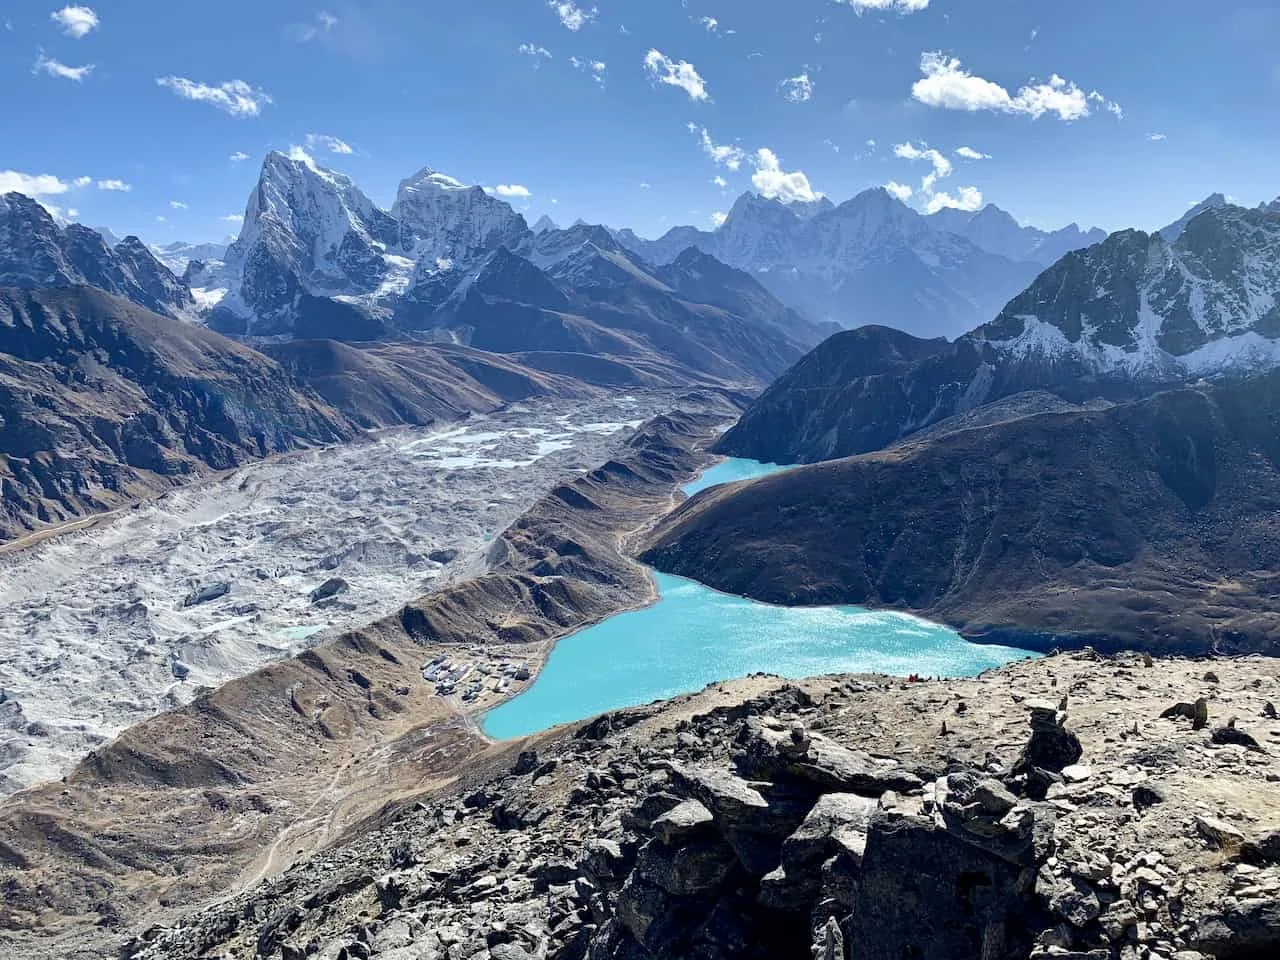
From there the trek across the Ngozumpa Glacier begins as you make your way to the lakeside village of Gokyo. Note that you will not need the micro spikes for this glacier as it is mostly on the loose dirt/rock that sits on top of the glacier itself.
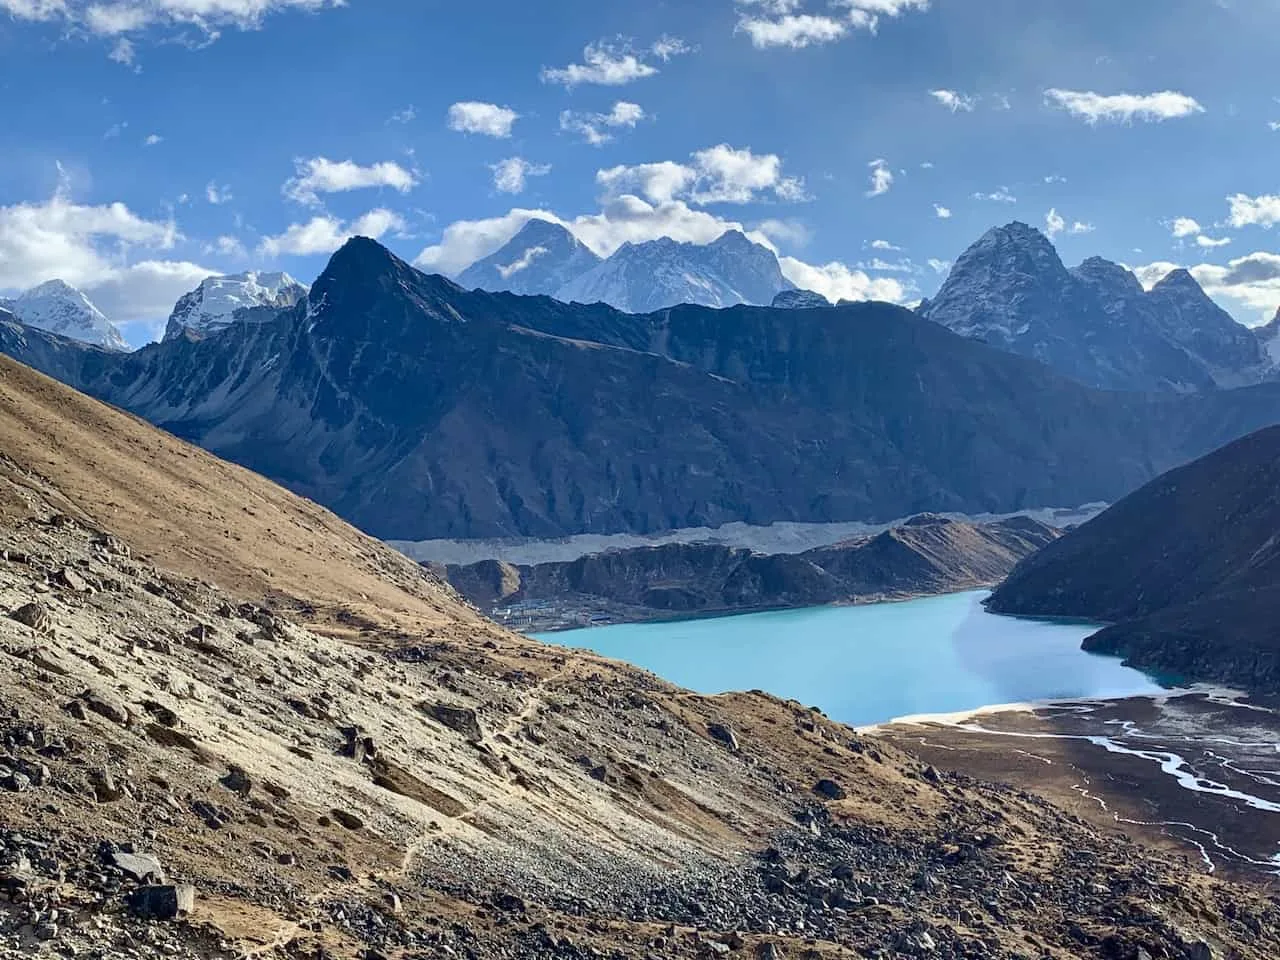
Gokyo will be home for the next three nights as you get to now enjoy some day hikes (or a rest day if needed) from the village.
» Learn more in the Cho La Pass guide up on the site

Day 13: Hike up Gokyo Ri
Starting Elevation: 15,584 feet / 4,790 meters
Peak Elevation: 17,575 feet / 5,357 meters
Distance: 2.5 miles / 4 km
Duration: 5 hours
Elevation Gain: 1,965 feet / 599 meters
Net Elevation Gain: –
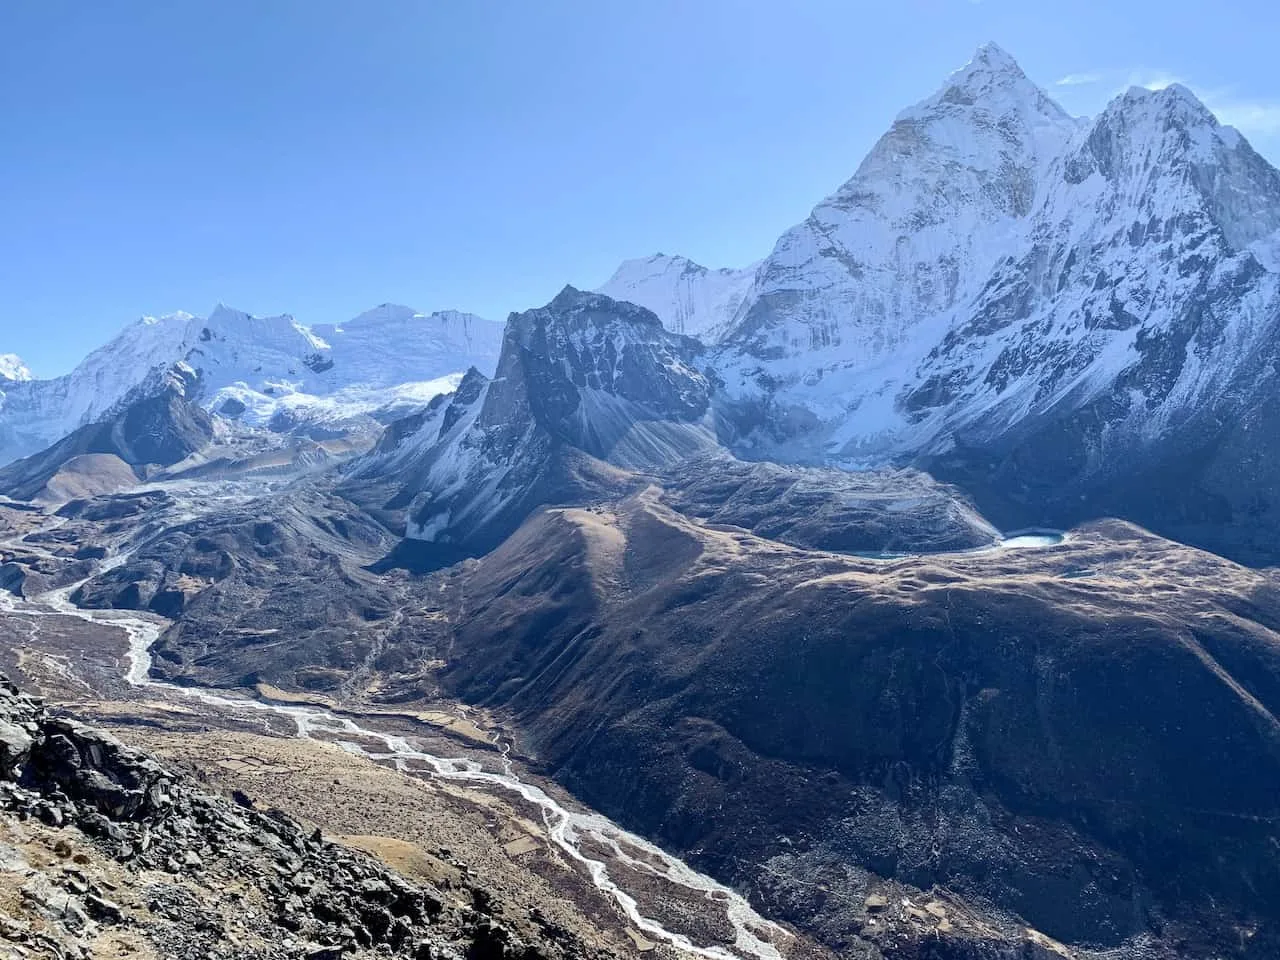
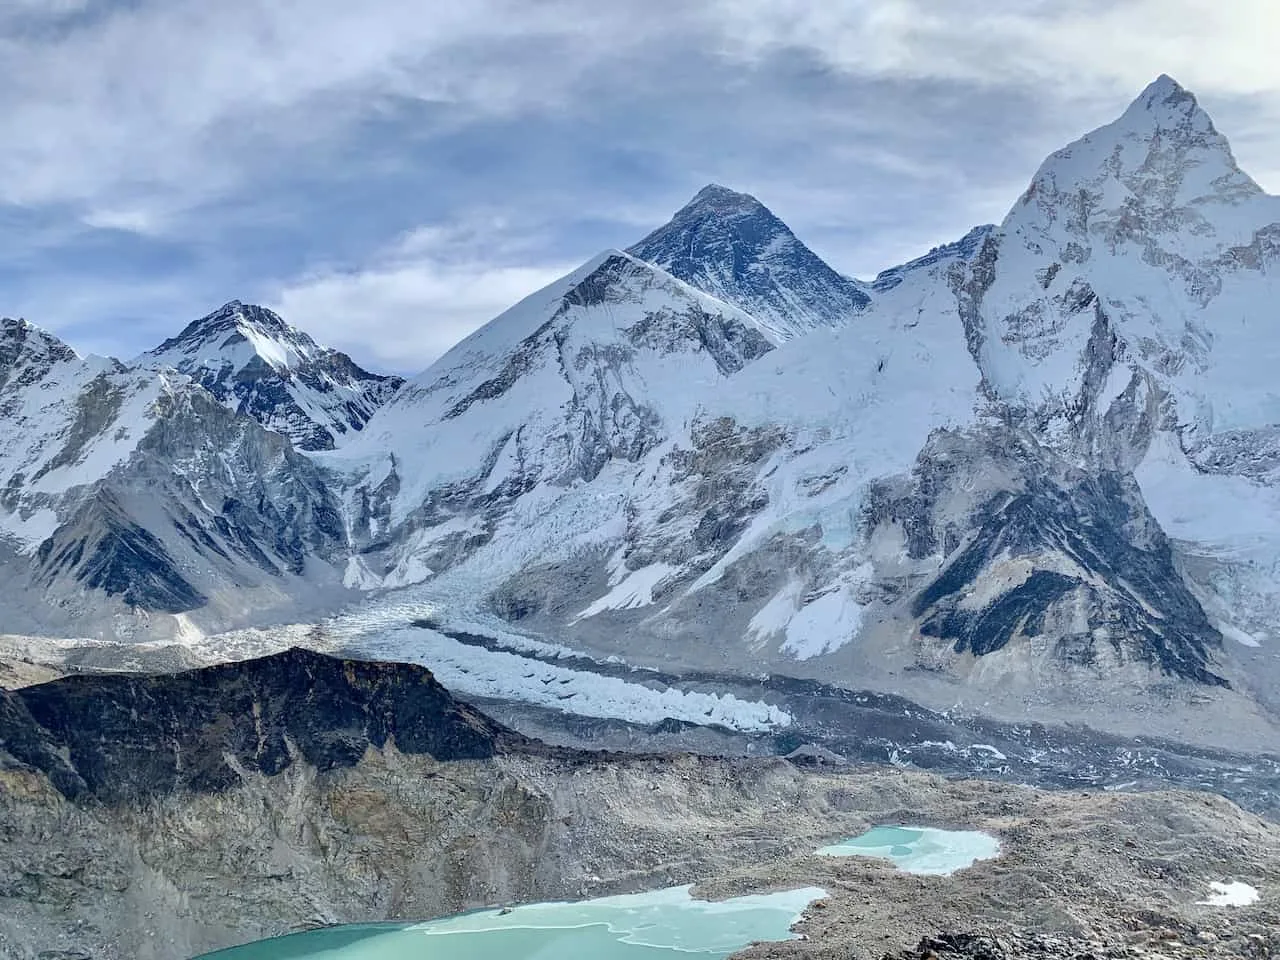
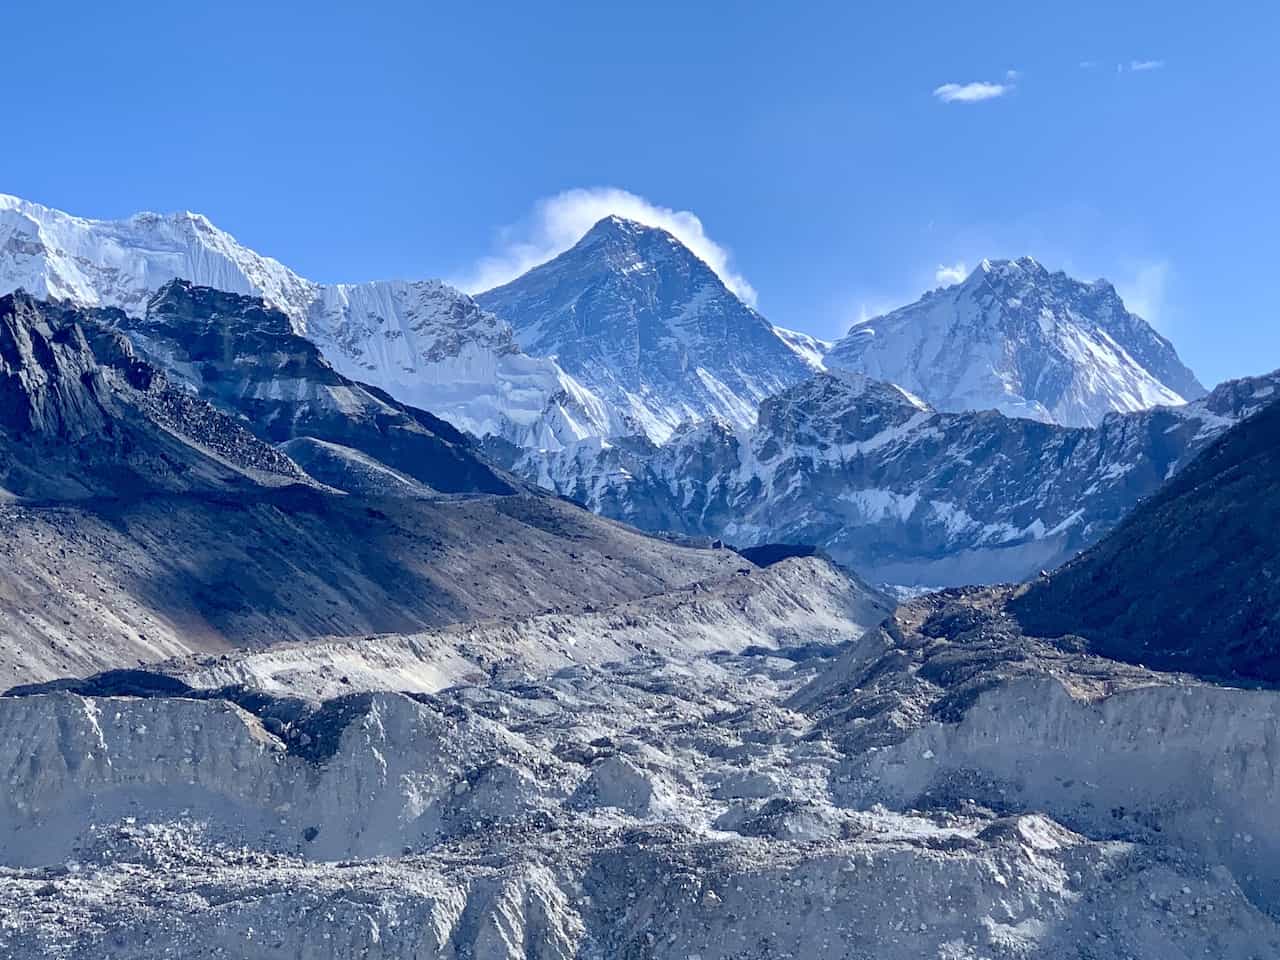
Gokyo Ri towers above the village of Gokyo and its lakes. From the summit of this 17,575 foot mountain, you will get views of the Ngozumpa Glacier in both directions, a few of the Gokyo Lakes, mountains such as Cho Oyu and Makalu, and of course Mount Everest itself.
This is a definite must do hike for those that are spending some time in Gokyo.
» Learn more in the Gokyo Ri guide up on the site
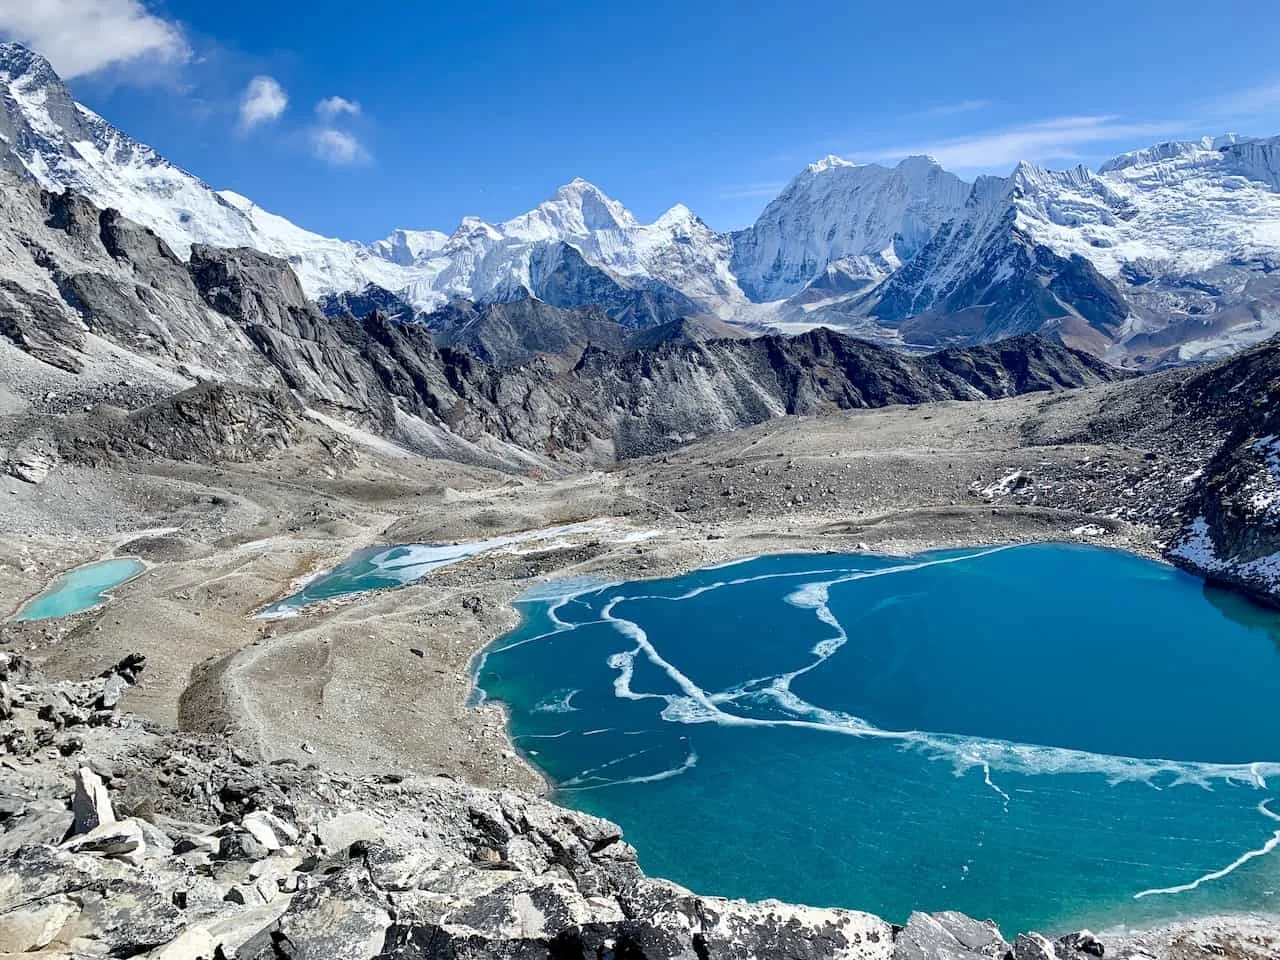
Day 14: Hike to the 4th & 5th Gokyo Lakes
Starting Elevation: 15,584 feet / 4,790 meters
Lake Elevation: 16,322 feet / 4,975 meters
Distance: 8 miles / 13 km
Duration: 5 hours
Elevation Gain: 950 feet / 290 meters
Net Elevation Gain: –
Understandingly so, you may want to have a rest day at some point, and I don’t think there is a better place to enjoy one than Gokyo. You can spend some time by the main lake, head up the short trail behind the village to take in some views, and just walk around the village.
But if you are up for it, then a trek towards the 4th and 5th Gokyo Lakes is also worth the extra day of hiking.
There is limited elevation gain here as you head alongside the Ngozumpa Glacier and towards the two lakes. Along the way too you will get the most unobstructed view of Mount Everest straight down the valley.
So, if you have it in you, it is certainly worth the effort.
» Learn more in the Gokyo Lakes guide up on the site
Day 15: Gokyo – Renjo La Pass – Lungde
Starting Elevation: 15,584 feet / 4,790 meters
Ending Elevation: 14,370 feet / 4,380 meters
Distance: 11.7 miles / 18.8 km
Duration: 6 hours
Elevation Gain: 2,572 feet / 784 meters
Net Elevation Gain: (1,214 feet) / (410 meters)
It is now time to leave Gokyo and head over the Renjo La Pass towards the other side of the valley to the village of Lungde. The trek over Renjo La will give you more spectacular views of the lakes, glacier and Mount Everest itself.
Once over the pass, it is a nice downhill trek through the valley towards Lungde, where you will spend the night.
» Learn more in the Renjo La Pass guide up on the site

Day 16: Lungde – Namche Bazaar
Starting Elevation: 14,370 feet / 4,380 meters
Ending Elevation: 11,286 feet / 3,440 meters
Distance: 11.4 miles / 18.3 km
Duration: 6 hours
Elevation Gain: 1,012 feet / 305 meters
Net Elevation Gain: (3,084 feet) / (940 meters)
While a longer distance of a day, the trekking won’t be as strenuous. You will continuously lose elevation as you circle around towards Namche Bazaar.
Along the way you will cross some bridges, make your way past the village of Thame, and enjoy some of the last views of this side of the valley.
You will soon be welcomed to views of Namche Bazaar from above, and can then make your way down into the familiar village to spend the night.
» Learn more in the Lungde to Namche Bazaar guide up on the site
Day 17: Namche Bazaar – Lukla
Starting Elevation: 11,286 feet / 3,440 meters
Ending Elevation: 9,318 feet / 2,840 meters
Distance: 11.9 miles / 19.1 km
Duration: 7 hours
Elevation Gain: 2,904 feet / 885 meters
Net Elevation Gain: (1,968 feet) / (600 meters)
This is going to be the last day of trekking on the journey! It is now time to backtrack days 1 and 2 of the trek as you make your way from Namche all the way to Lukla as you pass Phakding along the way.
While you will be losing quite a bit of elevation throughout the day, remember that the portion of trail between Phakding and Lukla will actually be an elevation gain. Nothing like ending the trek with some uphill battles after 17 days of hiking.
Once you make it back to Lukla, head to your teahouse for the night, take a nice hot shower (hopefully), and get ready for your flight back in the morning.
» Learn more in the Namche Bazaar to Lukla guide up on the site

Day 18: Depart Lukla
It is now time to depart Lukla and head back to Kathmandu. Be sure to sit on the right side of the plane here so you can get those last views of the Himalayas outside your window.
Back in Kathmandu, go do some laundry, take some showers, and get some massages after a once in a lifetime trekking experience.
9) How Hard is the Three Passes Trek
The Three Passes Trek is quite demanding both physically and mentally. For about 2.5 weeks you will need to hike on average of 5-6 hours per day, covering 112 miles and nearly 36,000 feet of elevation gain.
And at the end of each day, you won’t have a nice hot shower and heated room to come back to (although you can pay for some warm showers in certain villages).
While the teahouses are some of the most hospitable places I have been to, they do not have hotel like amenities. So, while the physical toll is demanding, the mental toll is too.
But at the end of the day, we are talking about seeing and experiencing some of the most beautiful landscapes on this planet. And every day really does bring something new – whether that is a village, mountain peak, lake, or the uniqueness of Everest Base Camp.
If you think you are up for the challenge, I highly recommend the Three Passes Trek for your trip.

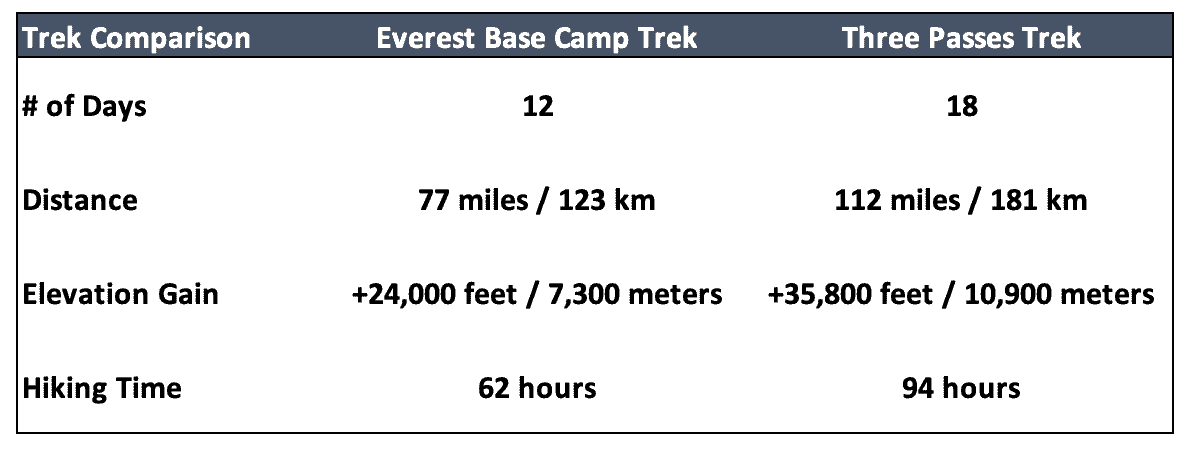
10) Three Passes Trek vs Everest Base Camp
A big question that is asked when going about a hike in the region is the difference between the Three Passes Trek vs Everest Base Camp.
From a pure statistics point of view, below is a chart that shows the main differences between the two treks – days, distance, elevation gain, and time on the trail.
The nice thing at the end of the day is that Three Passes Trek essentially covers 95%+ of the the standard Everest Base Camp trek.
The only portion of trail you would be missing out on is the walk between Dingboche and Lobuche (that is where you would be heading to Chukhung and then Kongma La Pass to Lobuche). Beyond that you get everything that the EBC trek offers.
If you think you have those extra days in you and you want to see more of this beautiful region, then opt for the Three Passes. On the other hand, if you are shorter on time and don’t want to hike for another week, then go for the EBC trek.
End of the day, it is hard to go wrong in this region and you certainly will enjoy it out there in the Himalayas.
» Learn more about the hike in the Everest Base Camp Trek guide on the site

I really hope that this guide has given you all the information you need to fully prepare and enjoy the Three Passes Trek of the Himalayas. If you do have additional questions, feel free to add them in below.
Also, be sure to take a look at the other Nepal trekking guides up on the site.
Have fun out there and safe travels!


Jeff
Thursday 26th of January 2023
Just one quick question, can I do Three passes solo or I have to hire a guide, porter or both? There are some blogs which stated that for Everest Region, no solo trekking allowed anymore.
Lynton Smith
Sunday 28th of August 2022
Thanks for sharing. I am interested to know how you booked your internal flight ticks return to Lukla? Did you hire any porters on your trip and if so where from? Cheers Lynton
Charles
Monday 29th of August 2022
Hi Lynton - I booked my internal flights through the Yeti Airlines website a few months prior to my departure. I did up end having a porter guide with me for a portion of the hike that was set up for me when I was in Kathmandu.
Enjoy your time out in the Himalayas!