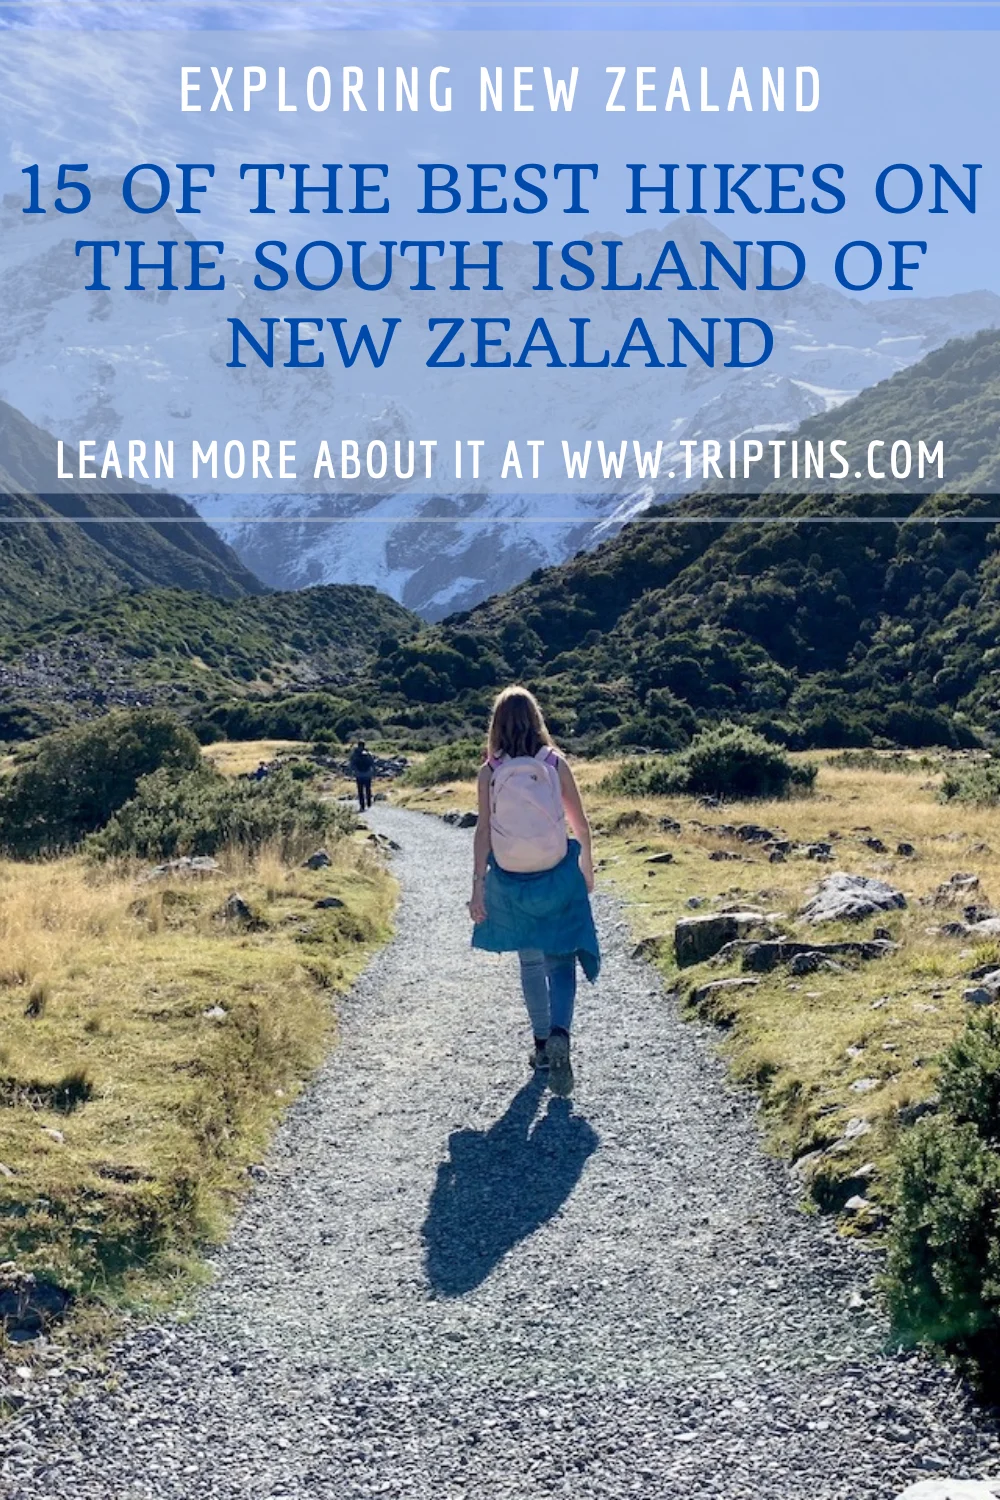

The South Island of New Zealand offers some of the best natural landscape in the world. To see some of this landscape for yourself, there are plenty of hiking options that are offered all throughout the island.
This guide will go through 15 beautiful South Island New Zealand hikes that you can add onto your next trip to the country. It will include maps, trail guides, hiking details, photos, and much more to get you set for your time on the trails.
* Affiliate Disclosure: This post may contain affiliate links, which means I may receive a commission if you make a purchase through the links provided, at no additional cost to you. Thanks for supporting the work I put into TripTins!
1) New Zealand Hiking Intro & Things to Know
When it comes to hiking, New Zealand’s South Island offers some of the most diverse and stunning landscape that you can ask for.
Whether you are looking for mountains, lakes, rivers, glaciers, beaches, or forests, the South Island has it all and much more.
What better way to take advantage of this beautiful landscape than to hit the hiking trails. All throughout New Zealand you will find official hiking trails that take you deeper into the natural landscape as you get to experience some of this beauty for yourself.
Hikes around New Zealand can be anything from short 30-minute trails to longer multi day treks. I mean there is even an official trail that makes its way across the entire country from North to South.
No matter what type of trail you are looking for, there should be an option for you.
Some of these hikes will be considered easy and therefore good for anyone to take part of, while other hikes may be much more difficult. This will be an important thing to consider as you decide which trails to take part of.
As I go through 15 of my favorite hikes, I will be sure to touch on the difficulty level and duration of trails, to give you a better sense if the hike is right for you.
In addition, there are some very important things to consider when heading out on the trails. Weather forecasts, packing lists, safety considerations, among several other important factors need to be taken into account.
I will jump into some of those topics before talking through the hikes themselves.

2) New Zealand Weather
You cannot head out onto the hiking trails without understanding the weather forecasts for the day (or days).
Much of the South Island is mountainous and can bring a whole variety of poor weather. Rain, wind, and stormy conditions are common for the region.
The last thing you want is to be stuck in terrible weather conditions with poor visibility and far from a trailhead. Understanding weather is going to be of upmost importance here.
Whenever I travel I try to be as flexible as possible when it comes to an itinerary. If I know I will be in a certain city or region for a few days, I won’t try to put a day to day itinerary down to a tee.
Instead, I will be aware of the weather forecasts and plan my days around that. If certain activities (like hikes) need better weather to take part, I will be sure to save a hike for those more ideal days.
I have been using a weather forecasting site/app called Meteoblue that gives forecasts for more particular regions. For example, if you are visiting Wanaka and taking part of the Roy’s Peak hike, you can search for “Roys Peak” on the app. If just searching for the weather in Wanaka, you may get a totally different forecast.
At the end of the day, it is important to understand that mountain weather is not the same as city weather. So, if taking part of hikes up in the mountains, or further away from a city center, try to understand the hiking location forecast first.

3) Hiking Packing List
If you are planning to do multi hour New Zealand South Island hikes, you must be prepared with the appropriate gear. Having a solid hiking packing list is going to keep you worry free in all different types of situations.
For a place like New Zealand, you will want to consider bringing multiple layers onto hikes. A day can start off nice and calm, but turn windy later on in the day.
You may be sweating heading up to a peak, but then start shivering once you made it to the top and aren’t moving anymore.
From a layering perspective I would recommend bringing along the following (all of which should be of a moisture wicking material):
→ Hiking Shorts
→ Hiking Pants
→ Short Sleeve and/or Long Sleeve Shirt
→ Mid Layer Fleece
→ Packable Rain Jacket
Other hiking gear I bring along on hikes include:
→ Hiking Shoes & Socks
→ Hiking Backpack & Rain cover
→ Water Bottle & Nutrition
→ Portable Charger
→ Hat & Sunglasses
→ Sunscreen & Bug Spray
→ Feel free to take a look at my Hiking Packing List for more details and options when it comes to what to take out on the trail.

Hiking Resources & Checklist
Before heading out for the trails, be sure to read up on some of the hiking resources up on the site. These are here to better prepare you for all types of outdoor adventure.
- Gear: Hiking Packing List
- Weather: How to Prepare for Hiking Weather
- Navigation: Hiking GPS & Navigation
- Tips: 20+ Hiking Tips & Tricks for the Trail
- Accommodation: Book Your Hotel Today
- Rental Car: Book Your Car Rental Today
4) Preparing for a Hike
No matter where I am in the world, I always go through a checklist when it comes to preparing myself for a day out hiking. Below are some of the most important things to consider:
→ Download an offline route of the trail on an app like Maps.me, Gaia, or AllTrails. This will give you a better understanding of where you are on the route and how you are progressing.
While trails are nicely marked in New Zealand (for the most part), having a GPS app can work wonders.
→ Be sure to understand where the exact trailhead location is before setting out. Sometimes, just putting a mountain or lake name into a navigation app is not necessarily going to take you right to a trailhead.
Instead, do the quick research to make sure you know the trailhead coordinates or name before heading out.
→ I would also recommend downloading offline maps for the entire region you are visiting. Sometimes trailheads are in locations where there is no cellular network.
That means, when leaving a trailhead you may not be able to see the route back to your hotel when attempting to do so in an app like Google Maps.
If you download the offline maps for the region, you will still have the roads mapped out and the navigation app will be able to work.
→ As mentioned before, always check the weather forecast. I wont go into details about it again but this is an important one!
→ For New Zealand in particular, I would recommend just reading through the DOC (Department of Conservation) website regarding the particular trail you are trying to hike.
They will have the most up to date information regarding potential closures, routes, etc. for all New Zealand South Island hikes.
→ If you are interested in taking part of a multi day route, then you will most likely be able to stay at an official mountain hut along the trail.
Many of these can be booked in advance to guarantee a spot for the night. This guide will touch on a few of these routes, if you are looking to extend a particular hike.
» Enjoy these hikes as part of a longer New Zealand South Island Itinerary

5) Getting Around New Zealand
In general, getting yourself around New Zealand is going to be easiest if renting your own car (or camper van).
While there are busses that make their way around the South Island, it will still prove difficult to get to trailheads without a car of your own.
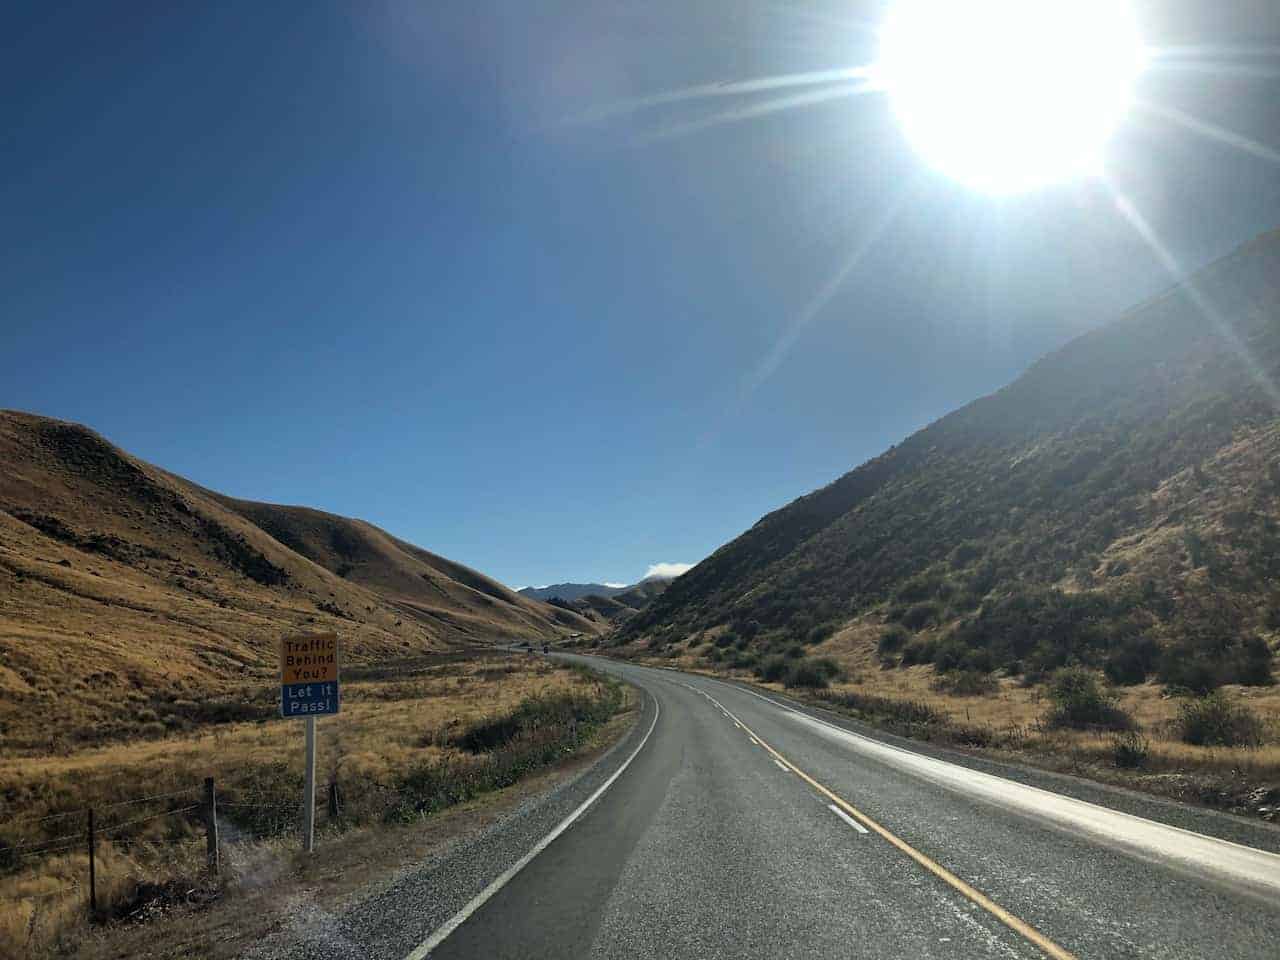
For many people, driving in New Zealand is going to be a different experience vs. driving at home. This is mostly due to the fact that driving in New Zealand is done on the left hand side of the road.
Coupled with the fact that the roads can get windy and twisty throughout, can make for a new type of driving experience.
As you are looking for rental cars, I would highly recommend checking out Rentalcars.com for your search.
This will give you a whole host of options to consider from a variety of companies all in one spot. It has been my go to car rental search engine for years now and I couldn’t recommend it enough.
6) South Island New Zealand Hiking Map
Below is a hiking map pinpointing each of the New Zealand South Island hikes that I will be going through on this list.
You can see that they are situated in certain areas of the island. During my trip I focused on Queenstown, Wanaka, Mount Cook, and Abel Tasman, so those are going to be the main jump off points for the hikes I will be talking through.
Note: I was only able to import the hiking routes for a handful of the hikes due to limitations on the map. I still pinpointed down the trails that do not have the full route laid out.
7) 15 Best Hikes in South Island New Zealand
Now let’s get into some of the best hikes that the South Island of New Zealand has to offer.
I will start off by listing out some all important hiking details for each one, followed by a short description and some photos.
For each hike, I have also written up a more comprehensive hiking guide to give you even more information about the particular trail.
If you find yourself interested in doing one or more of the hikes, I would recommend you checking the hiking guides out to learn more.
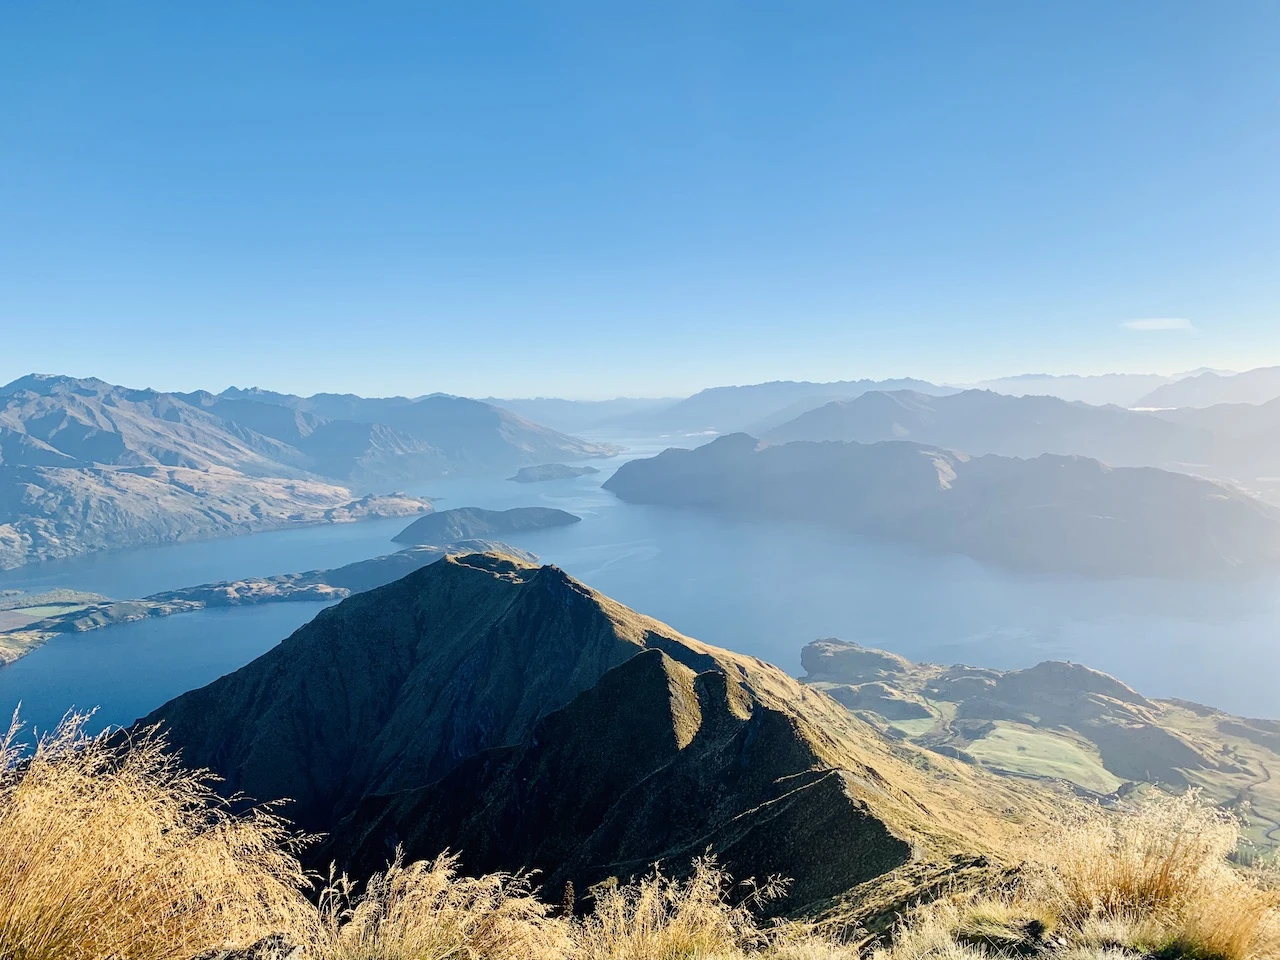
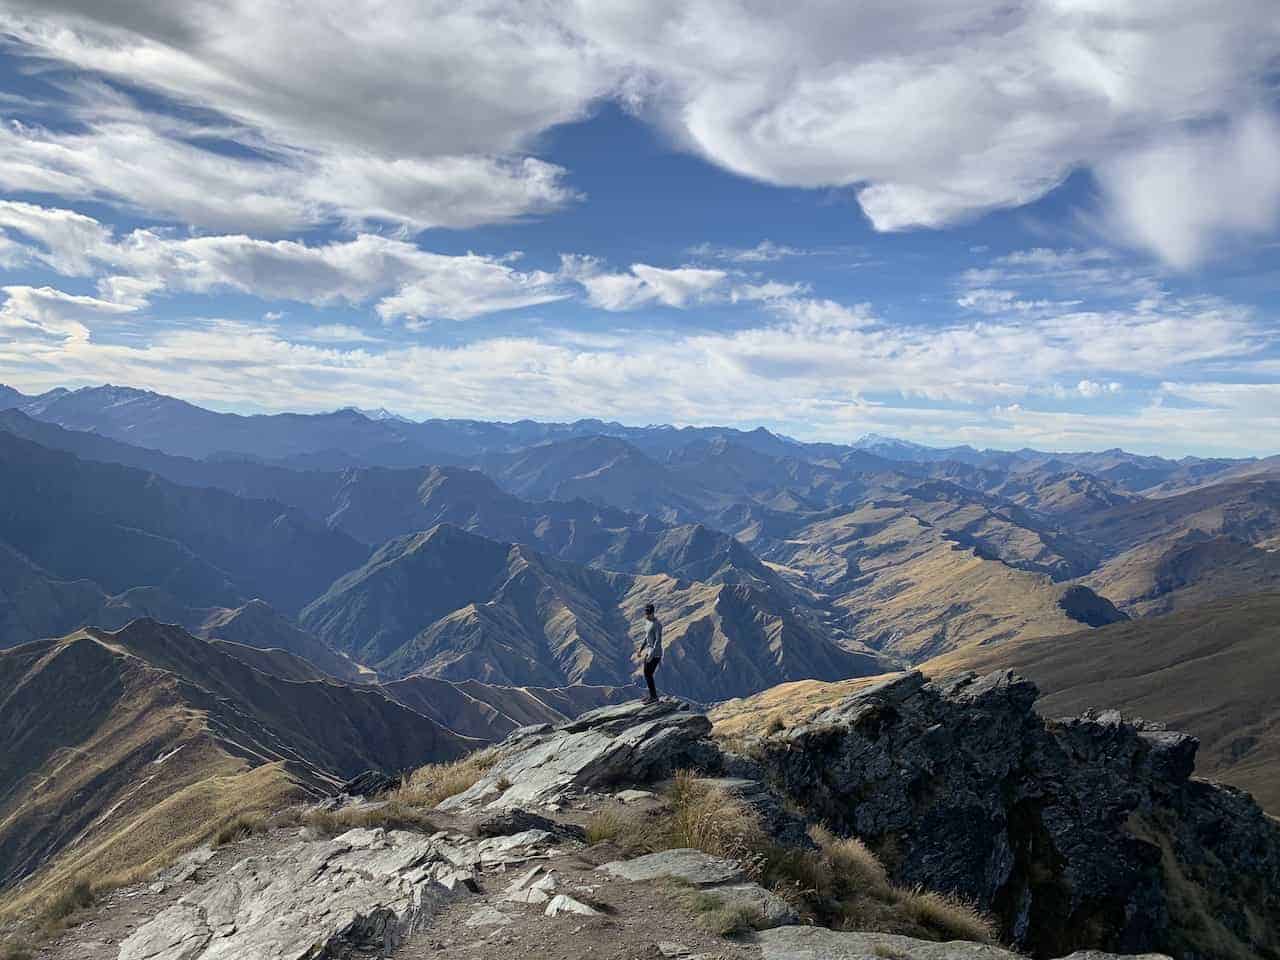
Isthmus Peak
Hike Name: Isthmus Peak
Trailhead Name: Isthmus Peak Trail Head
Base Town: Wanaka
Hike Length: 16 km / 10 miles
Hike Elevation Gain: 1,250 meters / 4,100 feet
Hike Duration: 4-6 hours
Difficulty Level: Hard
Hiking Guide: Isthmus Peak Track
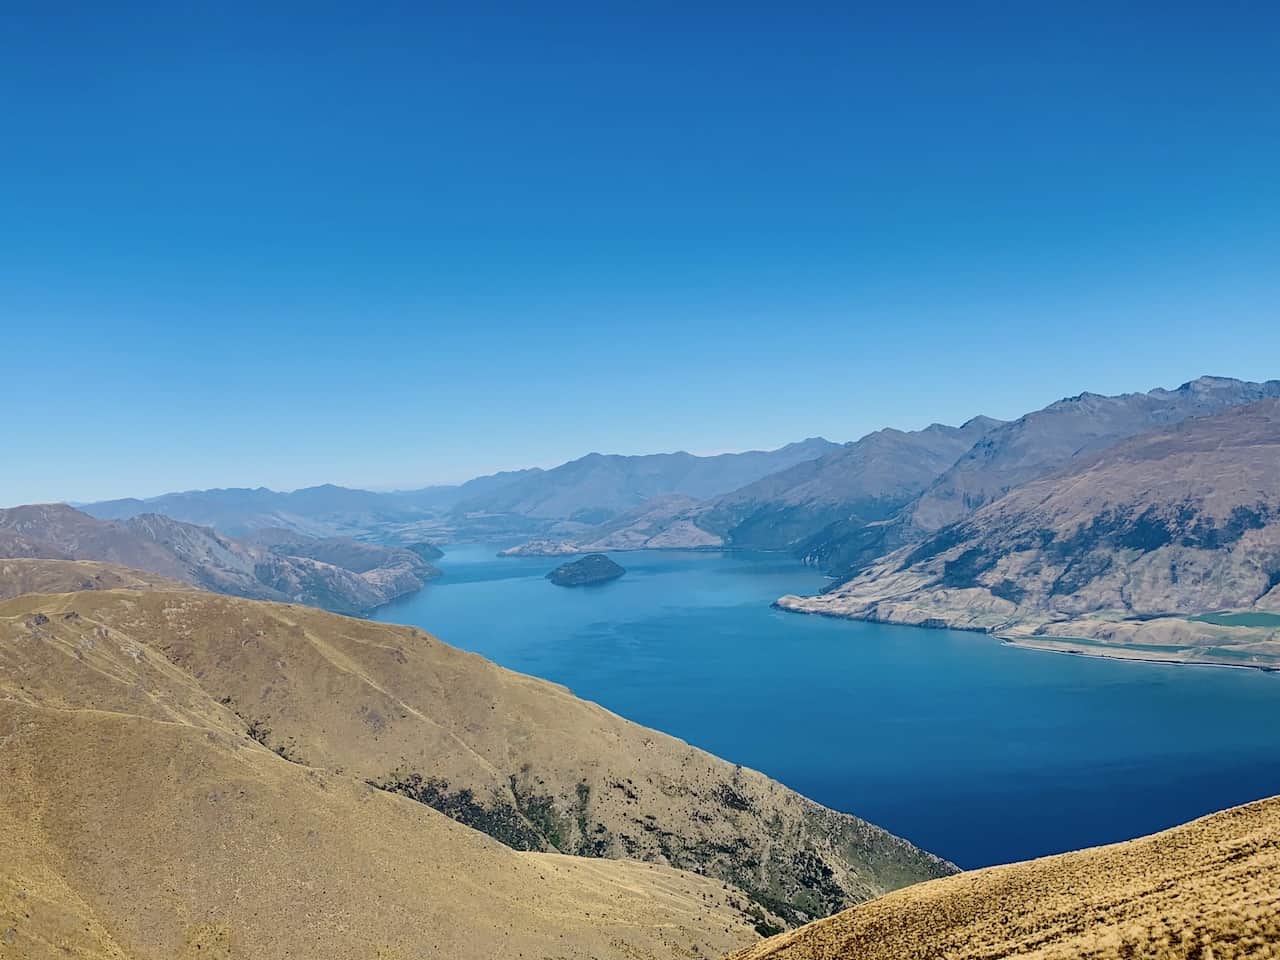
While Roy’s Peak is the more well known hike around Wanaka, Isthmus Peak deserves a lot of credit too. This less frequented trail offers an experience right on par with some of the best hikes in the country.
Just a quick drive northbound from Wanaka, you will reach a roadside parking lot. From there, the trail heads up into the mountains, gaining plenty of elevation all throughout the way.
As you are hiking up, views of Lake Hawea will get better and better as you get further along on the mountain. The surrounding landscape will have you consistently stopping for photos and you will get to just enjoy what you have out in front of you.
While you may have some false peaks along the way, you will soon continue on up to the summit, where the views of Laka Wanaka come into view as well. On a clear day you will be able to see the various peaks of Mount Aspiring National Park across the lake.
The hike down follows the same trail that you took up, and brings those same beautiful views out in front of you (just with no elevation gain this time around).

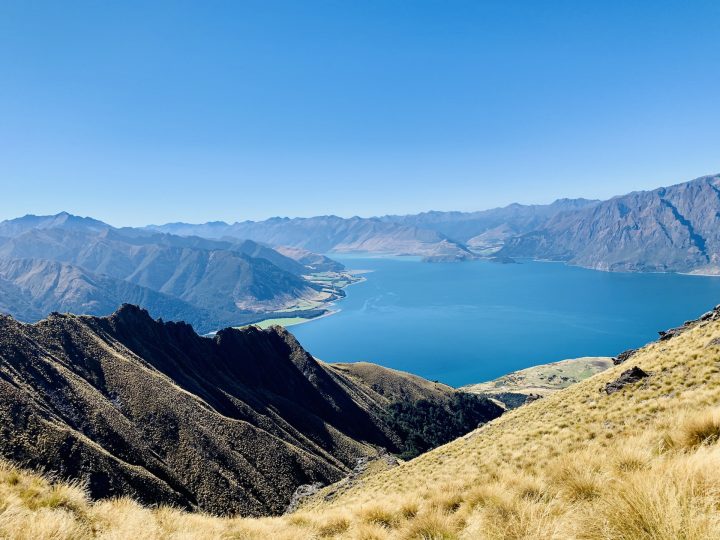
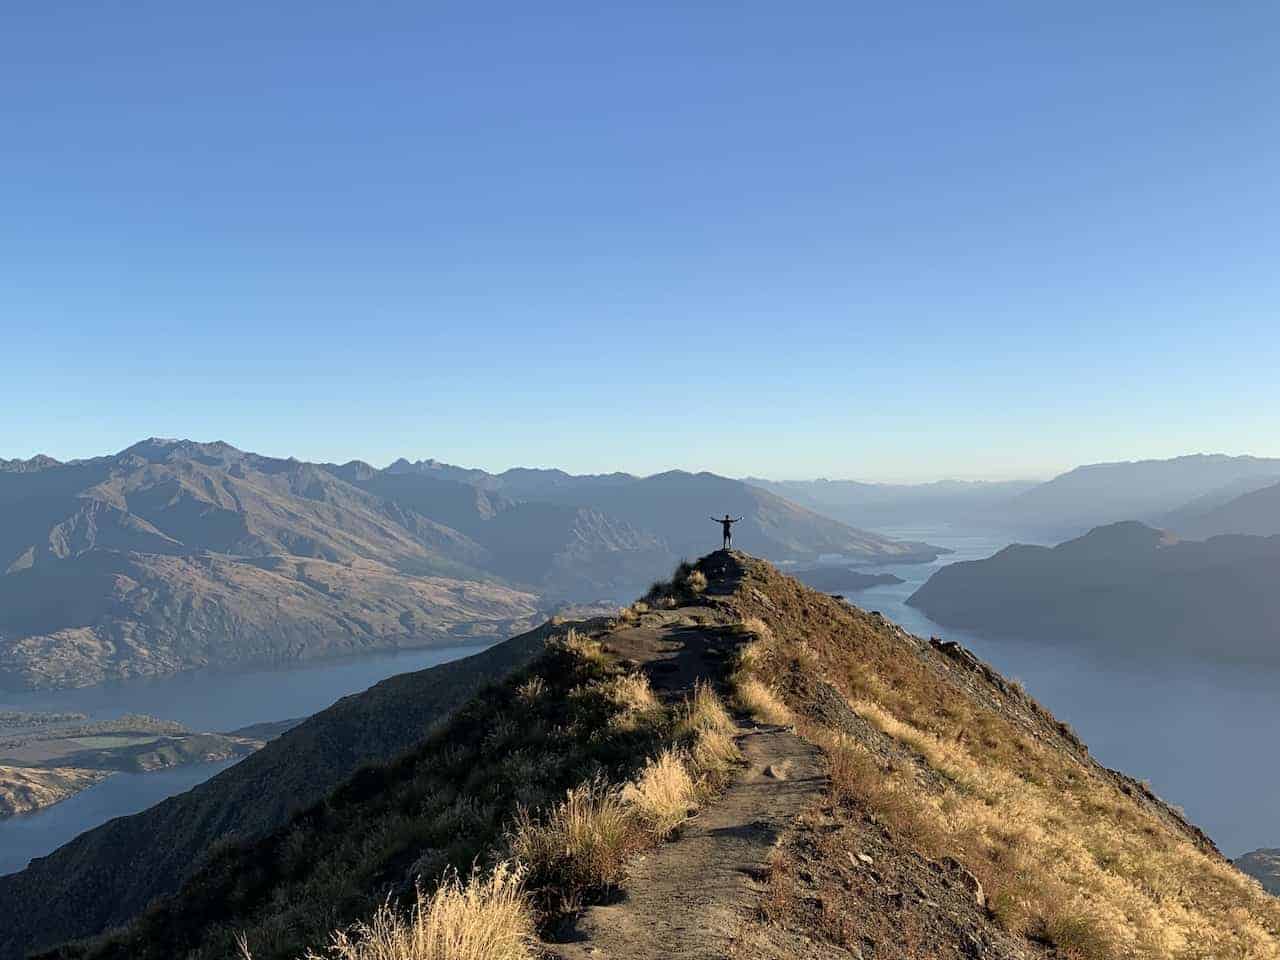
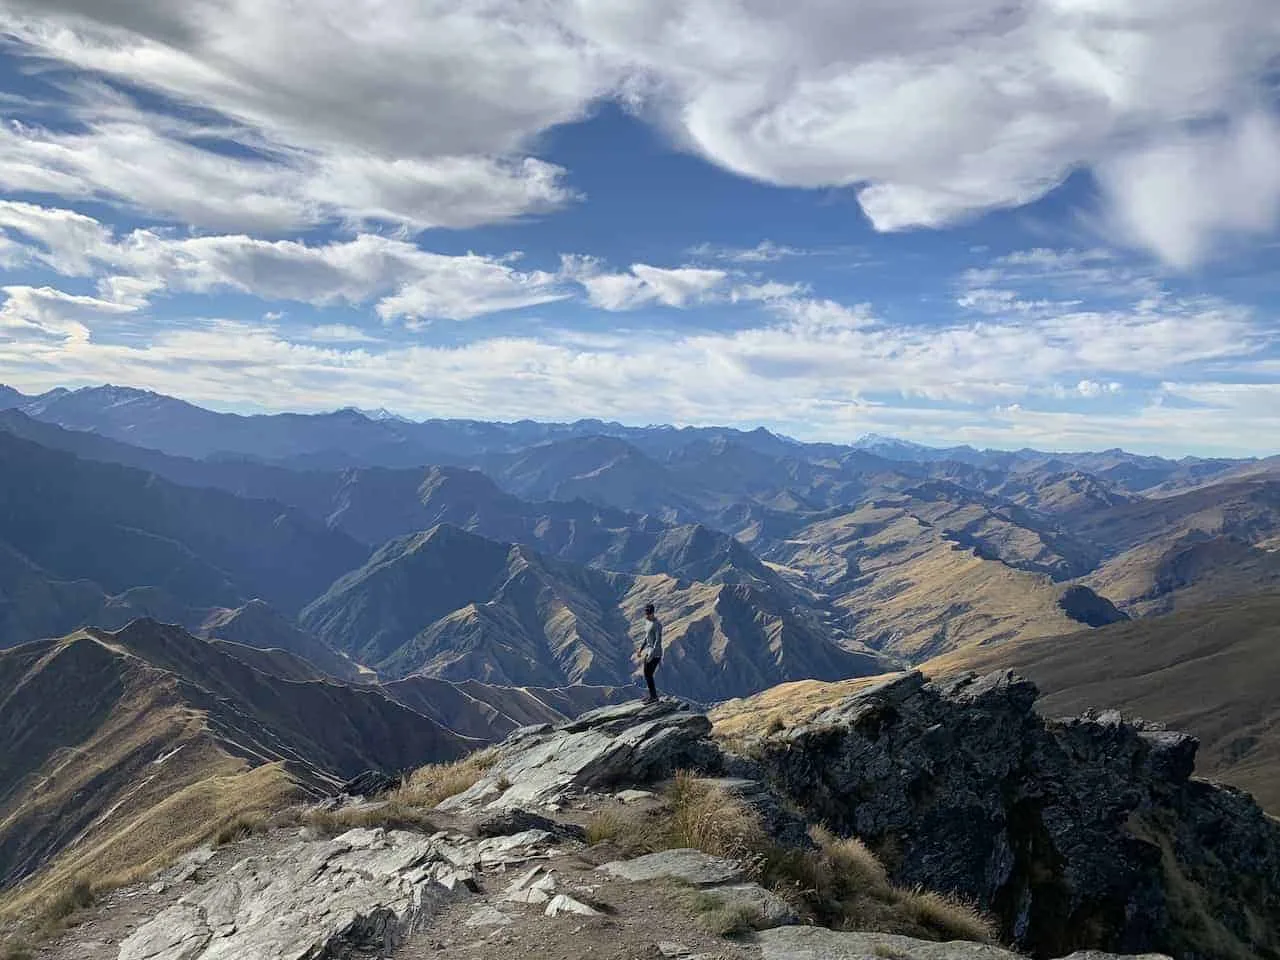
Roys Peak
Hike Name: Roys Peak
Trailhead Name: Roys Peak Track Parking
Base Town: Wanaka
Hike Length: 16 km / 10 miles
Hike Elevation Gain: 1,228 meters / 4,029 feet
Hike Duration: 4-6 hours
Difficulty Level: Hard
Hiking Guide: Roys Peak Track
If there is one trail you would have heard of during your research, it is going to be Roys Peak. And that is for good reason!
It truly is one of the best hikes and offers some jaw dropping views of the lakes and mountains of New Zealand.
With that said, Roys Peak can bring the crowds due to those exact reasons. Getting an earlier start to the day though and you may be lucky like me and completely avoid the crowds altogether.
The trail in general is essentially one long and winding snake path from the parking lot up to the summit. You can pretty much see your end destination throughout the duration of the hike. While the ascent is pretty demanding, you will hopefully be distracted by some beautiful views of Lake Wanaka throughout.
As usual, the higher you get, the better the views are going to be. Once you get close to the summit, you will reach the famous Roys Peak lookout, where you can take some photos before continuing onto the summit itself.

Mount Iron
Hike Name: Mount Iron
Trailhead Name: Mount Iron Trail Parking
Base Town: Wanaka
Hike Length: 4.5 km / 2.8 miles
Hike Elevation Gain: 240 meters / 787 feet
Hike Duration: 1.5 hours
Difficulty Level: Easy
Hiking Guide: Mount Iron Track
A less demanding hike in the Wanaka region is Mount Iron. The mountain is located just outside of town, so you can choose to either drive to the starting point or simply walk the extra ~45 minutes round trip.
The Mount Iron track can be done as an out and back type route or you can switch things up and make it a loop trail (which I would recommend).
During a climb up, you will get some views of Wanaka right down below with the lake and mountains further out in the distance.
Once at the summit, you will also be able to see the landscape in the opposite direction before continuing on the loop back down to the parking lot.
It is a great little hike to enjoy when visiting Wanaka and I would highly recommend it, even if doing other more demanding hikes.


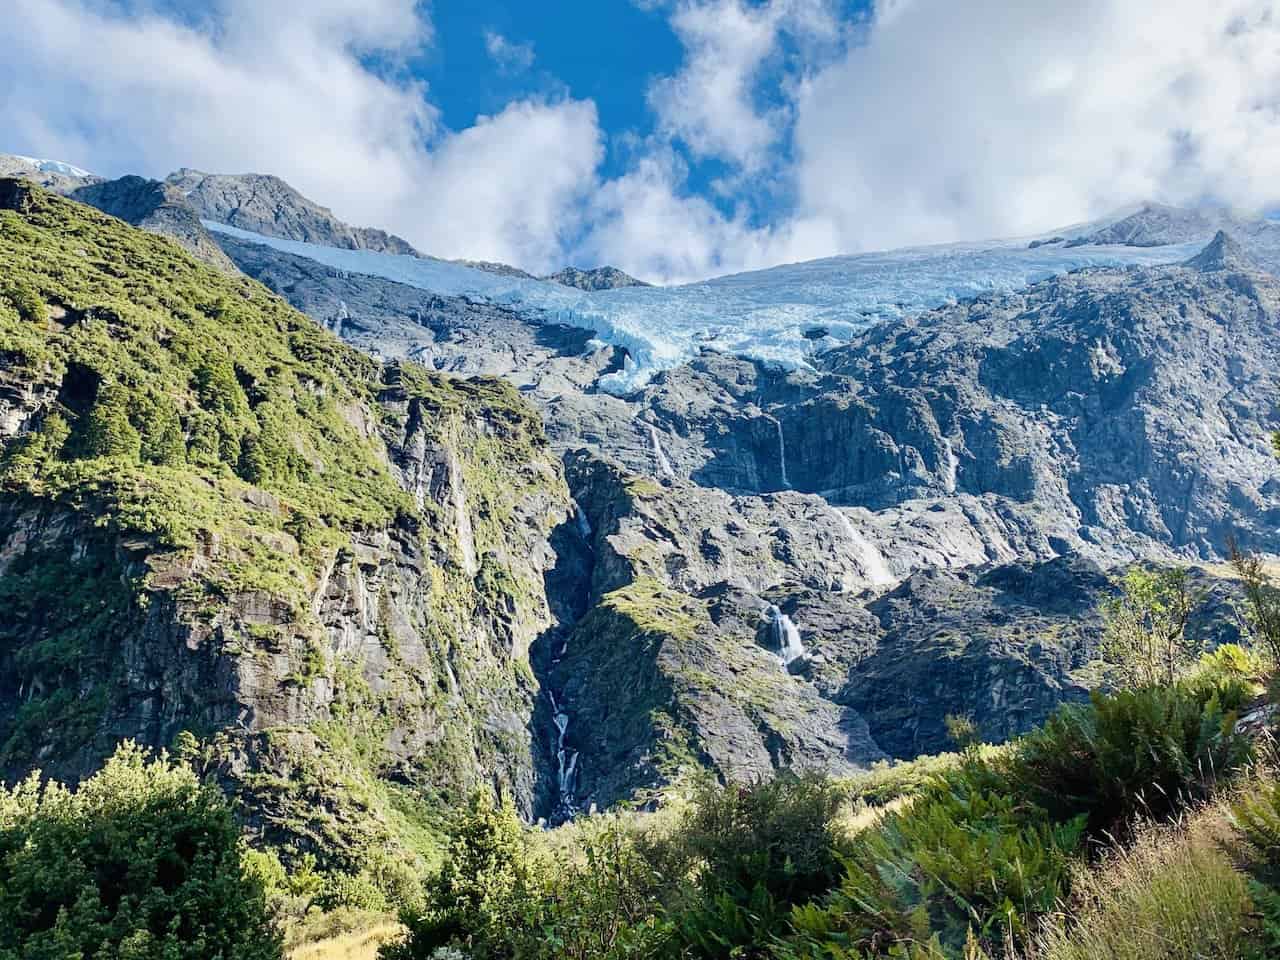
Rob Roy Glacier Track
Hike Name: Rob Roy Glacier Track
Trailhead Name: Raspberry Flat Carpark
Base Town: Wanaka
Hike Length: 10.3 km / 6.4 miles
Hike Elevation Gain: 410 meters / 1,345 feet
Hike Duration: 3-4 hours
Difficulty Level: Moderate
Hiking Guide: Rob Roy Glacier Track
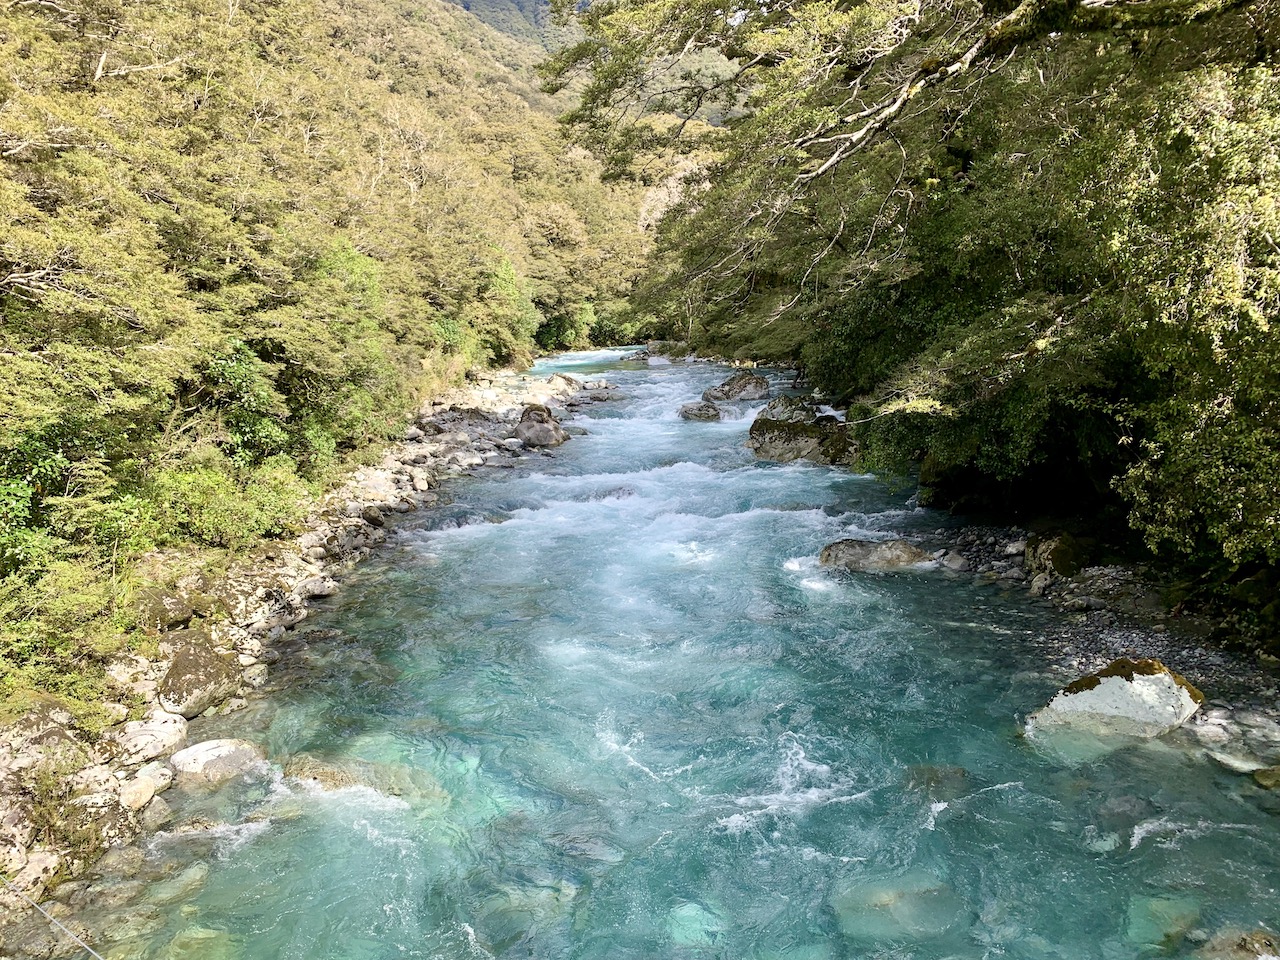
Located a bit further out of Wanaka, you will find Mount Aspiring National Park. The park is home to many different hiking trails to enjoy. One of these tracks is the Rob Roy Glacier track.
The highlight of a hike like this is getting to see a glacier up and close. But before seeing the glacier, you will need to make your way all along the trail.
From the parking lot, the route continues along a beautiful river, before crossing over onto a suspension bridge and into the forest. The forest portion will have elevation gain with some mountain and river views sprawled throughout.
As you get closer to the endpoint of the hike, you will come across two lookout spots – a lower and upper lookout of Rob Roy Glacier.
As you take in the views from these lookouts, you will get to see the sheer size of the Rob Roy Glacier along with waterfalls, rivers, and mountains surrounding it all.
Once all done at the second lookout area, it is then retracing your steps all the way back down to the parking lot to end a successful day out on the trail.

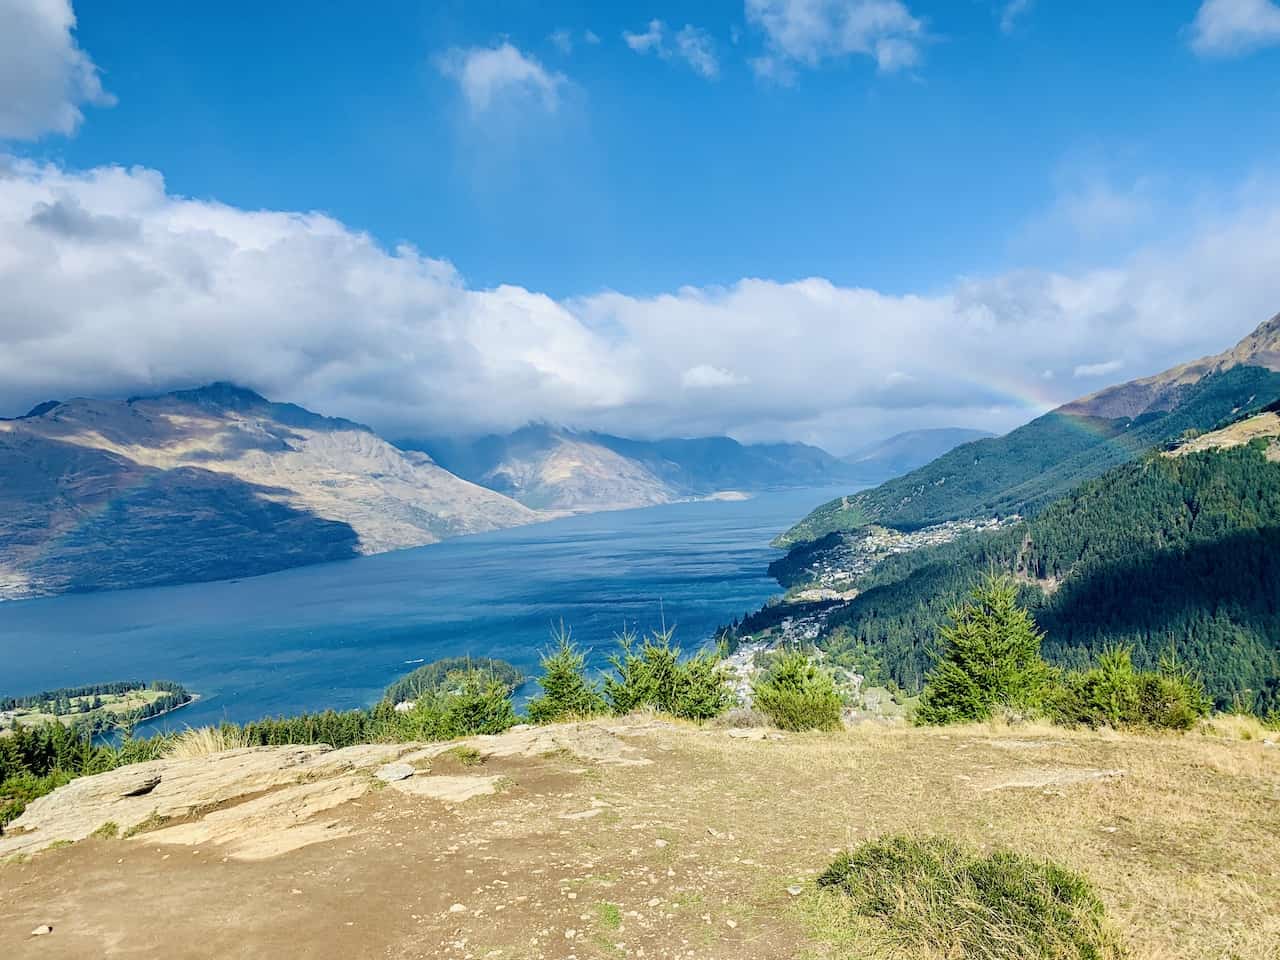
Queenstown Hill
Hike Name: Queenstown Hill
Trailhead Name: Belfast Terrace / Queenstown Hill Walking Track
Base Town: Queenstown
Hike Length: 5 km / 3.1 miles
Hike Elevation Gain: 500 meters / 1,640 feet
Hike Duration: 2-3 hours
Difficulty Level: Moderate
Hiking Guide: Queenstown Hill Walk
Moving onto the Queenstown area, you will find many more hiking trails to take part of. One of the favorites here is Queenstown Hill.
While it does have some moderate elevation gain, it is a more doable hike than some other more strenuous climbs.
The nice thing about the hike is that you can take part of it directly from the town itself. Simply walk up to the trailhead, and continue into the forest from there. While you will get some views here and there through the trees, the best is yet to come.
Once you clear the tree line, you will be welcomed to the Basket of Dreams monument, where you can get some great views of Queenstown and Lake Wakatipu. The trail then continues further past the monument to the Queenstown Hill summit.
From here you will get some even better, more unobstructed views of the surrounding Queenstown landscape.

Ben Lomond Track
Hike Name: Ben Lomond Track
Trailhead Name: Tiki Trail
Base Town: Queenstown
Hike Length: 14 km / 8.7 miles
Hike Elevation Gain: 1,438 meters / 4,718 feet
Hike Duration: 6-8 hours
Difficulty Level: Hard
Hiking Guide: Ben Lomond Track
* Hiking details based on starting/ending from Queenstown
Now for those that want to get an even higher view of Queenstown and its surroundings, the Ben Lomond track will be for you. This demanding climb either begins at the base of the Queenstown gondola or on the top of it.
If you are looking to shorten the climb, simply take the gondola up and begin the hike from there.
However, if you are trying to take part of the true full climb, you can first head up the Tiki Trail. This trail takes you from the lakeside, through the forest and up to the top of the gondola, where you can take a nice break.
From there, the climb continues up to the Ben Lomond saddle. The views are going to be spectacular throughout, even as you have to catch your breath during the climb.
Once you reach the saddle, the final push to the summit is where things really get tough. The trail is steeper and is on harder terrain as you make that push all the way up to the Ben Lomond summit.
From up top, you will get 360 degree views of the surrounding landscape and take in one of the best panoramas you could ask for.
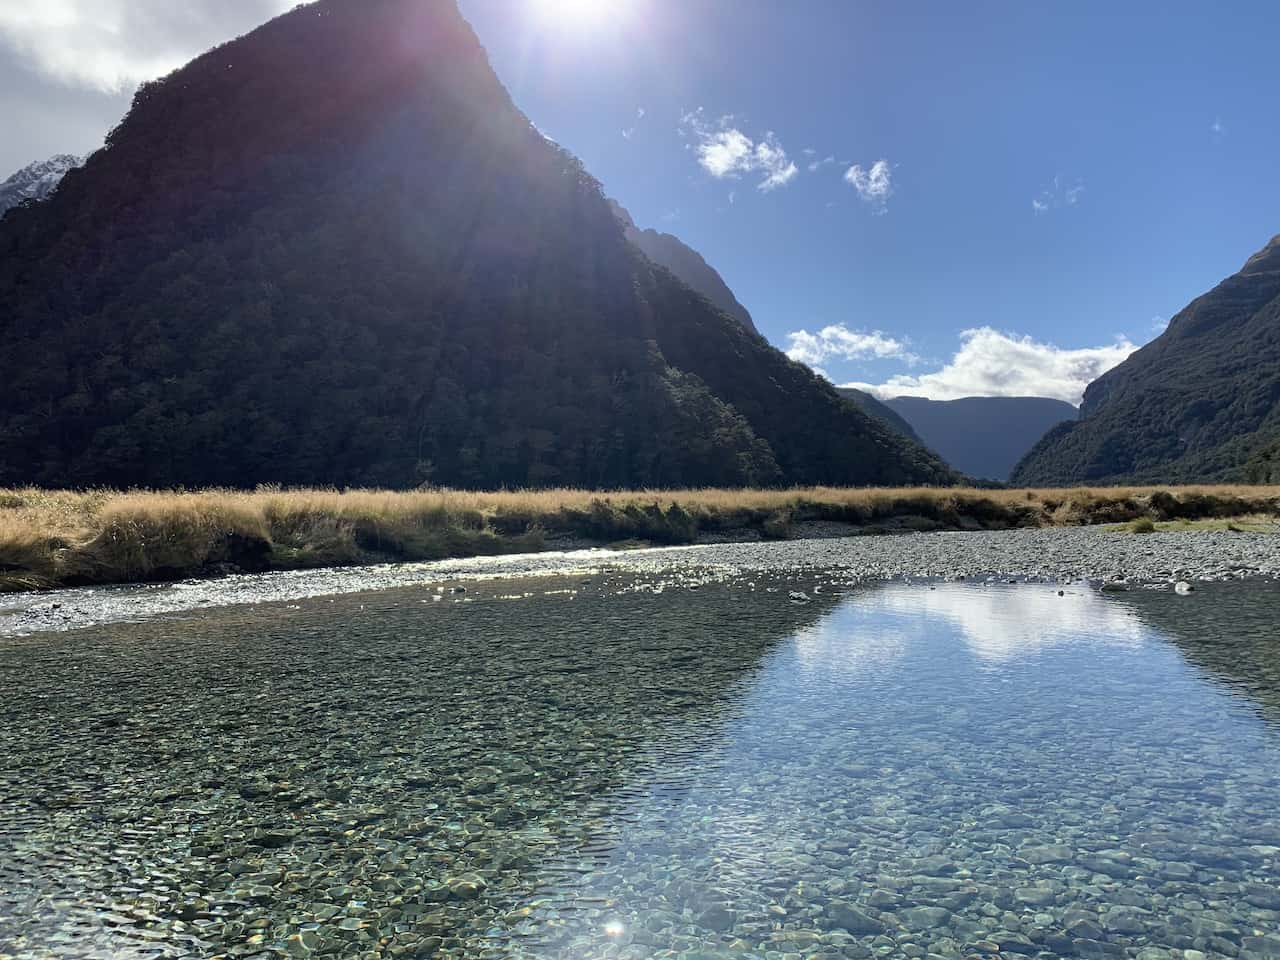
Routeburn Track
Hike Name: Routeburn Track
Trailhead Name: Routeburn Shelter
Base Town: Queenstown
Hike Length: 17.6 km / 10.9 miles
Hike Elevation Gain: 495 meters / 1,624 feet
Hike Duration: 6-8 hours
Difficulty Level: Moderate
Hiking Guide: Routeburn Track Day Hike
* Hiking details based on round trip to Routeburn Falls Hut
At the end of this guide I will talk more about multi day hikes on the South Island, one of which is the Routeburn Track. However, for those that don’t have the time or are not interested in a multi day hike, you can still take part of a day hike on the Routeburn Track.
Instead of going all the way from the Routeburn Shelter to the Divide Shelter, you can instead do the first portion of the hike to the Routeburn Falls Hut.
This out and back hike will still give you some of the top landscape of the overall track as you make your way up and down.
Not only will you be able to enjoy a beautiful hike during the course of a day, but you will also be able to enjoy a beautiful drive as well. The drive between Queenstown and Glenorchy is one of the best there is, with views of Lake Wakatipu all the way through.
After taking part of the hike, I made a couple of additional stops on the way back just to take in the view and enjoy the beautiful mountains and lakes all around.

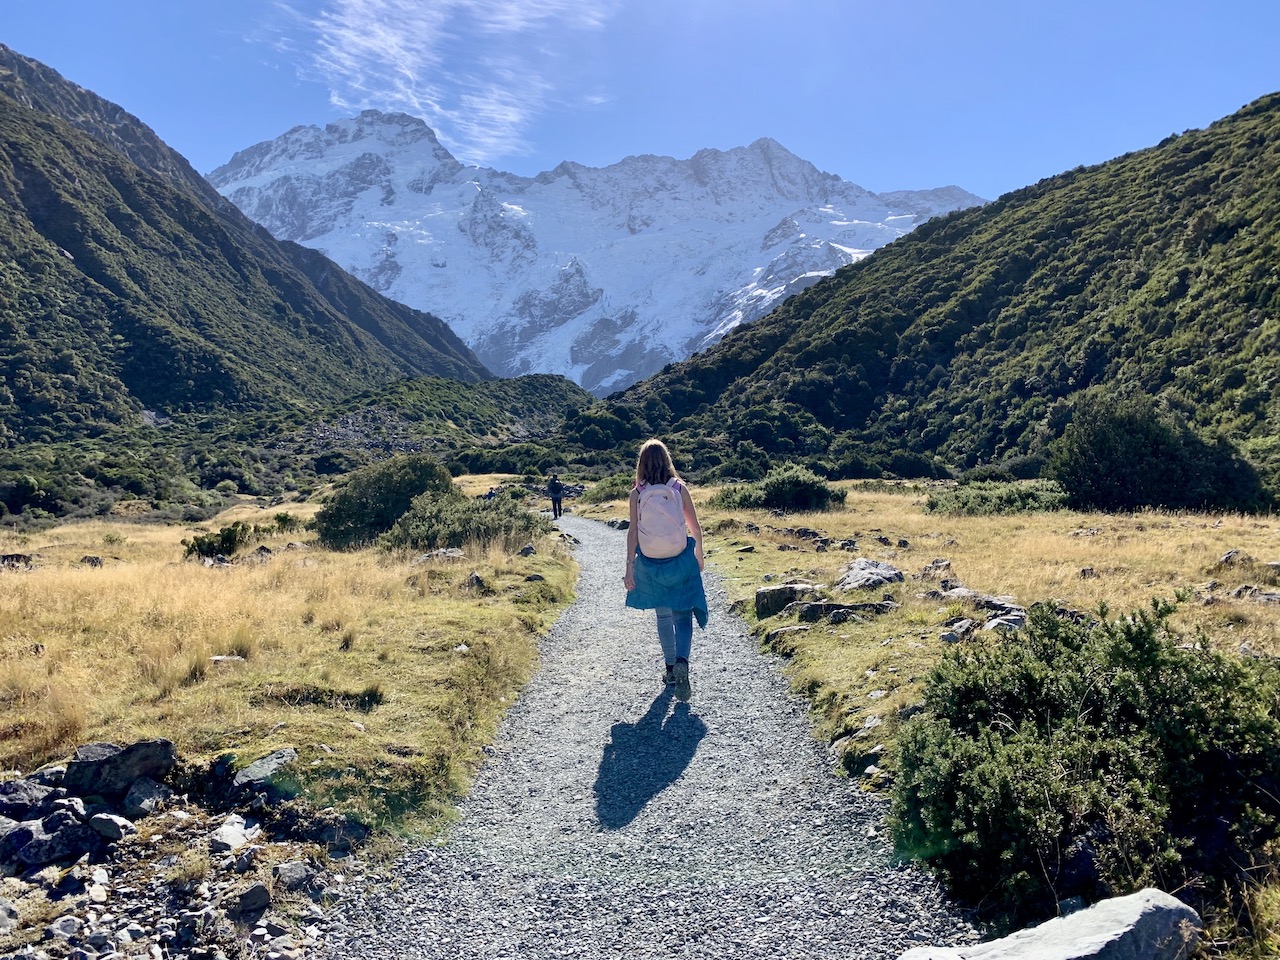
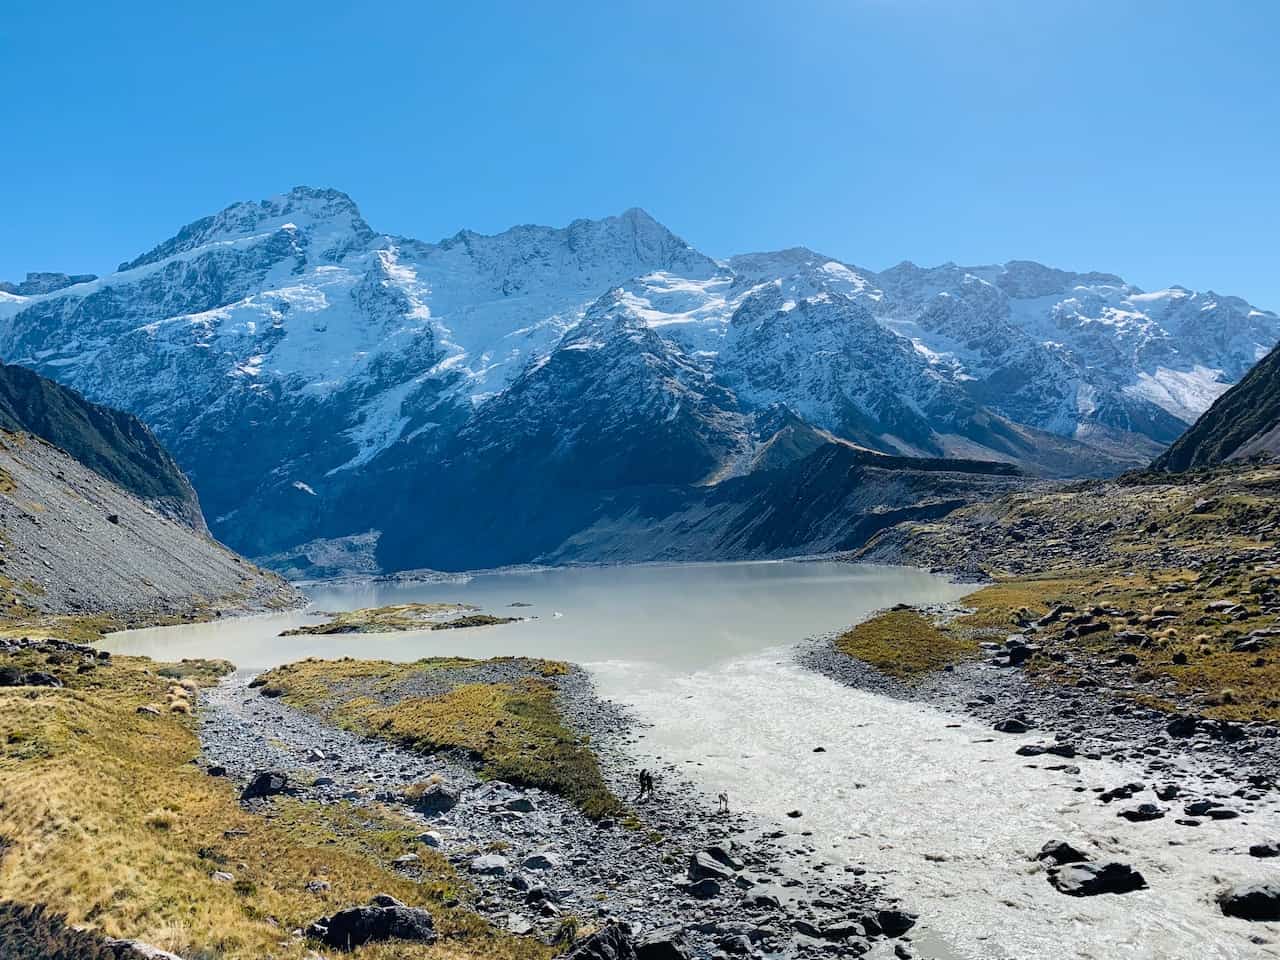
Hooker Valley Track
Hike Name: Hooker Valley Track
Trailhead Name: White Horse Hill Campground
Base Town: Mount Cook Village
Hike Length: 10 km / 6.2 miles
Hike Elevation Gain: 80 meters / 262 feet
Hike Duration: 3 hours
Difficulty Level: Easy
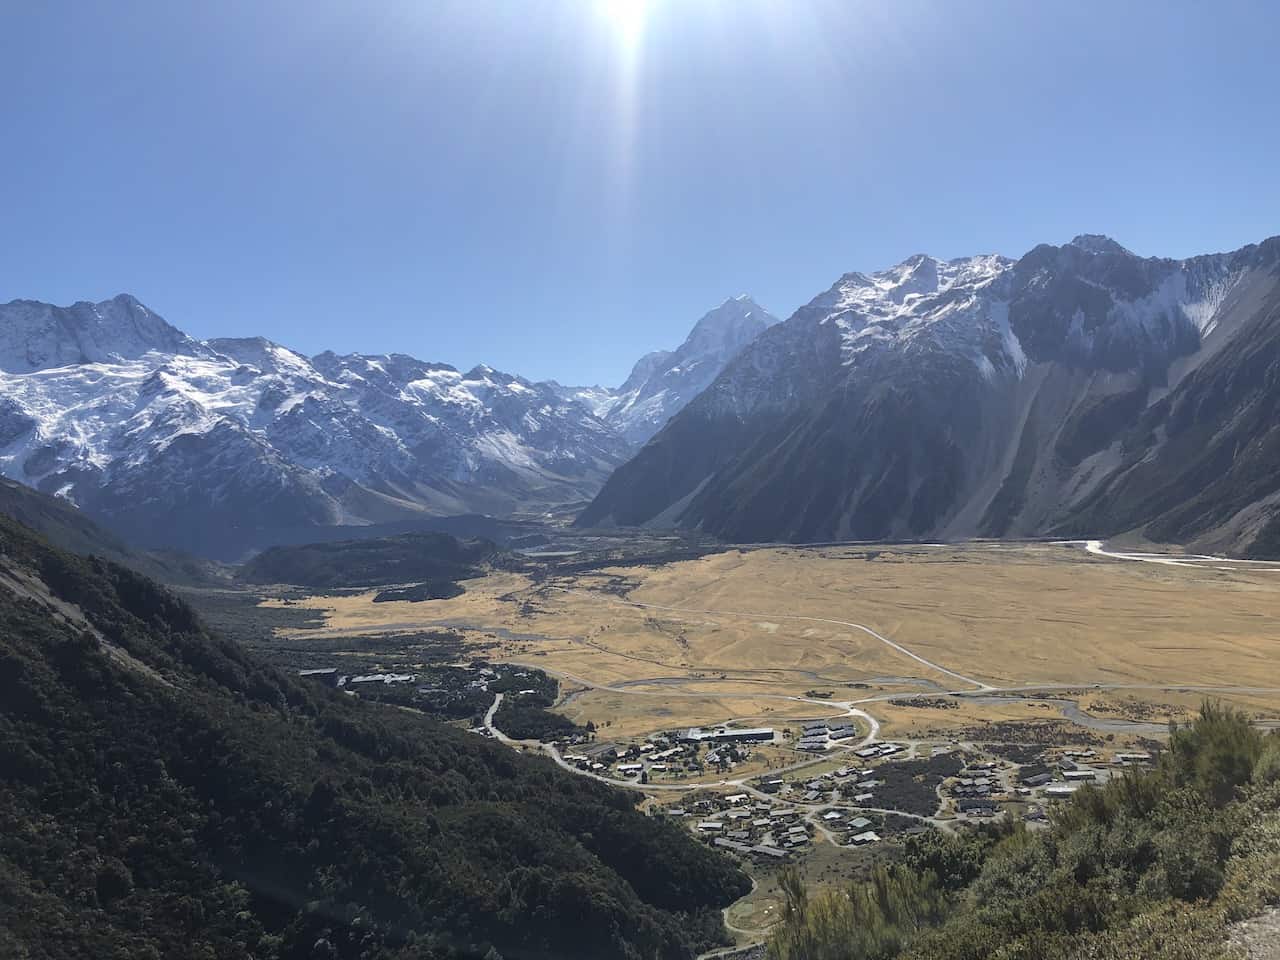
Moving onto Mount Cook National Park, you will find some jaw dropping hikes to take part of. One of the easier and stunning hikes is the route down the Hooker Valley.
The hike heads over a few suspension bridges, passes by Mueller Lake and heads through the Hooker Valley until it reaches Hooker Lake.
The surrounding glaciated mountains, including Mount Cook make for some surreal views to take in.

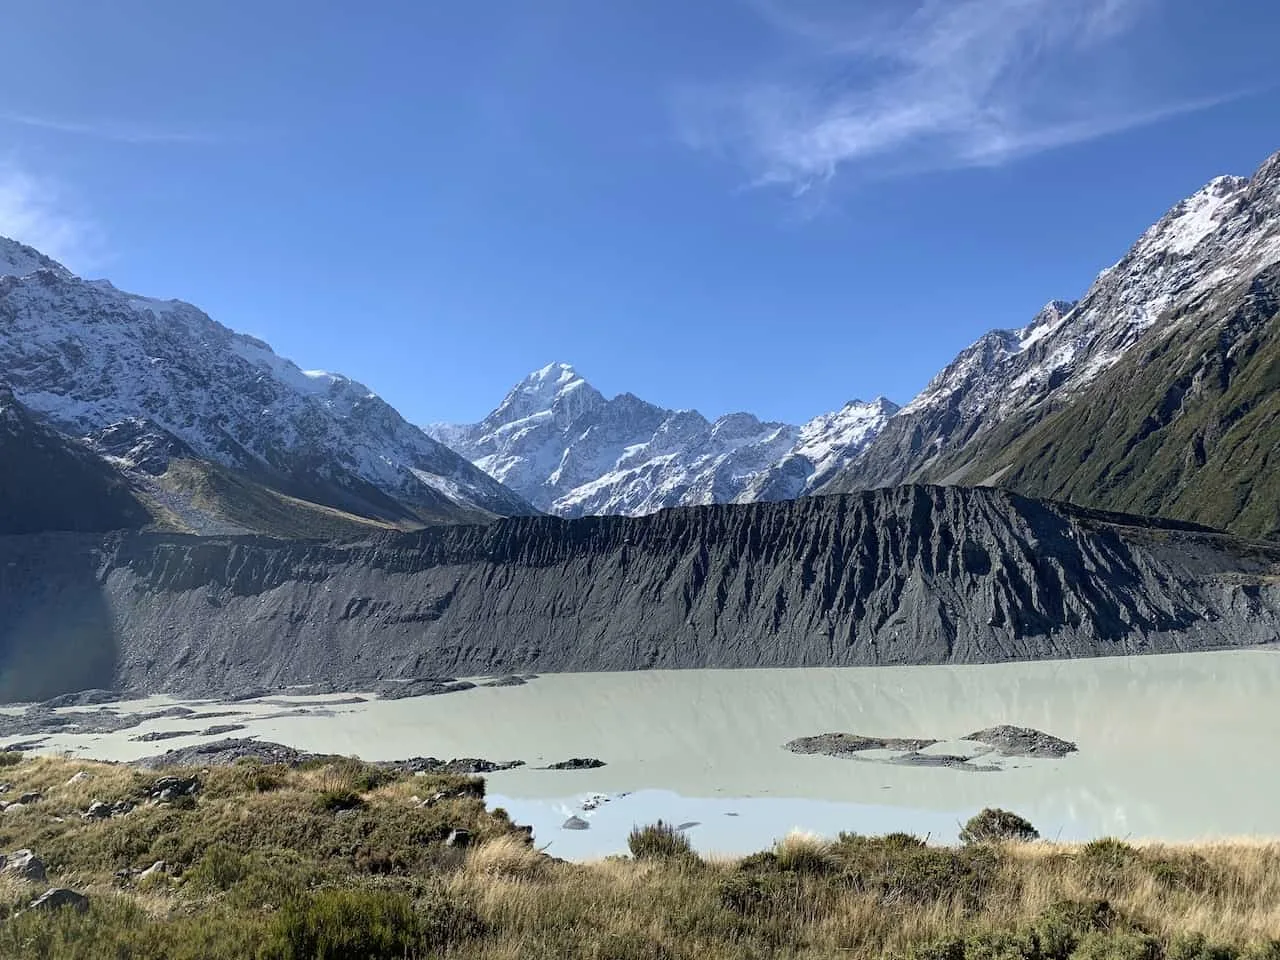
Kea Point Track
Hike Name: Kea Point Track
Trailhead Name: White Horse Hill Campground
Base Town: Mount Cook Village
Hike Length: 2.8 km / 1.7 miles
Hike Elevation Gain: 95 meters / 312 feet
Hike Duration: 1 hour
Difficulty Level: Easy
Hiking Guide: Kea Point Track
A shorter hike in Mount Cook National Park is the Kea Point track. Although it is a shorter hike, it is just as rewarding as some of the other hikes on this list. The trail begins at the same trailhead as the Hooker Valley track.
Instead of heading down the valley though, the trail will wrap around the moraine wall of Mueller Lake.
The views from the lookout point will have a beautiful panorama down the Hooker Valley and up to Mt Cook.

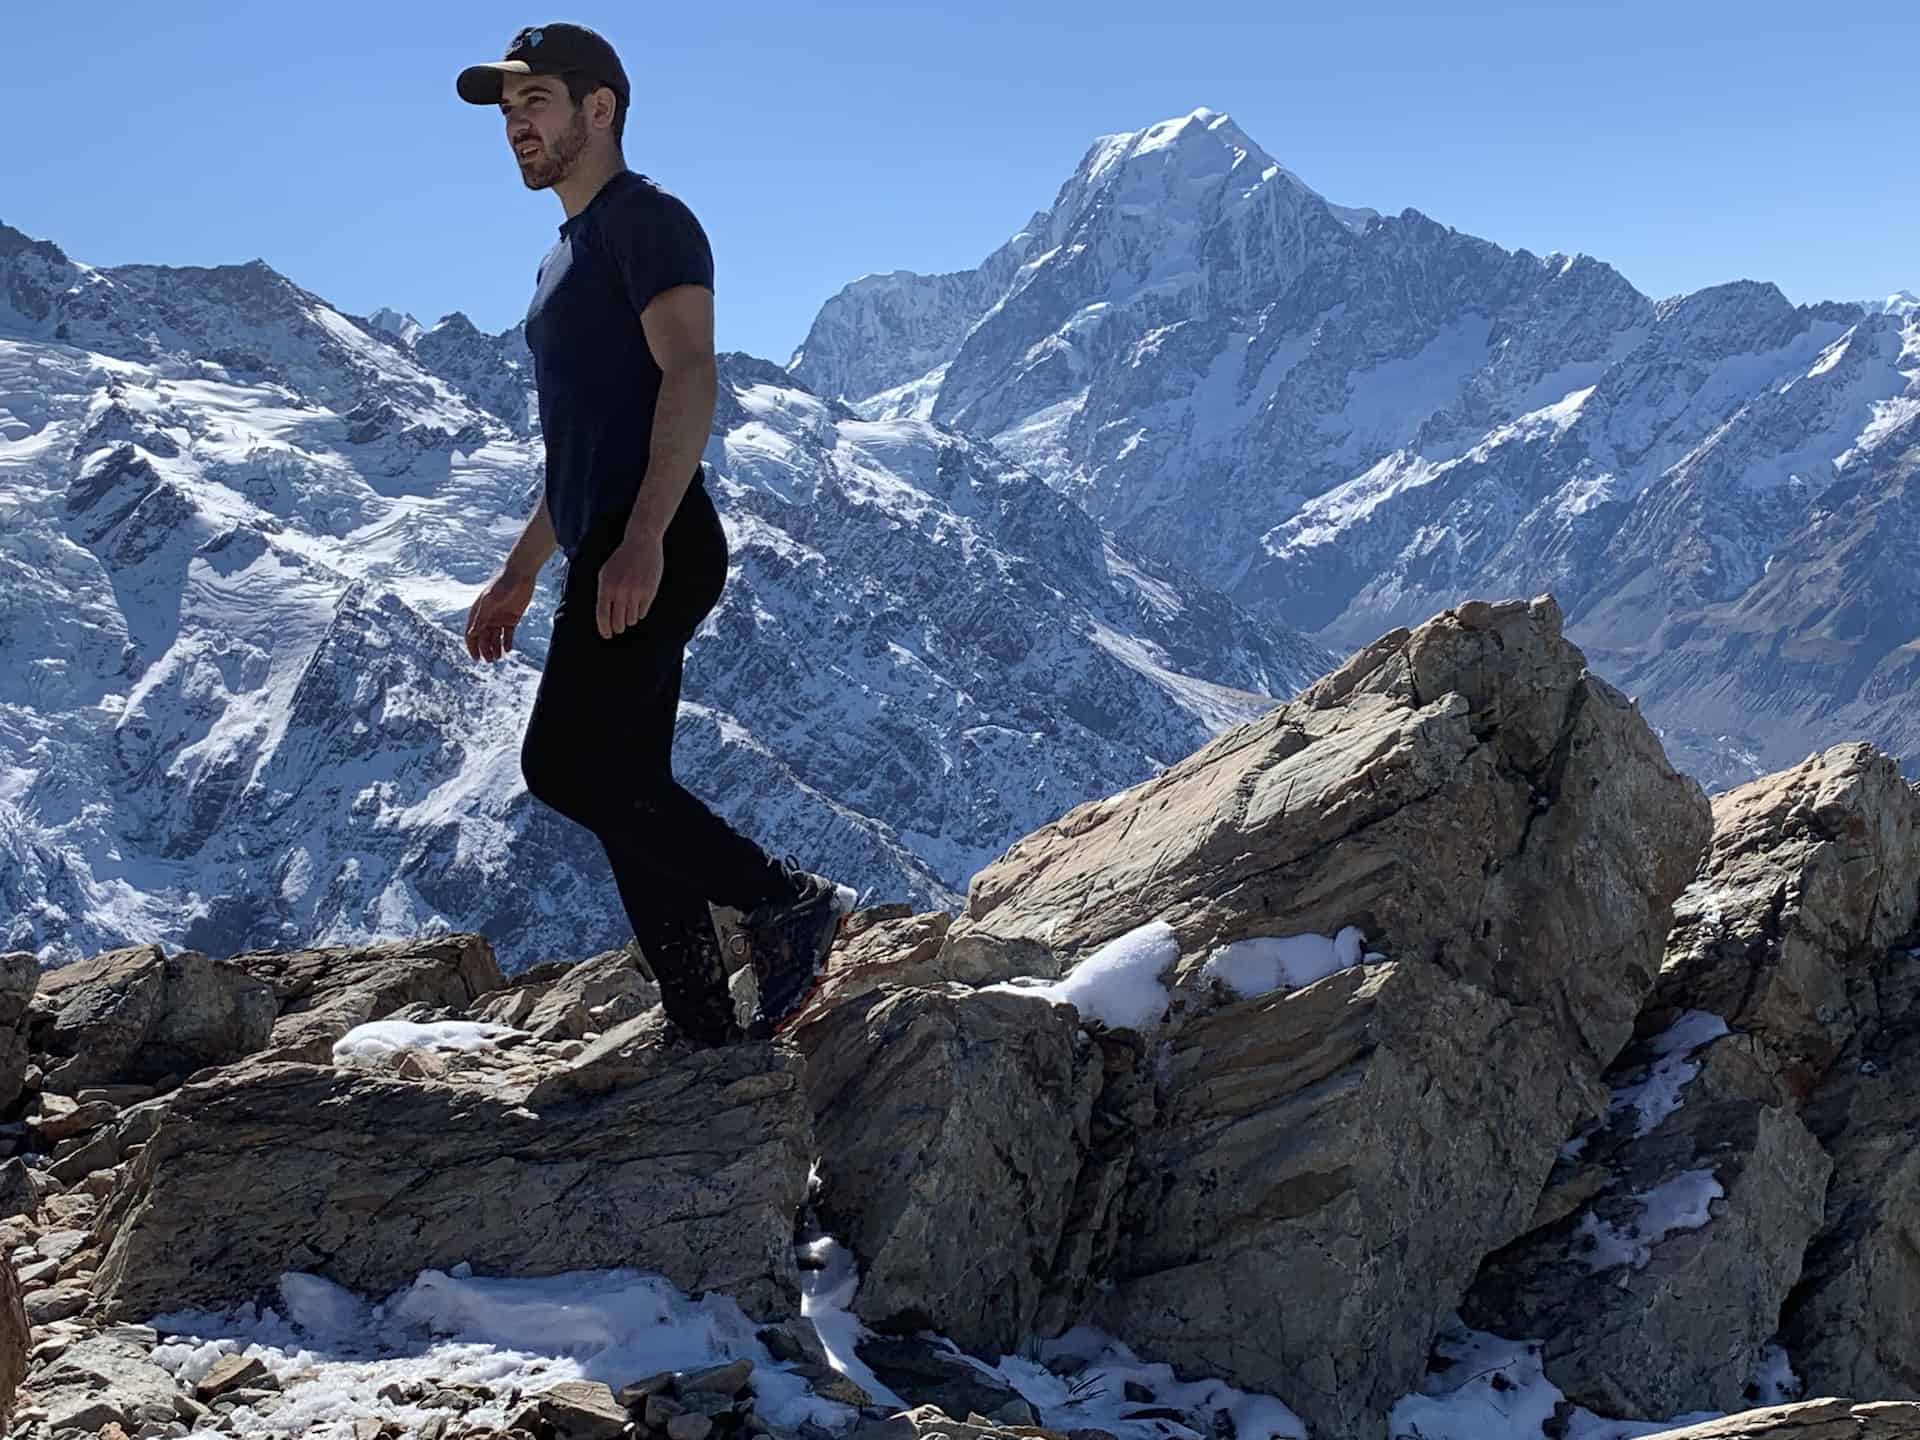
Mueller Hut Track
Hike Name: Mueller Hut Track
Trailhead Name: White Horse Hill Campground
Base Town: Mount Cook Village
Hike Length: 10.4 km / 6.5 miles
Hike Elevation Gain: 1,040 meters / 3,412 feet
Hike Duration: 8 hours
Difficulty Level: Hard
Hiking Guide: Mueller Hut Track
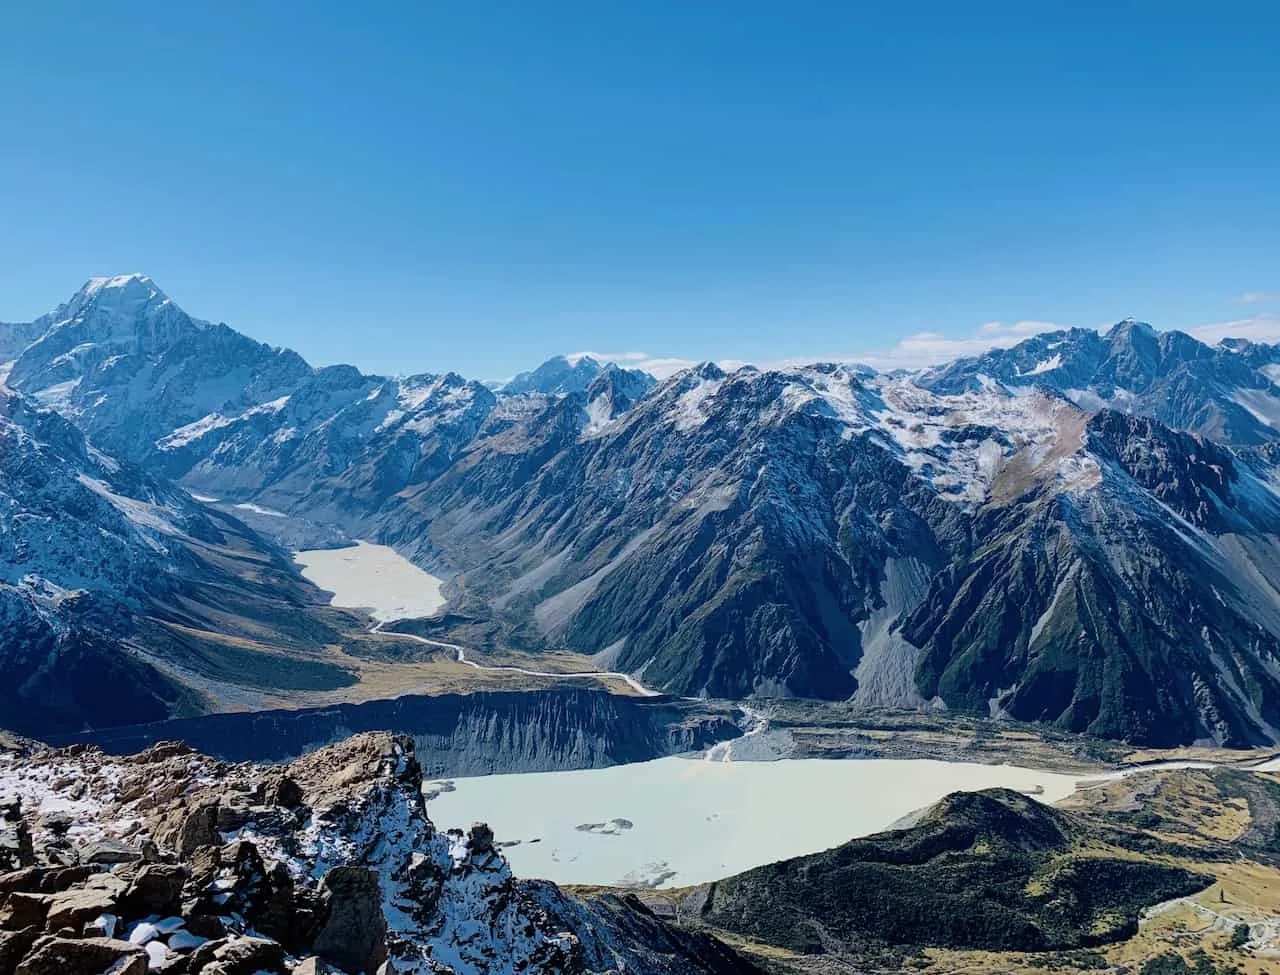
One of my favorite hikes in all of New Zealand has to be the Mueller Hut track. While the previous couple of hikes mentioned are flatter and easier routes, the hike up to the Mueller Hut is a demanding climb.
The trail splits off from the Kea Point track, and heads up the mountainside as you gain a couple thousand feet of elevation along the way. There is a notorious 2,000+ step staircase to climb that will get you further and further up the mountain.
Soon enough you will reach Sealy Tarns (more on that next), before continuing a more technical ascent towards the hut itself.
Throughout the hike up you will continue to get some stunning views of the lakes, mountains, and glaciers that make up Mount Cook National Park.
Once you reach the hut itself, you can take time to find a spot nearby to enjoy the view. When it comes to panoramas in the area, it doesn’t get much better than this.

Sealy Tarns Track
Hike Name: Sealy Tarns Track
Trailhead Name: White Horse Hill Campground
Base Town: Mount Cook Village
Hike Length: 5.8 km / 3.6 miles
Hike Elevation Gain: 600 meters / 1,969 feet
Hike Duration: 4 hours
Difficulty Level: Moderate
Hiking Guide: Sealy Tarns Track
For those that don’t want to head all the way up to the Mueller Hut, a popular alternative is to just head up the Sealy Tarns. This still will require that grueling 2,000+ stair ascent up alongside the mountain.
However, once you reach Sealy Tarns, you can simply enjoy your time there before heading back down to the trailhead.
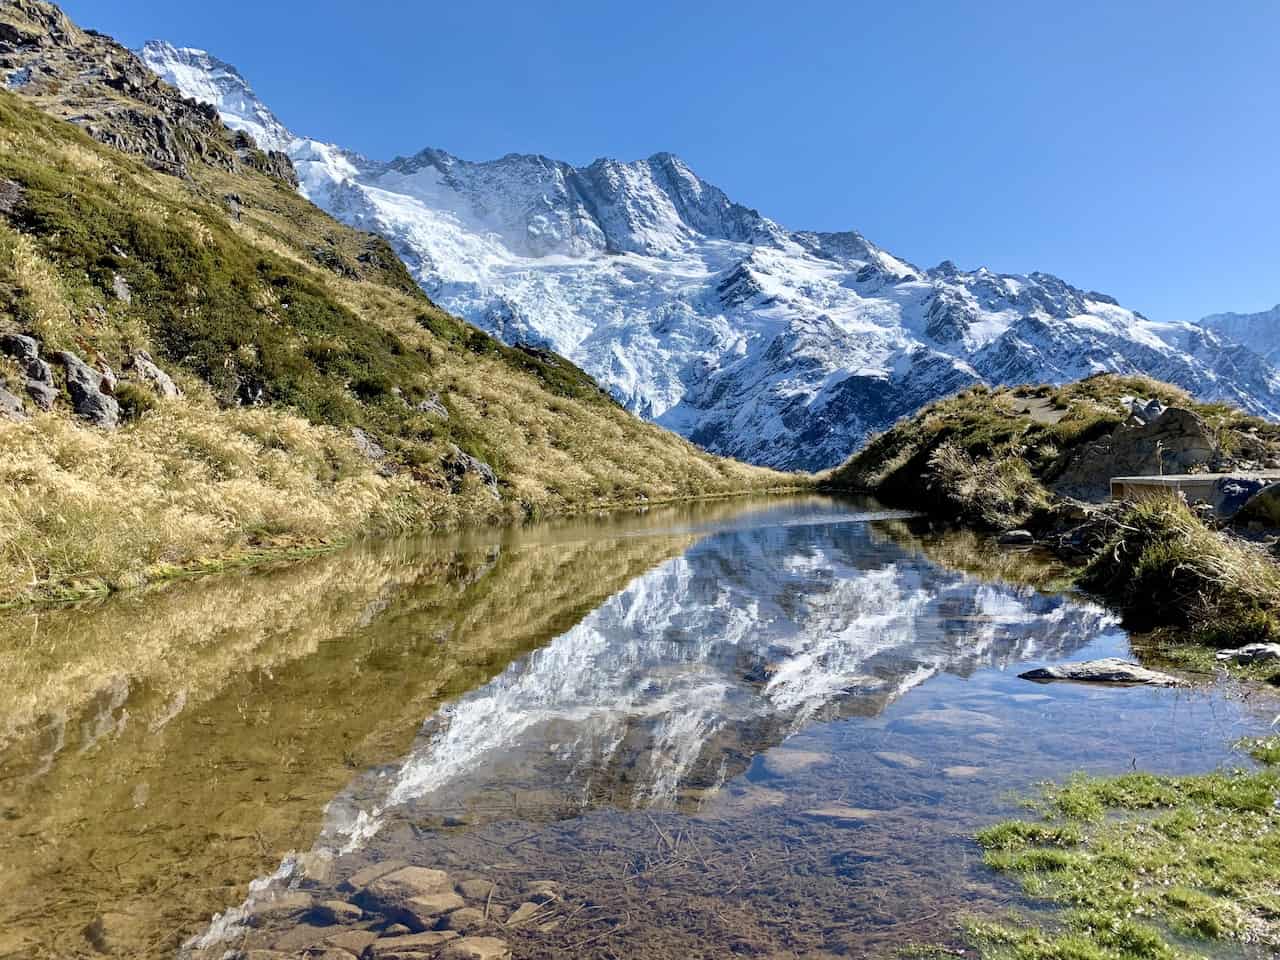
If you are not familiar with what a tarns is, it is essentially a small mountain lake. At Sealy Tarns you will find a beautiful alpine lake that can get some nice reflections off of the surrounding mountains on a clear day.

Red Tarns Track
Hike Name: Red Tarns Track
Trailhead Name: Mount Cook Village
Base Town: Mount Cook Village
Hike Length: 4 km / 2.5 miles
Hike Elevation Gain: 300 meters / 984 feet
Hike Duration: 2 hours
Difficulty Level: Easy/Moderate
Hiking Guide: Red Tarns Track
Another tarns hike in the region is the Red Tarns Track. This hike can be done right from town as the trail makes its way across a river and then up a mountainside.
Similar to Sealy Tarns, this trail will also require a long staircase up to the top. While it is not as long, it is still a long zig zagging way up.
During the ascent you will get some alternative views from of Mount Cook National Park and the surrounding valley.
Once you have made it to the top, enjoy the view and the tarns, before making your way back to the village.
Blue Lakes & Tasman View + Lake Track
Hike Name: Blue Lakes, Tasman View, Tasman Lake
Trailhead Name: Tasman Glacier Car Park
Base Town: Mount Cook Village
Hike Length: 5 km / 3 miles
Hike Elevation Gain: 100 meters / 328 feet
Hike Duration: 2 hours
Difficulty Level: Easy
Hiking Guide: Blue Lakes & Tasman View Track
The last track that I will mention in Mount Cook National Park is the Blue Lakes & Tasman View hike.
Here you will find several different hiking trails that can easily be combined into one longer hike.
The first highlights are the Blue Lakes, that sit off to the side of the main Tasman Lake. There are several lakes that you will get to walk along, each with its vibrant colors.
The next highlight is the Tasman Glacier viewpoint that sits atop the moraine wall. The viewpoint will be a perfect spot to take in the landscape from above as you see the sheer size of the lake and its beauty.
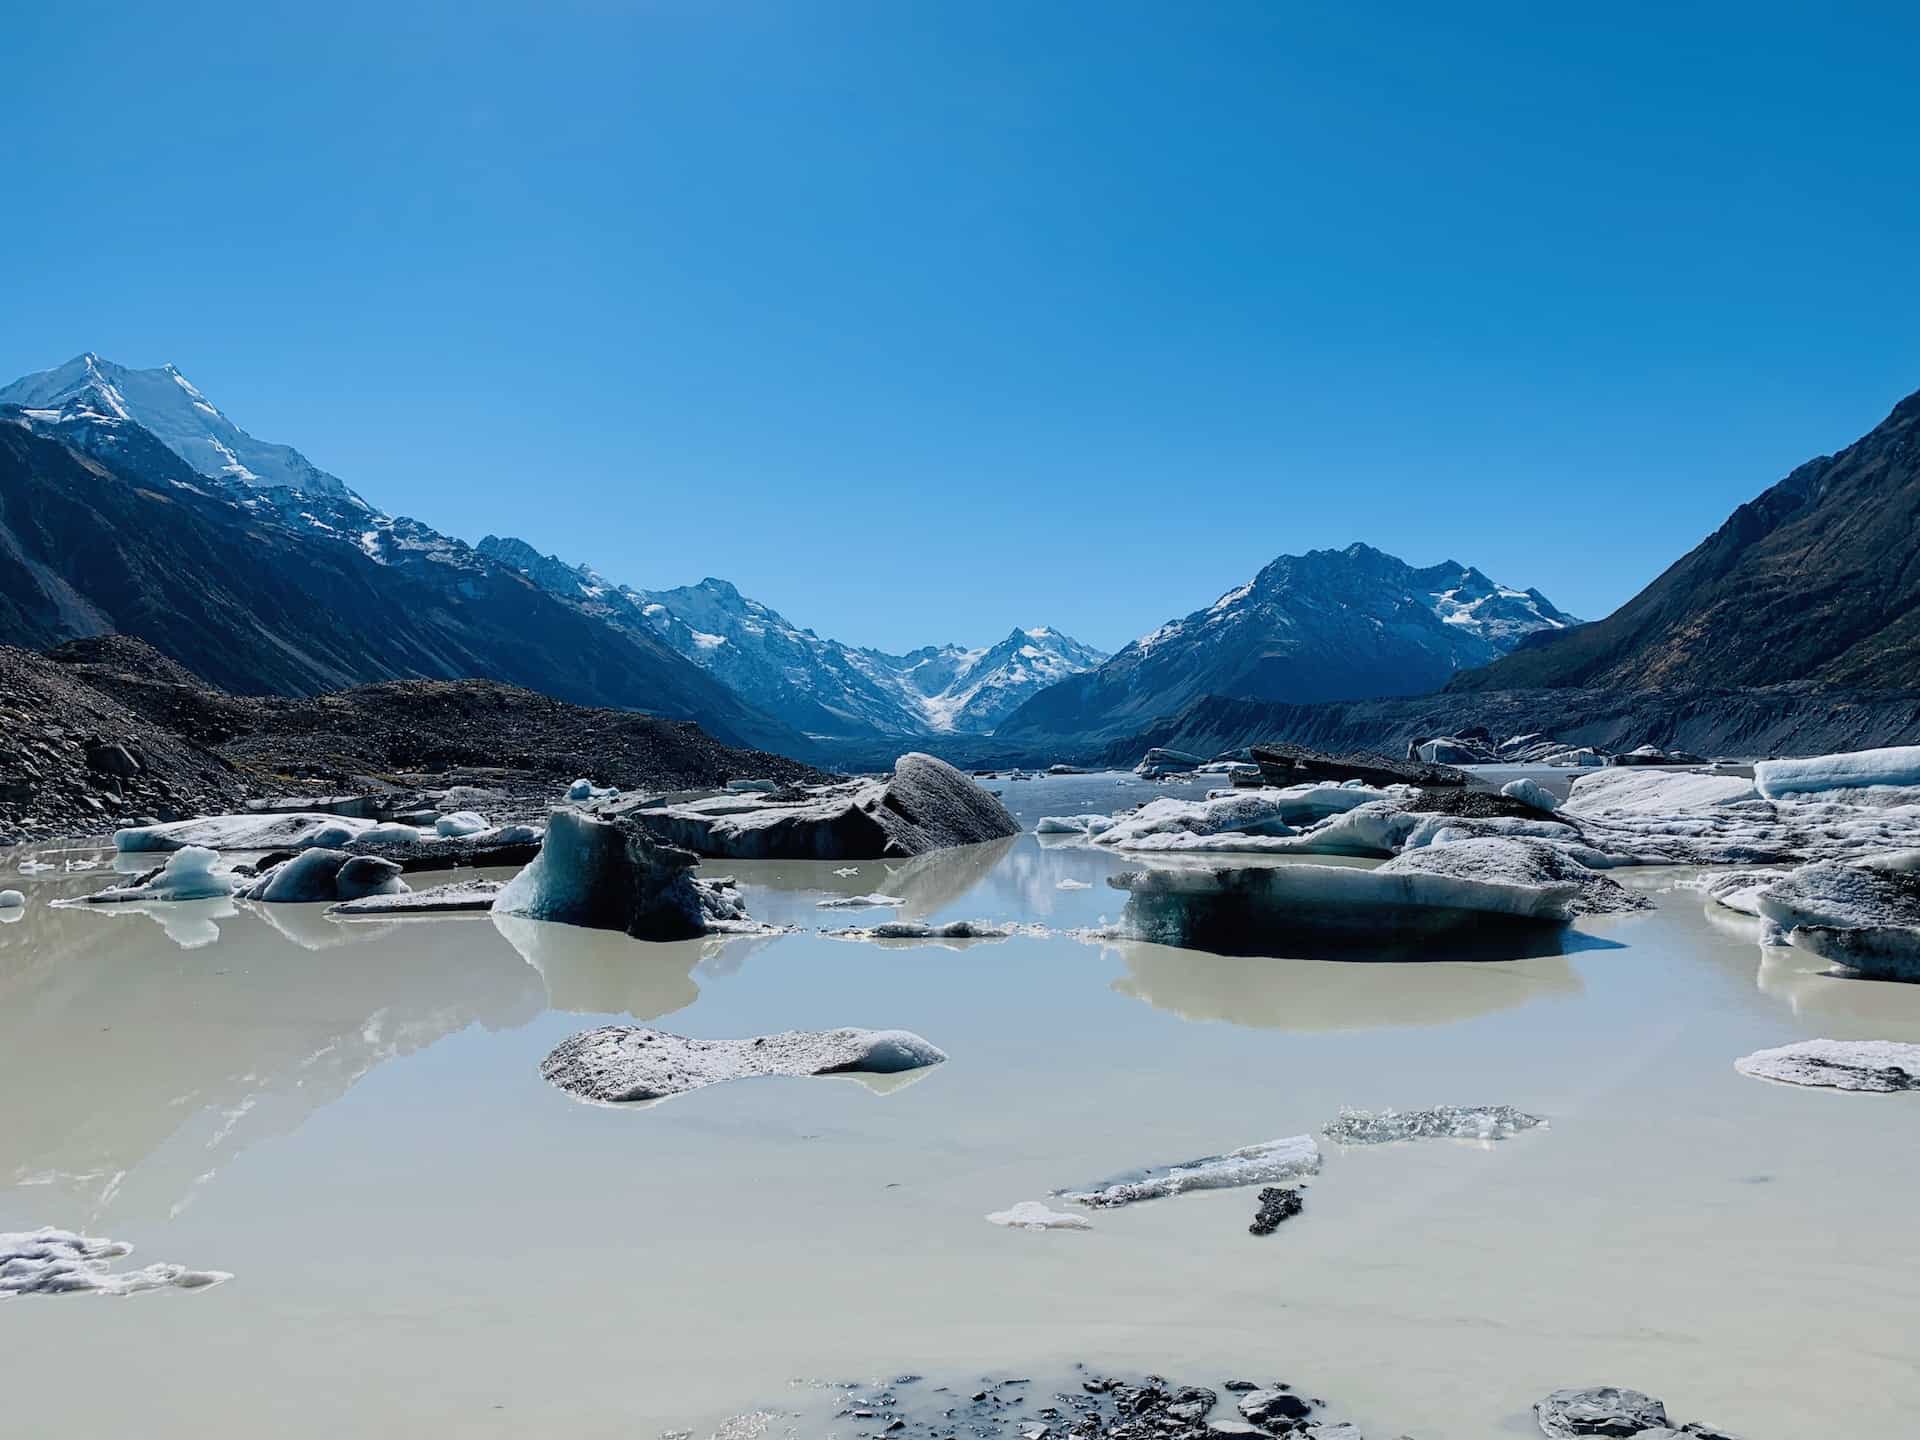
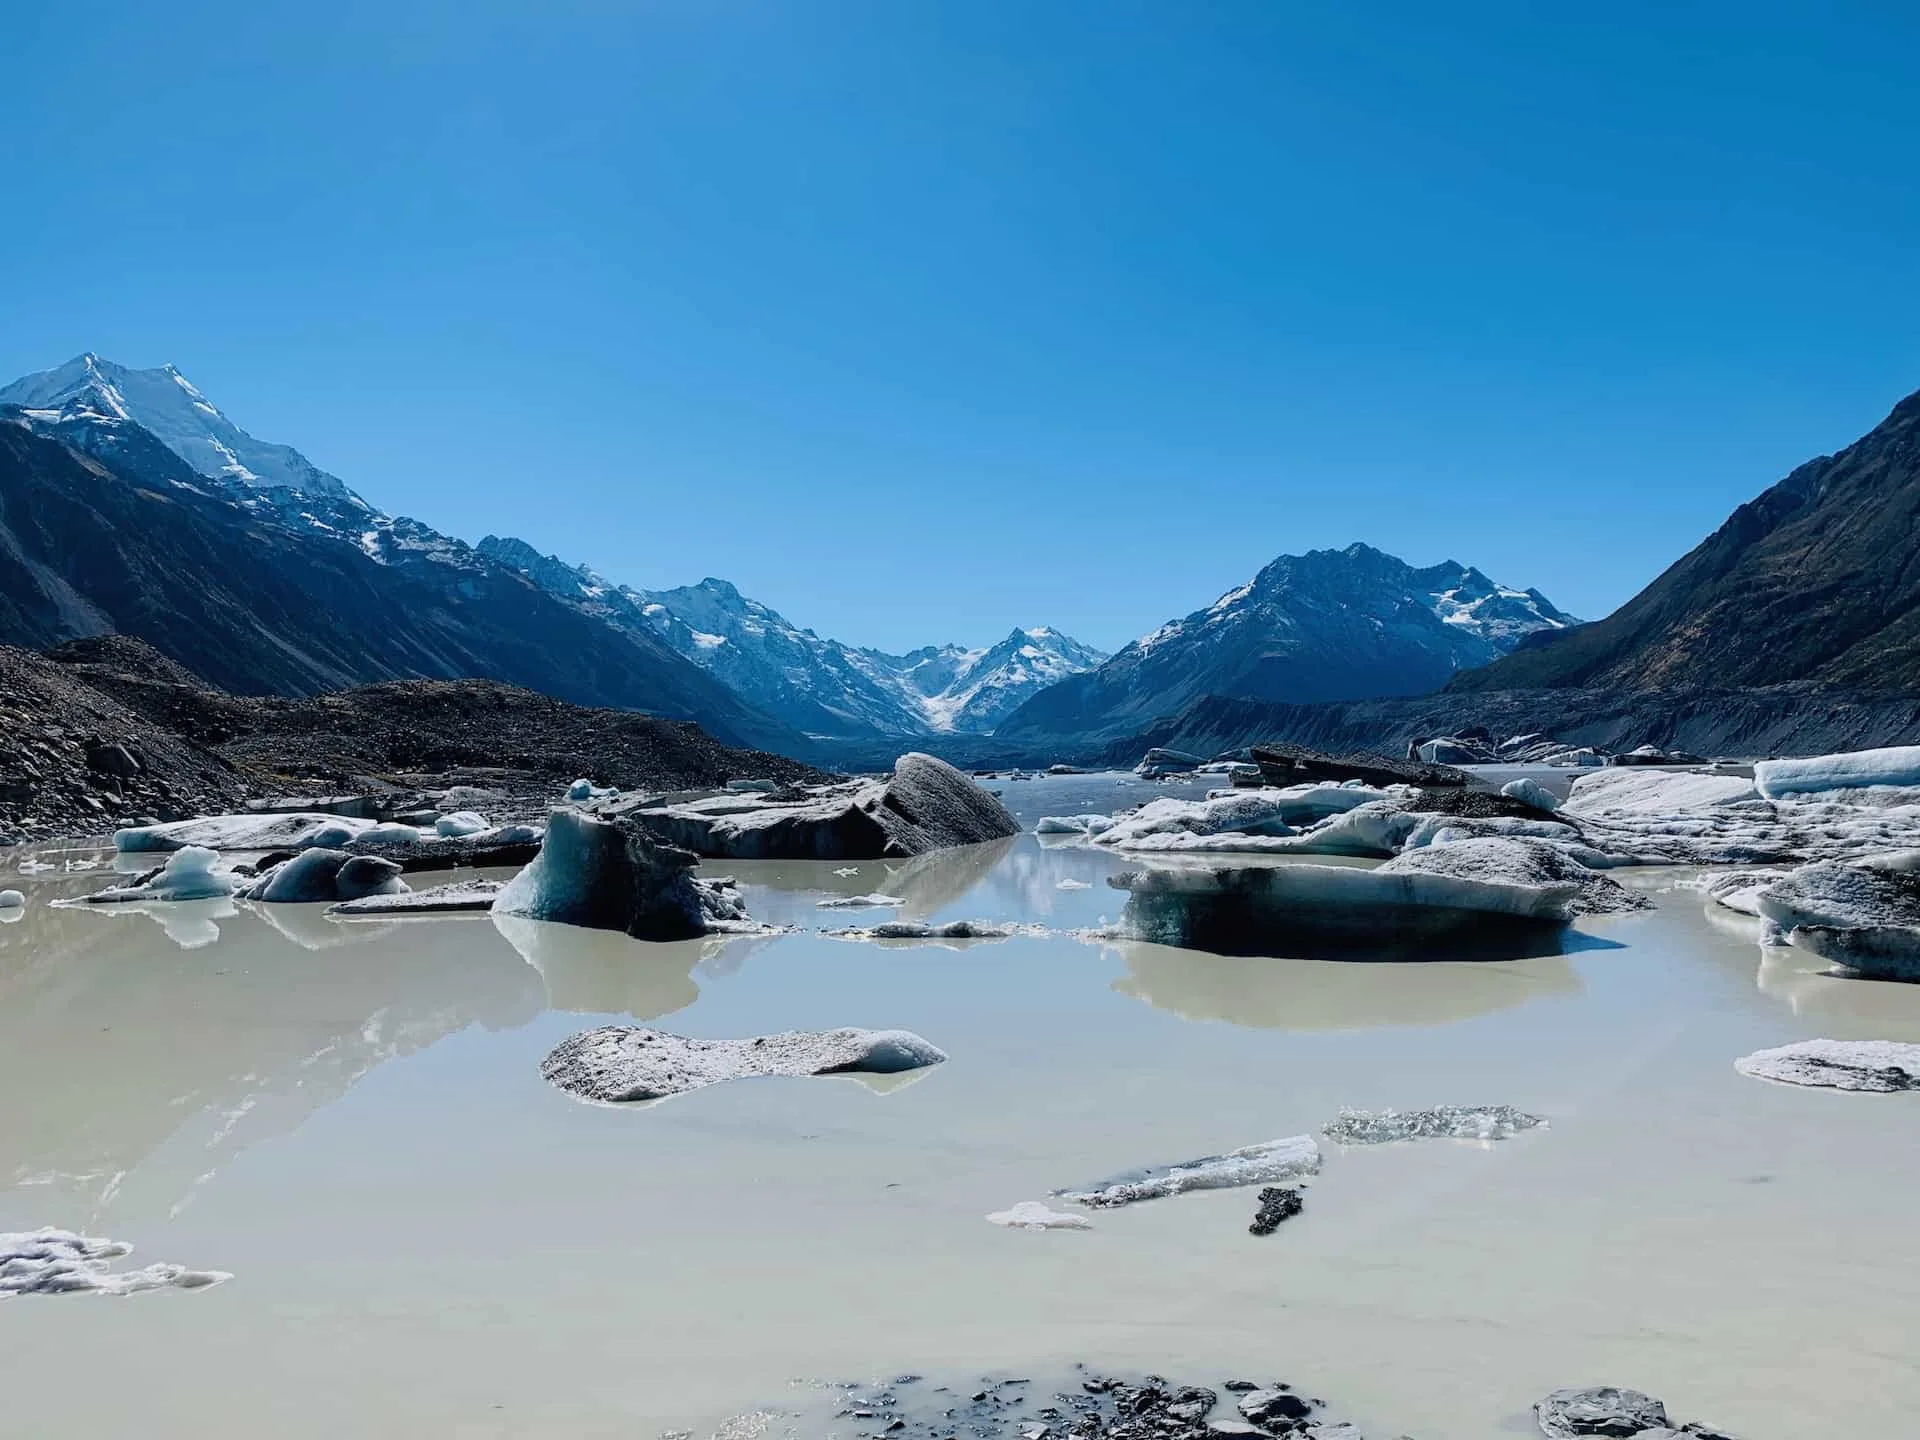
You can then continue the trail to the base of Tasman Lake, and walk right along its shores to the point where the lake feeds the Tasman River. Several icebergs are usually floating around here with the mountain landscape filling the background.
Overall, this is a great diverse track to take part of that will give you a little bit of everything during a hike.
Lake Marian
Hike Name: Lake Marian
Trailhead Name: Lake Marian Trail Carpark
Base Town: Te Anau
Hike Length: 7 km / 4.4 miles
Hike Elevation Gain: 426 meters / 1,400 feet
Hike Duration: 3 hours
Difficulty Level: Moderate
Hiking Guide: Lake Marian Track
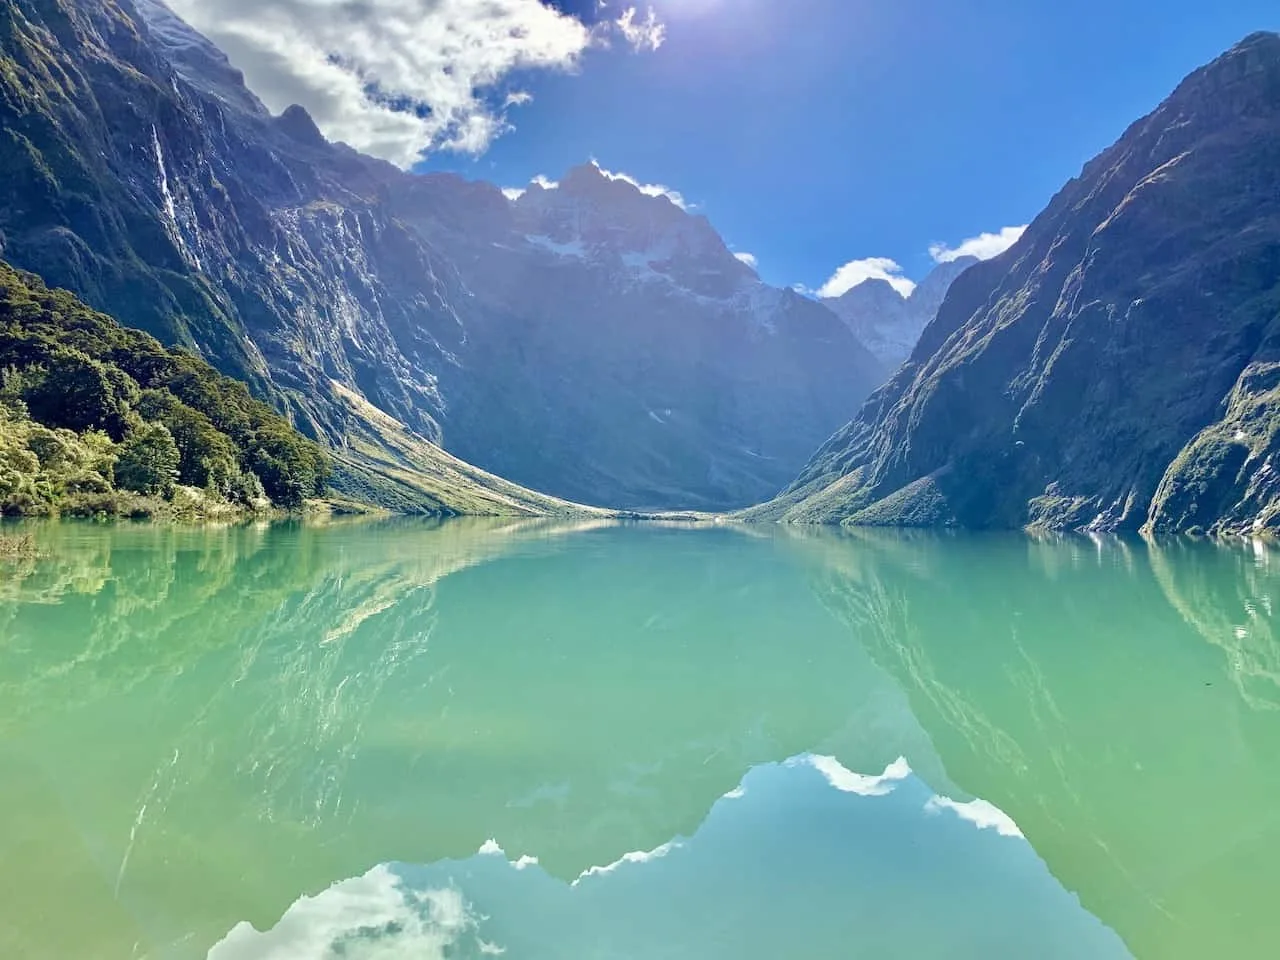
If you are traveling into Fiordland National Park, then a hike up to Lake Marian is a must do. Most people who are heading to this area, make their way on a Milford Sound cruise, which I would highly recommend.
On the way back, stopping for a hike up to Lake Marian can be the perfect addition to your day. The trail is mostly going to be a forest trail as you hike alongside a river, through the trees, and then onto the lake itself.
During the first portion of the hike you will come across the glacial river “Viewing Gantry”, before continuing along into the forest. Many people who don’t want to do the full hike, may just choose to take in this viewpoint and then turn around.
The trail continues up through the lush forest, and from time to time you will get some nice views of the surrounding landscape. The terrain itself can be quite tricky as you are dealing with rocks, roots, and other uneven pathways to make your way along.
However, soon enough the lake will come into view and you will be able to enjoy a top destination on the South Island of New Zealand. The calm, reflective waters can make it even that much more special.

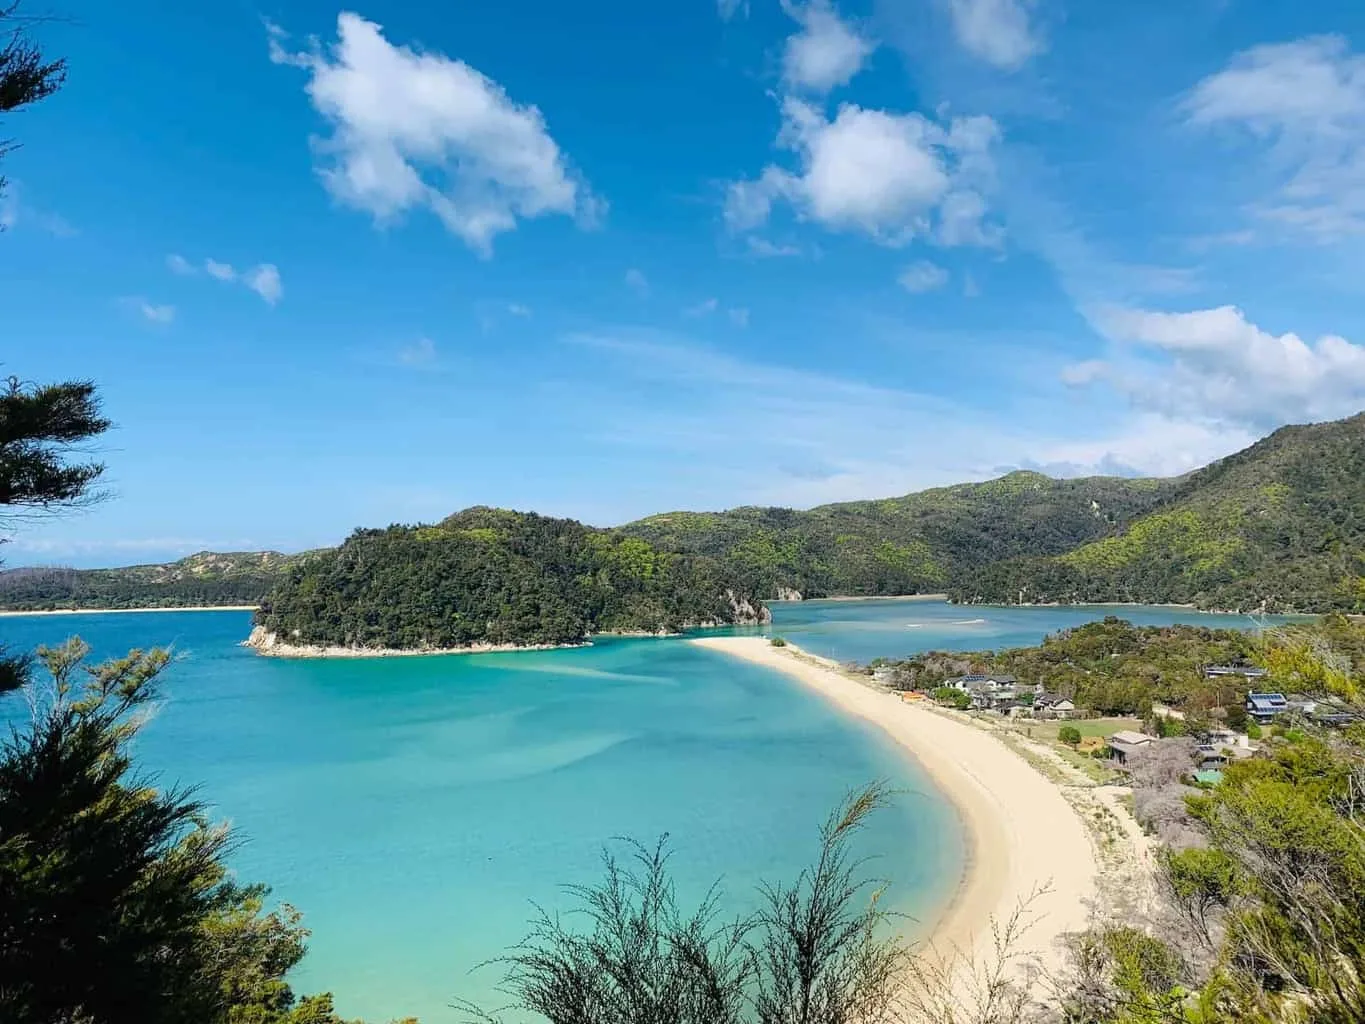
Abel Tasman Coastal Track
Hike Name: Abel Tasman Coastal Track
Trailhead Name: Bark Bay
Base Town: Marahau
Hike Length: 24 km / 14.9 miles
Hike Elevation Gain: 400 meters / 1,312 feet
Hike Duration: 8 hours
Difficulty Level: Moderate
Hiking Guide: Abel Tasman Coast Track
* Hiking details based on Bark Bay to Marahau route
Similar to the Routeburn Track, the Abel Tasman Coastal Track is also one of the New Zealand’s great walks. While you can opt for the 5 day hike, many people just do 1-2 days on the trail.
Essentially, you will find water taxis that can drop you off at various points along the coastal track. Depending on how many days you want to spend on the trail, you can decide where to get dropped off at.
In this case, I would recommend a 1-2 day hike starting in Bark Bay, walking to Anchorage and ending in Marahau.
Marahau is the town you can base yourself in before and after the hike. I would recommend taking a water taxi out in the morning and then walking back to Marahau over the course of your 1+ days there.
If you think you can take on 8 hours of hiking in a day you can take part of the whole thing in a single shot. Alternatively, you could split it up into two days (with an overnight in Anchorage), or just do either Bark Bay to Anchorage, or Anchorage to Marahau.
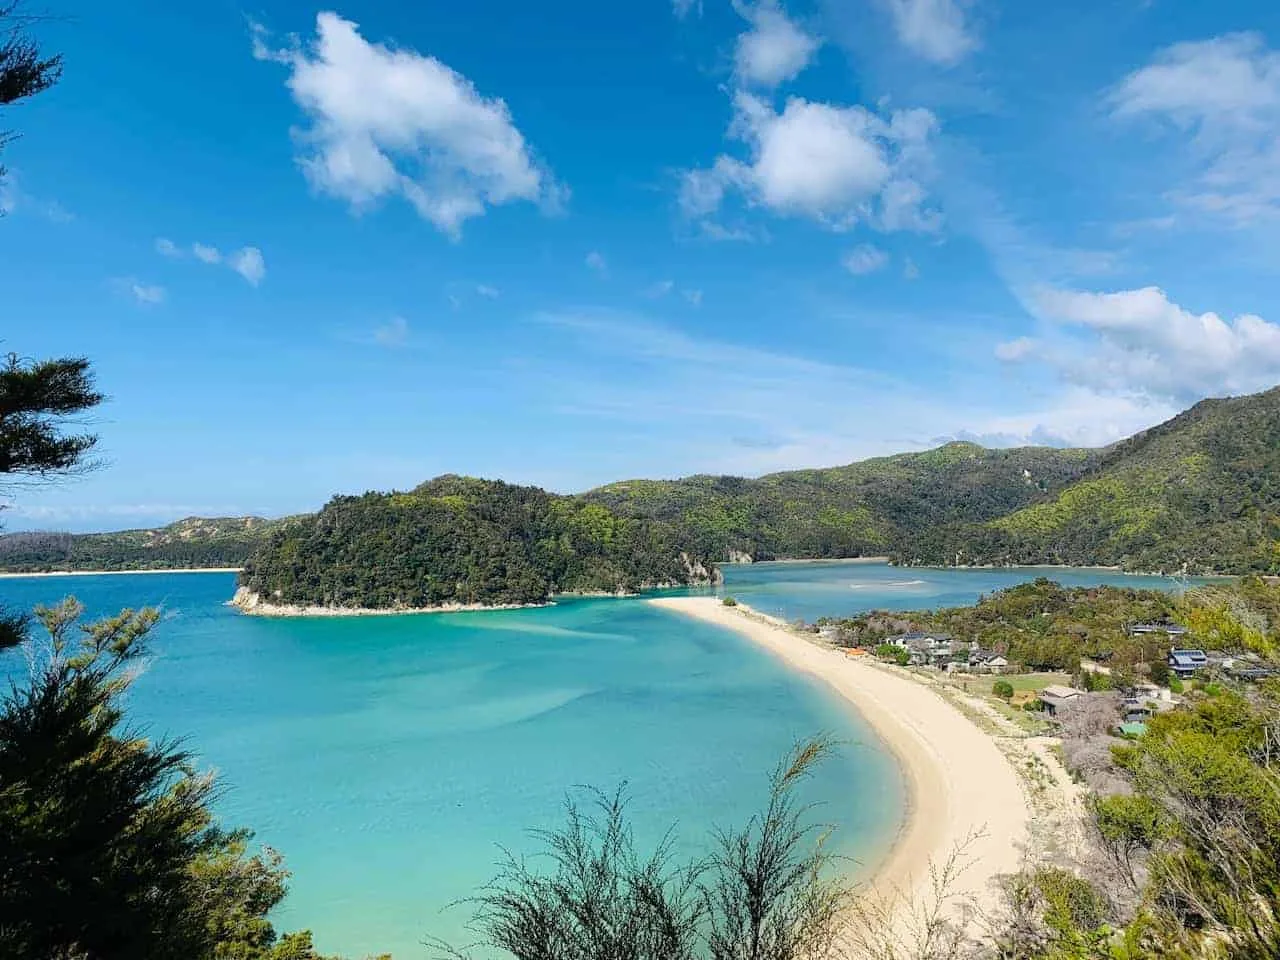
Throughout a hike along the coast, you will be able to get some beautiful views of the Tasman Bay, spend some time on beaches, take in views, and go for a swim. This is definitely a different type of hike than the rest of the hikes mentioned on this list.

8) Great Walks South Island
While the 15 South Island New Zealand hikes mentioned above are all perfect additions to any itinerary, there is also the option to take part of Great Walks.
I touched upon these a bit already, but Great Walks are going to multi day adventures taking in some of the most beautiful scenery in the country. Along the way you will find huts or campsites to sleep at, making it even that much better of an experience.
As for the Great Walks on the South Island of New Zealand, below are the options out there for you:
1) Abel Tasman Coast Track | Nelson/Tasman | 3-5 days
2) Heaphy Track | Nelson/Tasman | 4-6 days
3) Kepler Track | Fiordland | 3-4 days
4) Milford Track | Fiordland | 4 days
5) Paparoa Track | West Coast | 3 days
6) Rakiura Track | Southland | 3 days
7) Routeburn Track | Otago/Fiordland | 2-4 days
In addition to those 7 tracks, you will also find 3 more Great Walks on the North Island of New Zealand including the Tongariro Alpine Crossing.
South Island Te Araroa
If you are looking for the most demanding of hikes you can ask for then you may want to look into the South Island Te Araroa walk.
Te Araroa translated into “The Long Path”, and this hike takes you from the top of the North Island to the bottom of the South Island – 4,000 km!
The average time to walk the entire thing is 4 months, hiking about 25km per day. If you are just interested in the South Island, that will be just around 1,400 km as you experience so much of the beautiful island landscape.


That about does it for a guide to some of the best New Zealand South Island hikes. If you have any questions or comments, be sure to add them in below.
Also be sure to check out the other New Zealand itineraries and guides up on the site like this 3 Week New Zealand Itinerary.
Have fun out there and safe travels!